2015 BUICK REGAL run flat
[x] Cancel search: run flatPage 103 of 399

Black plate (48,1)Buick Regal Owner Manual (GMNA-Localizing-U.S./Canada/Mexico-
7576024) - 2015 - CRC - 9/15/14
3-48 Seats and Restraints
{Warning
A child in a rear-facing child
restraint can be seriously injured
or killed if the front outboard
passenger frontal airbag inflates.
This is because the back of the
rear-facing child restraint would
be very close to the inflating
airbag. A child in a forward-facing
child restraint can be seriously
injured or killed if the front
outboard passenger frontal airbag
inflates and the passenger seat is
in a forward position.
Even if the passenger sensing
system has turned off the front
outboard passenger frontal
airbag, no system is fail-safe. No
one can guarantee that an airbag
will not deploy under some
unusual circumstance, even
though it is turned off.(Continued)
Warning (Continued)
Secure rear-facing child restraints
in a rear seat, even if the airbag
is off. If you secure a
forward-facing child restraint in
the front seat, always move the
front passenger seat as far back
as it will go. It is better to secure
the child restraint in a rear seat.
SeePassenger Sensing System
on page 3-23 for additional
information.
If the child restraint uses a top
tether, see Lower Anchors and
Tethers for Children (LATCH
System) on page 3-37 for top tether
anchor locations.
Do not secure a child seat in a
position without a top tether anchor
if a national or local law requires
that the top tether be anchored, or if
the instructions that come with the
child restraint say that the top strap
must be anchored. In Canada, the law requires that
forward-facing child restraints have
a top tether, and that the tether be
attached.
When using the lap-shoulder belt to
secure the child restraint in this
position, follow the instructions that
came with the child restraint and the
following instructions:
1. Move the seat as far back as it
will go before securing the
forward-facing child restraint.
When the passenger sensing
system has turned off the front
outboard passenger frontal
airbag, the off indicator on the
passenger airbag status
indicator should light and stay lit
when the vehicle is started. See
Passenger Airbag Status
Indicator on page 5-19.
2. Put the child restraint on the seat.
3. Pick up the latch plate, and run the lap and shoulder portions of
the vehicle's safety belt through
Page 311 of 399

Black plate (64,1)Buick Regal Owner Manual (GMNA-Localizing-U.S./Canada/Mexico-
7576024) - 2015 - CRC - 9/15/14
10-64 Vehicle Care
The following information explains
how to repair or change a tire.
Tire Sealant and
Compressor Kit
{Warning
Idling a vehicle in an enclosed
area with poor ventilation is
dangerous. Engine exhaust may
enter the vehicle. Engine exhaust
contains carbon monoxide (CO)
which cannot be seen or smelled.
It can cause unconsciousness
and even death. Never run the
engine in an enclosed area that
has no fresh air ventilation. For
more information, seeEngine
Exhaust on page 9-25.
{Warning
Overinflating a tire could cause
the tire to rupture and you or
others could be injured. Be sure
to read and follow the tire sealant
and compressor kit instructions
and inflate the tire to its
recommended pressure. Do not
exceed the recommended
pressure.
{Warning
Storing the tire sealant and
compressor kit or other
equipment in the passenger
compartment of the vehicle could
cause injury. In a sudden stop or
collision, loose equipment could
strike someone. Store the tire
sealant and compressor kit in its
original location. If this vehicle has a tire sealant and
compressor kit, there may not be a
spare tire and tire changing
equipment, and on some vehicles
there may not be a place to store
a tire.
The tire sealant and compressor
can be used to temporarily seal
punctures up to 6 mm (0.25 in) in
the tread area of the tire. It can also
be used to inflate an
underinflated tire.
If the tire has been separated from
the wheel, has damaged sidewalls,
or has a large puncture, the tire is
too severely damaged for the tire
sealant and compressor kit to be
effective. See
Roadside Assistance
Program on page 13-5.
Read and follow all of the tire
sealant and compressor kit
instructions.
Page 313 of 399

Black plate (66,1)Buick Regal Owner Manual (GMNA-Localizing-U.S./Canada/Mexico-
7576024) - 2015 - CRC - 9/15/14
10-66 Vehicle Care
When using the tire sealant and
compressor kit during cold
temperatures, warm the kit in aheated environment for five minutes.
This will help to inflate the tire
faster.
If a tire goes flat, avoid further tire
and wheel damage by driving slowly
to a level place. Turn on the hazard
warning flashers. See
Hazard
Warning Flashers on page 6-3.
See If a Tire Goes Flat on
page 10-62 for other important
safety warnings.
Do not remove any objects that
have penetrated the tire.
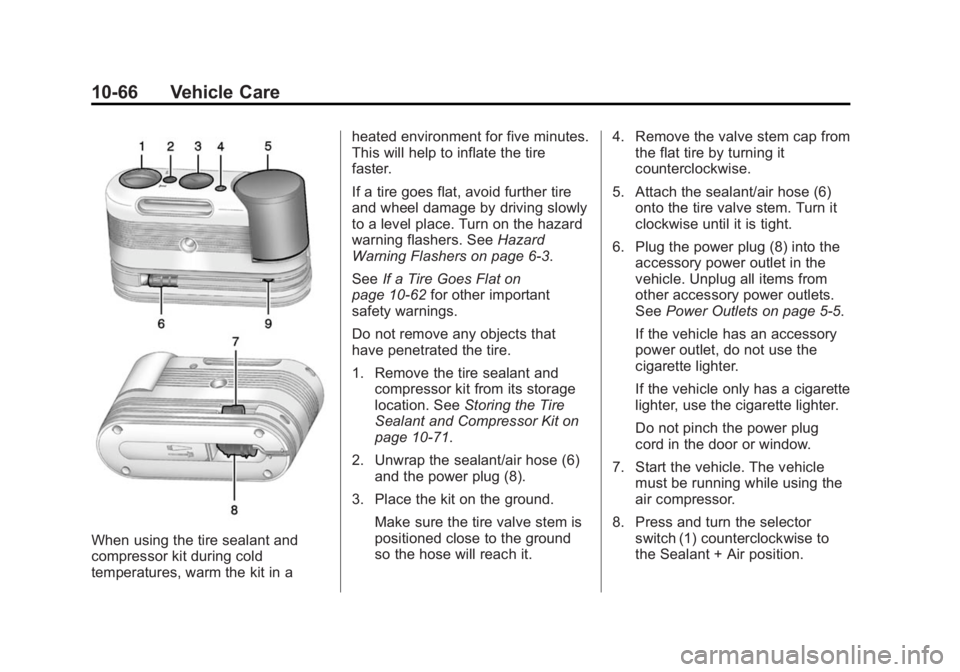
1. Remove the tire sealant and compressor kit from its storage
location. See Storing the Tire
Sealant and Compressor Kit on
page 10-71.
2. Unwrap the sealant/air hose (6) and the power plug (8).
3. Place the kit on the ground. Make sure the tire valve stem is
positioned close to the ground
so the hose will reach it. 4. Remove the valve stem cap from
the flat tire by turning it
counterclockwise.
5. Attach the sealant/air hose (6) onto the tire valve stem. Turn it
clockwise until it is tight.
6. Plug the power plug (8) into the accessory power outlet in the
vehicle. Unplug all items from
other accessory power outlets.
See Power Outlets on page 5-5.
If the vehicle has an accessory
power outlet, do not use the
cigarette lighter.
If the vehicle only has a cigarette
lighter, use the cigarette lighter.
Do not pinch the power plug
cord in the door or window.
7. Start the vehicle. The vehicle must be running while using the
air compressor.
8. Press and turn the selector switch (1) counterclockwise to
the Sealant + Air position.
Page 316 of 399

Black plate (69,1)Buick Regal Owner Manual (GMNA-Localizing-U.S./Canada/Mexico-
7576024) - 2015 - CRC - 9/15/14
Vehicle Care 10-69
If a tire goes flat, avoid further tire
and wheel damage by driving slowly
to a level place. Turn on the hazard
warning flashers. SeeHazard
Warning Flashers on page 6-3.
See If a Tire Goes Flat on
page 10-62 for other important
safety warnings.
1. Remove the tire sealant and compressor kit from its storage
location. See Storing the Tire
Sealant and Compressor Kit on
page 10-71.
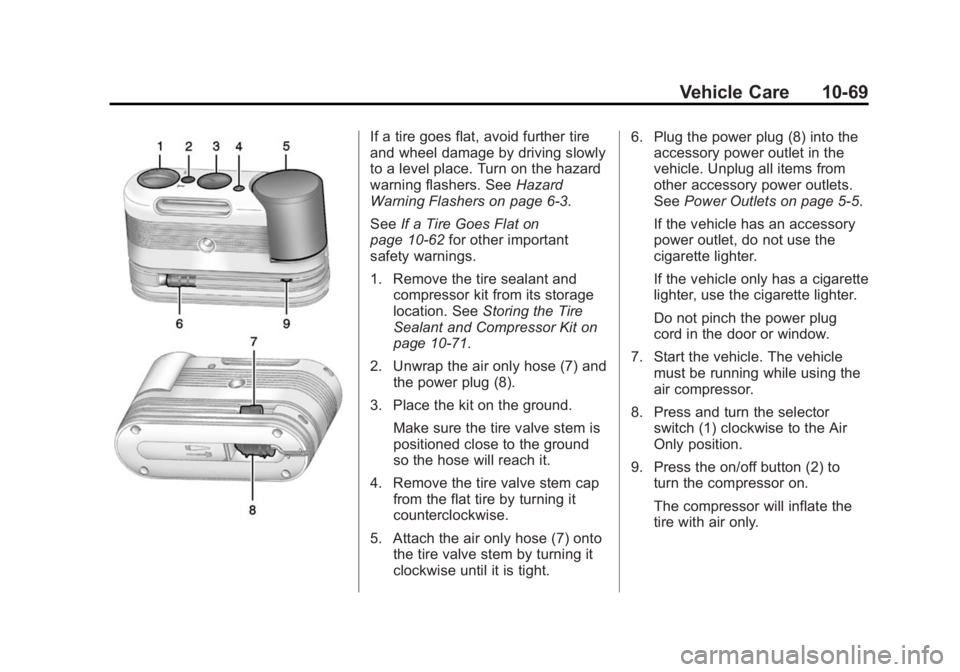
2. Unwrap the air only hose (7) and the power plug (8).
3. Place the kit on the ground. Make sure the tire valve stem is
positioned close to the ground
so the hose will reach it.
4. Remove the tire valve stem cap from the flat tire by turning it
counterclockwise.
5. Attach the air only hose (7) onto the tire valve stem by turning it
clockwise until it is tight. 6. Plug the power plug (8) into the
accessory power outlet in the
vehicle. Unplug all items from
other accessory power outlets.
See Power Outlets on page 5-5.
If the vehicle has an accessory
power outlet, do not use the
cigarette lighter.
If the vehicle only has a cigarette
lighter, use the cigarette lighter.
Do not pinch the power plug
cord in the door or window.
7. Start the vehicle. The vehicle must be running while using the
air compressor.
8. Press and turn the selector switch (1) clockwise to the Air
Only position.
9. Press the on/off button (2) to turn the compressor on.
The compressor will inflate the
tire with air only.
Page 328 of 399

Black plate (81,1)Buick Regal Owner Manual (GMNA-Localizing-U.S./Canada/Mexico-
7576024) - 2015 - CRC - 9/15/14
Vehicle Care 10-81
6. Connect the red positive (+)cable to the remote positive (+)
terminal of the discharged
battery.
7. Connect the other end of the positive (+) cable to the
positive (+) terminal of the good
battery. Use a remote
positive (+) terminal if the
vehicle has one.
8. Connect one end of the black negative (−) cable to the
negative (−) terminal of the good
battery.
9. Connect the other end of the negative (−) to the negative (–)
grounding point for the
discharged battery.
10. Start the vehicle with the good battery and run the engine at
idle speed for at least
four minutes.
11. Try to start the vehicle that had the dead battery. If it will not
start after a few tries, it
probably needs service.{Caution
If the jumper cables are
connected or removed in the
wrong order, electrical shorting
may occur and damage the
vehicle. The repairs would not be
covered by the vehicle warranty.
Always connect and remove the
jumper cables in the correct order,
making sure that the cables do
not touch each other or other
metal.
Jumper Cable Removal
Reverse the sequence exactly when
removing the jumper cables.
Towing
Towing the Vehicle
{Caution
Incorrectly towing a disabled
vehicle may cause damage. The
damage would not be covered by
the vehicle warranty.
Have the vehicle towed on a wheel
lift tow truck. A flatbed car carrier
could damage the vehicle. The
wheel lift tow truck must raise the
rear of the vehicle and wheel dollies
must be used to lift the front wheels
off the ground.
Consult your dealer or a
professional towing service if the
disabled vehicle must be towed.
Page 389 of 399

Black plate (4,1)Buick Regal Owner Manual (GMNA-Localizing-U.S./Canada/Mexico-
7576024) - 2015 - CRC - 9/15/14
i-4 INDEX
Dual Automatic ClimateControl System . . . . . . . . . . . . . . . . 8-1
E
E85 or FlexFuel . . . . . . . . . . . . . . . 9-61
Electric Parking Brake Light . . . 5-24
Electrical Equipment,
Add-On . . . . . . . . . . . . . . . . . . . . . . 9-65
Electrical System
Engine CompartmentFuse Block . . . . . . . . . . . . . . . . 10-35
Fuses and Circuit Breakers . . . . . . . . . . . . . . . . . . 10-35
Instrument Panel Fuse Block . . . . . . . . . . . . . . . . . . . . . . 10-39
Overload . . . . . . . . . . . . . . . . . . . 10-34
Emergency OnStar
®. . . . . . . . . . . . . . . . . . . . . . 14-2
Energy Information . . . . . . . . . . . . 5-32
Engine Air Cleaner/Filter . . . . . . . . . . . 10-16
Check and Service EngineSoon Light . . . . . . . . . . . . . . . . . . 5-20
Compartment Overview . . . . . . . 10-6
Coolant . . . . . . . . . . . . . . . . . . . . . 10-19 Engine (cont'd)
Coolant Temperature
Gauge . . . . . . . . . . . . . . . . . . . . . . 5-17
Coolant Temperature
Warning Light . . . . . . . . . . . . . . . 5-27
Cooling System . . . . . . . . . . . . . 10-18
Cooling System Messages . . . 5-41
Drive Belt Routing . . . . . . . . . . . . 12-4
Exhaust . . . . . . . . . . . . . . . . . . . . . . 9-25
Heater . . . . . . . . . . . . . . . . . . . . . . . . 9-21
Oil Life System . . . . . . . . . . . . . 10-13
Oil Messages . . . . . . . . . . . . . . . . . 5-41
Overheating . . . . . . . . . . . . . . . . 10-22
Power Messages . . . . . . . . . . . . . 5-42
Pressure Light . . . . . . . . . . . . . . . . 5-28
Running While Parked . . . . . . . . 9-26
Starting . . . . . . . . . . . . . . . . . . . . . . . 9-18
Entry Lighting . . . . . . . . . . . . . . . . . . . 6-6
Event Data Recorders . . . . . . . . 13-14
Exit Lighting . . . . . . . . . . . . . . . . . . . . 6-6
Extender, Safety Belt . . . . . . . . . . 3-16
Exterior Lamp Controls . . . . . . . . . 6-1
Exterior Lamps Off Reminder . . . 6-1
F
Features
Memory . . . . . . . . . . . . . . . . . . . . . . . . 1-8
Filter, Engine Air Cleaner . . . . . . . . . 10-16
Flash-to-Pass . . . . . . . . . . . . . . . . . . . 6-2
Flashers, Hazard Warning . . . . . . 6-3
Flat Tire . . . . . . . . . . . . . . . . . . . . . . 10-62 Changing . . . . . . . . . . . . . . . . . . . 10-71
FlexFuel E85 . . . . . . . . . . . . . . . . . . . . . . . . . . . 9-61
Floor Mats . . . . . . . . . . . . . . . . . . . . 10-93
Fluid Automatic Transmission . . . . 10-15
Brakes . . . . . . . . . . . . . . . . . . . . . . 10-25
Washer . . . . . . . . . . . . . . . . . . . . . 10-23
Fog Lamps . . . . . . . . . . . . . . . . . . . . . 6-4 Bulb Replacement . . . . . . . . . . 10-32
Folding Mirrors . . . . . . . . . . . . . . . . 2-19
Forward Collision Alert (FCA) System . . . . . . . . . . . . . . . . 9-52
Frequency Statement Radio . . . . . . . . . . . . . . . . . . . . . . . 13-12
Front Fog Lamp Light . . . . . . . . . . . . . . . . . . . . . . . . . . 5-29