Page 7 of 16

7
Cruise Control
Driver Information Center
DIC Controls
A. MENU
Press to display the Vehicle Information menu (units, tire pres-sure, remaining oil life) or the Trip/Fuel Information menu (digital speedometer, trip odometers, fuel range, average fuel economy, instantaneous fuel economy, average vehicle speed, timer, OnStar Turn-by-Turn guidance navigationF).
B.
Rotate the switch to scroll through the items of each menu.
C. SET/CLR
Press the button on the end of the lever to set a menu item or clear a message. Press and hold the button to reset a menu item.
The Driver Information Center (DIC) on the instrument cluster displays a variety of vehicle system information and warning messages.
F Optional equipment
Setting Cruise Control
1. Press the On/Off button. The Cruise Control symbol will illumi-nate in white on the instrument cluster.
2. When traveling at the desired speed, rotate the thumbwheel down to the SET position to set the speed. The
symbol will illuminate in green on the instrument cluster.
Adjusting Cruise Control
RES/+ Resume/Accelerate
Rotate the thumbwheel up to resume a set speed. When the system is active, rotate the thumbwheel up to increase speed.
SET/– Set/Coast
When the system is active, rotate the thumbwheel down to decrease speed.
Cancel
Press to cancel the cruise control but retain the set speed in memory.
Pressing the brake pedal also will cancel the cruise control.
Turn off cruise control or the vehicle igni-tion to erase the cruise control set speed.
See Driving and Operating in your Owner Manual.
See Instruments and Controls in your Owner Manual.
CBA
Page 8 of 16

8
Infotainment System
Refer to your Owner Manual for important safety information about using \
the infotainment system while driving.
The infotainment system is controlled using the radio buttons and knobs, voice recognition and audio steering wheel controls.
VOL Power/ Volume
HOME: Home page
Open the phone menu/Press and hold to mute the speakers
Seek/Previous radio station, track or file
Eject discOpen the Clock menu
SRCE: Select the audio source
FAV: Display pages of favorite radio stations
AS: Autostore list of stations with strongest signal
Play/Pause
TUNE/MENU:Turn the knob to highlight menus or tune stations; press the knob to open/select items
CONFIG:Open the Configuration Settings menu
1–6: Favorite preset stations
BACK: Move back one level in a menu
Seek/Next radio station, track or file
TONE: Open the Tone Settings menu
INFO:Display available information
See Infotainment System in your Owner Manual.
Standard color radio shown. For navigation system information, refer to \
the Infotainment System Owner Manual.
Page 15 of 16

15
Tire Pressure Monitor
Engine Oil Life System
The Low Tire Pressure warning light on the instrument cluster illuminates when one or more of the vehicle’s tires is significantly underinflated. Fill the tires to the proper tire pressures. The proper tire pressures for the vehicle are listed on the T\
ire and Loading Information label located below the driver’s door latch. Current tire pressures can be viewed in the Driver Information Center Vehicle Information menu.
Tire pressure is affected by cold weather and distance driven. If the low tire pressure
warning light illuminates when the vehicle is first started and then turns off as the vehicle is driven, check for the proper tire pressures.
Refer to your Owner Manual for information about normal monthly tire maintenance.
See Vehicle Care in your Owner Manual.
The Oil Life System calculates engine oil life based on vehicle use and displays Change Engine Oil Soon on the Driver Information Center (DIC) when it’s necessary to change the engine oil and filter. The system should be reset to 100% only following an oil change.
See Vehicle Care in your Owner Manual.
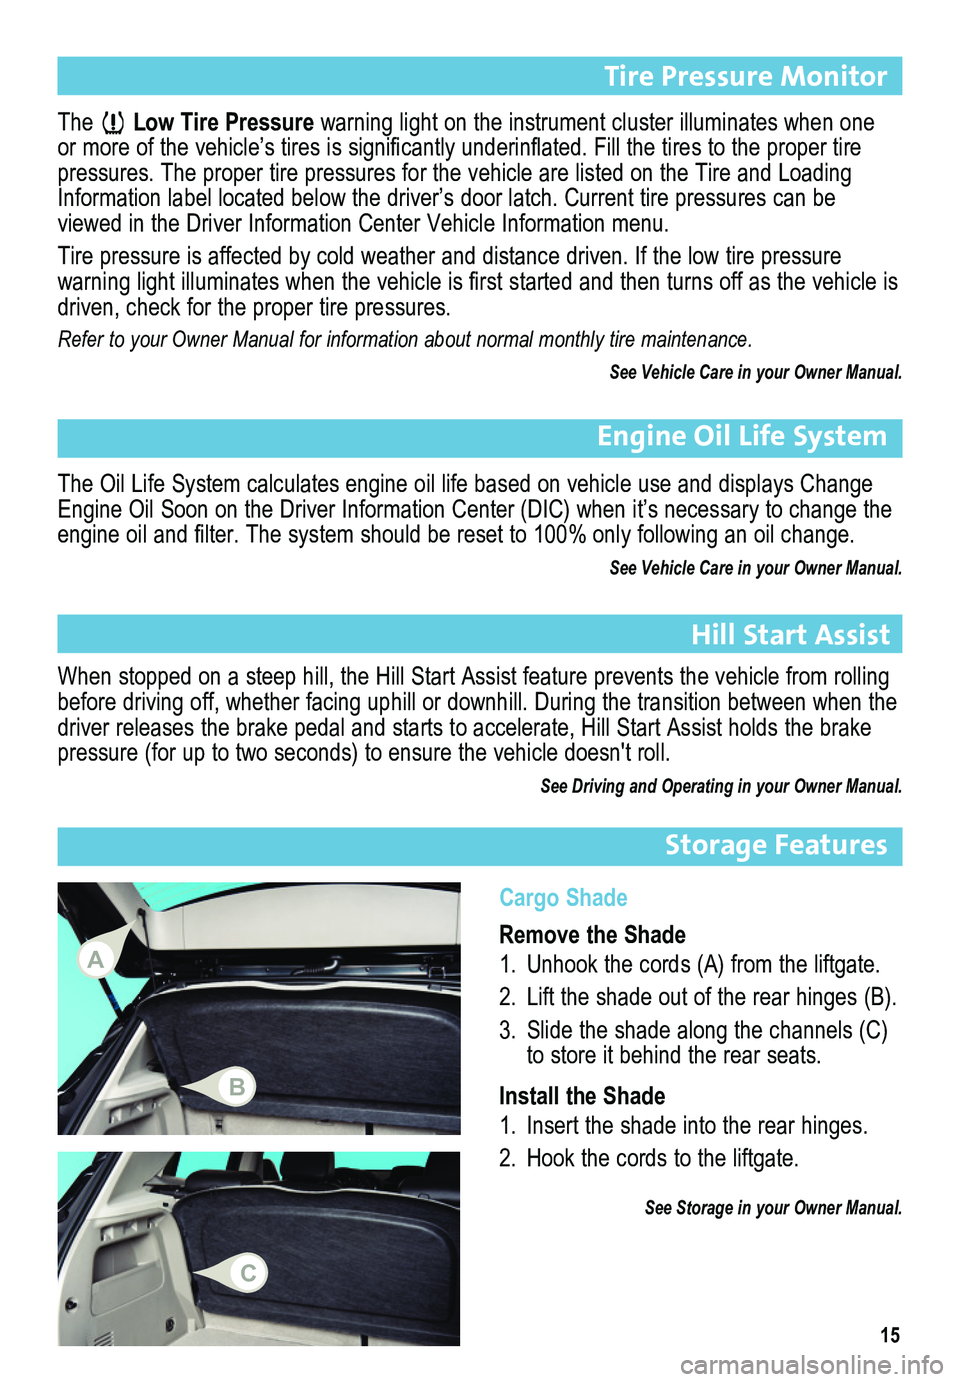
Cargo Shade
Remove the Shade
1. Unhook the cords (A) from the liftgate.
2. Lift the shade out of the rear hinges (B).
3. Slide the shade along the channels (C) to store it behind the rear seats.
Install the Shade
1. Insert the shade into the rear hinges.
2. Hook the cords to the liftgate.
See Storage in your Owner Manual.
Storage Features
Hill Start Assist
When stopped on a steep hill, the Hill Start Assist feature prevents the\
vehicle from rolling before driving off, whether facing uphill or downhill. During the transi\
tion between when the driver releases the brake pedal and starts to accelerate, Hill Start Assist holds the brake pressure (for up to two seconds) to ensure the vehicle doesn't roll.
See Driving and Operating in your Owner Manual.
A
B
C