2015 BMW Z4 SDRIVE35IS lights
[x] Cancel search: lightsPage 249 of 289
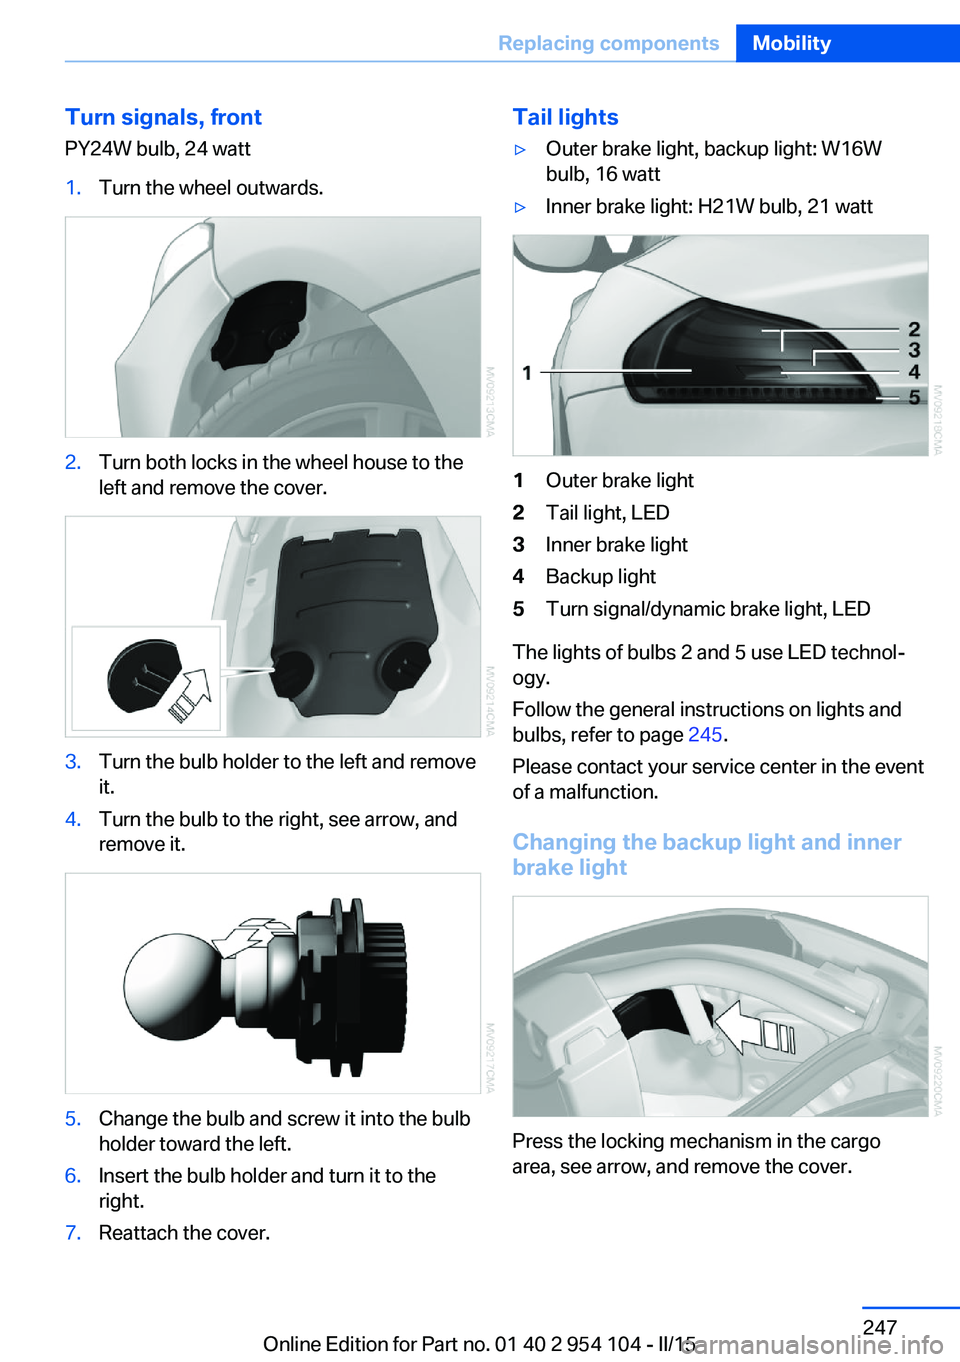
Turn signals, frontPY24W bulb, 24 watt1.Turn the wheel outwards.2.Turn both locks in the wheel house to the
left and remove the cover.3.Turn the bulb holder to the left and remove
it.4.Turn the bulb to the right, see arrow, and
remove it.5.Change the bulb and screw it into the bulb
holder toward the left.6.Insert the bulb holder and turn it to the
right.7.Reattach the cover.Tail lights▷Outer brake light, backup light: W16W
bulb, 16 watt▷Inner brake light: H21W bulb, 21 watt1Outer brake light2Tail light, LED3Inner brake light4Backup light5Turn signal/dynamic brake light, LED
The lights of bulbs 2 and 5 use LED technol‐
ogy.
Follow the general instructions on lights and
bulbs, refer to page 245.
Please contact your service center in the event
of a malfunction.
Changing the backup light and inner brake light
Press the locking mechanism in the cargo
area, see arrow, and remove the cover.
Seite 247Replacing componentsMobility247
Online Edition for Part no. 01 40 2 954 104 - II/15
Page 250 of 289
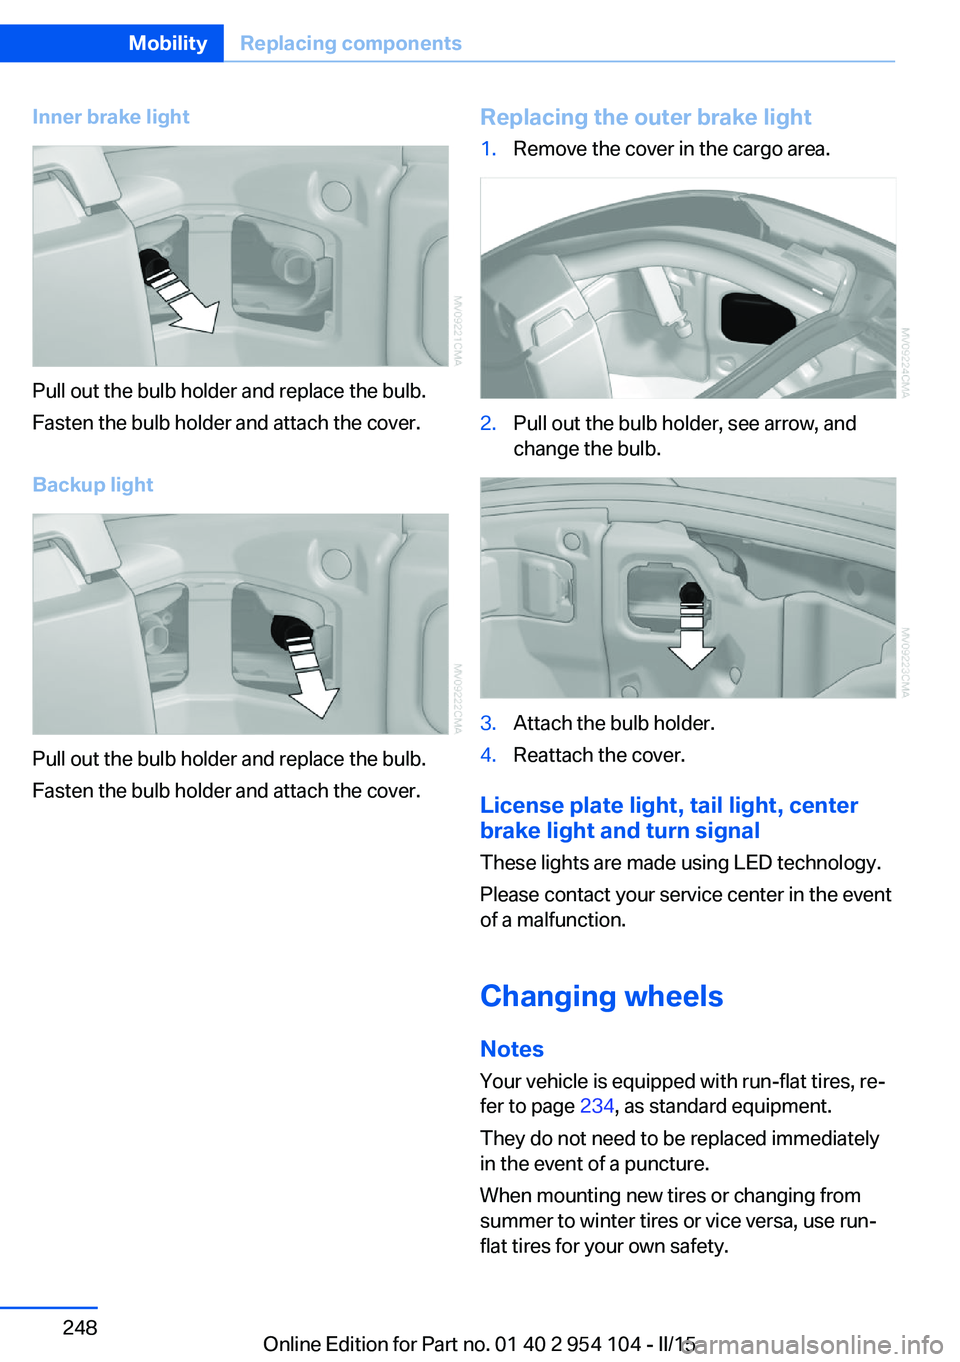
Inner brake light
Pull out the bulb holder and replace the bulb.
Fasten the bulb holder and attach the cover.
Backup light
Pull out the bulb holder and replace the bulb.
Fasten the bulb holder and attach the cover.
Replacing the outer brake light1.Remove the cover in the cargo area.2.Pull out the bulb holder, see arrow, and
change the bulb.3.Attach the bulb holder.4.Reattach the cover.
License plate light, tail light, center
brake light and turn signal
These lights are made using LED technology.
Please contact your service center in the event
of a malfunction.
Changing wheels Notes
Your vehicle is equipped with run-flat tires, re‐
fer to page 234, as standard equipment.
They do not need to be replaced immediately
in the event of a puncture.
When mounting new tires or changing from
summer to winter tires or vice versa, use run-
flat tires for your own safety.
Seite 248MobilityReplacing components248
Online Edition for Part no. 01 40 2 954 104 - II/15
Page 253 of 289
Breakdown assistanceVehicle equipment
This chapter describes all series equipment as
well as country-specific and special equipment
offered for this model series. Therefore, it also
describes equipment that may not be found in
your vehicle, for instance due to the selected
special equipment or the country version. This
also applies to safety-related functions and
systems.
When using the features and systems descri‐
bed here, adhere to local regulations.
Hazard warning system
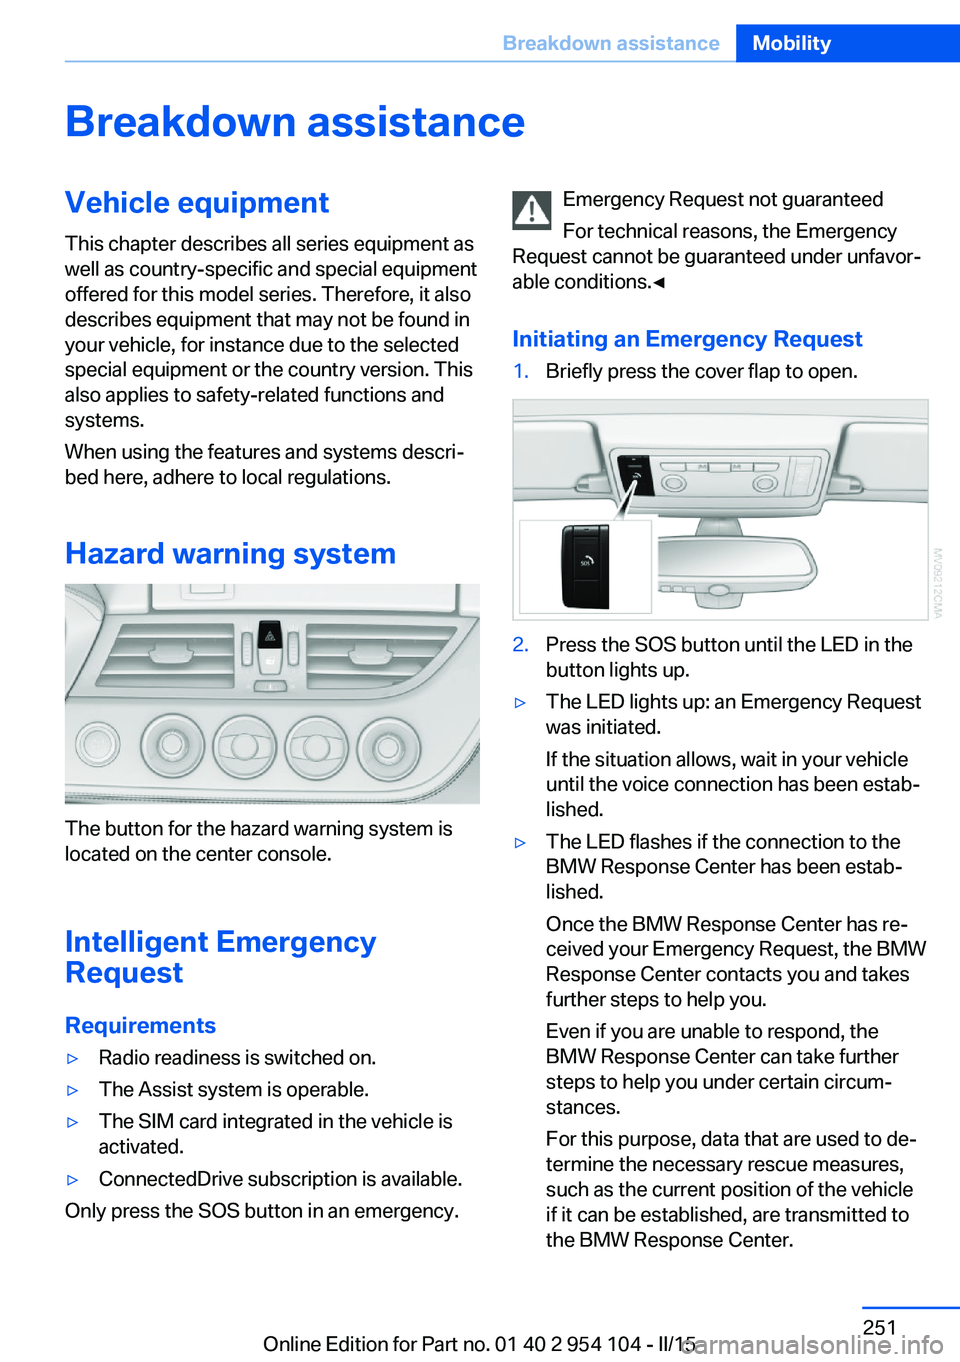
The button for the hazard warning system is
located on the center console.
Intelligent Emergency
Request
Requirements
▷Radio readiness is switched on.▷The Assist system is operable.▷The SIM card integrated in the vehicle is
activated.▷ConnectedDrive subscription is available.
Only press the SOS button in an emergency.
Emergency Request not guaranteed
For technical reasons, the Emergency
Request cannot be guaranteed under unfavor‐
able conditions.◀
Initiating an Emergency Request1.Briefly press the cover flap to open.2.Press the SOS button until the LED in the
button lights up.▷The LED lights up: an Emergency Request
was initiated.
If the situation allows, wait in your vehicle
until the voice connection has been estab‐
lished.▷The LED flashes if the connection to the
BMW Response Center has been estab‐
lished.
Once the BMW Response Center has re‐
ceived your Emergency Request, the BMW
Response Center contacts you and takes
further steps to help you.
Even if you are unable to respond, the
BMW Response Center can take further
steps to help you under certain circum‐
stances.
For this purpose, data that are used to de‐
termine the necessary rescue measures,
such as the current position of the vehicle
if it can be established, are transmitted to
the BMW Response Center.Seite 251Breakdown assistanceMobility251
Online Edition for Part no. 01 40 2 954 104 - II/15
Page 256 of 289
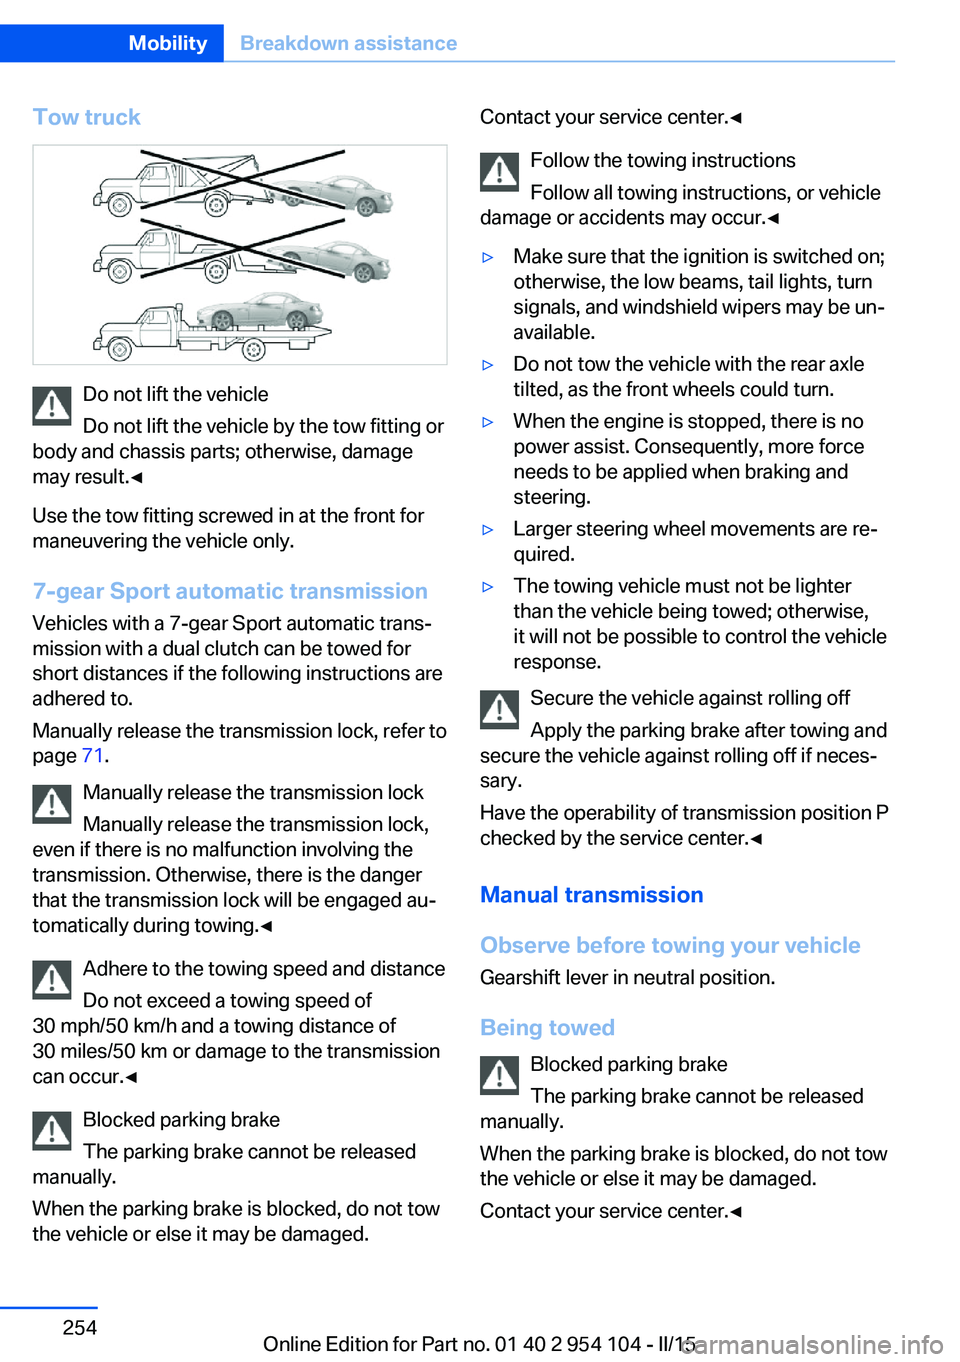
Tow truck
Do not lift the vehicle
Do not lift the vehicle by the tow fitting or
body and chassis parts; otherwise, damage
may result.◀
Use the tow fitting screwed in at the front for
maneuvering the vehicle only.
7-gear Sport automatic transmission
Vehicles with a 7-gear Sport automatic trans‐
mission with a dual clutch can be towed for
short distances if the following instructions are
adhered to.
Manually release the transmission lock, refer to
page 71.
Manually release the transmission lock
Manually release the transmission lock,
even if there is no malfunction involving the
transmission. Otherwise, there is the danger
that the transmission lock will be engaged au‐
tomatically during towing.◀
Adhere to the towing speed and distance
Do not exceed a towing speed of
30 mph/50 km/h and a towing distance of
30 miles/50 km or damage to the transmission
can occur.◀
Blocked parking brake
The parking brake cannot be released
manually.
When the parking brake is blocked, do not tow
the vehicle or else it may be damaged.
Contact your service center.◀
Follow the towing instructions
Follow all towing instructions, or vehicle
damage or accidents may occur.◀▷Make sure that the ignition is switched on;
otherwise, the low beams, tail lights, turn
signals, and windshield wipers may be un‐
available.▷Do not tow the vehicle with the rear axle
tilted, as the front wheels could turn.▷When the engine is stopped, there is no
power assist. Consequently, more force
needs to be applied when braking and
steering.▷Larger steering wheel movements are re‐
quired.▷The towing vehicle must not be lighter
than the vehicle being towed; otherwise,
it will not be possible to control the vehicle
response.
Secure the vehicle against rolling off
Apply the parking brake after towing and
secure the vehicle against rolling off if neces‐
sary.
Have the operability of transmission position P
checked by the service center.◀
Manual transmission
Observe before towing your vehicle Gearshift lever in neutral position.
Being towed Blocked parking brake
The parking brake cannot be released
manually.
When the parking brake is blocked, do not tow
the vehicle or else it may be damaged.
Contact your service center.◀
Seite 254MobilityBreakdown assistance254
Online Edition for Part no. 01 40 2 954 104 - II/15
Page 257 of 289
Follow the towing instructions
Follow all towing instructions, or vehicle
damage or accidents may occur.◀▷Make sure that the ignition is switched on;
otherwise, the low beams, tail lights, turn
signals, and windshield wipers may be un‐
available.▷Do not tow the vehicle with the rear axle
tilted, as the front wheels could turn.▷When the engine is stopped, there is no
power assist. Consequently, more force
needs to be applied when braking and
steering.▷Larger steering wheel movements are re‐
quired.▷The towing vehicle must not be lighter
than the vehicle being towed; otherwise,
it will not be possible to control the vehicle
response.
Tow truck
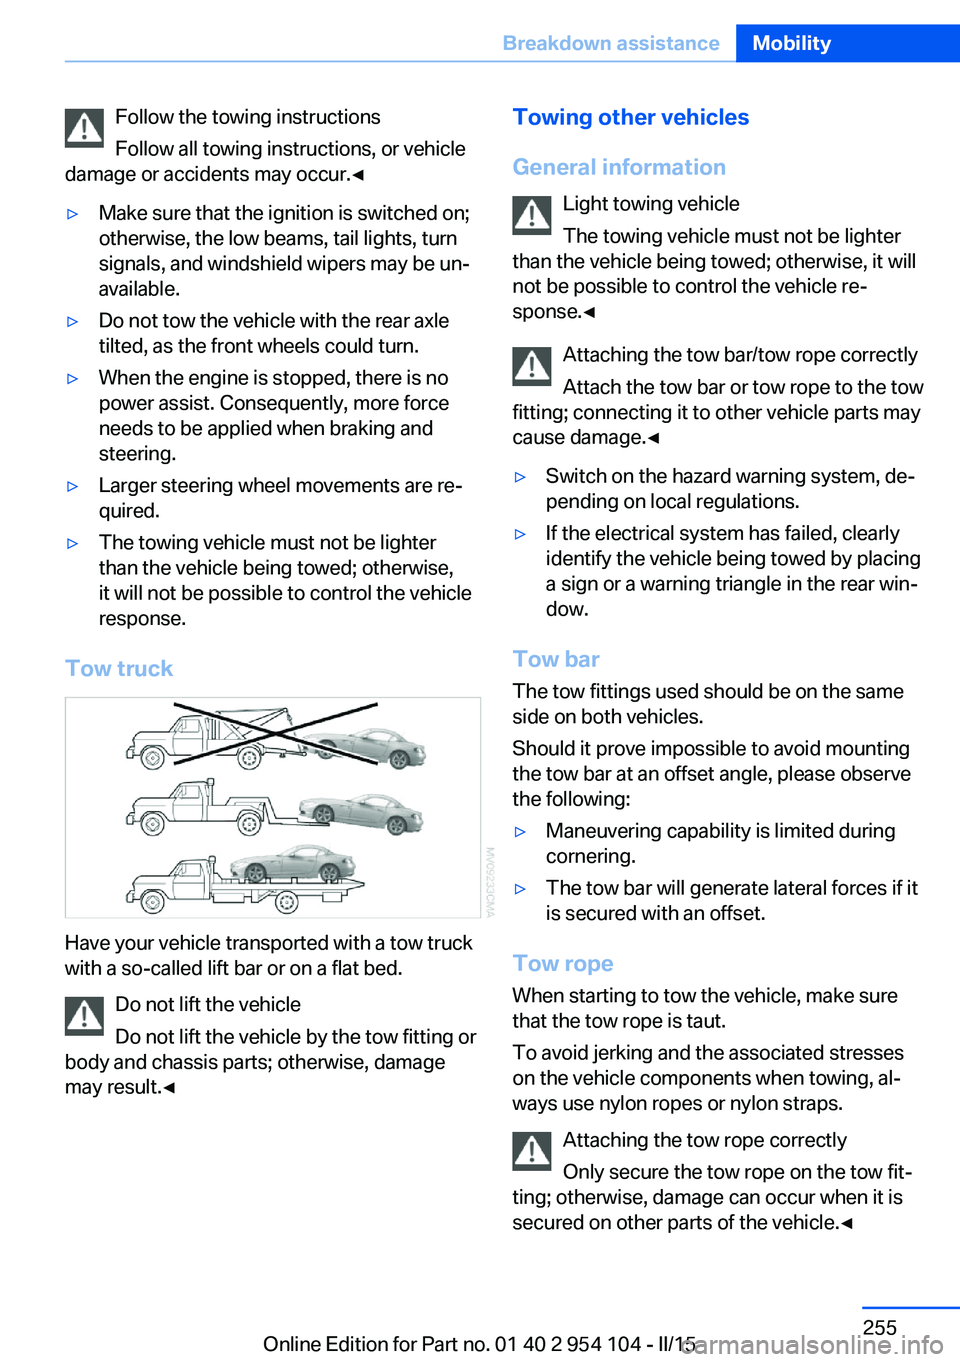
Have your vehicle transported with a tow truck
with a so-called lift bar or on a flat bed.
Do not lift the vehicle
Do not lift the vehicle by the tow fitting or
body and chassis parts; otherwise, damage
may result.◀
Towing other vehicles
General information Light towing vehicle
The towing vehicle must not be lighter
than the vehicle being towed; otherwise, it will
not be possible to control the vehicle re‐
sponse.◀
Attaching the tow bar/tow rope correctly
Attach the tow bar or tow rope to the tow
fitting; connecting it to other vehicle parts may
cause damage.◀▷Switch on the hazard warning system, de‐
pending on local regulations.▷If the electrical system has failed, clearly
identify the vehicle being towed by placing
a sign or a warning triangle in the rear win‐
dow.
Tow bar
The tow fittings used should be on the same
side on both vehicles.
Should it prove impossible to avoid mounting
the tow bar at an offset angle, please observe
the following:
▷Maneuvering capability is limited during
cornering.▷The tow bar will generate lateral forces if it
is secured with an offset.
Tow rope
When starting to tow the vehicle, make sure
that the tow rope is taut.
To avoid jerking and the associated stresses
on the vehicle components when towing, al‐
ways use nylon ropes or nylon straps.
Attaching the tow rope correctly
Only secure the tow rope on the tow fit‐
ting; otherwise, damage can occur when it is
secured on other parts of the vehicle.◀
Seite 255Breakdown assistanceMobility255
Online Edition for Part no. 01 40 2 954 104 - II/15
Page 260 of 289
Sport automatic transmission1.Insert the remote control into the ignition
lock, even with Comfort Access.2.Release the parking brake, refer to
page 61.3.Drive into the car wash.4.Engage transmission position N.5.Switch the engine off.6.Leave the remote control in the ignition
lock so that the vehicle can roll.
When starting the engine:
1.Depress the brake pedal.2.Press the Start/Stop button.
Transmission position P is engaged automati‐
cally:
▷Automatically after approx. 30 minutes.▷When the remote control is removed from
the ignition lock.
Headlights
▷Do not rub dry and do not use abrasive or
caustic cleansers.▷Soak areas that have been soiled e.g. due
to insects, with shampoo and wash off with
water.▷Thaw ice with de-icing spray; do not use an
ice scraper.
Retractable hardtop
When you open a wet hardtop, water drops
may run into the cargo area. If necessary, re‐
move items from the cargo area beforehand to
avoid water stains or soiling.
After washing the vehicle
After washing the vehicle, apply the brakes
briefly to dry them; otherwise, braking action
can be reduced and corrosion of the brake
discs can occur.
Fully remove any residue from the windows to
prevent obstruction of view from streaking,
wiping noises, and wiper wear.
Vehicle careCar care productsBMW recommends using cleaning and care
products from BMW, since these have been
tested and approved.
Car care and cleaning products
Follow the instructions on the container.
When cleaning the interior, open the doors or
windows.
Only use products intended for cleaning vehi‐
cles.
Cleansers can contain substances that are
dangerous and harmful to your health.◀
Vehicle paint Regular care contributes to driving safety and
value retention. Environmental influences in
areas with high air pollution or natural contami‐
nants, such as tree resin or pollen, can have an
impact on the vehicle paint. Tailor the fre‐
quency and extent of your car care to these in‐
fluences.
Immediately remove aggressive substances,
such as spilled fuel, oil, grease, or bird drop‐
pings, to prevent damage to or discoloration of
the paintwork.
Leather care
Remove dust from the leather often, using a
cloth or vacuum cleaner.
Otherwise, particles of dust and road grime
chafe in pores and folds, and lead to increased
wear and premature degradation of the leather
surface.
To guard against discoloration, such as from
clothing, provide leather care roughly every
two months.Seite 258MobilityCare258
Online Edition for Part no. 01 40 2 954 104 - II/15
Page 276 of 289

Everything from A to Z
IndexA ABS, Antilock Brake Sys‐ tem 101
Acceleration assistant, Launch Control 71
Accident, refer to Initiating an Emergency Request 251
Activated charcoal filter with automatic climate con‐
trol 114
Adaptive brake lights, see Brake force display 100
Adaptive Light Control 88
Additional telephone 194
Additives, coolant 241
Additives, oil 240
After washing vehicle 258
Airbags 92
Airbags, indicator/warning light 94
Air circulation, refer to Recir‐ culated air mode 110, 113
Air conditioner 110
Air conditioning mode, air conditioner 110
Air conditioning mode, auto‐ matic climate control 112
Air conditioning mode, venti‐ lation 111, 115
Air distribution, auto‐ matic 113
Air distribution, individ‐ ual 111
Air distribution, manual 111
Air flow rate 111, 114
Airing, refer to Ventila‐ tion 111, 115
Air outlets, refer to Air vents 109 Air pressure, refer to Tire in‐
flation pressure 228
Air supply, air condi‐ tioner 110
Air supply, automatic climate control 112
Air supply, ventila‐ tion 111, 115
Air vents 109
Air vents, refer to Ventila‐ tion 111, 115
Alarm system 41
Alarm system, avoiding unin‐ tentional alarms 42
Alarm system, ending an alarm 41
Alarm system, interior motion sensor 42
Alarm system, tilt alarm sen‐ sor 42
All around the headliner 19
All-season tires, refer to Win‐ ter tires 235
Alternating-code hand-held transmitter 117
Alternative oil types 240
AM/FM station 164
Announcement, navigation, see Spoken instruc‐
tions 153
Antifreeze, coolant 241
Antifreeze, washer fluid 65
Antilock Brake System, ABS 101
Anti-slip control, refer to DSC 101
Anti-theft protection 34
Anti-theft protection, lug bolts 249
Appointments 210 Approved axle loads, refer to
Weights 264
Approved engine oils 240
Approved gross vehicle weight, refer to
Weights 264
Armrest, refer to Center arm‐ rest 124
Arrival time, refer to Com‐ puter 75
Ashtray 120
Assistance systems, refer to Driving stability control sys‐
tems 101
Assistance when driving off 104
Audio device, external 125
Audio playback 173
Audio playback, Blue‐ tooth 185
Automatic air distribu‐ tion 113
Automatic air flow 113
Automatic car wash 257
Automatic climate con‐ trol 112
Automatic climate control, automatic air distribu‐
tion 113
Automatic cruise control 105
Automatic Curb Monitor 52
Automatic headlamp con‐ trol 88
Automatic recirculated air control 113
Automatic Start/Stop func‐ tion 59
Automatic transmission, 7- gear with dual clutch 68
Automatic transmission, 8- gear 66 Seite 274ReferenceEverything from A to Z274
Online Edition for Part no. 01 40 2 954 104 - II/15
Page 277 of 289
AUTO program with auto‐matic climate control 113
AUX-IN port 182
Average fuel consumption 75
Average fuel consumption, setting the unit 78
Average speed 75
Axle loads, refer to Weights 264
B
Backrest curvature, refer to Lumbar support 49
Backrests, refer to Seat ad‐ justment 48
Backrest width adjust‐ ment 50
Backup lights, bulb replace‐ ment 247
Balance 162
Band-aids, refer to First aid kit 252
Bass 162
Battery, disposal 41
Battery, power failure 249
Battery, remote control 32
Battery, replacement in the remote control 41
Battery replacement, vehicle battery 249
Battery, vehicle 249
Before entering the car wash 257
Belts, refer to Safety belts 50
Belt tensioners, refer to Safety belts 50
Beverage holder, refer to Cu‐ pholder 126
Black and white map dis‐ play 156
Blower, refer to Air flow rate 111, 114
Bluetooth audio 185
Bluetooth connection, acti‐ vating/deactivating 195 BMW Apps 220
BMW Driver's Guide App 6
BMW EfficientDynamics, re‐ fer to Saving fuel 134
BMW Homepage 6
BMW Internet page 6
BMW Maintenance Sys‐ tem 243
BMW Online 218
Bottle holder, refer to Cu‐ pholder 126
Brake assistant, refer to Dy‐ namic Brake Control 101
Brake discs, breaking in 130
Brake force display 100
Brake force distribution, elec‐ tronic 101
Brake lights, adaptive 100
Brake lights, brake force dis‐ play 100
Brake lights, bulb replace‐ ment 247
Brake pads, breaking in 130
Brake, refer to Parking brake 61
Brakes, ABS 101
Braking, notes 131
Braking, parking brake 61
Breakdown assistance, refer to Roadside Assistance 217
Break-in 130
Brightness of Control Dis‐ play 80
Bulbs, replacing, refer to Lamps and bulbs 245
Button for starting the engine, refer to Start/Stop but‐
ton 57
Buttons on the steering wheel 14
Bypassing, see Starting aid 252
C Calendar 210 California Proposition 65
Warning 7
Camera, care 260
Can holder, refer to Cu‐ pholder 126
Capacities 265
Capacities, cargo area, refer to Weights 264
Capacities, fuel tank, refer to Filling capacities 265
Car battery 249
Car care products 258
Care 257
Care, displays 260
Care, vehicle 258
Cargo 132
Cargo area 121
Cargo area, capacity 264
Cargo area capacity, enlarg‐ ing 121
Cargo area, Comfort Ac‐ cess 40
Cargo area, lamp, refer to In‐ terior lights 91
Cargo area, opening from the inside 38
Cargo area, opening from the outside 38
Cargo, securing 122
Cargo straps, securing cargo 134
Car key, refer to Integrated key/remote control 32
Carpet, care 260
Car phone installation loca‐ tion, refer to Center arm‐
rest 124
Car phone, refer to Tele‐ phone 194
Car vacuum cleaner, connect‐ ing, refer to Connecting
electrical devices 120
Car wash 257
Car wash, with Comfort Ac‐ cess 40 Seite 275Everything from A to ZReference275
Online Edition for Part no. 01 40 2 954 104 - II/15