2015 BMW Z4 SDRIVE35IS transmission
[x] Cancel search: transmissionPage 200 of 289
▷Switch the mobile phone off and on again.▷Is the ambient temperature too high or
low? Do not expose the mobile phone to
extreme environmental conditions.
The telephone functions are not available.
▷Is the mobile phone paired as an additional
telephone and is the additional telephone
function deactivated? Activate the func‐
tion.▷Is an outgoing call not possible? Connect
the mobile phone as a telephone.
No phone book entries or only some phone
book entries are displayed, or they are incom‐
plete.
▷Transmission of the phone book entries is
not yet complete.▷It is possible that only the phone book en‐
tries of the mobile phone or the SIM card
are transmitted.▷It may not be possible to display phone
book entries with special characters.▷The number of phone book entries to be
stored is too high.▷Is the data volume of the contact too large,
e. g., due to stored information such as
notes? Reduce the data volume of the con‐
tact.▷Is the mobile phone connected as an audio
source or additional telephone? The mo‐
bile phone must be connected as a tele‐
phone.
The phone connection quality is poor.
▷The strength of the Bluetooth signal on the
mobile phone can be adjusted, depending
on the mobile phone.▷Insert the mobile phone into the snap-in
adapter or place it in the area of the center
console.▷Adjust the volume of the microphone and
loudspeakers separately.If all points in this list have been checked and
the required function is still not available, con‐
tact Customer Relations or the service center.
Controls
Adjusting the volume
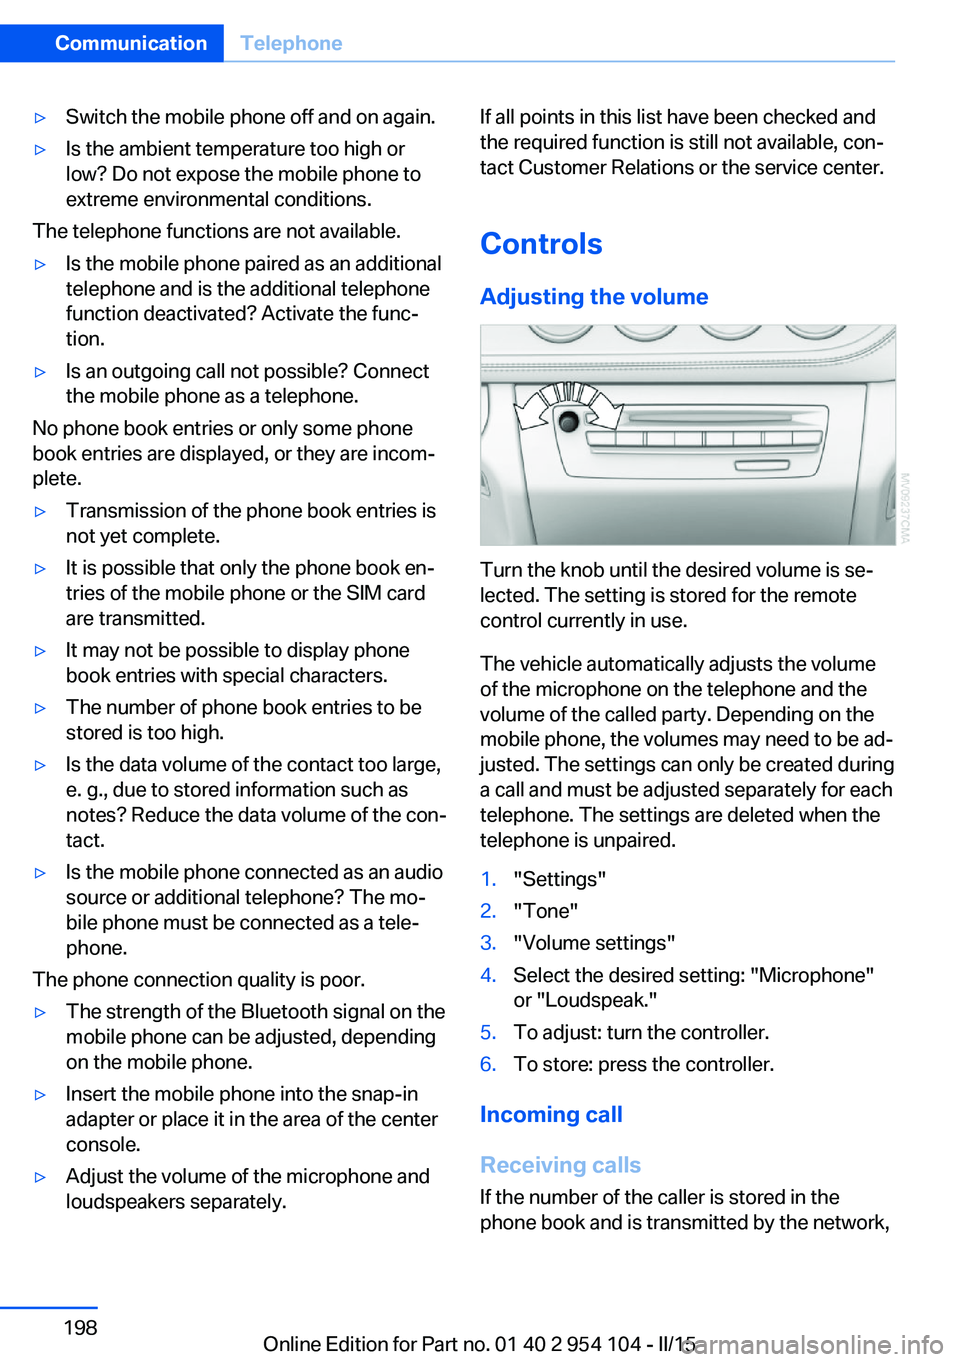
Turn the knob until the desired volume is se‐
lected. The setting is stored for the remote
control currently in use.
The vehicle automatically adjusts the volume
of the microphone on the telephone and the
volume of the called party. Depending on the
mobile phone, the volumes may need to be ad‐
justed. The settings can only be created during
a call and must be adjusted separately for each
telephone. The settings are deleted when the
telephone is unpaired.
1."Settings"2."Tone"3."Volume settings"4.Select the desired setting: "Microphone"
or "Loudspeak."5.To adjust: turn the controller.6.To store: press the controller.
Incoming call
Receiving calls If the number of the caller is stored in the
phone book and is transmitted by the network,
Seite 198CommunicationTelephone198
Online Edition for Part no. 01 40 2 954 104 - II/15
Page 210 of 289
Show contact picturesPictures stored with the contacts are stored in
the vehicle when the mobile phone is con‐
nected to the vehicle. The number of transmit‐ ted pictures depends on the mobile phone.
The mobile phone must support this function.1."Office"2."Contacts"3.Open "Options".4."Configure Bluetooth®"5."Show images"
Display of all contact pictures is activated or
deactivated.
Deleting contacts
Only contacts that are stored in the vehicle are
deleted. The contacts on the mobile phone
cannot be deleted.
1."Office"2."Contacts"3.Highlight the contact.4.Open "Options".5."Delete contact" or "Delete all contacts"6.If necessary. "Yes"
Messages
General information
Whether or not text messages and e-mails
from the mobile phone are displayed depends
on whether transmission from the mobile
phone to the vehicle is supported. Text mes‐
sages and e-mails may not be supported by
the service provider, or the function may need
to be enabled separately. After the mobile
phone is first paired, transmission may take
several minutes. Messages are only displayed
in full length when the vehicle is stationary.
Messages from the additional telephone are
not transmitted.
Displaying messages1."Office"2."Messages"
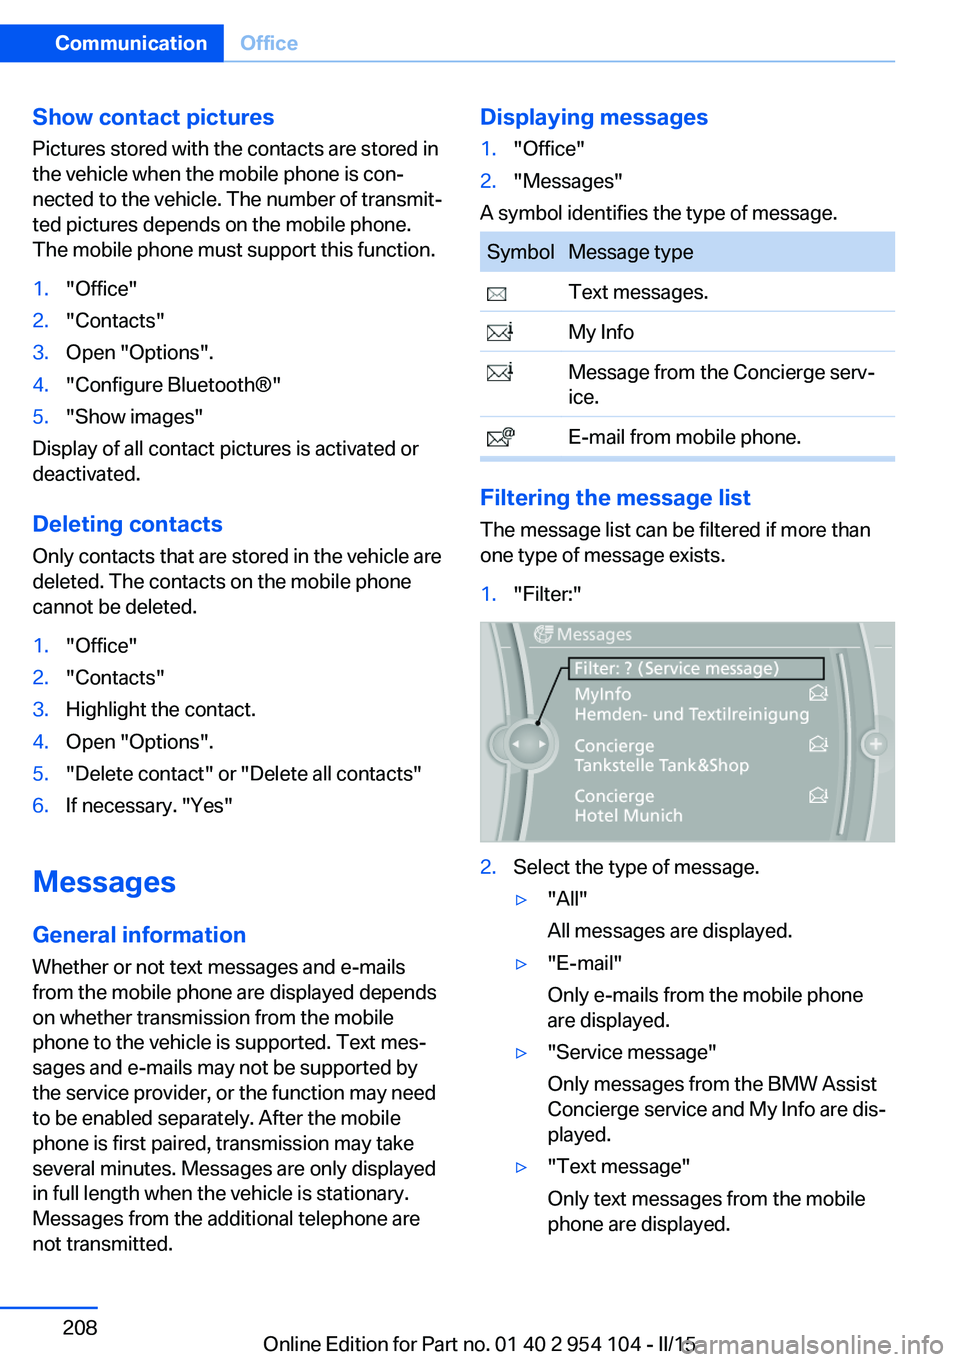
A symbol identifies the type of message.
SymbolMessage type Text messages. My Info Message from the Concierge serv‐
ice. E-mail from mobile phone.
Filtering the message list
The message list can be filtered if more than
one type of message exists.
1."Filter:"2.Select the type of message.▷"All"
All messages are displayed.▷"E-mail"
Only e-mails from the mobile phone
are displayed.▷"Service message"
Only messages from the BMW Assist
Concierge service and My Info are dis‐
played.▷"Text message"
Only text messages from the mobile
phone are displayed.Seite 208CommunicationOffice208
Online Edition for Part no. 01 40 2 954 104 - II/15
Page 220 of 289
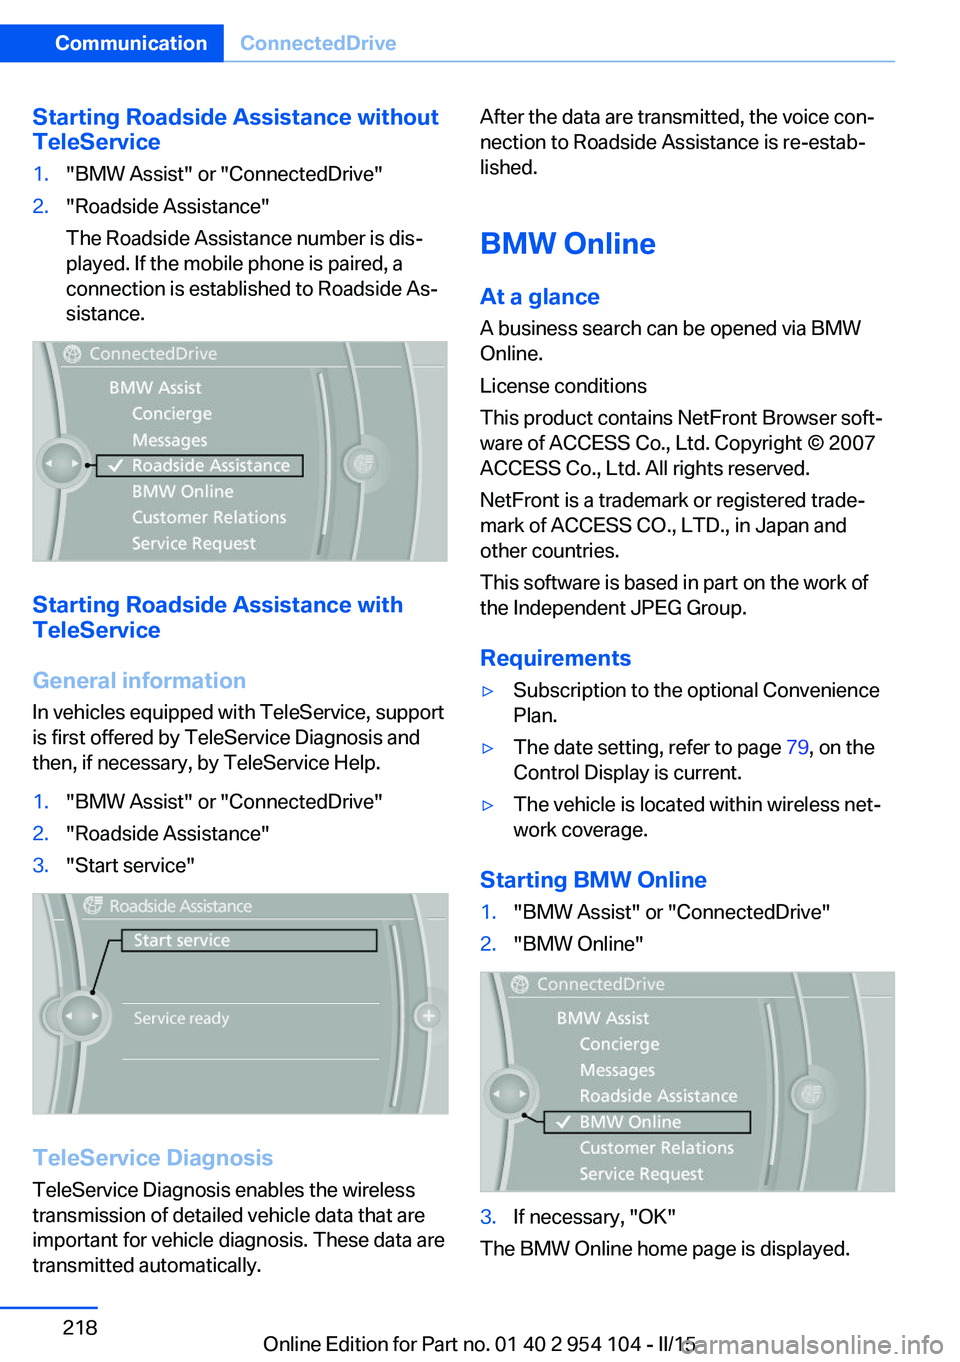
Starting Roadside Assistance without
TeleService1."BMW Assist" or "ConnectedDrive"2."Roadside Assistance"
The Roadside Assistance number is dis‐
played. If the mobile phone is paired, a
connection is established to Roadside As‐
sistance.
Starting Roadside Assistance with
TeleService
General information
In vehicles equipped with TeleService, support
is first offered by TeleService Diagnosis and
then, if necessary, by TeleService Help.
1."BMW Assist" or "ConnectedDrive"2."Roadside Assistance"3."Start service"
TeleService Diagnosis
TeleService Diagnosis enables the wireless
transmission of detailed vehicle data that are
important for vehicle diagnosis. These data are
transmitted automatically.
After the data are transmitted, the voice con‐
nection to Roadside Assistance is re-estab‐
lished.
BMW Online
At a glance
A business search can be opened via BMW
Online.
License conditions
This product contains NetFront Browser soft‐
ware of ACCESS Co., Ltd. Copyright © 2007
ACCESS Co., Ltd. All rights reserved.
NetFront is a trademark or registered trade‐
mark of ACCESS CO., LTD., in Japan and
other countries.
This software is based in part on the work of
the Independent JPEG Group.
Requirements▷Subscription to the optional Convenience
Plan.▷The date setting, refer to page 79, on the
Control Display is current.▷The vehicle is located within wireless net‐
work coverage.
Starting BMW Online
1."BMW Assist" or "ConnectedDrive"2."BMW Online"3.If necessary, "OK"
The BMW Online home page is displayed.
Seite 218CommunicationConnectedDrive218
Online Edition for Part no. 01 40 2 954 104 - II/15
Page 223 of 289
▷Corresponding mobile wireless contract.
Any additionally incurred costs are not a
part of Apps.▷Use only BMW approved software applica‐
tions; otherwise, it may result in malfunc‐
tions.
Information about suitable mobile phones,
available software applications and their instal‐
lation can be found at www.bmw.com/connec‐
tivity or at the service center.
Create the entries.
Make entries only when traffic and road
conditions allow. Otherwise, the vehicle occu‐
pants and other road users may be put in dan‐
ger because of the distraction from driving.
For reasons of safety, some software applica‐
tions are usable only while the vehicle is sta‐
tionary.◀
Operating Apps
1.Connect the mobile phone via the snap-in
adapter or via the USB audio interface.2."ConnectedDrive"3.Select the desired software application.
Displaying status
Information about the currently available soft‐
ware applications can be displayed.
1."ConnectedDrive"2."BMW apps"
Notes
▷The ranges of Apps that can be displayed
on the Control Display depend on the
range of installed software applications on
the mobile phone.▷The data transmission of the software ap‐
plications from the mobile phone to the ve‐
hicle can last some time. Some software
applications depend on the speed of the
available Internet connection of the mobile
phone.▷Some mobile phones cannot simultane‐
ously use Apps and the Bluetooth hands-
free system.
If necessary, restart the software applica‐
tion on the mobile phone after a phone
conversation.
Remote Services
With Remote Services, a connection can be
established between a mobile phone and the
vehicle. This connection can be used, for ex‐
ample, to lock and unlock the vehicle.
Depending on the vehicle, additional functions
may be available.
To be able to use the functions, the My BMW
Remote app must be downloaded. Operation
takes place via the app.
Alternatively, the functions can also be used
via the ConnectedDrive Hotline.
The operating instructions for the My BMW
Remote app can be found on the Connected‐
Drive portal or at www.bmw.com.
Seite 221ConnectedDriveCommunication221
Online Edition for Part no. 01 40 2 954 104 - II/15
Page 255 of 289
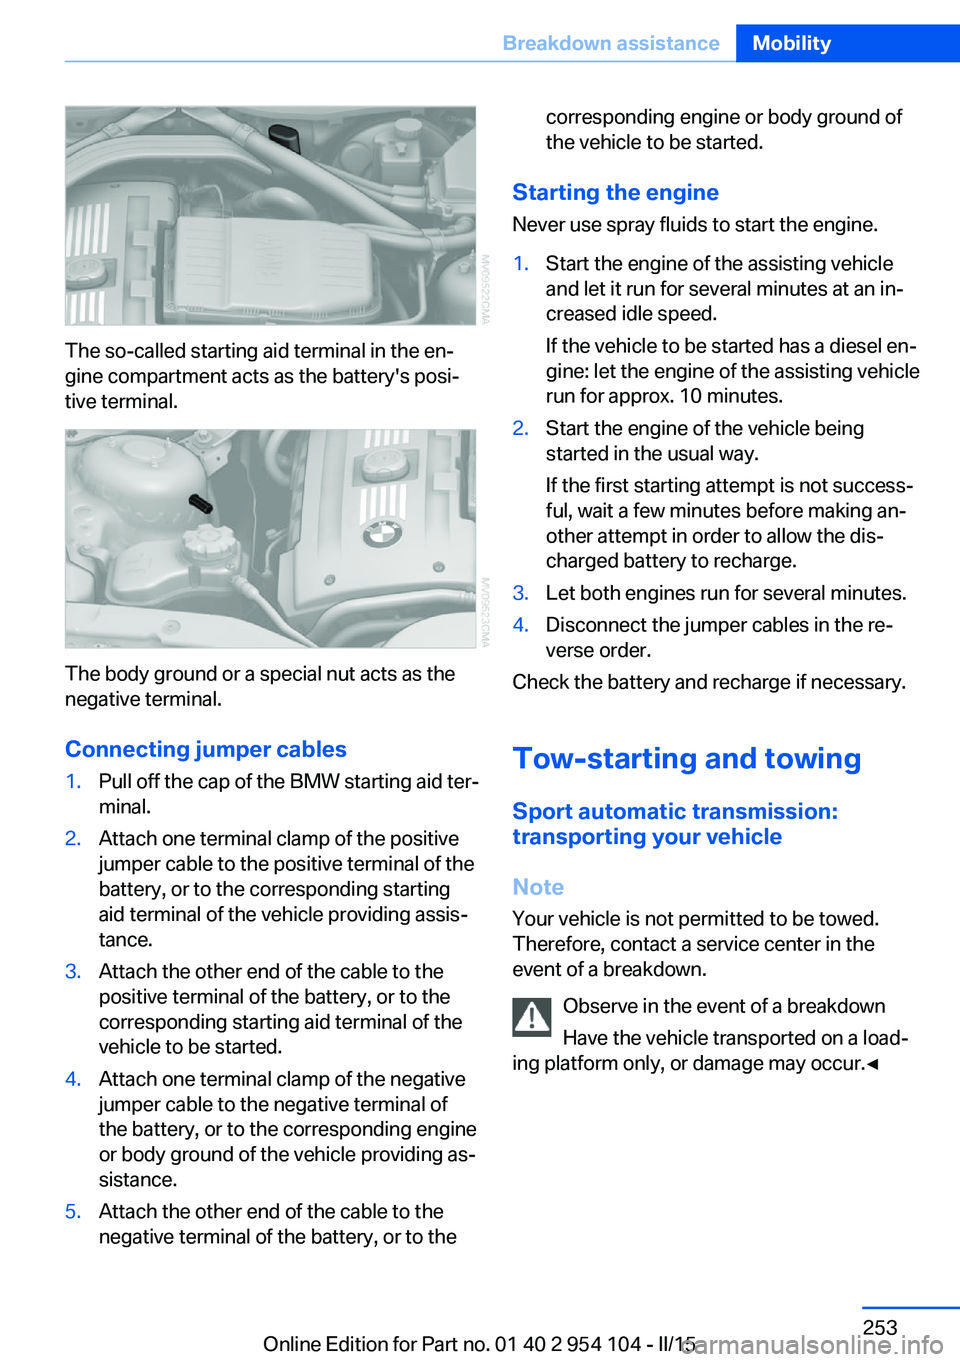
The so-called starting aid terminal in the en‐
gine compartment acts as the battery's posi‐
tive terminal.
The body ground or a special nut acts as the
negative terminal.
Connecting jumper cables
1.Pull off the cap of the BMW starting aid ter‐
minal.2.Attach one terminal clamp of the positive
jumper cable to the positive terminal of the
battery, or to the corresponding starting
aid terminal of the vehicle providing assis‐
tance.3.Attach the other end of the cable to the
positive terminal of the battery, or to the
corresponding starting aid terminal of the
vehicle to be started.4.Attach one terminal clamp of the negative
jumper cable to the negative terminal of
the battery, or to the corresponding engine
or body ground of the vehicle providing as‐
sistance.5.Attach the other end of the cable to the
negative terminal of the battery, or to thecorresponding engine or body ground of
the vehicle to be started.
Starting the engine
Never use spray fluids to start the engine.
1.Start the engine of the assisting vehicle
and let it run for several minutes at an in‐
creased idle speed.
If the vehicle to be started has a diesel en‐
gine: let the engine of the assisting vehicle
run for approx. 10 minutes.2.Start the engine of the vehicle being
started in the usual way.
If the first starting attempt is not success‐
ful, wait a few minutes before making an‐
other attempt in order to allow the dis‐
charged battery to recharge.3.Let both engines run for several minutes.4.Disconnect the jumper cables in the re‐
verse order.
Check the battery and recharge if necessary.
Tow-starting and towing Sport automatic transmission:
transporting your vehicle
Note
Your vehicle is not permitted to be towed.
Therefore, contact a service center in the
event of a breakdown.
Observe in the event of a breakdown
Have the vehicle transported on a load‐
ing platform only, or damage may occur.◀
Seite 253Breakdown assistanceMobility253
Online Edition for Part no. 01 40 2 954 104 - II/15
Page 256 of 289
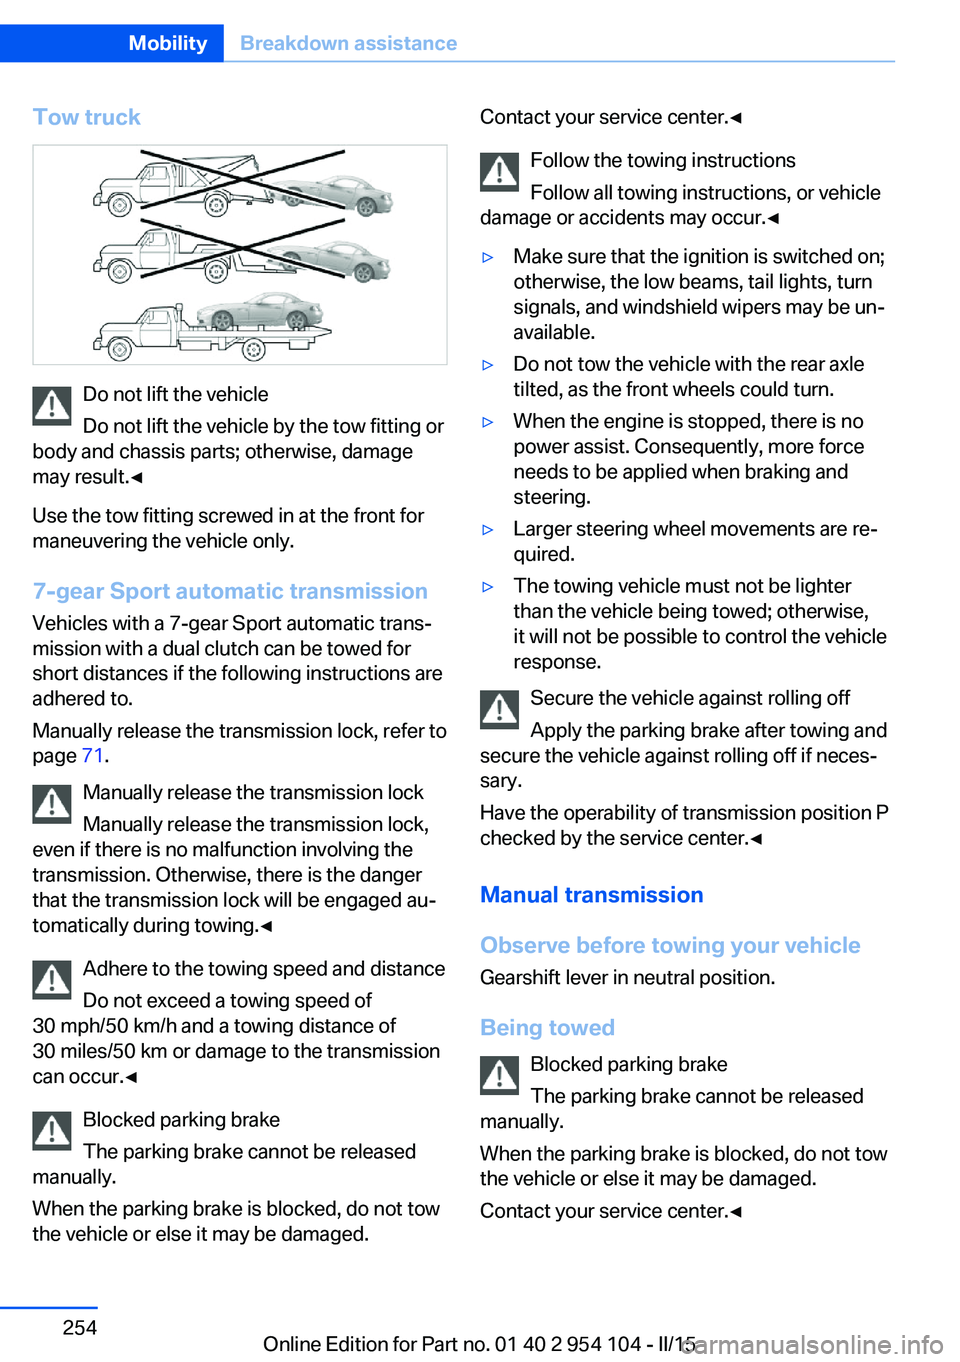
Tow truck
Do not lift the vehicle
Do not lift the vehicle by the tow fitting or
body and chassis parts; otherwise, damage
may result.◀
Use the tow fitting screwed in at the front for
maneuvering the vehicle only.
7-gear Sport automatic transmission
Vehicles with a 7-gear Sport automatic trans‐
mission with a dual clutch can be towed for
short distances if the following instructions are
adhered to.
Manually release the transmission lock, refer to
page 71.
Manually release the transmission lock
Manually release the transmission lock,
even if there is no malfunction involving the
transmission. Otherwise, there is the danger
that the transmission lock will be engaged au‐
tomatically during towing.◀
Adhere to the towing speed and distance
Do not exceed a towing speed of
30 mph/50 km/h and a towing distance of
30 miles/50 km or damage to the transmission
can occur.◀
Blocked parking brake
The parking brake cannot be released
manually.
When the parking brake is blocked, do not tow
the vehicle or else it may be damaged.
Contact your service center.◀
Follow the towing instructions
Follow all towing instructions, or vehicle
damage or accidents may occur.◀▷Make sure that the ignition is switched on;
otherwise, the low beams, tail lights, turn
signals, and windshield wipers may be un‐
available.▷Do not tow the vehicle with the rear axle
tilted, as the front wheels could turn.▷When the engine is stopped, there is no
power assist. Consequently, more force
needs to be applied when braking and
steering.▷Larger steering wheel movements are re‐
quired.▷The towing vehicle must not be lighter
than the vehicle being towed; otherwise,
it will not be possible to control the vehicle
response.
Secure the vehicle against rolling off
Apply the parking brake after towing and
secure the vehicle against rolling off if neces‐
sary.
Have the operability of transmission position P
checked by the service center.◀
Manual transmission
Observe before towing your vehicle Gearshift lever in neutral position.
Being towed Blocked parking brake
The parking brake cannot be released
manually.
When the parking brake is blocked, do not tow
the vehicle or else it may be damaged.
Contact your service center.◀
Seite 254MobilityBreakdown assistance254
Online Edition for Part no. 01 40 2 954 104 - II/15
Page 258 of 289
Tow fitting
The screw-in tow fitting should always be car‐
ried in the vehicle. It can be screwed in at the
front or rear of the BMW.
It is stored in the onboard vehicle tool kit under
the cargo floor panel, refer to page 245.
Tow fitting, information on use▷Use only the tow fitting provided with
the vehicle and screw it all the way in.▷Use the tow fitting for towing on paved
roads only.▷Avoid lateral loading of the tow fitting, e.g.,
do not lift the vehicle by the tow fitting.
Otherwise, damage to the tow fitting and the
vehicle can occur.◀
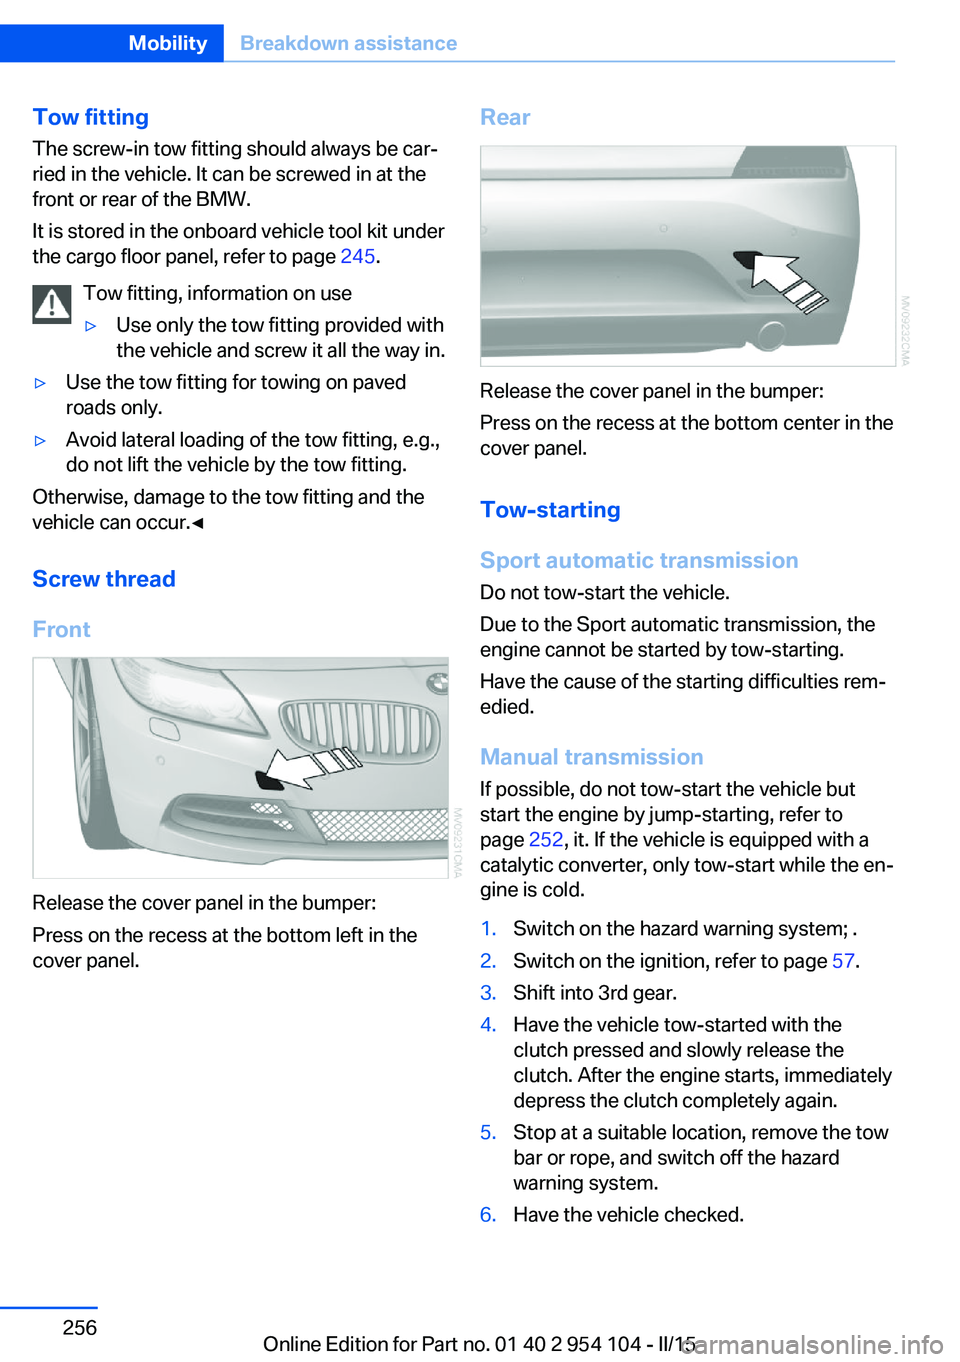
Screw thread
Front
Release the cover panel in the bumper:
Press on the recess at the bottom left in the
cover panel.
Rear
Release the cover panel in the bumper:
Press on the recess at the bottom center in the
cover panel.
Tow-starting
Sport automatic transmission Do not tow-start the vehicle.
Due to the Sport automatic transmission, the
engine cannot be started by tow-starting.
Have the cause of the starting difficulties rem‐
edied.
Manual transmission If possible, do not tow-start the vehicle but
start the engine by jump-starting, refer to
page 252, it. If the vehicle is equipped with a
catalytic converter, only tow-start while the en‐
gine is cold.
1.Switch on the hazard warning system; .2.Switch on the ignition, refer to page 57.3.Shift into 3rd gear.4.Have the vehicle tow-started with the
clutch pressed and slowly release the
clutch. After the engine starts, immediately
depress the clutch completely again.5.Stop at a suitable location, remove the tow
bar or rope, and switch off the hazard
warning system.6.Have the vehicle checked.Seite 256MobilityBreakdown assistance256
Online Edition for Part no. 01 40 2 954 104 - II/15
Page 259 of 289

CareVehicle equipmentThis chapter describes all series equipment as
well as country-specific and special equipment
offered for this model series. Therefore, it also
describes equipment that may not be found in
your vehicle, for instance due to the selected
special equipment or the country version. This
also applies to safety-related functions and
systems.
When using the features and systems descri‐
bed here, adhere to local regulations.
Car washes Notes Steam jets or high-pressure washers
When using steam jets or high-pressure
washers, hold them a sufficient distance away
and use a maximum temperature of
140 ℉/60 ℃.
Holding them too close or using excessively
high pressures or temperatures can cause
damage or preliminary damage that may then
lead to long-term damage.
Follow the operating instructions for the high-
pressure washer.◀
Cleaning sensors/cameras with high-
pressure washers
When using high-pressure washers, do not
spray the seals of the retractable hardtop and
the exterior sensors and cameras, for Park Dis‐
tance Control, for instance, for extended peri‐
ods of time and only from a distance of at least
12 in/30 cm.◀
Regularly remove foreign bodies, such as
leaves, from the area below the windshield
when the hood is open.Wash your vehicle frequently, particularly in
winter.
Intense soiling and road salt can damage the
vehicle.
Washing in automatic car washes Give preference to cloth car washes or those
that use soft brushes in order to avoid paint damage.
Notes Note the following:▷Make sure that the wheels and tires are not
damaged by the transport mechanisms.▷Fold in the exterior mirrors; otherwise, they
may be damaged, depending on the width
of the vehicle.▷Deactivate the rain sensor, refer to
page 64, to avoid unintentional wiper acti‐
vation.▷Unscrew the road antenna.
Guide rails in car washes
Avoid car washes with guide rails higher
than 4 in/10 cm; otherwise, the vehicle body
could be damaged.◀
Before driving into a car wash The vehicle is able to roll if the following steps
are taken.
Manual transmission
1.Shift to neutral.2.Release the parking brake, refer to
page 61.3.Switch the engine off.4.Leave the remote control in the ignition
lock.Seite 257CareMobility257
Online Edition for Part no. 01 40 2 954 104 - II/15