2015 BMW Z4 SDRIVE35IS tow
[x] Cancel search: towPage 249 of 289
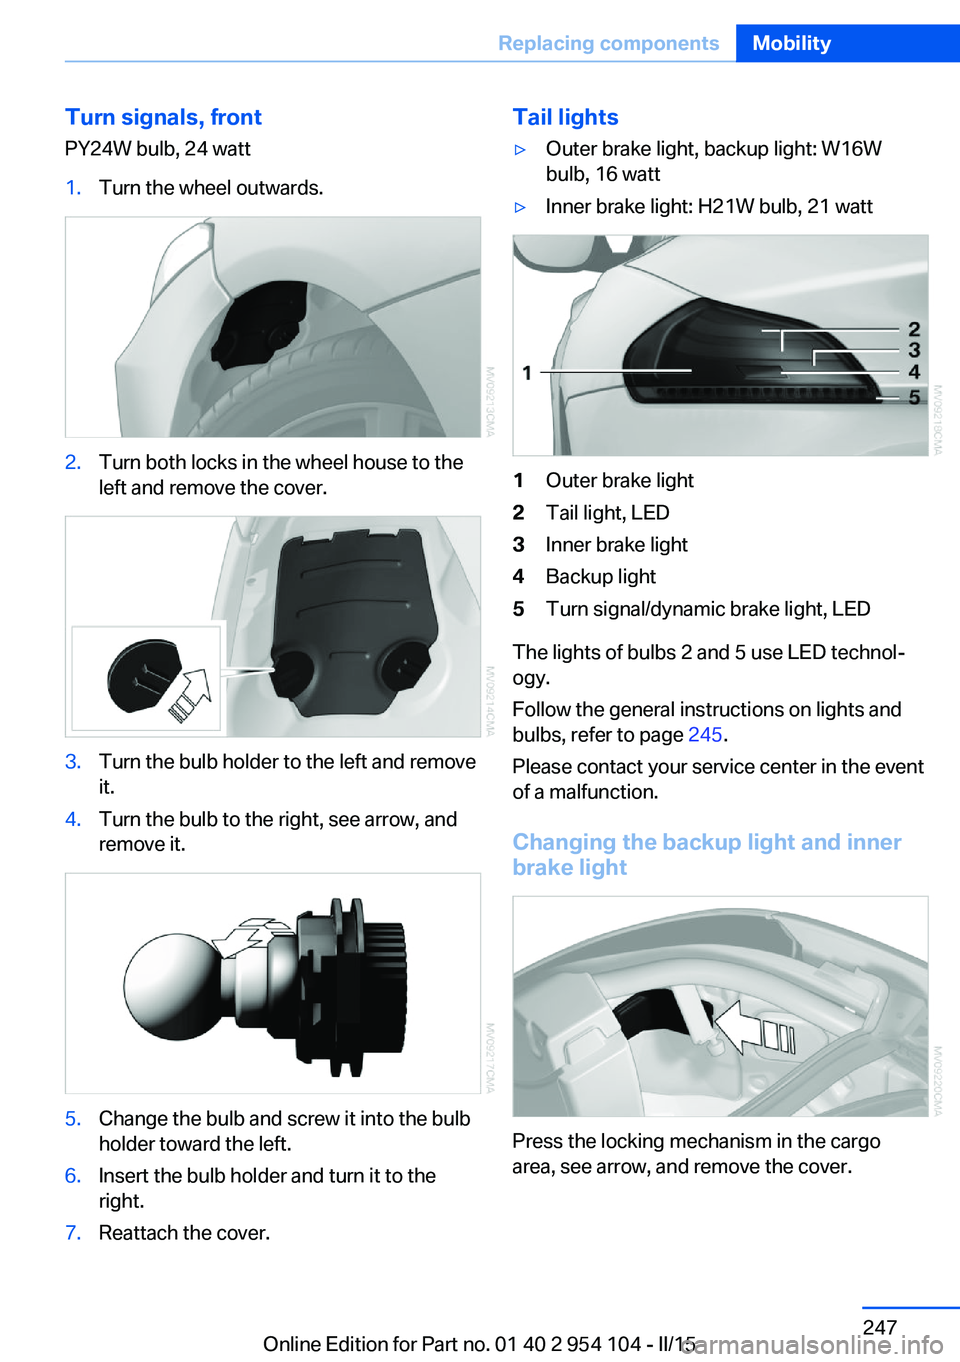
Turn signals, frontPY24W bulb, 24 watt1.Turn the wheel outwards.2.Turn both locks in the wheel house to the
left and remove the cover.3.Turn the bulb holder to the left and remove
it.4.Turn the bulb to the right, see arrow, and
remove it.5.Change the bulb and screw it into the bulb
holder toward the left.6.Insert the bulb holder and turn it to the
right.7.Reattach the cover.Tail lights▷Outer brake light, backup light: W16W
bulb, 16 watt▷Inner brake light: H21W bulb, 21 watt1Outer brake light2Tail light, LED3Inner brake light4Backup light5Turn signal/dynamic brake light, LED
The lights of bulbs 2 and 5 use LED technol‐
ogy.
Follow the general instructions on lights and
bulbs, refer to page 245.
Please contact your service center in the event
of a malfunction.
Changing the backup light and inner brake light
Press the locking mechanism in the cargo
area, see arrow, and remove the cover.
Seite 247Replacing componentsMobility247
Online Edition for Part no. 01 40 2 954 104 - II/15
Page 255 of 289
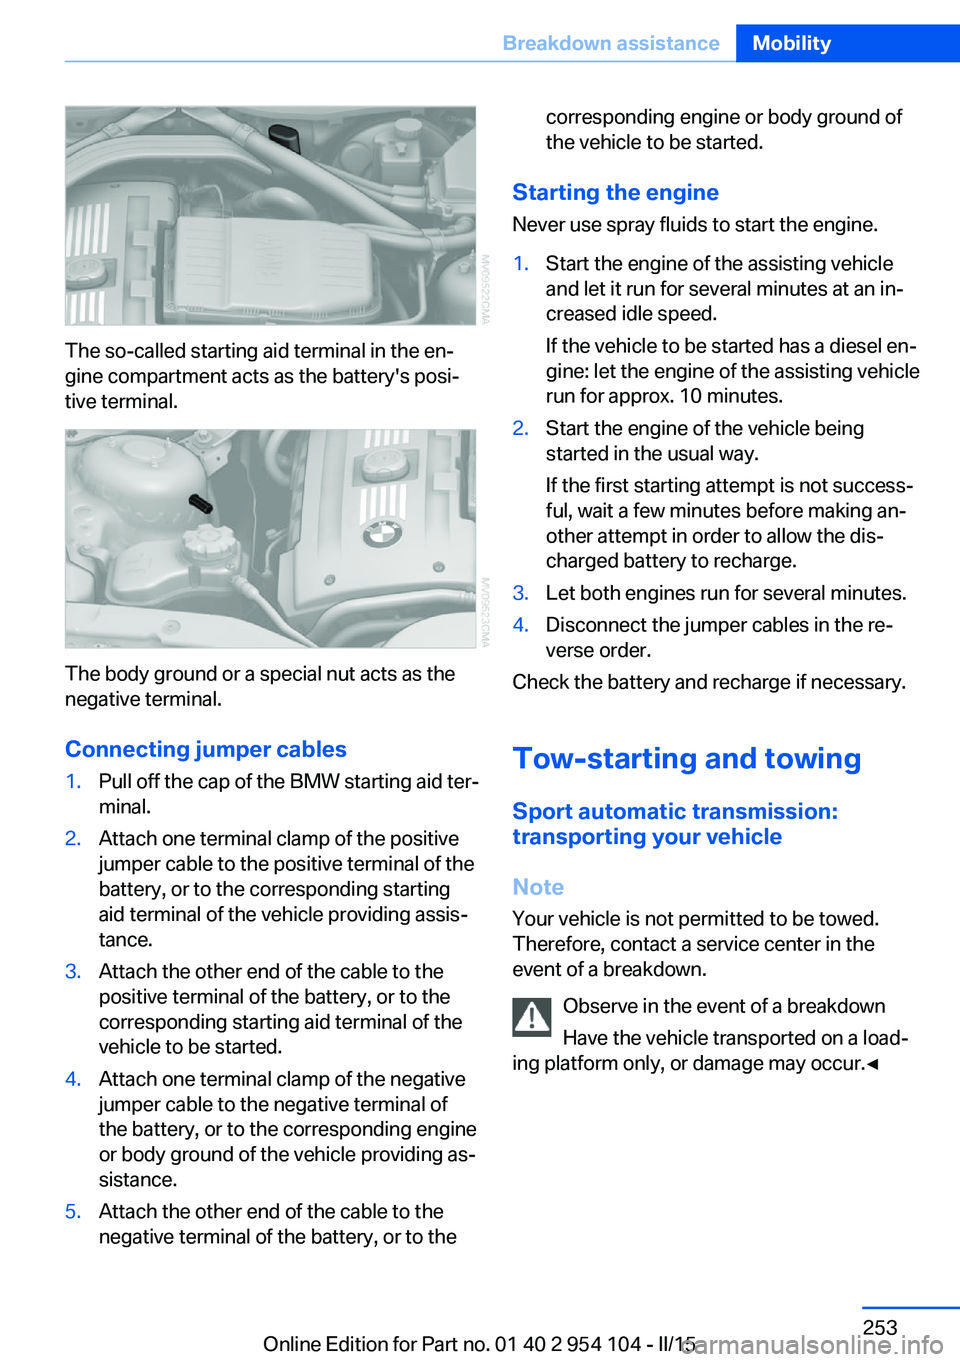
The so-called starting aid terminal in the en‐
gine compartment acts as the battery's posi‐
tive terminal.
The body ground or a special nut acts as the
negative terminal.
Connecting jumper cables
1.Pull off the cap of the BMW starting aid ter‐
minal.2.Attach one terminal clamp of the positive
jumper cable to the positive terminal of the
battery, or to the corresponding starting
aid terminal of the vehicle providing assis‐
tance.3.Attach the other end of the cable to the
positive terminal of the battery, or to the
corresponding starting aid terminal of the
vehicle to be started.4.Attach one terminal clamp of the negative
jumper cable to the negative terminal of
the battery, or to the corresponding engine
or body ground of the vehicle providing as‐
sistance.5.Attach the other end of the cable to the
negative terminal of the battery, or to thecorresponding engine or body ground of
the vehicle to be started.
Starting the engine
Never use spray fluids to start the engine.
1.Start the engine of the assisting vehicle
and let it run for several minutes at an in‐
creased idle speed.
If the vehicle to be started has a diesel en‐
gine: let the engine of the assisting vehicle
run for approx. 10 minutes.2.Start the engine of the vehicle being
started in the usual way.
If the first starting attempt is not success‐
ful, wait a few minutes before making an‐
other attempt in order to allow the dis‐
charged battery to recharge.3.Let both engines run for several minutes.4.Disconnect the jumper cables in the re‐
verse order.
Check the battery and recharge if necessary.
Tow-starting and towing Sport automatic transmission:
transporting your vehicle
Note
Your vehicle is not permitted to be towed.
Therefore, contact a service center in the
event of a breakdown.
Observe in the event of a breakdown
Have the vehicle transported on a load‐
ing platform only, or damage may occur.◀
Seite 253Breakdown assistanceMobility253
Online Edition for Part no. 01 40 2 954 104 - II/15
Page 256 of 289
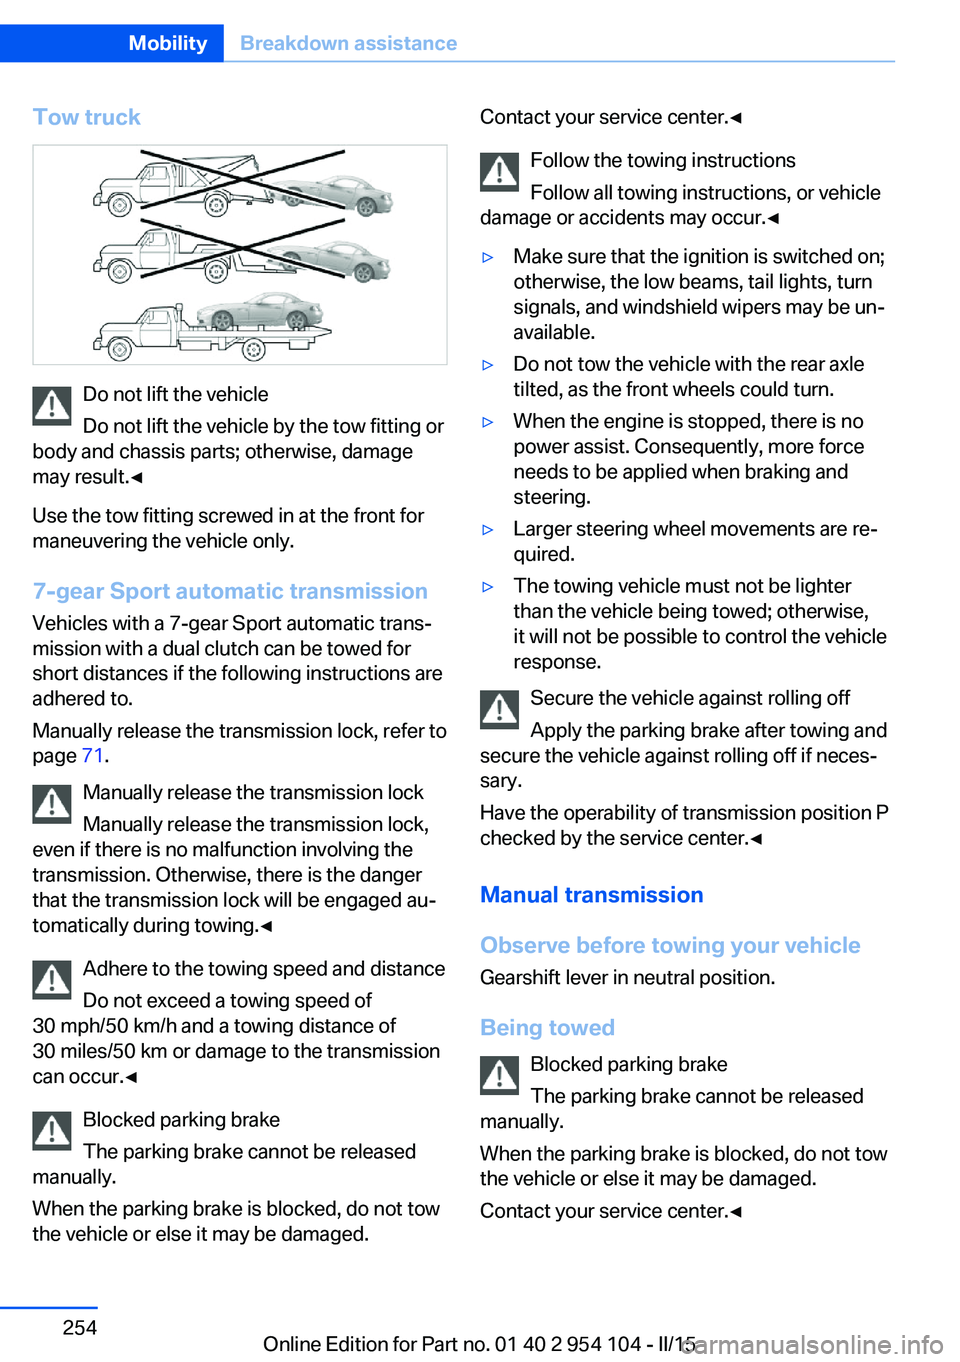
Tow truck
Do not lift the vehicle
Do not lift the vehicle by the tow fitting or
body and chassis parts; otherwise, damage
may result.◀
Use the tow fitting screwed in at the front for
maneuvering the vehicle only.
7-gear Sport automatic transmission
Vehicles with a 7-gear Sport automatic trans‐
mission with a dual clutch can be towed for
short distances if the following instructions are
adhered to.
Manually release the transmission lock, refer to
page 71.
Manually release the transmission lock
Manually release the transmission lock,
even if there is no malfunction involving the
transmission. Otherwise, there is the danger
that the transmission lock will be engaged au‐
tomatically during towing.◀
Adhere to the towing speed and distance
Do not exceed a towing speed of
30 mph/50 km/h and a towing distance of
30 miles/50 km or damage to the transmission
can occur.◀
Blocked parking brake
The parking brake cannot be released
manually.
When the parking brake is blocked, do not tow
the vehicle or else it may be damaged.
Contact your service center.◀
Follow the towing instructions
Follow all towing instructions, or vehicle
damage or accidents may occur.◀▷Make sure that the ignition is switched on;
otherwise, the low beams, tail lights, turn
signals, and windshield wipers may be un‐
available.▷Do not tow the vehicle with the rear axle
tilted, as the front wheels could turn.▷When the engine is stopped, there is no
power assist. Consequently, more force
needs to be applied when braking and
steering.▷Larger steering wheel movements are re‐
quired.▷The towing vehicle must not be lighter
than the vehicle being towed; otherwise,
it will not be possible to control the vehicle
response.
Secure the vehicle against rolling off
Apply the parking brake after towing and
secure the vehicle against rolling off if neces‐
sary.
Have the operability of transmission position P
checked by the service center.◀
Manual transmission
Observe before towing your vehicle Gearshift lever in neutral position.
Being towed Blocked parking brake
The parking brake cannot be released
manually.
When the parking brake is blocked, do not tow
the vehicle or else it may be damaged.
Contact your service center.◀
Seite 254MobilityBreakdown assistance254
Online Edition for Part no. 01 40 2 954 104 - II/15
Page 257 of 289
Follow the towing instructions
Follow all towing instructions, or vehicle
damage or accidents may occur.◀▷Make sure that the ignition is switched on;
otherwise, the low beams, tail lights, turn
signals, and windshield wipers may be un‐
available.▷Do not tow the vehicle with the rear axle
tilted, as the front wheels could turn.▷When the engine is stopped, there is no
power assist. Consequently, more force
needs to be applied when braking and
steering.▷Larger steering wheel movements are re‐
quired.▷The towing vehicle must not be lighter
than the vehicle being towed; otherwise,
it will not be possible to control the vehicle
response.
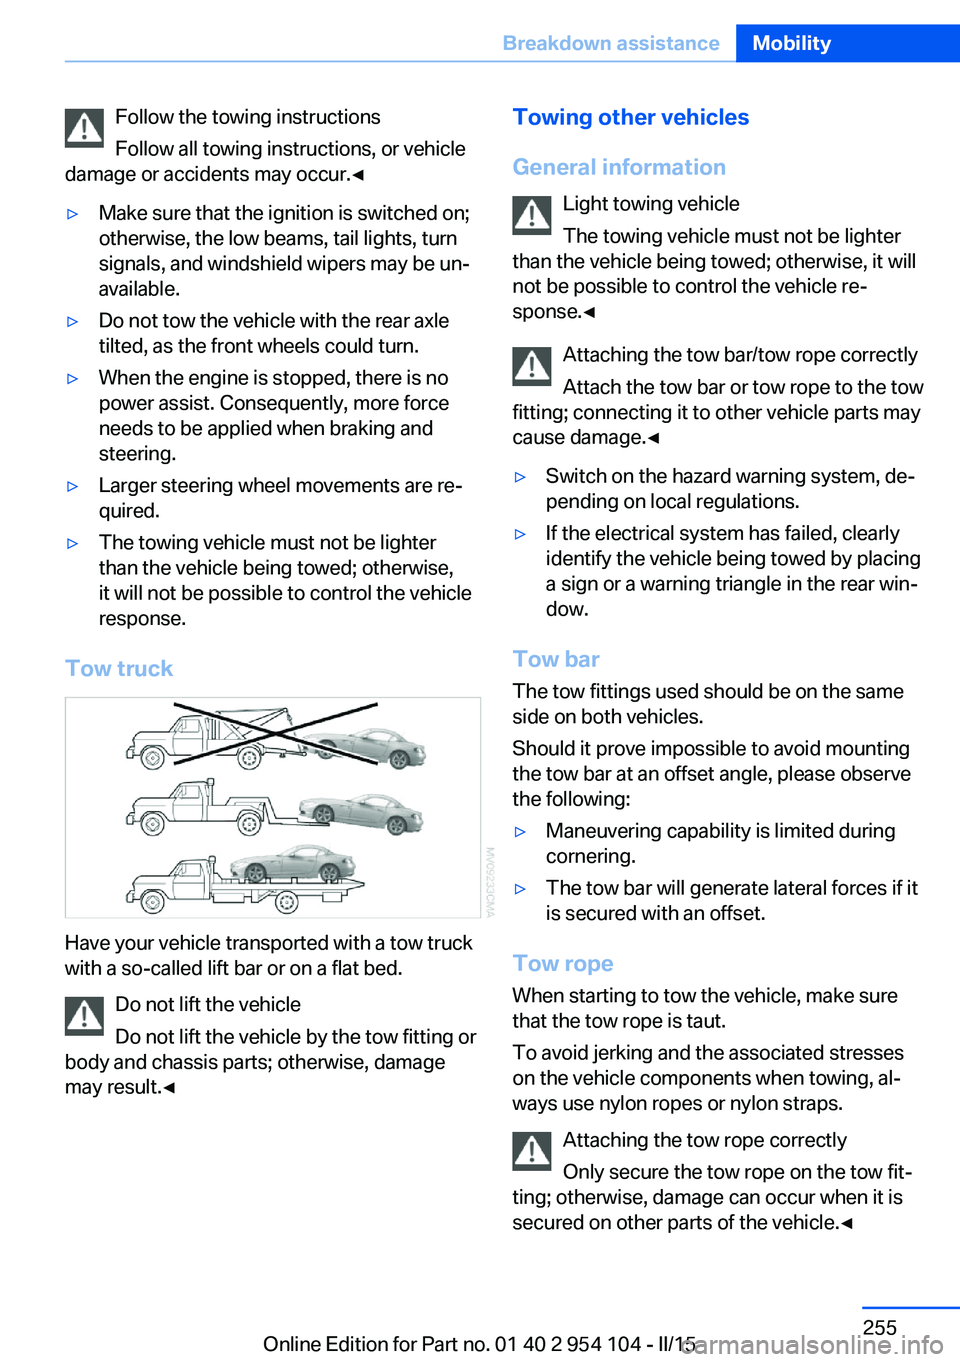
Tow truck
Have your vehicle transported with a tow truck
with a so-called lift bar or on a flat bed.
Do not lift the vehicle
Do not lift the vehicle by the tow fitting or
body and chassis parts; otherwise, damage
may result.◀
Towing other vehicles
General information Light towing vehicle
The towing vehicle must not be lighter
than the vehicle being towed; otherwise, it will
not be possible to control the vehicle re‐
sponse.◀
Attaching the tow bar/tow rope correctly
Attach the tow bar or tow rope to the tow
fitting; connecting it to other vehicle parts may
cause damage.◀▷Switch on the hazard warning system, de‐
pending on local regulations.▷If the electrical system has failed, clearly
identify the vehicle being towed by placing
a sign or a warning triangle in the rear win‐
dow.
Tow bar
The tow fittings used should be on the same
side on both vehicles.
Should it prove impossible to avoid mounting
the tow bar at an offset angle, please observe
the following:
▷Maneuvering capability is limited during
cornering.▷The tow bar will generate lateral forces if it
is secured with an offset.
Tow rope
When starting to tow the vehicle, make sure
that the tow rope is taut.
To avoid jerking and the associated stresses
on the vehicle components when towing, al‐
ways use nylon ropes or nylon straps.
Attaching the tow rope correctly
Only secure the tow rope on the tow fit‐
ting; otherwise, damage can occur when it is
secured on other parts of the vehicle.◀
Seite 255Breakdown assistanceMobility255
Online Edition for Part no. 01 40 2 954 104 - II/15
Page 258 of 289
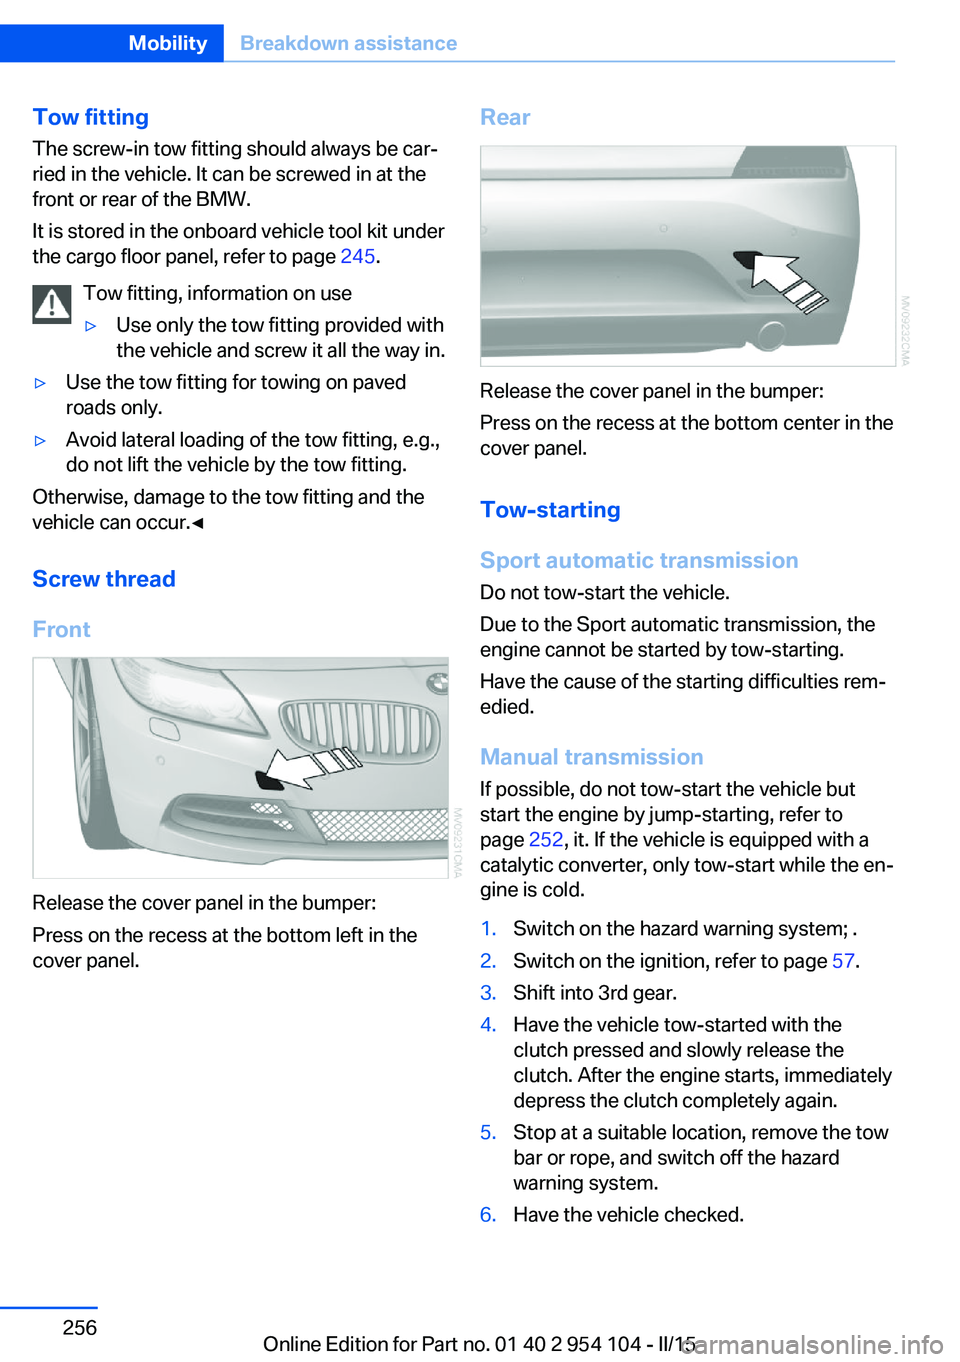
Tow fitting
The screw-in tow fitting should always be car‐
ried in the vehicle. It can be screwed in at the
front or rear of the BMW.
It is stored in the onboard vehicle tool kit under
the cargo floor panel, refer to page 245.
Tow fitting, information on use▷Use only the tow fitting provided with
the vehicle and screw it all the way in.▷Use the tow fitting for towing on paved
roads only.▷Avoid lateral loading of the tow fitting, e.g.,
do not lift the vehicle by the tow fitting.
Otherwise, damage to the tow fitting and the
vehicle can occur.◀
Screw thread
Front
Release the cover panel in the bumper:
Press on the recess at the bottom left in the
cover panel.
Rear
Release the cover panel in the bumper:
Press on the recess at the bottom center in the
cover panel.
Tow-starting
Sport automatic transmission Do not tow-start the vehicle.
Due to the Sport automatic transmission, the
engine cannot be started by tow-starting.
Have the cause of the starting difficulties rem‐
edied.
Manual transmission If possible, do not tow-start the vehicle but
start the engine by jump-starting, refer to
page 252, it. If the vehicle is equipped with a
catalytic converter, only tow-start while the en‐
gine is cold.
1.Switch on the hazard warning system; .2.Switch on the ignition, refer to page 57.3.Shift into 3rd gear.4.Have the vehicle tow-started with the
clutch pressed and slowly release the
clutch. After the engine starts, immediately
depress the clutch completely again.5.Stop at a suitable location, remove the tow
bar or rope, and switch off the hazard
warning system.6.Have the vehicle checked.Seite 256MobilityBreakdown assistance256
Online Edition for Part no. 01 40 2 954 104 - II/15
Page 269 of 289
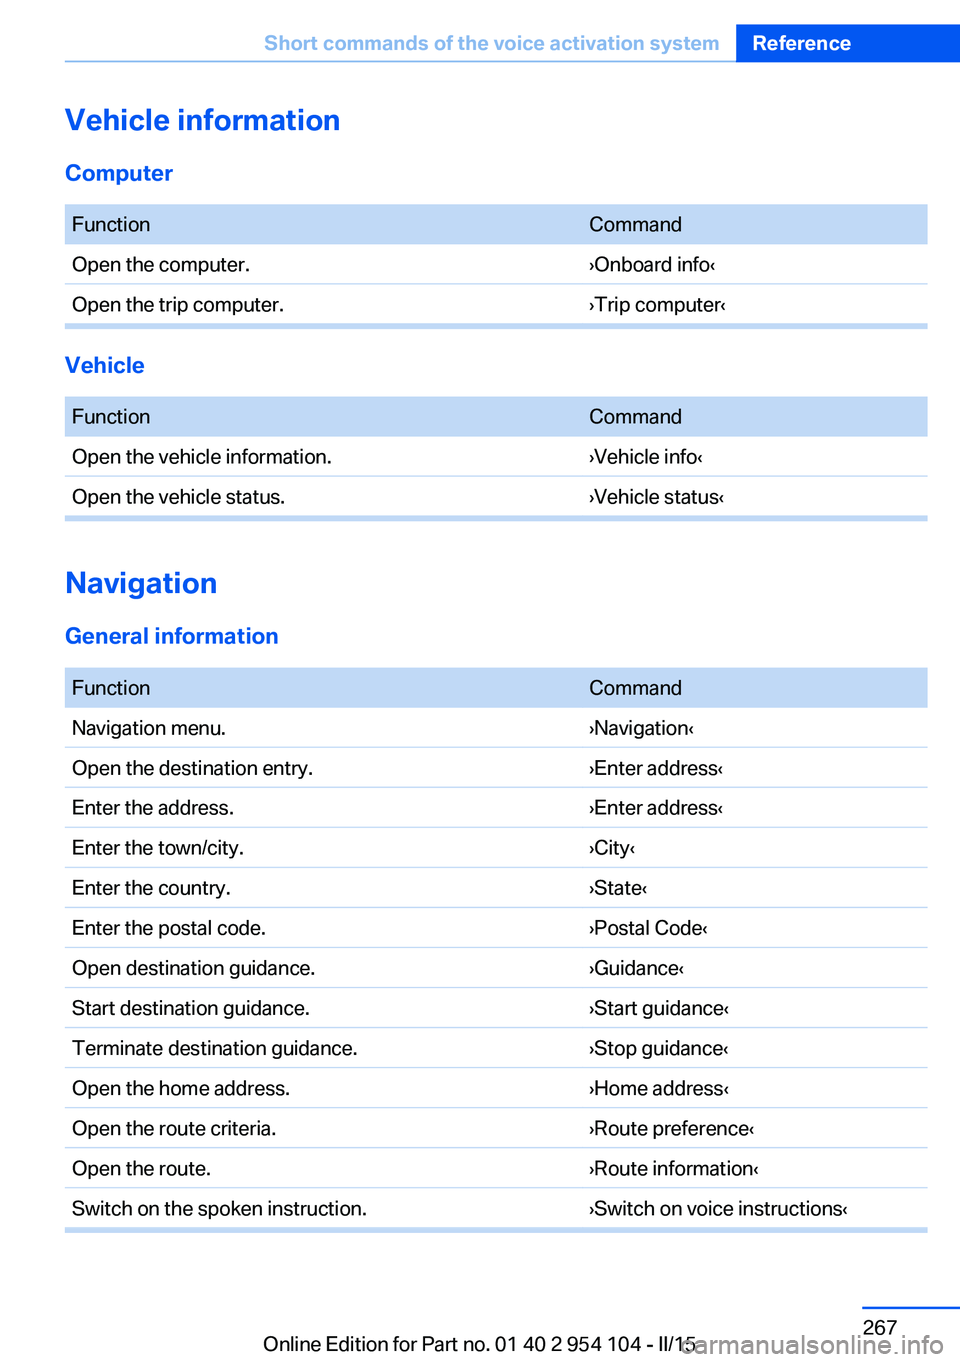
Vehicle information
Computer FunctionCommandOpen the computer.›Onboard info‹Open the trip computer.›Trip computer‹
Vehicle
FunctionCommandOpen the vehicle information.›Vehicle info‹Open the vehicle status.›Vehicle status‹
Navigation
General information
FunctionCommandNavigation menu.›Navigation‹Open the destination entry.›Enter address‹Enter the address.›Enter address‹Enter the town/city.›City‹Enter the country.›State‹Enter the postal code.›Postal Code‹Open destination guidance.›Guidance‹Start destination guidance.›Start guidance‹Terminate destination guidance.›Stop guidance‹Open the home address.›Home address‹Open the route criteria.›Route preference‹Open the route.›Route information‹Switch on the spoken instruction.›Switch on voice instructions‹Seite 267Short commands of the voice activation systemReference267
Online Edition for Part no. 01 40 2 954 104 - II/15
Page 281 of 289

Headlamp control, auto‐matic 88
Headlamps, care 258
Headlamps, cleaning 64
Headlight courtesy delay fea‐ ture 88
Headlight flasher 62
Headlight flasher, indicator lamp 17
Headliner 19
Heatable mirrors 53
Heatable rear win‐ dow 111, 114
Heating 109
Heating, mirrors 53
Heating, seats 50
Heavy cargo, stowing 133
Height adjustment, seats 48
Height adjustment, steering wheel 54
Height, refer to Dimen‐ sions 264
High-beam Assistant 89
High-beams 62
High-beams/low beams, refer to High-beam Assistant 89
High beams, headlight flasher 89
High-beams, indicator lamp 17
High-pressure washers 257
Hills 132
Hill start assistant, refer to Drive-off assistant 104
Holder for beverages 126
Holder for remote control, re‐ fer to Ignition lock 57
Homepage 6
Hood 238
Horn 14
Hot exhaust system 131
Hotline 219
House number, entering for navigation 143
Hydroplaning 131 I
Ice warning, refer to External temperature warning 73
Icy roads, refer to External temperature warning 73
Identification marks, tires 231
iDrive 20
iDrive, changing the date and time 78
iDrive, changing the units of measure and display for‐
mat 78
Ignition 58
Ignition key position 1, refer to Radio ready state 58
Ignition key position 2, refer to Ignition on 58
Ignition key, refer to Remote control with integrated
key 32
Ignition lock 57
Ignition, switched off 58
Ignition, switched on 58
Indication of a flat tire 95
Indicator and warning lamps, Tire Pressure Monitor
TPM 98
Indicator and warning lights 17
Individual air distribution 111
Inflation pressure, refer to Tire inflation pressure 228
Inflation pressure warning, tires 94
Information on the navigation data 140
Initializing, compass, refer to Calibrating 119
Initializing, Flat Tire Monitor FTM 95
Installation location, tele‐ phone 124
Instrument cluster 16
Instrument lighting 90 Instrument panel, refer to In‐
strument cluster 16
Instruments, refer to Cock‐ pit 14
Integrated key 32
Integrated universal remote control 116
Interactive map 147
Interior equipment 116
Interior lights 91
Interior lights, remote con‐ trol 35
Interior mirror 53
Interior motion sensor 42
Interior rearview mirror, auto‐ matic dimming 53
Interior rearview mirror, com‐ pass 118
Interior temperature, setting, refer to Air conditioner 110
Interior temperature, setting, refer to Automatic climate
control 112
Intermediate destina‐ tions 149
Intermittent wipe 63
Internet page 6
Intersection, entering for navi‐ gation 143
Interval display, service re‐ quirements 80
J Jacking points 249
Joystick, refer to iDrive 20
K
Keyless Go, refer to Comfort Access 39
Keyless opening and closing, refer to Comfort Access 39
Key Memory, refer to Per‐ sonal Profile 32 Seite 279Everything from A to ZReference279
Online Edition for Part no. 01 40 2 954 104 - II/15
Page 286 of 289

Telephone, installation loca‐tion, refer to Center arm‐
rest 124
TeleService 217
Temperature, air condi‐ tioner 110
Temperature, automatic cli‐ mate control 112
Temperature, changing the unit of measure 78
Temperature, coolant 74
Temperature display, external temperature 73
Temperature display, external temperature warning 73
Temperature display, setting the units 78
Temperature, engine oil 74
Text messages 208
Theft alarm system, refer to Alarm system 41
Thigh support adjustment 49
Third brake light, refer to Center brake light 248
Through-loading opening with integrated transport
bag 121
Tilt alarm sensor 42
Tilting the passenger side mirror 52
Time, setting the time 78
Tire age 232
Tire damage 233
Tire identification marks 231
Tire inflation pressure 228
Tire inflation pressure, pres‐ sure loss 97
Tire pressure monitoring, re‐ fer to FTM 94
Tire Pressure Monitor TPM 96
Tire Pressure Monitor TPM, system reset 97
Tire Pressure Monitor TPM, warning lamp 98
Tire Quality Grading 232 Tires, changing 234
Tires, flat tire 249
Tire size 231
Tires, run-flat tires 234
Tires, Tire Pressure Monitor TPM 96
Tire tread 233
Toll roads, route 151
Tone 162
Tool kit, refer to Onboard ve‐ hicle tool kit 245
Tools, refer to Onboard vehi‐ cle tool kit 245
Towing 253
Town/city, navigation 143
Tow-starting 253
TPM Tire Pressure Moni‐ tor 96
Traction control 102
TRACTION program, Dy‐ namic Driving Control 103
Traffic bulletins, naviga‐ tion 155
Transmission, 7-gear auto‐ matic transmission with dual
clutch 68
Transmission, 8-gear auto‐ matic transmission 66
Transmission lock, unlocking manually 71
Transmission lock, unlocking manually, with 7-gear auto‐
matic transmission 71
Transmission, manual trans‐ mission 65
Transmission positions, 7- gear automatic transmis‐
sion 68
Transmission positions, 8- gear automatic transmis‐
sion 66
Transmission, unlocking transmission lock manually,
for 7-gear automatic trans‐
mission 71 Transporting children
safely 55
Tread depth, tires 233
Tread, tires 233
Treble, tone 162
Trip-distance counter, refer to Trip odometer 73
Triple turn signal activa‐ tion 62
Trip odometer 73
Trips, planning 149
Trunk lid 38
Trunk lid, Comfort Access 40
Trunk lid, emergency unlock‐ ing 39
Trunk lid, opening from the inside 38
Trunk lid, opening from the outside 38
Turning circle, refer to Dimen‐ sions 264
Turn signal, indicator/warning lamp 16
Turn signals 62
Turn signals, bulb replace‐ ment, front 247
Turn signals, triple turn signal activation 62
U Uniform Tire Quality Grading/ UTQG 232
Unintentional alarms 42
Units, average fuel consump‐ tion 78
Units of measure, changing on the Control Display 78
Units, temperature 78
Universal remote control 116
Unlocking, from the inside 38
Unlocking, from the out‐ side 34
Unlocking, hood 238
Unlocking, setting the unlock‐ ing characteristics 34 Seite 284ReferenceEverything from A to Z284
Online Edition for Part no. 01 40 2 954 104 - II/15