2015 BMW Z4 SDRIVE35IS ECU
[x] Cancel search: ECUPage 135 of 289
inside the tires. This could result in a sudden
loss of tire inflation pressure.◀
Secure heavy objects
Never transport unsecured heavy or hard
objects in the passenger compartment, as they
could be thrown around and pose a safety haz‐
ard to the vehicle's occupants during abrupt
braking or evasive maneuvers.◀
No fluids in the cargo area
Make sure that fluids do not leak into the
cargo area; otherwise, the vehicle may be dam‐
aged.◀
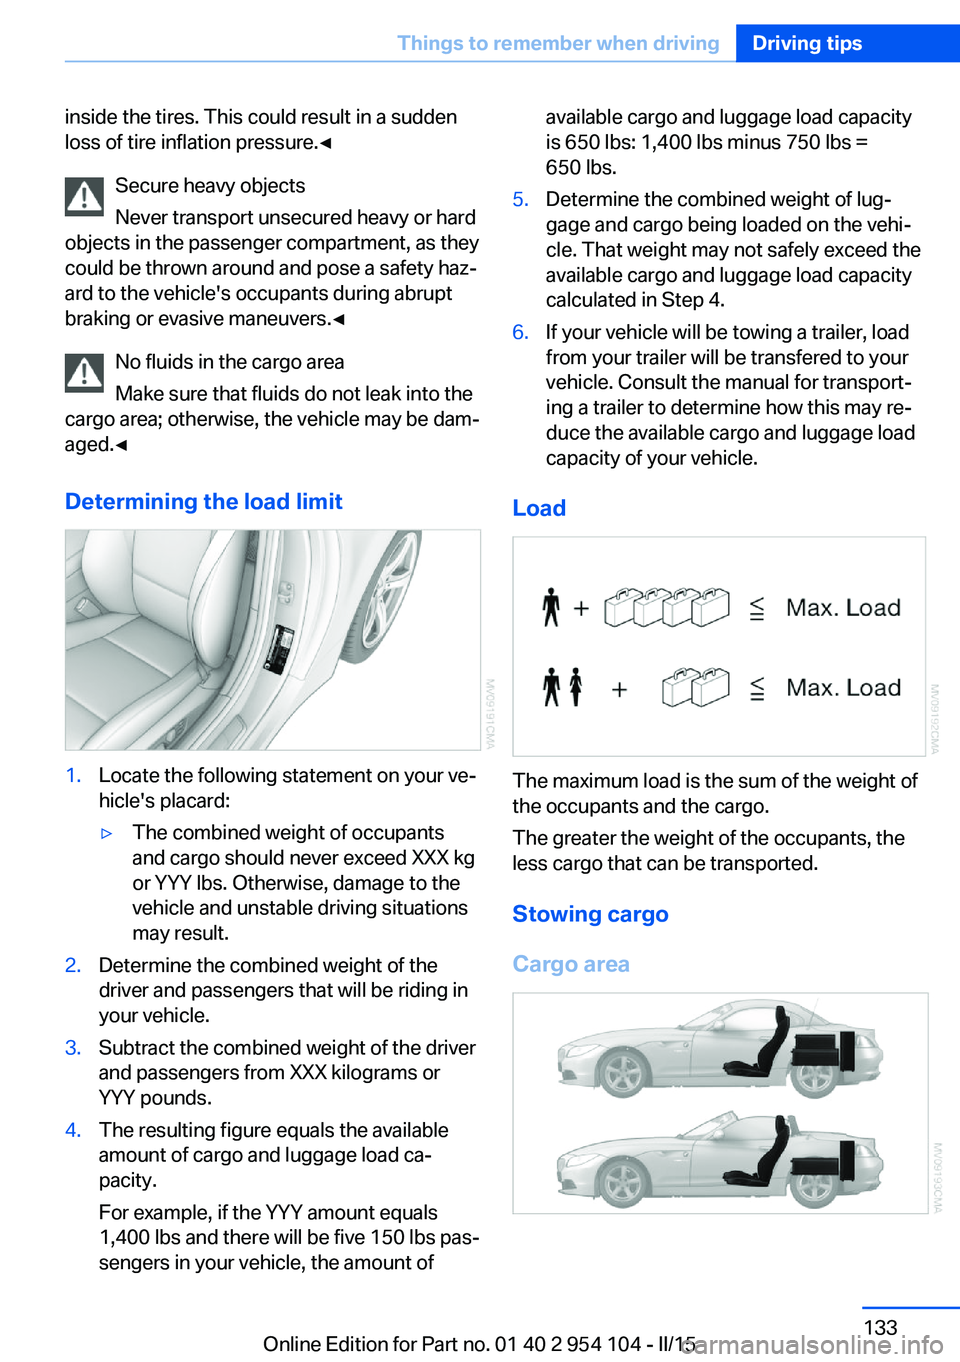
Determining the load limit1.Locate the following statement on your ve‐
hicle's placard:▷The combined weight of occupants
and cargo should never exceed XXX kg
or YYY lbs. Otherwise, damage to the
vehicle and unstable driving situations
may result.2.Determine the combined weight of the
driver and passengers that will be riding in
your vehicle.3.Subtract the combined weight of the driver
and passengers from XXX kilograms or
YYY pounds.4.The resulting figure equals the available
amount of cargo and luggage load ca‐
pacity.
For example, if the YYY amount equals
1,400 lbs and there will be five 150 lbs pas‐
sengers in your vehicle, the amount ofavailable cargo and luggage load capacity
is 650 lbs: 1,400 lbs minus 750 lbs =
650 lbs.5.Determine the combined weight of lug‐
gage and cargo being loaded on the vehi‐
cle. That weight may not safely exceed the
available cargo and luggage load capacity
calculated in Step 4.6.If your vehicle will be towing a trailer, load
from your trailer will be transfered to your
vehicle. Consult the manual for transport‐
ing a trailer to determine how this may re‐
duce the available cargo and luggage load
capacity of your vehicle.
Load
The maximum load is the sum of the weight of
the occupants and the cargo.
The greater the weight of the occupants, the
less cargo that can be transported.
Stowing cargo
Cargo area
Seite 133Things to remember when drivingDriving tips133
Online Edition for Part no. 01 40 2 954 104 - II/15
Page 136 of 289
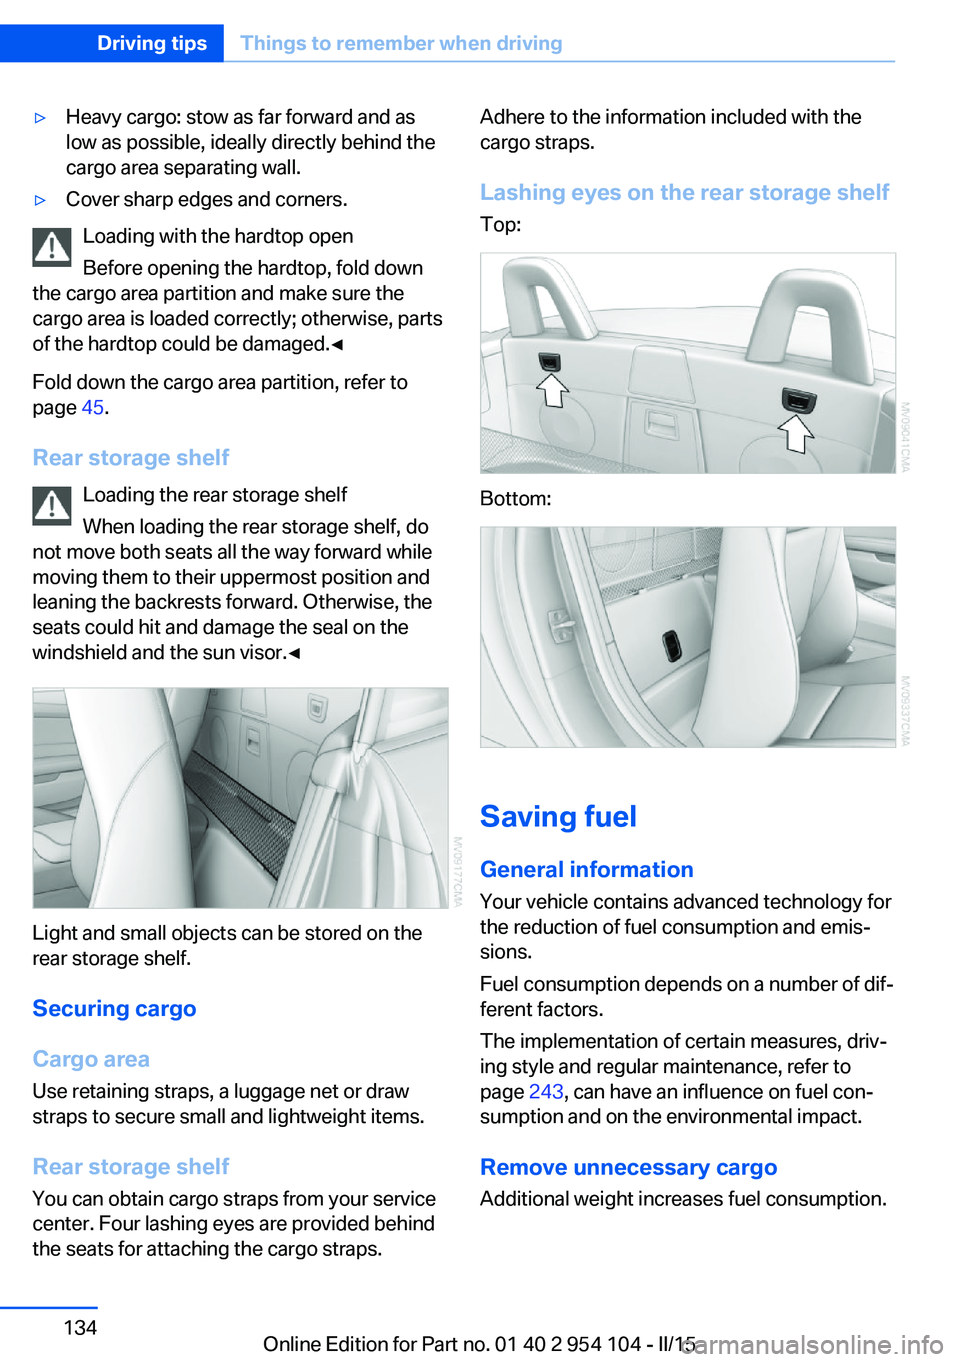
▷Heavy cargo: stow as far forward and as
low as possible, ideally directly behind the
cargo area separating wall.▷Cover sharp edges and corners.
Loading with the hardtop open
Before opening the hardtop, fold down
the cargo area partition and make sure the
cargo area is loaded correctly; otherwise, parts
of the hardtop could be damaged.◀
Fold down the cargo area partition, refer to
page 45.
Rear storage shelf Loading the rear storage shelf
When loading the rear storage shelf, do
not move both seats all the way forward while
moving them to their uppermost position and
leaning the backrests forward. Otherwise, the
seats could hit and damage the seal on the
windshield and the sun visor.◀
Light and small objects can be stored on the
rear storage shelf.
Securing cargo
Cargo area
Use retaining straps, a luggage net or draw
straps to secure small and lightweight items.
Rear storage shelf You can obtain cargo straps from your service
center. Four lashing eyes are provided behind
the seats for attaching the cargo straps.
Adhere to the information included with the
cargo straps.
Lashing eyes on the rear storage shelf
Top:
Bottom:
Saving fuel
General information
Your vehicle contains advanced technology for
the reduction of fuel consumption and emis‐
sions.
Fuel consumption depends on a number of dif‐
ferent factors.
The implementation of certain measures, driv‐
ing style and regular maintenance, refer to
page 243, can have an influence on fuel con‐
sumption and on the environmental impact.
Remove unnecessary cargo
Additional weight increases fuel consumption.
Seite 134Driving tipsThings to remember when driving134
Online Edition for Part no. 01 40 2 954 104 - II/15
Page 197 of 289
A software update, refer to page 189, can be
performed if necessary.
Notes At high temperatures, the charging function of
the mobile phone may be limited and functions
may not be executed.
When using the mobile phone via the vehicle,
note the operating instructions of the mobile
phone.
Pairing/unpairing the mobile
phone
General information The following functions are available:▷Use of a mobile phone as a telephone.▷Use of a mobile phone as an additional te‐
lephone.▷Use of a mobile phone as an audio source.▷Use of an audio device as an audio source,
refer to page 185.
Requirements
▷The mobile phone is suitable, refer to
page 194.▷The mobile phone is ready for operation.▷Bluetooth is activated in the vehicle and on
the mobile phone.▷Bluetooth presettings may need to be
made on the mobile phone, e.g., for a con‐
nection without confirmation or visibility,
refer to the mobile phone operating in‐
structions.▷Deactivate Bluetooth audio if necessary.▷A number with at least four and a maximum
of 16 digits was defined as the Bluetooth
passkey. It is only required once for pairing.▷The ignition is switched on.Activating/deactivating Bluetooth
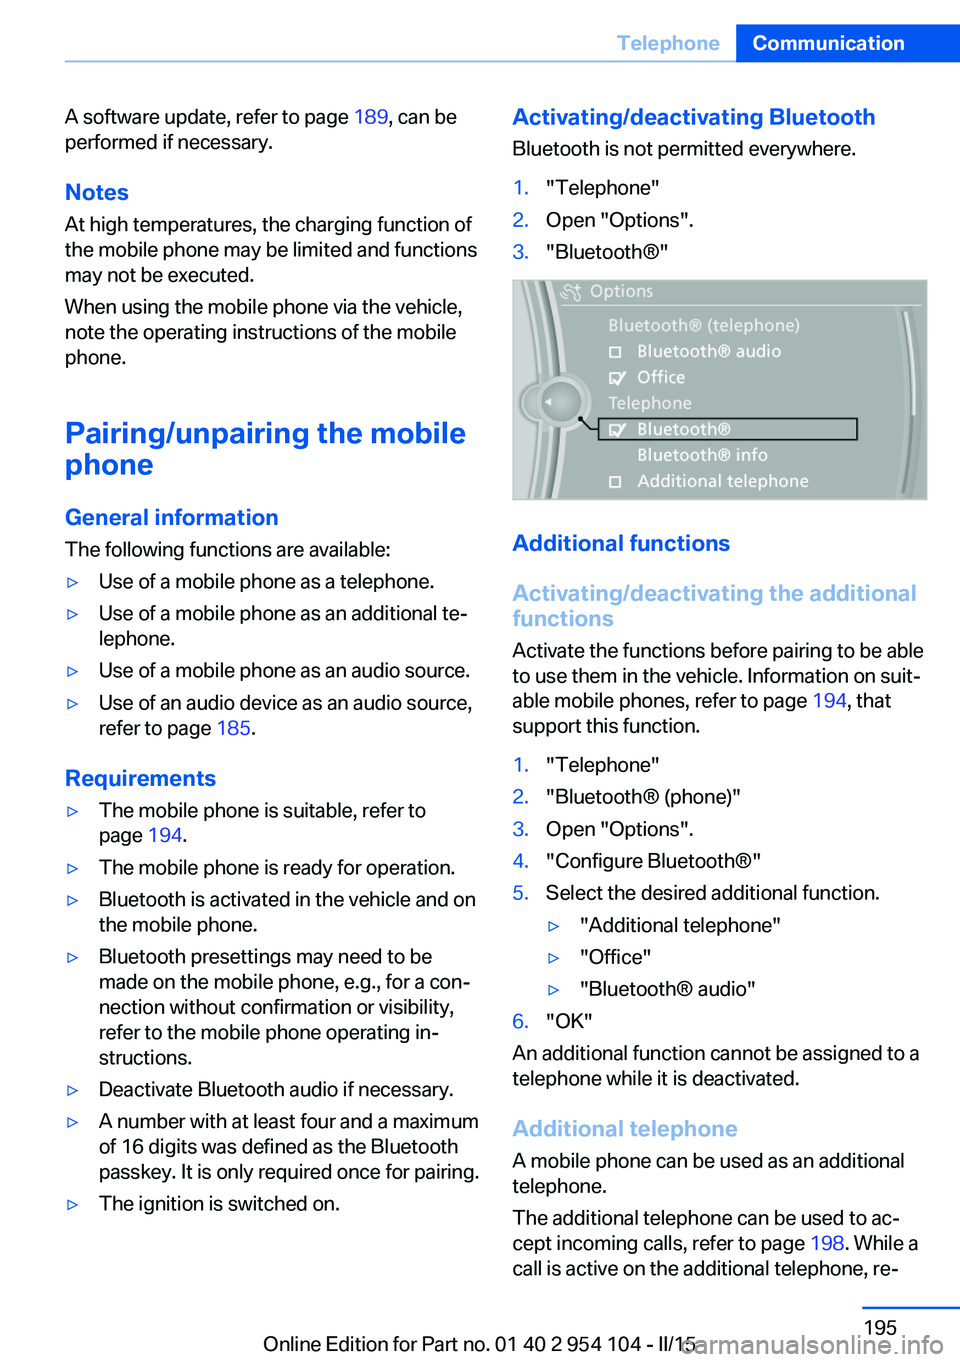
Bluetooth is not permitted everywhere.1."Telephone"2.Open "Options".3."Bluetooth®"
Additional functions
Activating/deactivating the additional
functions
Activate the functions before pairing to be able
to use them in the vehicle. Information on suit‐
able mobile phones, refer to page 194, that
support this function.
1."Telephone"2."Bluetooth® (phone)"3.Open "Options".4."Configure Bluetooth®"5.Select the desired additional function.▷"Additional telephone"▷"Office"▷"Bluetooth® audio"6."OK"
An additional function cannot be assigned to a
telephone while it is deactivated.
Additional telephone A mobile phone can be used as an additional
telephone.
The additional telephone can be used to ac‐
cept incoming calls, refer to page 198. While a
call is active on the additional telephone, re‐
Seite 195TelephoneCommunication195
Online Edition for Part no. 01 40 2 954 104 - II/15
Page 198 of 289
ceived calls are displayed on the Control Dis‐
play.
Audio source
A mobile phone can be used as an audio
source.
Pairing and connecting a mobile
phone
Pairing the mobile phone
To avoid becoming distracted and pos‐
ing an unnecessary hazard both to your own
vehicle's occupants and to other road users,
only pair the mobile phone while the vehicle is
stationary.◀1."Telephone"2."Bluetooth® (phone)"3."Add new phone"
The Bluetooth name of the vehicle is dis‐
played.4.To perform additional steps on the mobile
phone, refer to the mobile phone operating
instructions: for instance, search for or
connect the Bluetooth device or a new de‐
vice.
The Bluetooth name of the vehicle appears
on the mobile phone display.5.Select the Bluetooth name of the vehicle
on the mobile phone display.6.You are prompted by the iDrive or mobile
phone to enter the same Bluetooth pass‐
key. Enter the passkey and confirm.
or
Compare the control number on the vehi‐
cle display with the control number on the
mobile phone display. Confirm the control
number on the mobile phone and in the ve‐
hicle.
"OK"7.Select the functions for which the mobile
phone is to be used.8."OK"If the pairing was successful, the mobile phone
appears at the top of the list of mobile phones.
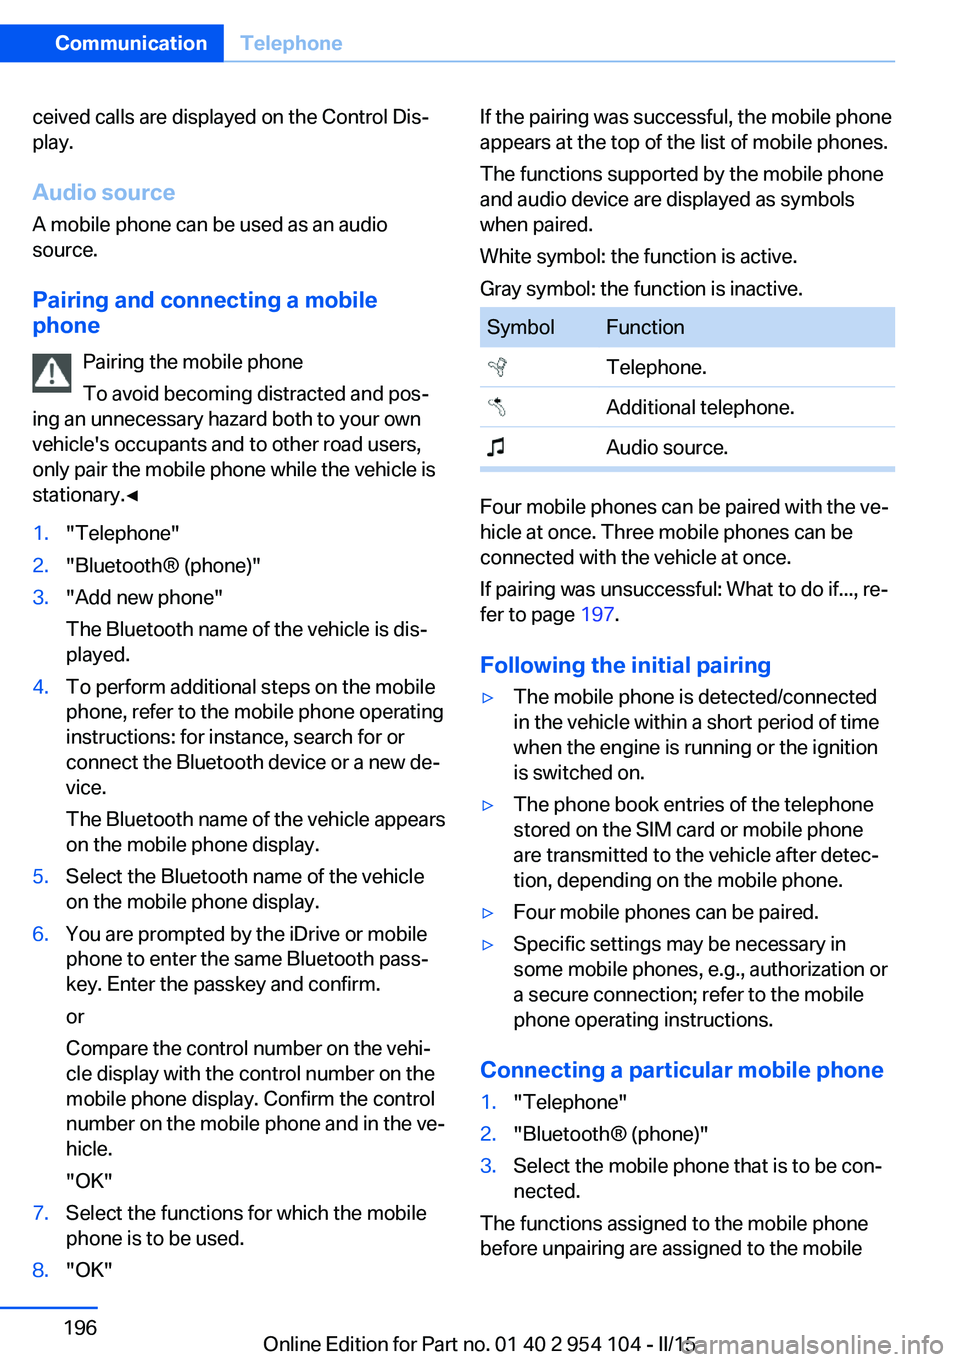
The functions supported by the mobile phone
and audio device are displayed as symbols
when paired.
White symbol: the function is active.
Gray symbol: the function is inactive.SymbolFunction Telephone. Additional telephone. Audio source.
Four mobile phones can be paired with the ve‐
hicle at once. Three mobile phones can be
connected with the vehicle at once.
If pairing was unsuccessful: What to do if..., re‐
fer to page 197.
Following the initial pairing
▷The mobile phone is detected/connected
in the vehicle within a short period of time
when the engine is running or the ignition
is switched on.▷The phone book entries of the telephone
stored on the SIM card or mobile phone
are transmitted to the vehicle after detec‐
tion, depending on the mobile phone.▷Four mobile phones can be paired.▷Specific settings may be necessary in
some mobile phones, e.g., authorization or
a secure connection; refer to the mobile
phone operating instructions.
Connecting a particular mobile phone
1."Telephone"2."Bluetooth® (phone)"3.Select the mobile phone that is to be con‐
nected.
The functions assigned to the mobile phone
before unpairing are assigned to the mobile
Seite 196CommunicationTelephone196
Online Edition for Part no. 01 40 2 954 104 - II/15
Page 205 of 289
Snap-in adapter
General information More information on compatible snap-in
adapters that support the functions of the mo‐
bile phone is available at the service center.
Notes At high temperatures, the charging function of
the mobile phone may be limited and functions
may not be executed.
When using the mobile phone via the vehicle,
note the operating instructions of the mobile
phone.
Installation position
In the center armrest.
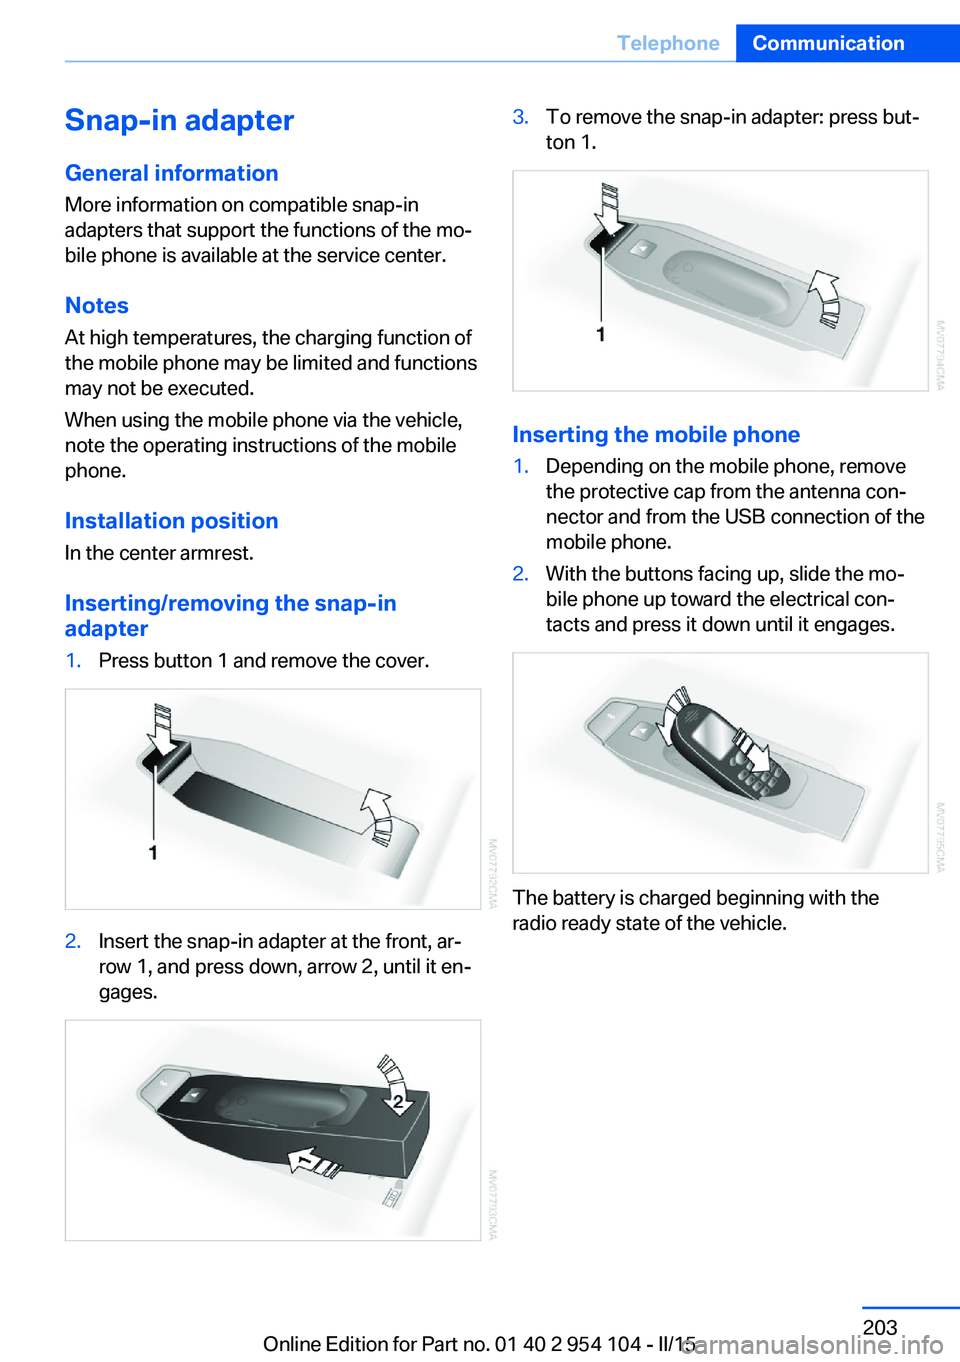
Inserting/removing the snap-in
adapter1.Press button 1 and remove the cover.2.Insert the snap-in adapter at the front, ar‐
row 1, and press down, arrow 2, until it en‐
gages.3.To remove the snap-in adapter: press but‐
ton 1.
Inserting the mobile phone
1.Depending on the mobile phone, remove
the protective cap from the antenna con‐
nector and from the USB connection of the
mobile phone.2.With the buttons facing up, slide the mo‐
bile phone up toward the electrical con‐
tacts and press it down until it engages.
The battery is charged beginning with the
radio ready state of the vehicle.
Seite 203TelephoneCommunication203
Online Edition for Part no. 01 40 2 954 104 - II/15
Page 240 of 289
Hood
Opening the hood Working in the engine compartment
Never attempt to perform any service or
repair operations on your vehicle without the necessary professional technical training.
If you are unfamiliar with the statutory guide‐
lines, have any work on the vehicle performed
only by a service center.
If this work is not carried out properly, there is
the danger of subsequent damage and related
safety hazards.◀
To avoid damage, make sure that the
wiper arms are resting against the wind‐
shield before you open the engine compart‐
ment. Do not open the engine hood before the
engine has cooled down; otherwise, injuries
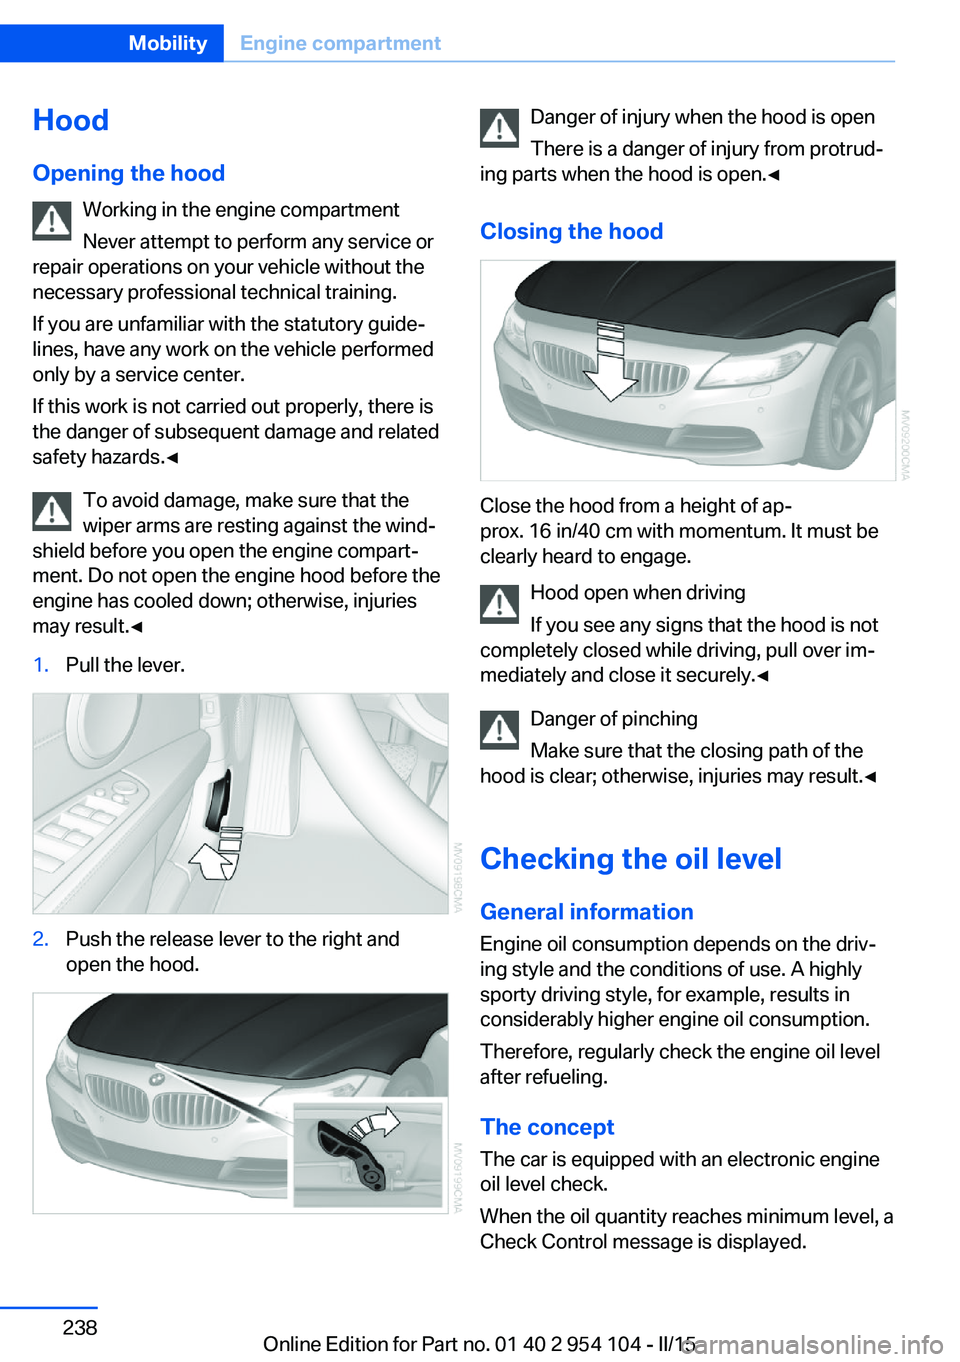
may result.◀1.Pull the lever.2.Push the release lever to the right and
open the hood.Danger of injury when the hood is open
There is a danger of injury from protrud‐
ing parts when the hood is open.◀
Closing the hood
Close the hood from a height of ap‐
prox. 16 in/40 cm with momentum. It must be
clearly heard to engage.
Hood open when driving
If you see any signs that the hood is not
completely closed while driving, pull over im‐
mediately and close it securely.◀
Danger of pinching
Make sure that the closing path of the
hood is clear; otherwise, injuries may result.◀
Checking the oil level General information
Engine oil consumption depends on the driv‐
ing style and the conditions of use. A highly
sporty driving style, for example, results in
considerably higher engine oil consumption.
Therefore, regularly check the engine oil level
after refueling.
The concept
The car is equipped with an electronic engine
oil level check.
When the oil quantity reaches minimum level, a
Check Control message is displayed.
Seite 238MobilityEngine compartment238
Online Edition for Part no. 01 40 2 954 104 - II/15
Page 252 of 289
▷Radio station: store again, refer to
page 164.▷Navigation system: wait for the operability
of the navigation.▷Interior rearview mirror with digital com‐
pass: recalibrate, refer to page 118.
Disposing of old batteries
Have old batteries disposed of by your
service center or bring them to a recy‐
cling center.
Maintain the battery in an upright position for
transport and storage. Secure the battery so
that it does not tip over during transport.
Fuses Notes Replacing fuses
Never attempt to repair a blown fuse and
do not replace a defective fuse with a substi‐
tute of another color or amperage rating; this could lead to a circuit overload, ultimately re‐
sulting in a fire in the vehicle.◀
A pair of plastic tweezers is found on the cur‐
rent distributor.
See the inside of the cover for information on
fuse assignment.
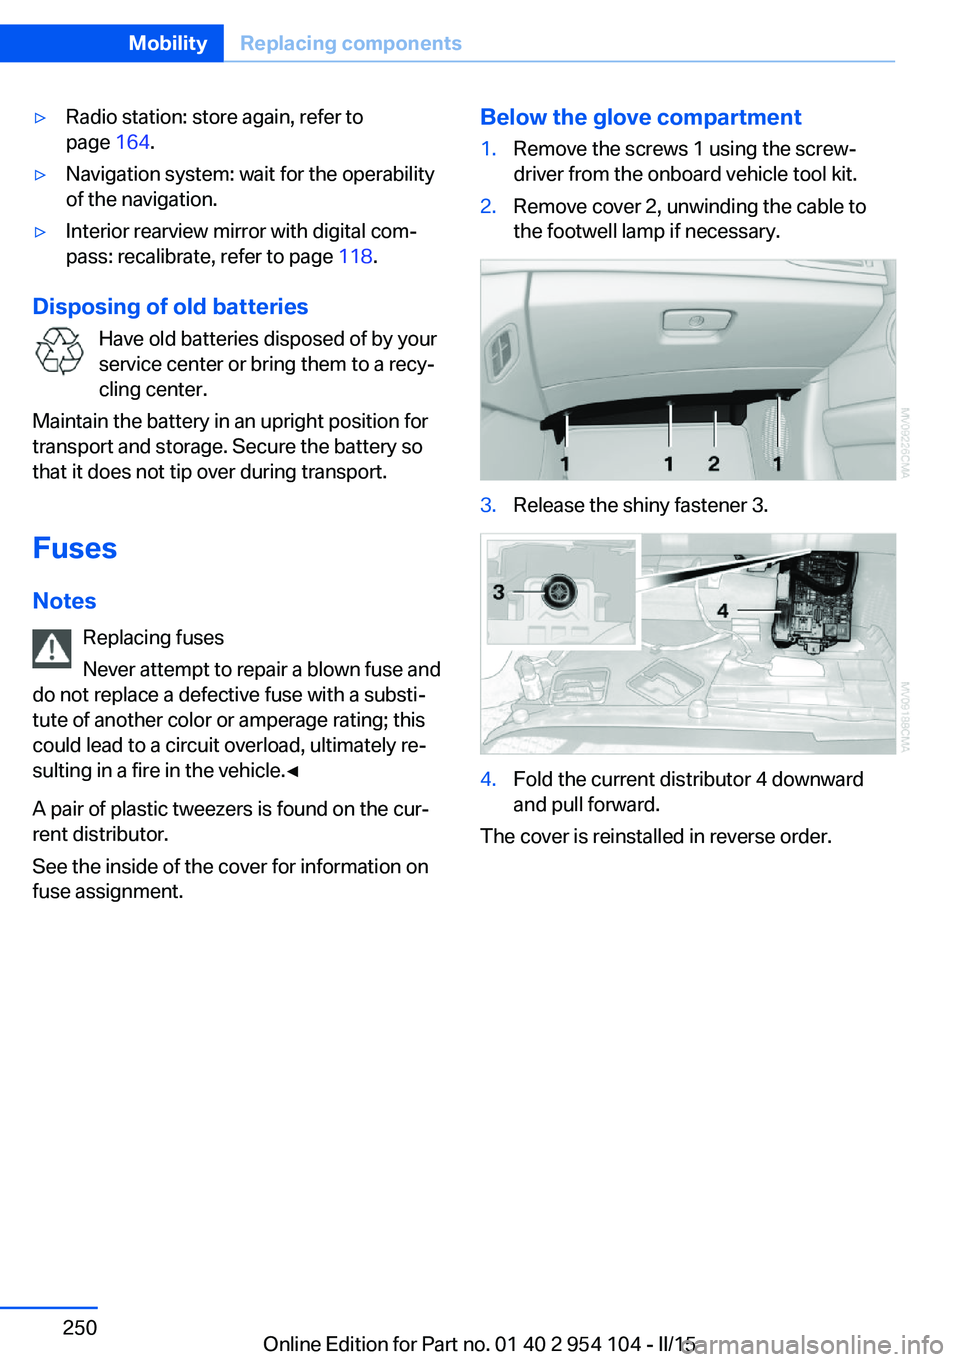
Below the glove compartment1.Remove the screws 1 using the screw‐
driver from the onboard vehicle tool kit.2.Remove cover 2, unwinding the cable to
the footwell lamp if necessary.3.Release the shiny fastener 3.4.Fold the current distributor 4 downward
and pull forward.
The cover is reinstalled in reverse order.
Seite 250MobilityReplacing components250
Online Edition for Part no. 01 40 2 954 104 - II/15
Page 256 of 289
Tow truck
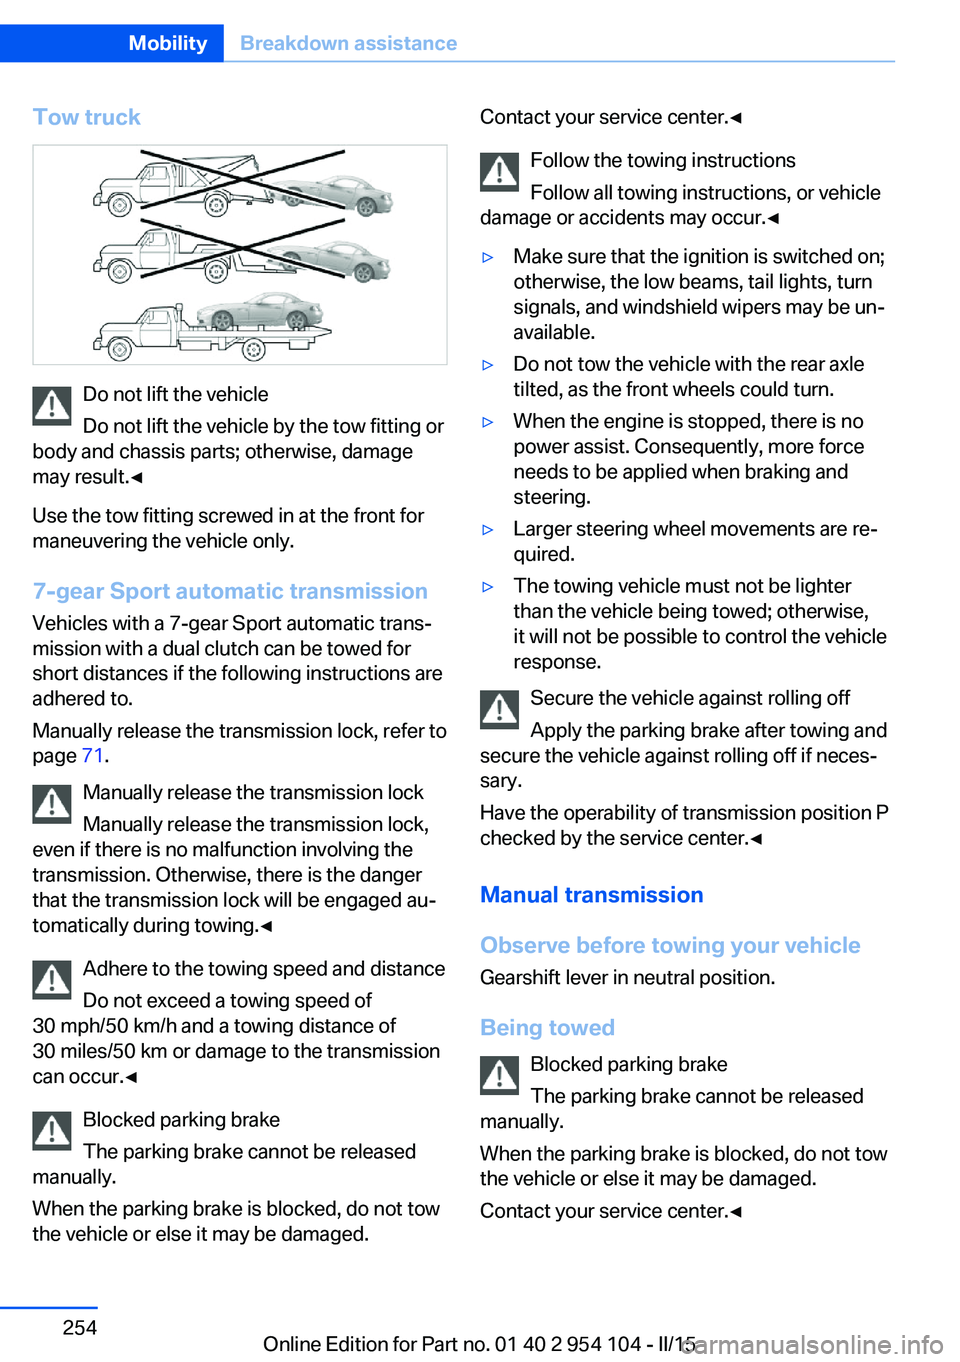
Do not lift the vehicle
Do not lift the vehicle by the tow fitting or
body and chassis parts; otherwise, damage
may result.◀
Use the tow fitting screwed in at the front for
maneuvering the vehicle only.
7-gear Sport automatic transmission
Vehicles with a 7-gear Sport automatic trans‐
mission with a dual clutch can be towed for
short distances if the following instructions are
adhered to.
Manually release the transmission lock, refer to
page 71.
Manually release the transmission lock
Manually release the transmission lock,
even if there is no malfunction involving the
transmission. Otherwise, there is the danger
that the transmission lock will be engaged au‐
tomatically during towing.◀
Adhere to the towing speed and distance
Do not exceed a towing speed of
30 mph/50 km/h and a towing distance of
30 miles/50 km or damage to the transmission
can occur.◀
Blocked parking brake
The parking brake cannot be released
manually.
When the parking brake is blocked, do not tow
the vehicle or else it may be damaged.
Contact your service center.◀
Follow the towing instructions
Follow all towing instructions, or vehicle
damage or accidents may occur.◀▷Make sure that the ignition is switched on;
otherwise, the low beams, tail lights, turn
signals, and windshield wipers may be un‐
available.▷Do not tow the vehicle with the rear axle
tilted, as the front wheels could turn.▷When the engine is stopped, there is no
power assist. Consequently, more force
needs to be applied when braking and
steering.▷Larger steering wheel movements are re‐
quired.▷The towing vehicle must not be lighter
than the vehicle being towed; otherwise,
it will not be possible to control the vehicle
response.
Secure the vehicle against rolling off
Apply the parking brake after towing and
secure the vehicle against rolling off if neces‐
sary.
Have the operability of transmission position P
checked by the service center.◀
Manual transmission
Observe before towing your vehicle Gearshift lever in neutral position.
Being towed Blocked parking brake
The parking brake cannot be released
manually.
When the parking brake is blocked, do not tow
the vehicle or else it may be damaged.
Contact your service center.◀
Seite 254MobilityBreakdown assistance254
Online Edition for Part no. 01 40 2 954 104 - II/15