2015 BMW Z4 SDRIVE35IS window
[x] Cancel search: windowPage 48 of 289
the desired direction by pushing or pulling the
switch.
Always open or close the hardtop fully.
Open or close the hardtop fully; other‐
wise, there is a risk of injury or damage when
driving. Do not interrupt and resume the clos‐
ing procedure several times in close succes‐
sion as this could damage the mechanism.◀
If the hardtop is not fully opened or closed, the
trunk lid cannot be opened and the windows
cannot be moved.
Convenient operation via the remote
control
Information on convenient operation, refer to
page 35.
Wind deflector
The wind deflector keeps air movements in the
passenger compartment to a minimum when
the hardtop is open and provides an even more
comfortable ride, particularly at high speeds.
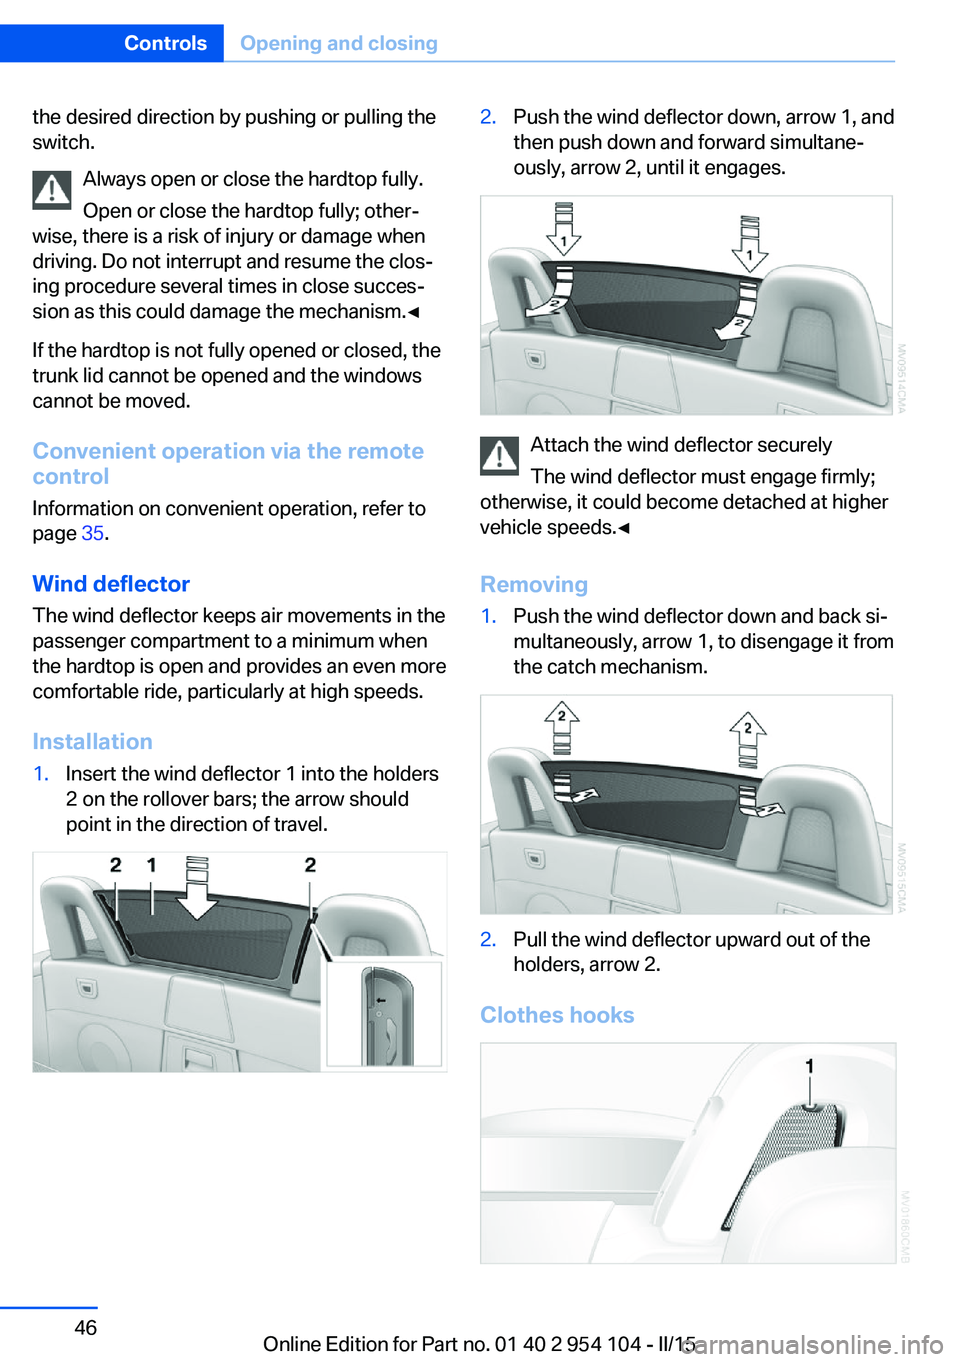
Installation1.Insert the wind deflector 1 into the holders
2 on the rollover bars; the arrow should
point in the direction of travel.2.Push the wind deflector down, arrow 1, and
then push down and forward simultane‐
ously, arrow 2, until it engages.
Attach the wind deflector securely
The wind deflector must engage firmly;
otherwise, it could become detached at higher
vehicle speeds.◀
Removing
1.Push the wind deflector down and back si‐
multaneously, arrow 1, to disengage it from
the catch mechanism.2.Pull the wind deflector upward out of the
holders, arrow 2.
Clothes hooks
Seite 46ControlsOpening and closing46
Online Edition for Part no. 01 40 2 954 104 - II/15
Page 62 of 289

▷High external temperature and operation of
the automatic climate control.▷The interior is not yet heated or cooled as
much as desired.▷The engine is not yet at operating temper‐
ature.▷Sharp steering angle or the steering wheel
is being turned.▷After driving in reverse.▷Fogging of the windows when the auto‐
matic climate control is switched on.▷Vehicle battery charge is very low.▷Hood is unlocked.▷Stop-and-go traffic.
The indicator lamp is lit.
Parking the vehicle during an
automatic engine stop
The vehicle can be parked safely during an au‐
tomatic engine stop, such as when you wish to
leave the vehicle.
1.Press the Start/Stop button. The ignition is
switched off. The Auto Start/Stop function
is deactivated.2.Set the parking brake.
Start the engine as usual using the Start/Stop
button.
Automatic engine start To drive away, the engine starts automatically
as soon as the clutch pedal is depressed.
After the engine starts, accelerate as usual.
Safety mode
The engine does not start by itself after it is
switched off automatically if any of the follow‐
ing conditions are fulfilled:
▷The driver's safety belt is unfastened or
the driver's door is open.▷Hood was unlocked.The indicator lamp lights up. A mes‐
sage appears on the Control Display.
The engine can only be started via
the Start/Stop button.
Note Even if you do not wish to drive away, the stop‐
ped engine still starts automatically in the fol‐
lowing situations:▷The interior has heated up strongly with
the cooling function switched on.▷The steering wheel is turned.▷The vehicle begins to roll.▷Fogging of the windows when the auto‐
matic climate control is switched on.▷Vehicle battery charge is very low.▷The interior has cooled down strongly with
the heating switched on.▷Low braking pressure, such as from de‐
pressing the brake pedal a number of times
consecutively.
Activating/deactivating the system
manually
Press the button.
▷LED on the button lights up: the Auto Start/
Stop function is deactivated.
The engine is started during an automatic
engine stop.
The engine can only be stopped or started
via the Start/Stop button.Seite 60ControlsDriving60
Online Edition for Part no. 01 40 2 954 104 - II/15
Page 67 of 289
Washer fluid
General information Antifreeze for washer fluid
Antifreeze is flammable and can cause
injuries if used improperly.
Therefore, keep it away from sources of igni‐
tion.
Only keep it in the closed original container
and inaccessible to children.
Follow the notes and instructions on the con‐
tainer.
United States: The washer fluid mixture ratio is
regulated by the U.S. EPA and many individual
states; do not exceed the allowable washer
fluid dilution ratios limits that apply. Follow the
usage instructions on the washer fluid con‐
tainer. Use BMW's Windshield Washer Con‐
centrate or the equivalent.◀
Washer fluid reservoir Adding washer fluid
Only add washer fluid when the engine is
cool, and then close the cover completely to
avoid contact between the washer fluid and
hot engine parts.
Otherwise, there is the danger of fire and a risk
to personal safety if the fluid is spilled.◀
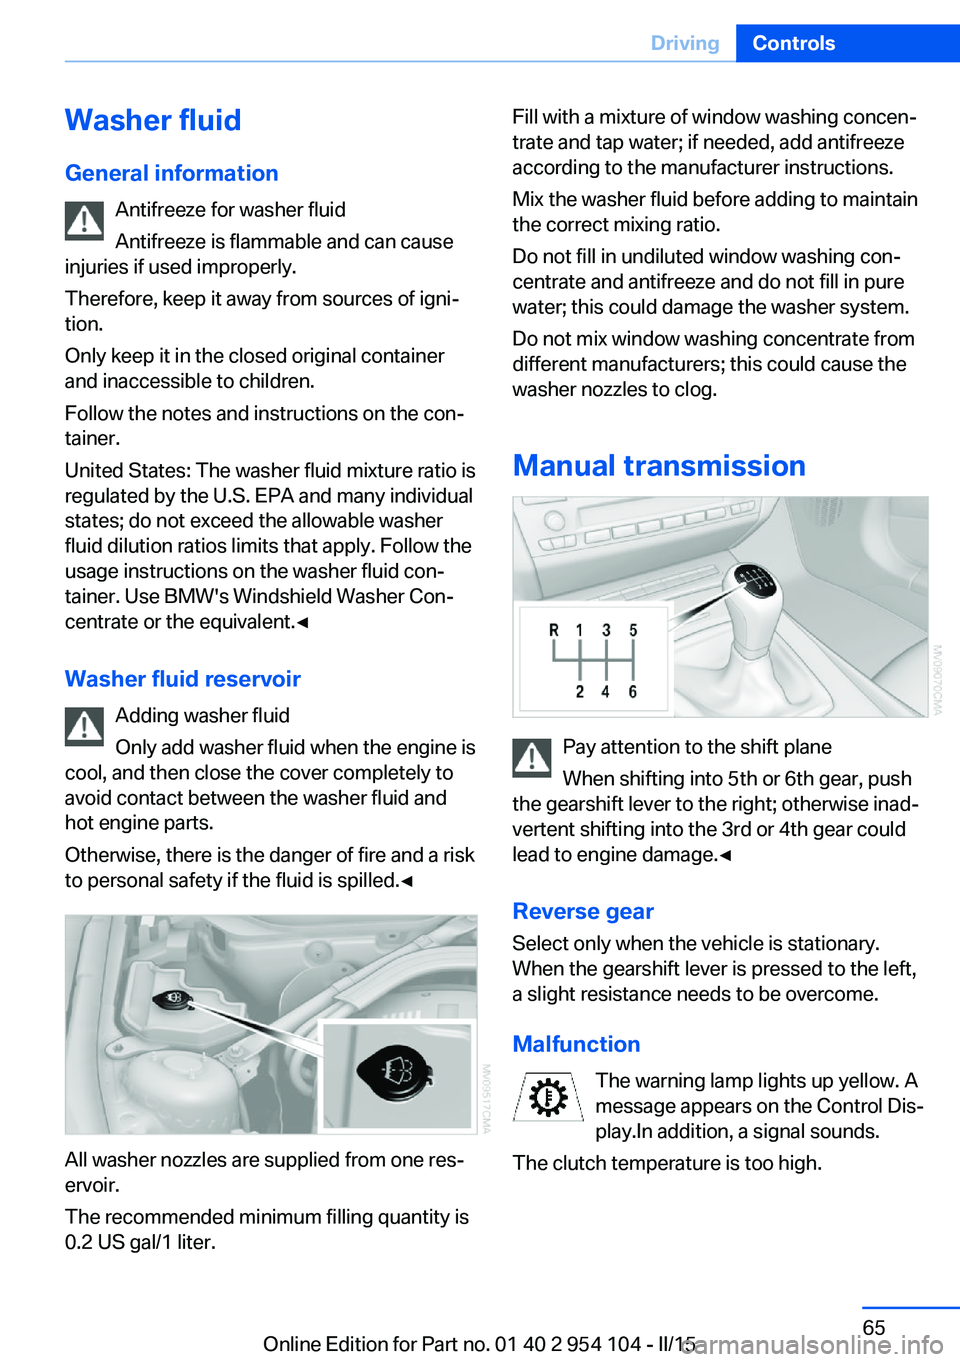
All washer nozzles are supplied from one res‐
ervoir.
The recommended minimum filling quantity is
0.2 US gal/1 liter.
Fill with a mixture of window washing concen‐
trate and tap water; if needed, add antifreeze
according to the manufacturer instructions.
Mix the washer fluid before adding to maintain
the correct mixing ratio.
Do not fill in undiluted window washing con‐
centrate and antifreeze and do not fill in pure
water; this could damage the washer system.
Do not mix window washing concentrate from
different manufacturers; this could cause the
washer nozzles to clog.
Manual transmission
Pay attention to the shift plane
When shifting into 5th or 6th gear, push
the gearshift lever to the right; otherwise inad‐
vertent shifting into the 3rd or 4th gear could
lead to engine damage.◀
Reverse gear Select only when the vehicle is stationary.
When the gearshift lever is pressed to the left,
a slight resistance needs to be overcome.
Malfunction The warning lamp lights up yellow. A
message appears on the Control Dis‐
play.In addition, a signal sounds.
The clutch temperature is too high.
Seite 65DrivingControls65
Online Edition for Part no. 01 40 2 954 104 - II/15
Page 94 of 289
SafetyVehicle equipment
This chapter describes all series equipment as
well as country-specific and special equipment
offered for this model series. Therefore, it also
describes equipment that may not be found in
your vehicle, for instance due to the selected
special equipment or the country version. This
also applies to safety-related functions and
systems.
When using the features and systems descri‐
bed here, adhere to local regulations.
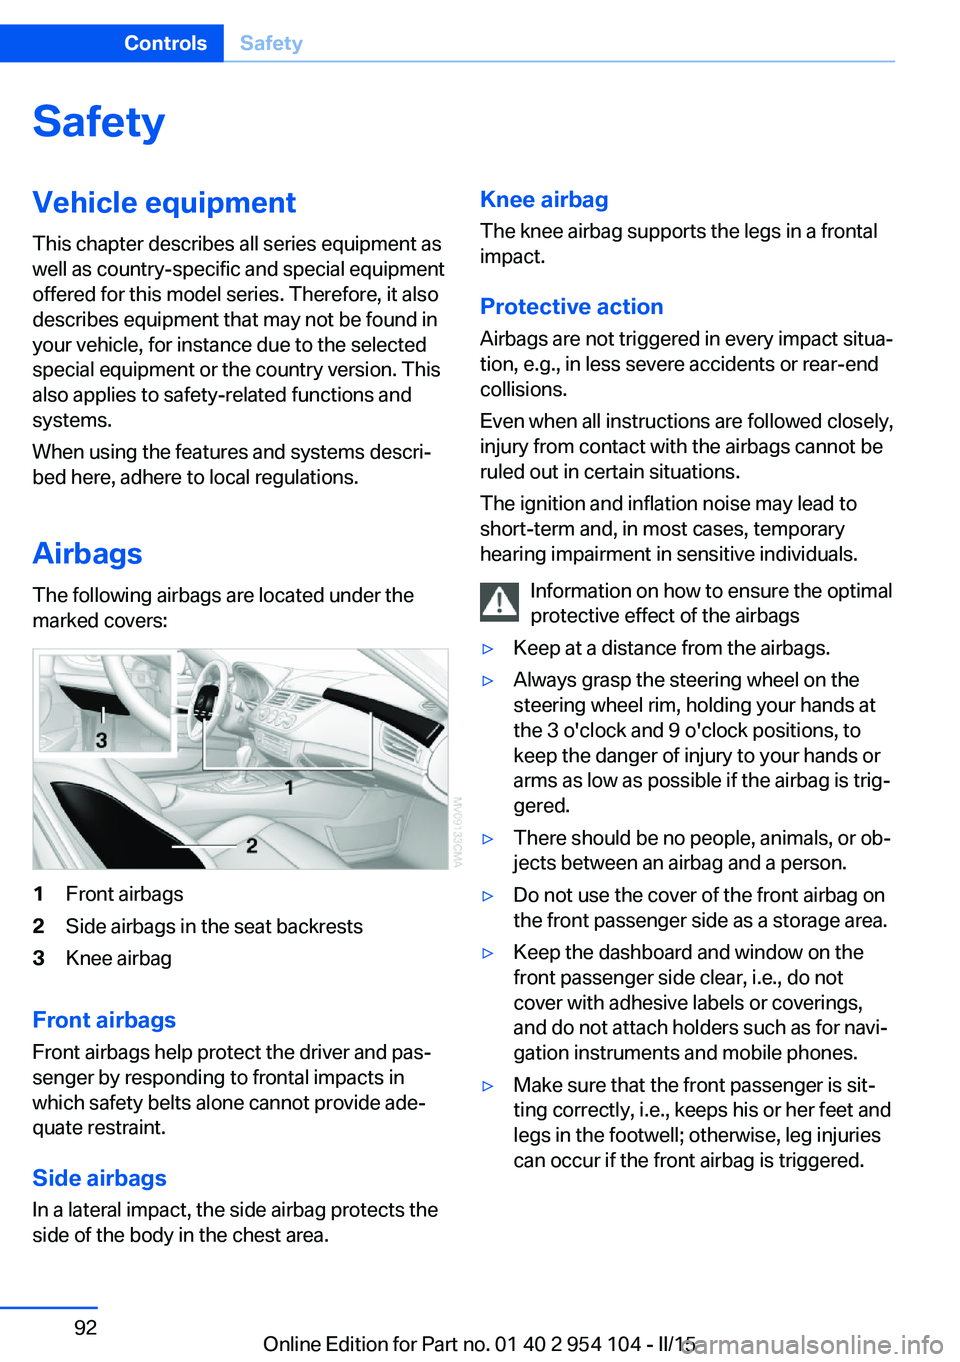
Airbags The following airbags are located under the
marked covers:1Front airbags2Side airbags in the seat backrests3Knee airbag
Front airbags
Front airbags help protect the driver and pas‐
senger by responding to frontal impacts in
which safety belts alone cannot provide ade‐
quate restraint.
Side airbags
In a lateral impact, the side airbag protects the
side of the body in the chest area.
Knee airbag
The knee airbag supports the legs in a frontal
impact.
Protective action
Airbags are not triggered in every impact situa‐
tion, e.g., in less severe accidents or rear-end
collisions.
Even when all instructions are followed closely,
injury from contact with the airbags cannot be
ruled out in certain situations.
The ignition and inflation noise may lead to
short-term and, in most cases, temporary
hearing impairment in sensitive individuals.
Information on how to ensure the optimal
protective effect of the airbags▷Keep at a distance from the airbags.▷Always grasp the steering wheel on the
steering wheel rim, holding your hands at
the 3 o'clock and 9 o'clock positions, to
keep the danger of injury to your hands or
arms as low as possible if the airbag is trig‐
gered.▷There should be no people, animals, or ob‐
jects between an airbag and a person.▷Do not use the cover of the front airbag on
the front passenger side as a storage area.▷Keep the dashboard and window on the
front passenger side clear, i.e., do not
cover with adhesive labels or coverings,
and do not attach holders such as for navi‐
gation instruments and mobile phones.▷Make sure that the front passenger is sit‐
ting correctly, i.e., keeps his or her feet and
legs in the footwell; otherwise, leg injuries
can occur if the front airbag is triggered.Seite 92ControlsSafety92
Online Edition for Part no. 01 40 2 954 104 - II/15
Page 111 of 289
ClimateVehicle equipmentThis chapter describes all series equipment as
well as country-specific and special equipment
offered for this model series. Therefore, it also
describes equipment that may not be found in
your vehicle, for instance due to the selectedspecial equipment or the country version. This
also applies to safety-related functions and
systems.
When using the features and systems descri‐
bed here, adhere to local regulations.
Overview
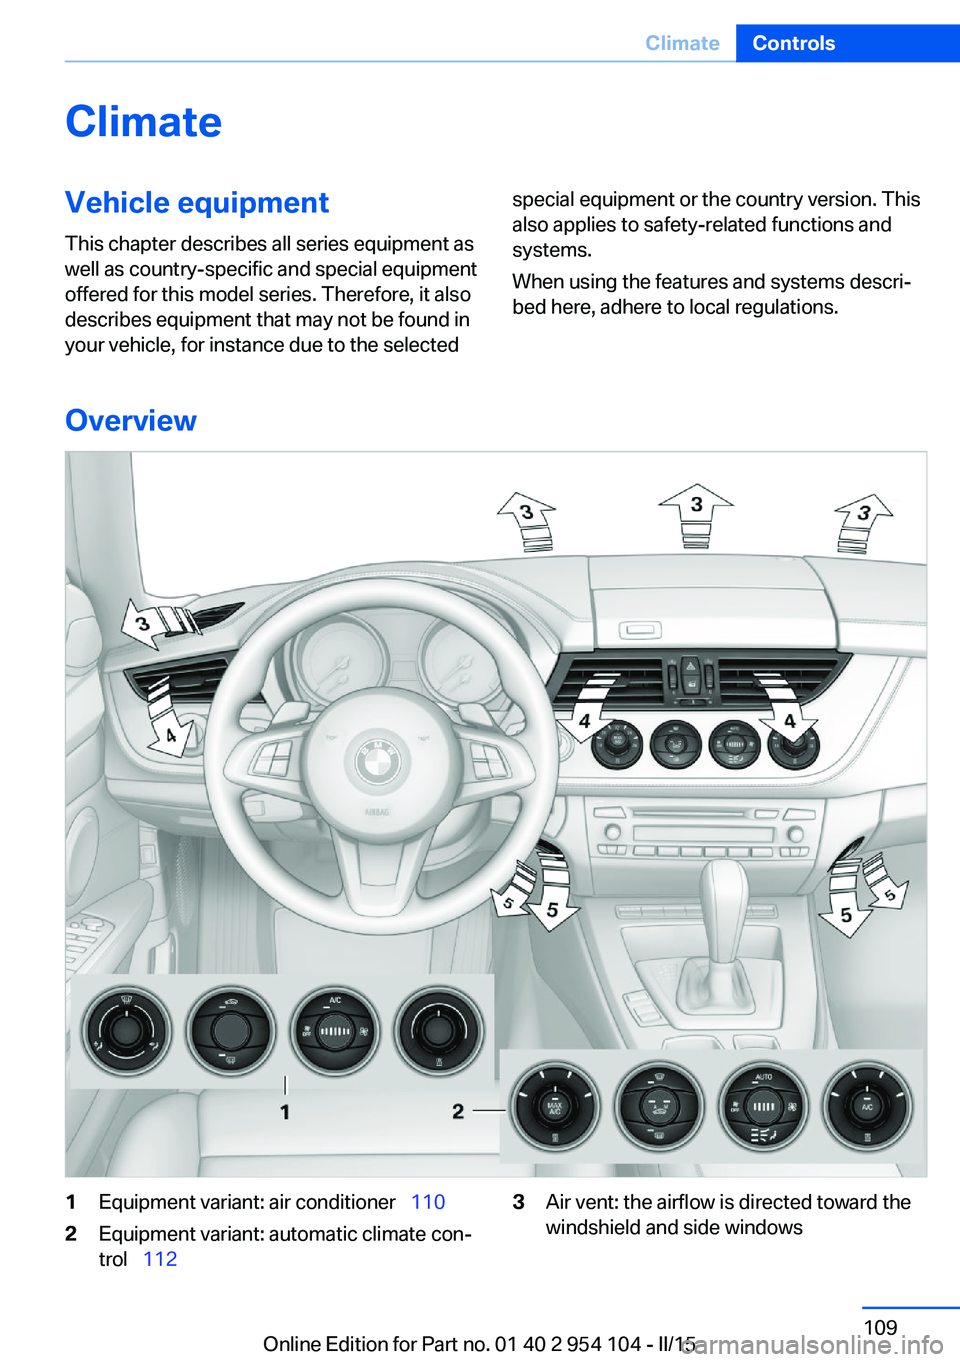
1Equipment variant: air conditioner 1102Equipment variant: automatic climate con‐
trol 1123Air vent: the airflow is directed toward the
windshield and side windowsSeite 109ClimateControls109
Online Edition for Part no. 01 40 2 954 104 - II/15
Page 112 of 289

4Air vent: air for the upper body area. The
thumbwheels increase and decrease theair supply continuously; the levers change
the direction of the airflow.5Air vent: air for the knee area, footwell
Air conditioner
1Vent settings2Recirculated air mode3Cooling function4Temperature5Air volume6Rear window defrosterNote
Sufficient ventilation
When remaining in the vehicle for an ex‐
tended period of time, ensure sufficient exter‐
nal ventilation. Do not continuously use recir‐
culated-air mode; otherwise the air quality in
the interior continuously worsens.◀
Climate control functions in detail
Switching the system on/off Press and hold the left button or,
with the blower at its lowest set‐
ting, press the left button. The
blower and air conditioner are completely
switched off and the air supply is cut off.
To switch on the air conditioner, set the de‐
sired air flow rate.Temperature
To increase the temperature, turn
the rotary switch clockwise to‐
wards red. For a lower tempera‐
ture, turn the rotary switch coun‐
terclockwise towards blue.
Switching cooling function on/off The cooling function cools and
dehumidifies the incoming air be‐
fore reheating it as required, according to the
temperature setting. This function is only avail‐
able while the engine is running.
The cooling function helps to prevent conden‐
sation on the windows or to remove it quickly.
Depending on the weather, the windshield may
fog over briefly when the engine is started.
Recirculated air mode If the air outside the car has an un‐
pleasant odor or contains pollu‐Seite 110ControlsClimate110
Online Edition for Part no. 01 40 2 954 104 - II/15
Page 113 of 289

tants, shut off the supply to the interior of the
car temporarily. The system then recirculates
the air currently within the vehicle.
The recirculated air mode can also be acti‐
vated/deactivated, refer to page 14, via a but‐
ton on the steering wheel.
Air volume Press the corresponding button.
The higher the rate, the more ef‐
fective the heating or cooling will
be.
The air flow rate may be reduced or the blower
may be switched off entirely to save on battery
power.
Vent settings Direct the flow of air to the win‐
dows
, to the upper body area
, or to the knee area and foot‐
well
. Intermediate positions
are possible. In the 6 o'clock posi‐
tion, a small amount of air is also directed to‐
ward the windows to keep them from fogging
over.
Defrosting windows and removing
condensation
1Air distribution 1 in position .2Deactivate recirculated air mode 2.3Switch on cooling function 3.4Temperature 4 to the right, red.5Set the air flow rate 5 to the maximum
level.6Switch on the rear window defroster 6 to
defrost the rear window
.
Rear window defroster
The defroster switches off auto‐
matically after a certain time or
when the hardtop is opened.
Microfilter
The microfilter removes dust and pollen from
the incoming air. The microfilter is changed by
your service center during routine mainte‐
nance work.
Ventilation
1Use the lever to change the direction of the
air flow2Use the thumbwheels to smoothly open
and close the air vents
Ventilation for cooling
Adjust the vents to direct the flow of cool air in
your direction, for instance if the interior has
become too warm.
Draft-free ventilation
Adjust the vents to let the air flow past you.
Seite 111ClimateControls111
Online Edition for Part no. 01 40 2 954 104 - II/15
Page 114 of 289
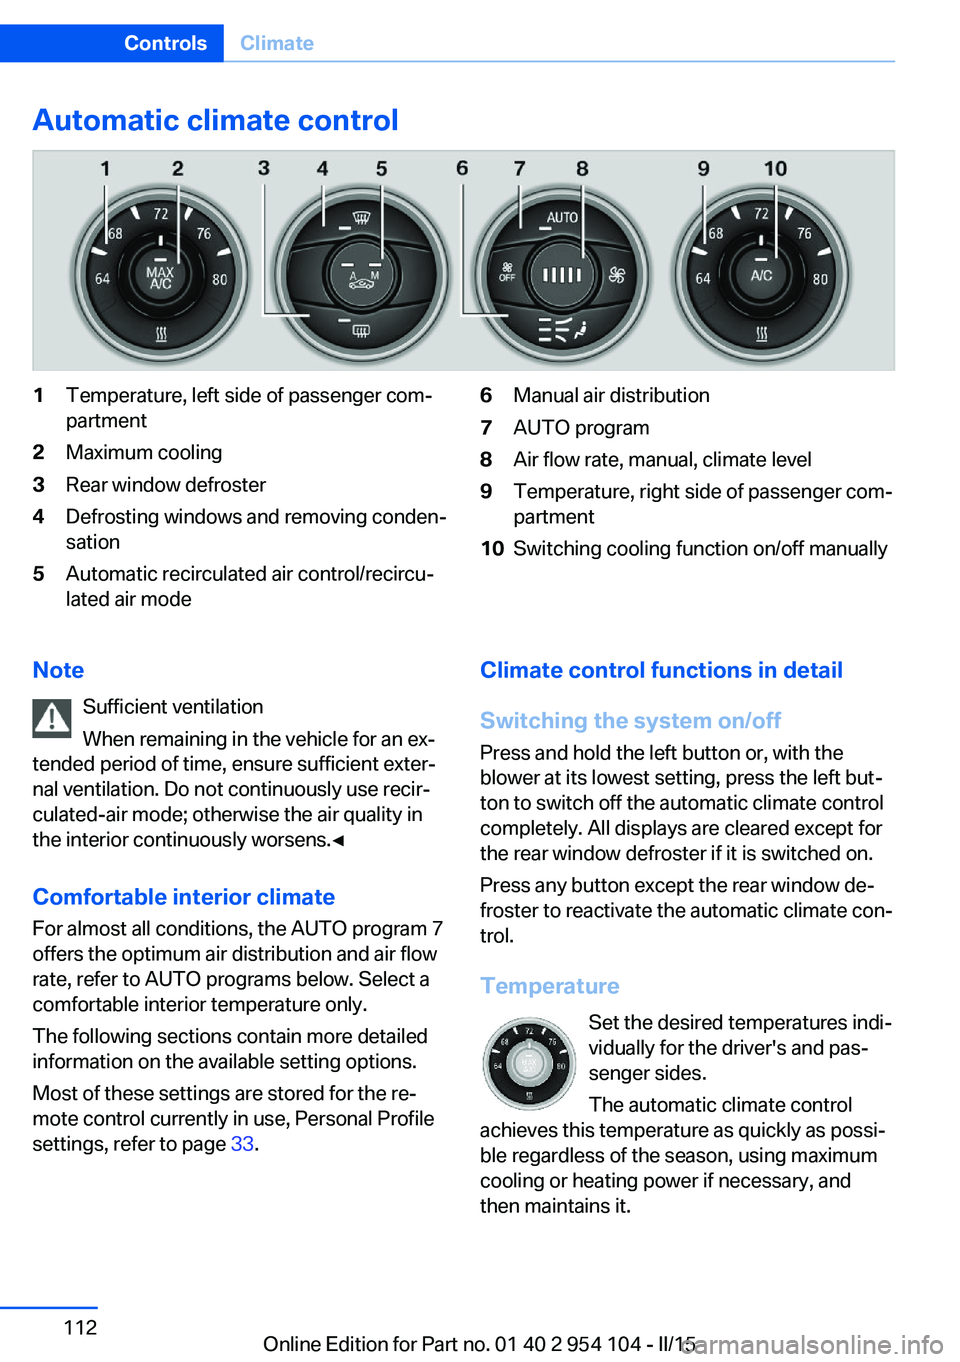
Automatic climate control1Temperature, left side of passenger com‐
partment2Maximum cooling3Rear window defroster4Defrosting windows and removing conden‐
sation5Automatic recirculated air control/recircu‐
lated air mode6Manual air distribution7AUTO program8Air flow rate, manual, climate level9Temperature, right side of passenger com‐
partment10Switching cooling function on/off manuallyNote
Sufficient ventilation
When remaining in the vehicle for an ex‐
tended period of time, ensure sufficient exter‐
nal ventilation. Do not continuously use recir‐
culated-air mode; otherwise the air quality in
the interior continuously worsens.◀
Comfortable interior climate For almost all conditions, the AUTO program 7
offers the optimum air distribution and air flow
rate, refer to AUTO programs below. Select a
comfortable interior temperature only.
The following sections contain more detailed
information on the available setting options.
Most of these settings are stored for the re‐
mote control currently in use, Personal Profile
settings, refer to page 33.Climate control functions in detail
Switching the system on/off
Press and hold the left button or, with the
blower at its lowest setting, press the left but‐
ton to switch off the automatic climate control
completely. All displays are cleared except for
the rear window defroster if it is switched on.
Press any button except the rear window de‐
froster to reactivate the automatic climate con‐
trol.
Temperature Set the desired temperatures indi‐
vidually for the driver's and pas‐
senger sides.
The automatic climate control
achieves this temperature as quickly as possi‐
ble regardless of the season, using maximum
cooling or heating power if necessary, and
then maintains it.Seite 112ControlsClimate112
Online Edition for Part no. 01 40 2 954 104 - II/15