2015 BMW Z4 SDRIVE35IS height
[x] Cancel search: heightPage 123 of 289

Under the center armrest
External audio device, refer to page 125.
In the passenger footwell A socket is located on the left below the glove
compartment.
Cargo area
Depending on your vehicle's equipment, the
following storage spaces can be found in the
cargo area:▷Rubber band for securing light objects.▷Storage compartment.
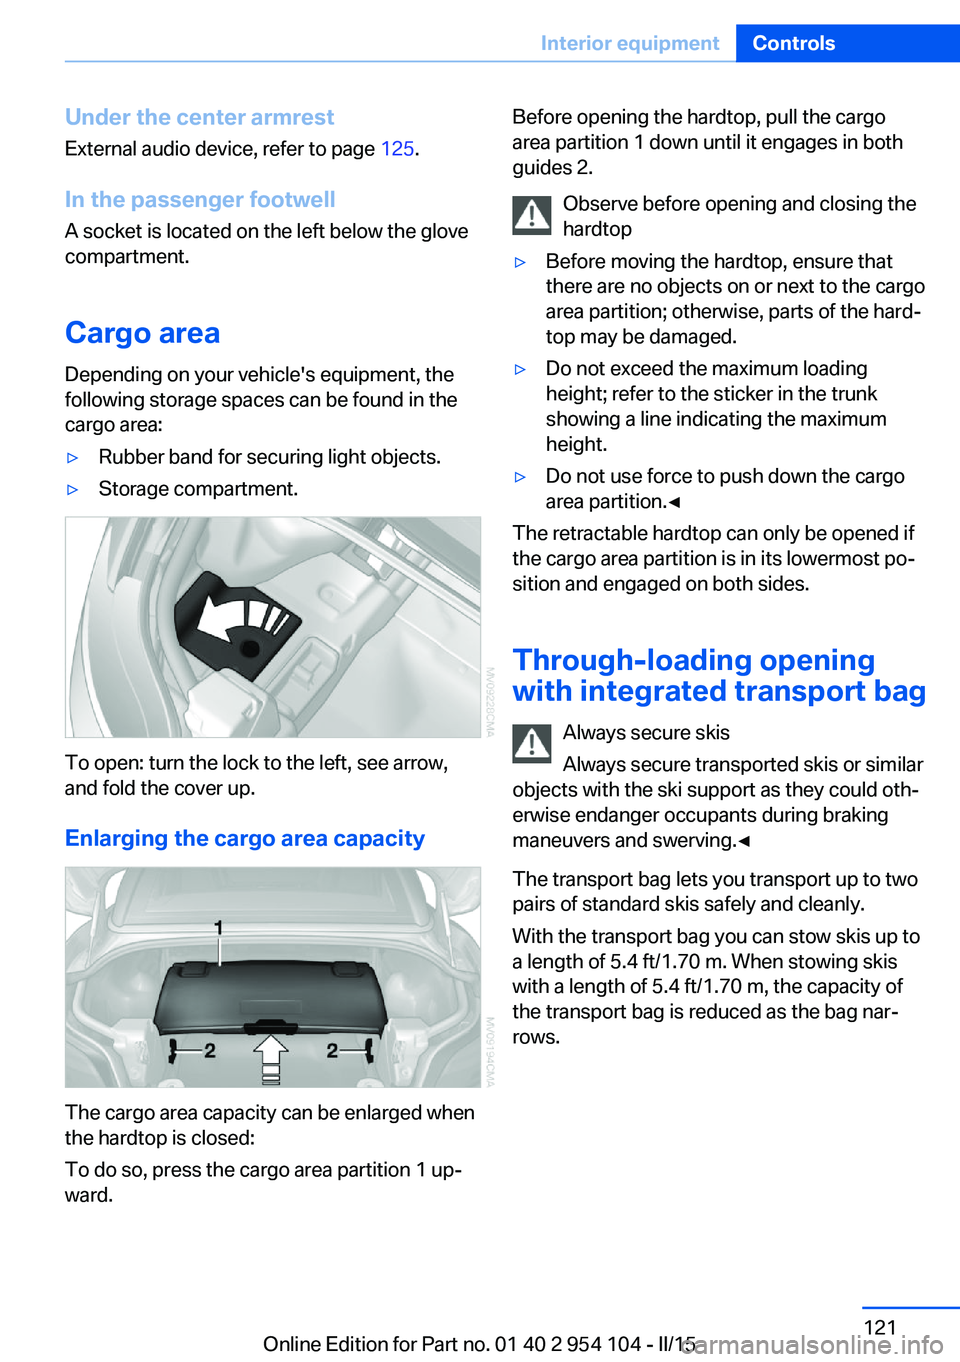
To open: turn the lock to the left, see arrow,
and fold the cover up.
Enlarging the cargo area capacity
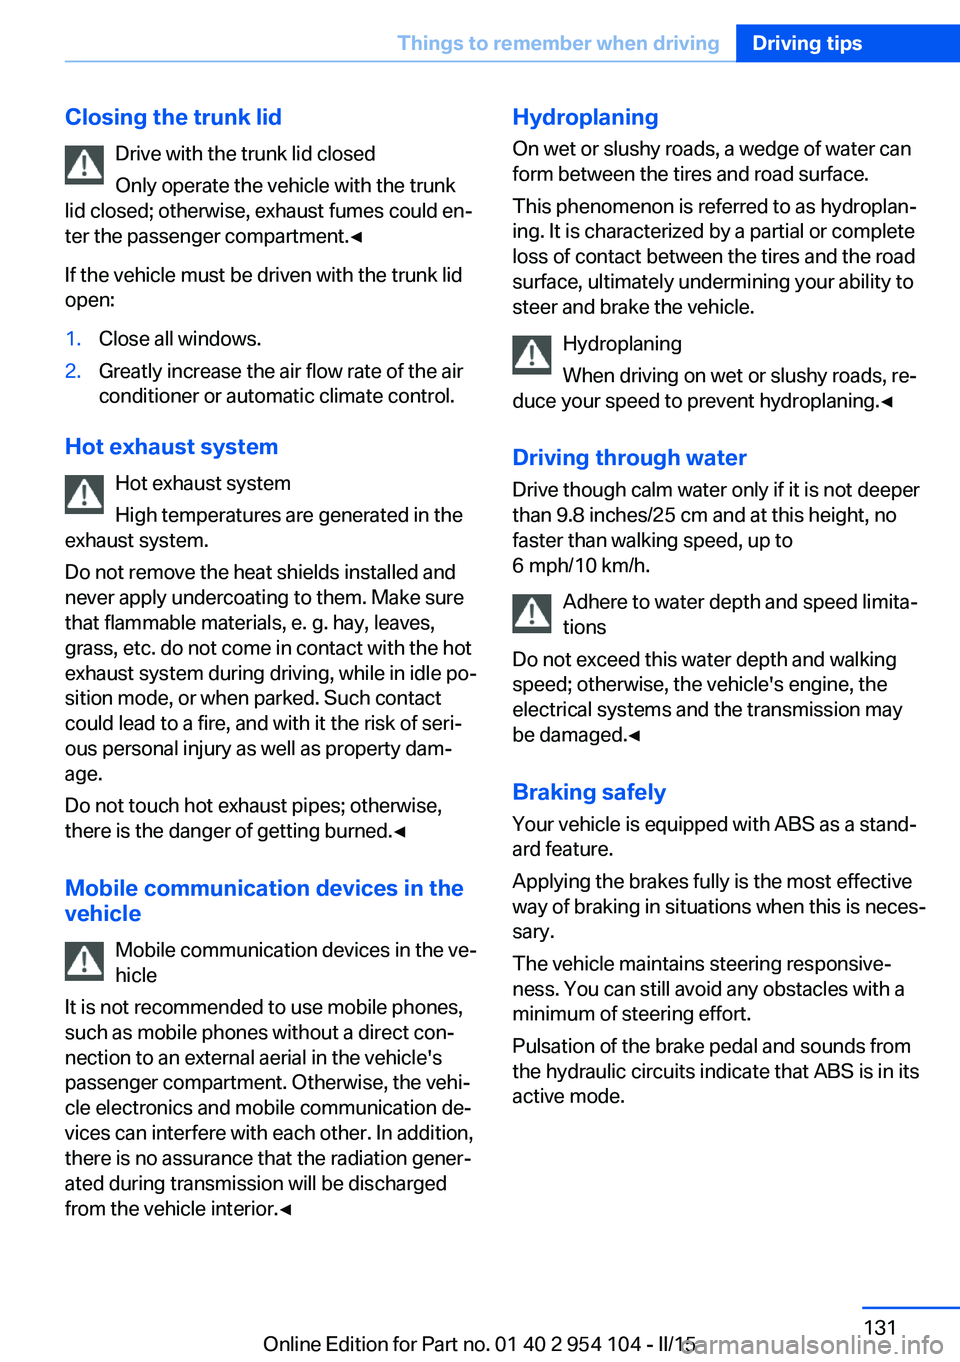
The cargo area capacity can be enlarged when
the hardtop is closed:
To do so, press the cargo area partition 1 up‐
ward.
Before opening the hardtop, pull the cargo
area partition 1 down until it engages in both
guides 2.
Observe before opening and closing the
hardtop▷Before moving the hardtop, ensure that
there are no objects on or next to the cargo
area partition; otherwise, parts of the hard‐
top may be damaged.▷Do not exceed the maximum loading
height; refer to the sticker in the trunk
showing a line indicating the maximum
height.▷Do not use force to push down the cargo
area partition.◀
The retractable hardtop can only be opened if
the cargo area partition is in its lowermost po‐
sition and engaged on both sides.
Through-loading opening
with integrated transport bag
Always secure skis
Always secure transported skis or similar
objects with the ski support as they could oth‐
erwise endanger occupants during braking
maneuvers and swerving.◀
The transport bag lets you transport up to two
pairs of standard skis safely and cleanly.
With the transport bag you can stow skis up to a length of 5.4 ft/1.70 m. When stowing skis
with a length of 5.4 ft/1.70 m, the capacity of
the transport bag is reduced as the bag nar‐
rows.
Seite 121Interior equipmentControls121
Online Edition for Part no. 01 40 2 954 104 - II/15
Page 127 of 289

Locking the storage compartment
When you lock the vehicle from the outside,
the storage compartment in the center armrest
is locked as well.
Opening
Fold the center armrest up, see arrow.Connection for an external audio
device
You can connect an external audio device such
as a CD or MP3 player and play audio tracks over the car's loudspeaker system:
▷AUX-IN port, refer to page 182.▷USB audio interface, refer to page 183.
Storage compartments
inside the vehicle
No non-slip mats on the dashboard
Do not use non-slip materials, such as
non-slip mats, on the dashboard, or it could be
damaged by the substances in the materials.◀
The following compartments are available, de‐
pending on how your vehicle is equipped:
In the doors
To open: fold open the cover.
In the center console One open storage compartment or ashtray.
In the partition wall
To open: pull the handle.
The intermediate floor of the storage compart‐
ment can be removed and inserted at various
heights.
Removing the storage compartment The storage compartment can be removed
completely to be able to use other inserts, for
example.
Seite 125Storage compartmentsControls125
Online Edition for Part no. 01 40 2 954 104 - II/15
Page 133 of 289

Closing the trunk lidDrive with the trunk lid closed
Only operate the vehicle with the trunk
lid closed; otherwise, exhaust fumes could en‐
ter the passenger compartment.◀
If the vehicle must be driven with the trunk lid
open:1.Close all windows.2.Greatly increase the air flow rate of the air
conditioner or automatic climate control.
Hot exhaust system
Hot exhaust system
High temperatures are generated in the
exhaust system.
Do not remove the heat shields installed and
never apply undercoating to them. Make sure
that flammable materials, e. g. hay, leaves,
grass, etc. do not come in contact with the hot
exhaust system during driving, while in idle po‐
sition mode, or when parked. Such contact
could lead to a fire, and with it the risk of seri‐
ous personal injury as well as property dam‐
age.
Do not touch hot exhaust pipes; otherwise,
there is the danger of getting burned.◀
Mobile communication devices in the
vehicle
Mobile communication devices in the ve‐
hicle
It is not recommended to use mobile phones,
such as mobile phones without a direct con‐
nection to an external aerial in the vehicle's
passenger compartment. Otherwise, the vehi‐
cle electronics and mobile communication de‐
vices can interfere with each other. In addition,
there is no assurance that the radiation gener‐
ated during transmission will be discharged
from the vehicle interior.◀
Hydroplaning
On wet or slushy roads, a wedge of water can
form between the tires and road surface.
This phenomenon is referred to as hydroplan‐
ing. It is characterized by a partial or complete
loss of contact between the tires and the road
surface, ultimately undermining your ability to
steer and brake the vehicle.
Hydroplaning
When driving on wet or slushy roads, re‐
duce your speed to prevent hydroplaning.◀
Driving through water Drive though calm water only if it is not deeper
than 9.8 inches/25 cm and at this height, no
faster than walking speed, up to
6 mph/10 km/h.
Adhere to water depth and speed limita‐
tions
Do not exceed this water depth and walking speed; otherwise, the vehicle's engine, the
electrical systems and the transmission may
be damaged.◀
Braking safely
Your vehicle is equipped with ABS as a stand‐
ard feature.
Applying the brakes fully is the most effective
way of braking in situations when this is neces‐
sary.
The vehicle maintains steering responsive‐
ness. You can still avoid any obstacles with a
minimum of steering effort.
Pulsation of the brake pedal and sounds from
the hydraulic circuits indicate that ABS is in its
active mode.Seite 131Things to remember when drivingDriving tips131
Online Edition for Part no. 01 40 2 954 104 - II/15
Page 235 of 289

car tires must meet under the Federal Motor
Vehicle Safety Standard No. 109. Grades B
and A represent higher levels of performance
on the laboratory test wheel than the minimum
required by law.
Temperature grade for this tire
The temperature grade for this tire is es‐
tablished for a tire that is properly inflated and
not overloaded. Excessive speed, underinfla‐
tion, or excessive loading, either separately or
in combination, can cause heat buildup and
possible tire failure.◀
RSC – Run-flat tires The symbol identifying run-flat tires is a circle
with the letters RSC on the sidewall, refer to
page 234.
M+S
Winter and all-season tires.
These have better winter properties than
summer tires.
XL
Designation for specially reinforced tires.
Tire tread
Summer tires
Do not drive with a tire tread depth of less than
0.12 in/3 mm.
There is an increased danger of hydroplaning if
the tread depth is less than 0.12 in/3 mm.
Winter tires
Do not drive with a tire tread depth of less than
0.16 in/4 mm.
Below a tread depth of 0.16 in/4 mm, tires are
less suitable for winter operation.Minimum tread depth
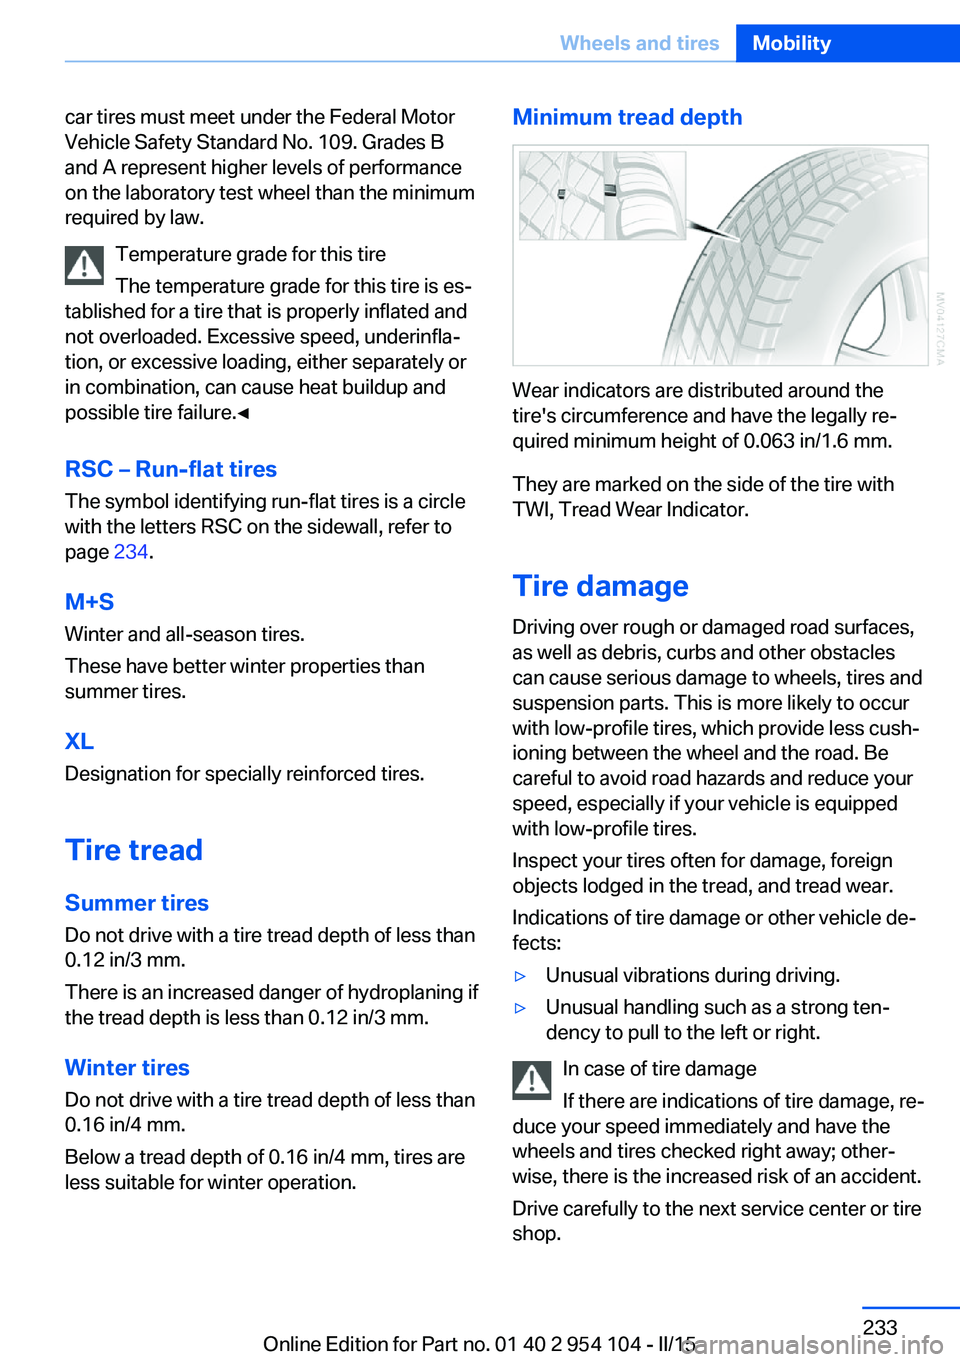
Wear indicators are distributed around the
tire's circumference and have the legally re‐
quired minimum height of 0.063 in/1.6 mm.
They are marked on the side of the tire with
TWI, Tread Wear Indicator.
Tire damage
Driving over rough or damaged road surfaces,
as well as debris, curbs and other obstacles can cause serious damage to wheels, tires and
suspension parts. This is more likely to occur
with low-profile tires, which provide less cush‐
ioning between the wheel and the road. Be
careful to avoid road hazards and reduce your
speed, especially if your vehicle is equipped
with low-profile tires.
Inspect your tires often for damage, foreign
objects lodged in the tread, and tread wear.
Indications of tire damage or other vehicle de‐
fects:
▷Unusual vibrations during driving.▷Unusual handling such as a strong ten‐
dency to pull to the left or right.
In case of tire damage
If there are indications of tire damage, re‐
duce your speed immediately and have the
wheels and tires checked right away; other‐
wise, there is the increased risk of an accident.
Drive carefully to the next service center or tire
shop.
Seite 233Wheels and tiresMobility233
Online Edition for Part no. 01 40 2 954 104 - II/15
Page 240 of 289

Hood
Opening the hood Working in the engine compartment
Never attempt to perform any service or
repair operations on your vehicle without the necessary professional technical training.
If you are unfamiliar with the statutory guide‐
lines, have any work on the vehicle performed
only by a service center.
If this work is not carried out properly, there is
the danger of subsequent damage and related
safety hazards.◀
To avoid damage, make sure that the
wiper arms are resting against the wind‐
shield before you open the engine compart‐
ment. Do not open the engine hood before the
engine has cooled down; otherwise, injuries
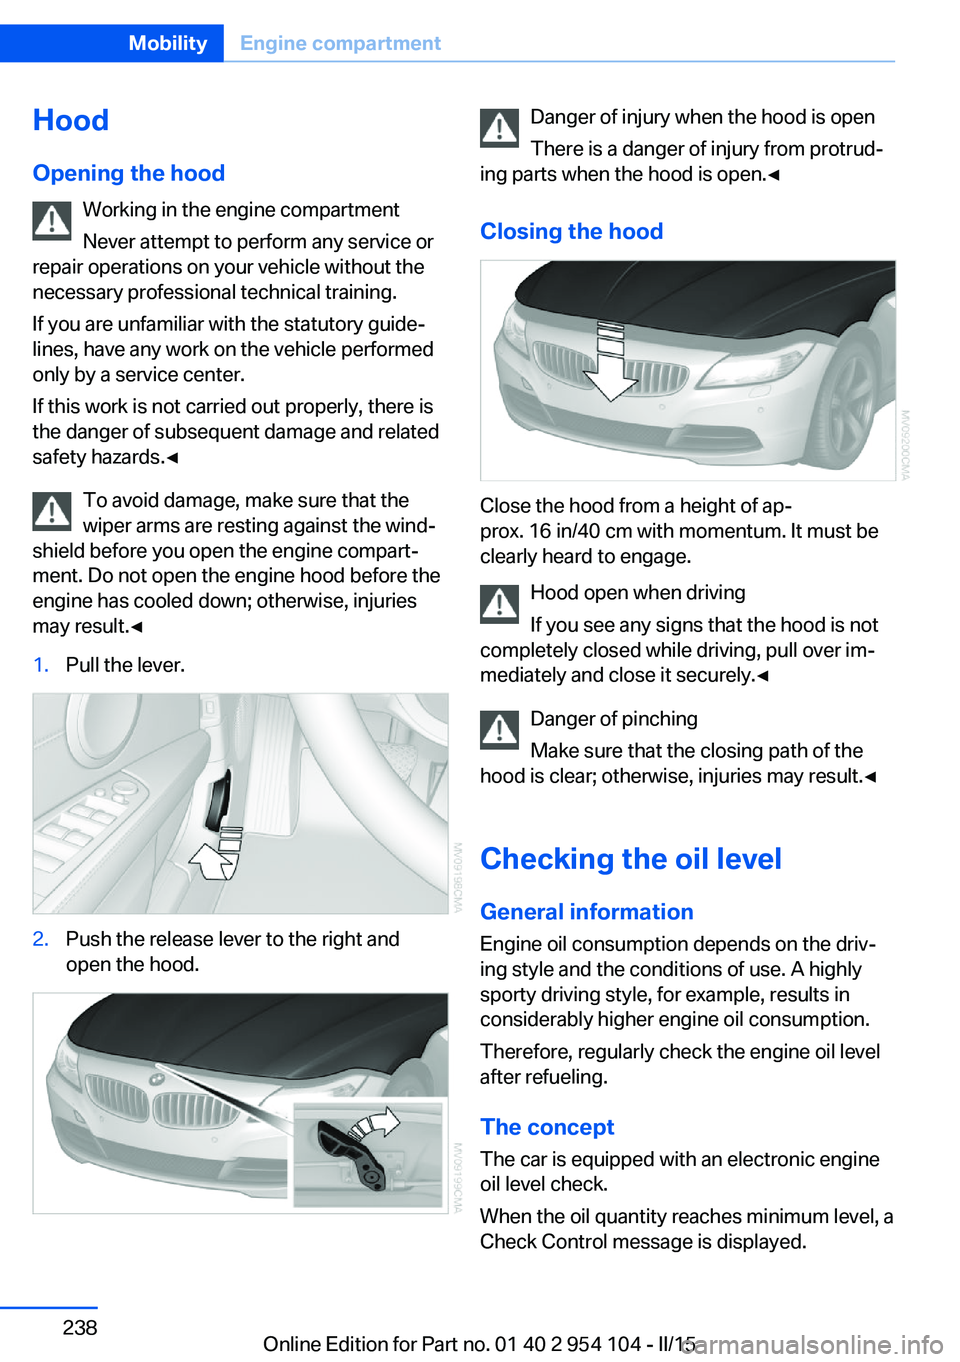
may result.◀1.Pull the lever.2.Push the release lever to the right and
open the hood.Danger of injury when the hood is open
There is a danger of injury from protrud‐
ing parts when the hood is open.◀
Closing the hood
Close the hood from a height of ap‐
prox. 16 in/40 cm with momentum. It must be
clearly heard to engage.
Hood open when driving
If you see any signs that the hood is not
completely closed while driving, pull over im‐
mediately and close it securely.◀
Danger of pinching
Make sure that the closing path of the
hood is clear; otherwise, injuries may result.◀
Checking the oil level General information
Engine oil consumption depends on the driv‐
ing style and the conditions of use. A highly
sporty driving style, for example, results in
considerably higher engine oil consumption.
Therefore, regularly check the engine oil level
after refueling.
The concept
The car is equipped with an electronic engine
oil level check.
When the oil quantity reaches minimum level, a
Check Control message is displayed.
Seite 238MobilityEngine compartment238
Online Edition for Part no. 01 40 2 954 104 - II/15
Page 266 of 289

Technical dataVehicle equipment
This chapter describes all series equipment as
well as country-specific and special equipment
offered for this model series. Therefore, it also
describes equipment that may not be found in
your vehicle, for instance due to the selectedspecial equipment or the country version. This
also applies to safety-related functions and
systems.
When using the features and systems descri‐
bed here, adhere to local regulations.
Note
The technical data and specifications in the
Owner's Manual serve as guidelines. Detailed
values can be obtained from your registrationdocuments, from labels in your vehicle, or from
the service center.
Dimensions
BMW Z4Width with mirrorsinches/mm76.8/1,951Width without mirrorsinches/mm70.5/1,790Heightinches/mm50.8/1,291Height Z4 sDrive35isinches/mm50.6/1,284Lengthinches/mm166.9/4,239Length Z4 sDrive35isinches/mm167.1/4,244Wheelbaseinches/mm98.3/2,496Smallest turning circle dia.ft/m35.1/10.7
Weights
Z4 sDrive28iZ4 sDrive35iZ4 sDrive35isApproved gross vehicle weightManual transmissionlbs/kg3,858/1,750——Seite 264ReferenceTechnical data264
Online Edition for Part no. 01 40 2 954 104 - II/15
Page 281 of 289

Headlamp control, auto‐matic 88
Headlamps, care 258
Headlamps, cleaning 64
Headlight courtesy delay fea‐ ture 88
Headlight flasher 62
Headlight flasher, indicator lamp 17
Headliner 19
Heatable mirrors 53
Heatable rear win‐ dow 111, 114
Heating 109
Heating, mirrors 53
Heating, seats 50
Heavy cargo, stowing 133
Height adjustment, seats 48
Height adjustment, steering wheel 54
Height, refer to Dimen‐ sions 264
High-beam Assistant 89
High-beams 62
High-beams/low beams, refer to High-beam Assistant 89
High beams, headlight flasher 89
High-beams, indicator lamp 17
High-pressure washers 257
Hills 132
Hill start assistant, refer to Drive-off assistant 104
Holder for beverages 126
Holder for remote control, re‐ fer to Ignition lock 57
Homepage 6
Hood 238
Horn 14
Hot exhaust system 131
Hotline 219
House number, entering for navigation 143
Hydroplaning 131 I
Ice warning, refer to External temperature warning 73
Icy roads, refer to External temperature warning 73
Identification marks, tires 231
iDrive 20
iDrive, changing the date and time 78
iDrive, changing the units of measure and display for‐
mat 78
Ignition 58
Ignition key position 1, refer to Radio ready state 58
Ignition key position 2, refer to Ignition on 58
Ignition key, refer to Remote control with integrated
key 32
Ignition lock 57
Ignition, switched off 58
Ignition, switched on 58
Indication of a flat tire 95
Indicator and warning lamps, Tire Pressure Monitor
TPM 98
Indicator and warning lights 17
Individual air distribution 111
Inflation pressure, refer to Tire inflation pressure 228
Inflation pressure warning, tires 94
Information on the navigation data 140
Initializing, compass, refer to Calibrating 119
Initializing, Flat Tire Monitor FTM 95
Installation location, tele‐ phone 124
Instrument cluster 16
Instrument lighting 90 Instrument panel, refer to In‐
strument cluster 16
Instruments, refer to Cock‐ pit 14
Integrated key 32
Integrated universal remote control 116
Interactive map 147
Interior equipment 116
Interior lights 91
Interior lights, remote con‐ trol 35
Interior mirror 53
Interior motion sensor 42
Interior rearview mirror, auto‐ matic dimming 53
Interior rearview mirror, com‐ pass 118
Interior temperature, setting, refer to Air conditioner 110
Interior temperature, setting, refer to Automatic climate
control 112
Intermediate destina‐ tions 149
Intermittent wipe 63
Internet page 6
Intersection, entering for navi‐ gation 143
Interval display, service re‐ quirements 80
J Jacking points 249
Joystick, refer to iDrive 20
K
Keyless Go, refer to Comfort Access 39
Keyless opening and closing, refer to Comfort Access 39
Key Memory, refer to Per‐ sonal Profile 32 Seite 279Everything from A to ZReference279
Online Edition for Part no. 01 40 2 954 104 - II/15
Page 284 of 289

Radio ready state, switchedon 58
Radio setting, refer to Radio ready state 58
Rain sensor 63
Random 173
Random playback 173
Range 75
RDS 165
Reading lights 91
Reading out loud 212
Rear lamp, refer to Tail lamp, bulb replacement 248
Rear lights, refer to Tail lights 247
Rearview mirror, refer to Mir‐ rors 52
Rear window de‐ froster 111, 114
Recirculated air mode 110, 113
Reclining seat, refer to Back‐ rest 48
Recommended tire brands 235
Redialing 201
Refueling 224
Remaining range, refer to Range 75
Reminders 212
Remote app 221
Remote control 32
Remote control, battery re‐ placement 41
Remote control, Comfort Ac‐ cess 39
Remote control, garage door opener 116
Remote control, malfunc‐ tion 36
Remote control, removing from the ignition lock 57
Remote control, tailgate 35
Remote control, univer‐ sal 116
Remote inquiry 200 Remote Services 221
Replacement fuses, refer to Spare fuses 250
Replacement remote con‐ trol 32
Replacing wheels/tires 234
Reporting safety defects 9
Reservoir for washer fluid 65
Restraining systems, refer to Safety belts 50
Restraint system for chil‐ dren 55
Retaining straps, securing cargo 134
Retractable hardtop, conven‐ ient opening and closing 35
Retractable hardtop, opening and closing 44
Retractable hardtop, remote control 35
Retreaded tires 235
Reverse gear, 7-gear auto‐ matic transmission 69
Reverse gear, 8-gear auto‐ matic transmission 66
Reverse gear, manual trans‐ mission 65
Rim cleaner, care 259
Road, avoiding 151
Road detour 151
Roadside Assistance 217
Roadside parking lights 89
Roadworthiness test 80
Roof, refer to Retractable hardtop 44
Route 152
Route criteria, route 151
Route, displaying 152
Route section, bypass‐ ing 152
RSC Runflat System Compo‐ nent, refer to Run-flat
tires 234
Rubber components, care 259
Run-flat tires 234 Run-flat tires, tire inflation
pressure 228
Running lights, refer to Park‐ ing lamps/low beams 87
S Safe braking 131
Safety 7
Safety-belt height adjust‐ ment 51
Safety belts, care 259
Safety belts, damage 51
Safety belts, indicator/warn‐ ing lamp 51
Safety belts, reminder 51
Safety systems, airbags 92
Safety systems, safety belts 50
Safety tires 234
Satellite radio 166
Saving fuel 134
Scale, changing during navi‐ gation 154
Screen, refer to Control Dis‐ play 20
Search, refer to BMW On‐ line 218
Seat adjustment, electric 49
Seat adjustment, mechani‐ cal 48
Seat and mirror memory 51
Seat and mirror memory, re‐ trieving automatically 36
Seat Belt Reminder, refer to Safety belt reminder 51
Seat belts 50
Seat heating 50
Seats 48
Seats, adjusting 48
Seats, adjusting electri‐ cally 49
Seats, heating 50
Seats, memory, refer to Seat and mirror memory 51 Seite 282ReferenceEverything from A to Z282
Online Edition for Part no. 01 40 2 954 104 - II/15