2015 BMW Z4 SDRIVE35IS ECO mode
[x] Cancel search: ECO modePage 70 of 289

▷If the shift paddles are not used and the ve‐
hicle is not accelerated for a certain time,
the system switches back into automatic
mode if the selector lever is in transmission
position D.▷Shift up: pull right shift paddle.▷Shift down: pull left shift paddle.
The vehicle only shifts up or down at appropri‐
ate engine and road speeds, e.g., it does not
shift down if the engine speed is too high.
The selected gear is briefly displayed in the in‐
strument cluster, followed by the current gear.
Displays in the instrument cluster
The transmission position is displayed and the
engaged gear, such as M4, is displayed in
manual mode.
7-gear Sport automatic
transmission with dual clutch
The concept This transmission is an automated manual
transmission with two clutches and two gear‐
box components in which the gears are
changed without loss of torque.
The transmission is operated using the selec‐
tor lever and two shift paddles on the steering
wheel.
Functions:▷Choice of manual or automatic operation:
manual mode or Drive mode.▷Automatic downshifting and protection
against selecting the wrong gear, even in
manual mode.▷Acceleration assistant, Launch Control, re‐
fer to page 71.▷Automatic throttle blip.
System limits
This transmission is equipped with an over‐
heating protection system that protects the
clutches against extremely high loads.
The indicator lamp lights up yellow if
the transmission becomes too warm.
Avoid high engine loads and driving
off frequently.
If the transmission overheats, the indicator
lamp lights up red and power flow to the en‐
gine is interrupted. You can only continue driv‐
ing after the transmission has cooled down.
Avoid driving off frequently with high accelera‐
tion and do not hold the vehicle on inclines by
depressing the accelerator lightly; otherwise,
the transmission may overheat.
Transmission positionsP R N D M/S + –
Seite 68ControlsDriving68
Online Edition for Part no. 01 40 2 954 104 - II/15
Page 72 of 289

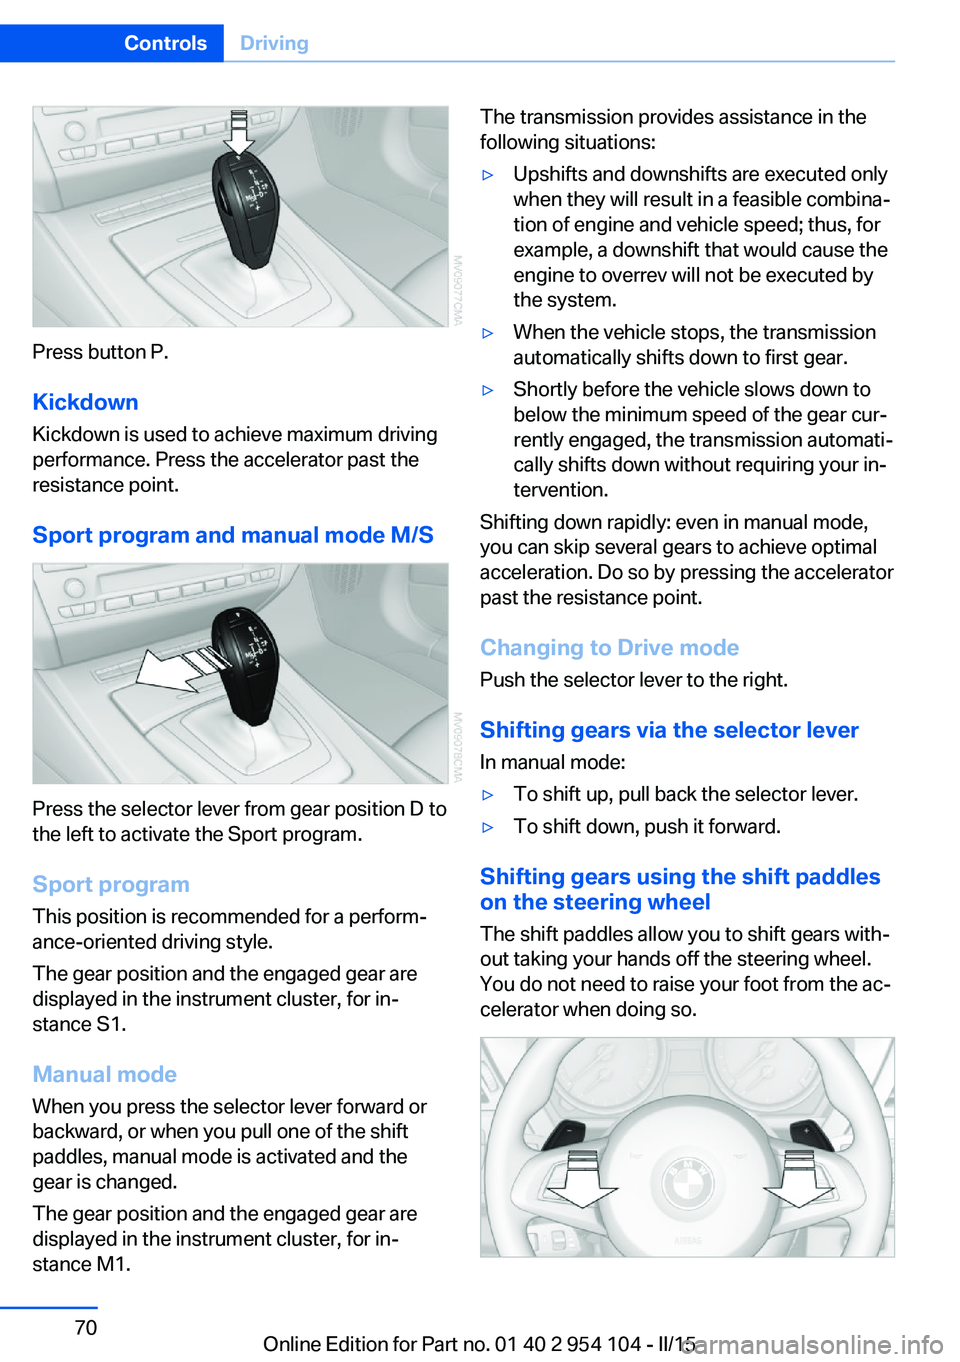
Press button P.KickdownKickdown is used to achieve maximum driving
performance. Press the accelerator past the
resistance point.
Sport program and manual mode M/S
Press the selector lever from gear position D to
the left to activate the Sport program.
Sport program
This position is recommended for a perform‐
ance-oriented driving style.
The gear position and the engaged gear are
displayed in the instrument cluster, for in‐
stance S1.
Manual mode
When you press the selector lever forward or
backward, or when you pull one of the shift
paddles, manual mode is activated and the
gear is changed.
The gear position and the engaged gear are
displayed in the instrument cluster, for in‐
stance M1.
The transmission provides assistance in the following situations:▷Upshifts and downshifts are executed only
when they will result in a feasible combina‐
tion of engine and vehicle speed; thus, for
example, a downshift that would cause the
engine to overrev will not be executed by
the system.▷When the vehicle stops, the transmission
automatically shifts down to first gear.▷Shortly before the vehicle slows down to
below the minimum speed of the gear cur‐
rently engaged, the transmission automati‐
cally shifts down without requiring your in‐
tervention.
Shifting down rapidly: even in manual mode,
you can skip several gears to achieve optimal
acceleration. Do so by pressing the accelerator
past the resistance point.
Changing to Drive mode Push the selector lever to the right.
Shifting gears via the selector lever
In manual mode:
▷To shift up, pull back the selector lever.▷To shift down, push it forward.
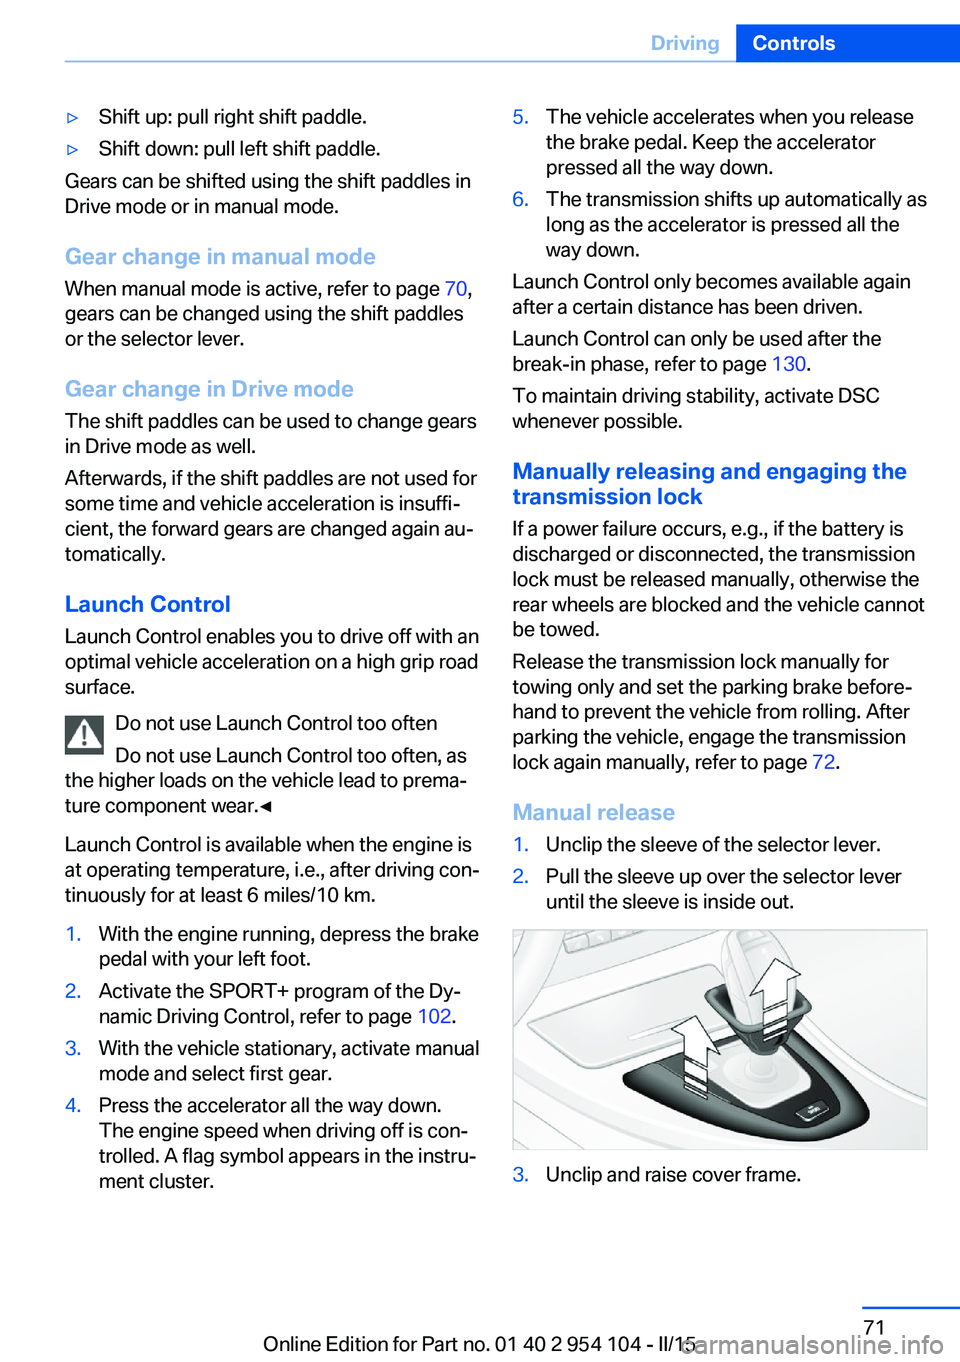
Shifting gears using the shift paddles
on the steering wheel
The shift paddles allow you to shift gears with‐
out taking your hands off the steering wheel.
You do not need to raise your foot from the ac‐
celerator when doing so.
Seite 70ControlsDriving70
Online Edition for Part no. 01 40 2 954 104 - II/15
Page 73 of 289

▷Shift up: pull right shift paddle.▷Shift down: pull left shift paddle.
Gears can be shifted using the shift paddles in
Drive mode or in manual mode.
Gear change in manual mode
When manual mode is active, refer to page 70,
gears can be changed using the shift paddles
or the selector lever.
Gear change in Drive mode The shift paddles can be used to change gears
in Drive mode as well.
Afterwards, if the shift paddles are not used for
some time and vehicle acceleration is insuffi‐
cient, the forward gears are changed again au‐ tomatically.
Launch Control
Launch Control enables you to drive off with an
optimal vehicle acceleration on a high grip road
surface.
Do not use Launch Control too often
Do not use Launch Control too often, as
the higher loads on the vehicle lead to prema‐
ture component wear.◀
Launch Control is available when the engine is
at operating temperature, i.e., after driving con‐
tinuously for at least 6 miles/10 km.
1.With the engine running, depress the brake
pedal with your left foot.2.Activate the SPORT+ program of the Dy‐
namic Driving Control, refer to page 102.3.With the vehicle stationary, activate manual
mode and select first gear.4.Press the accelerator all the way down.
The engine speed when driving off is con‐
trolled. A flag symbol appears in the instru‐
ment cluster.5.The vehicle accelerates when you release
the brake pedal. Keep the accelerator
pressed all the way down.6.The transmission shifts up automatically as
long as the accelerator is pressed all the
way down.
Launch Control only becomes available again
after a certain distance has been driven.
Launch Control can only be used after the
break-in phase, refer to page 130.
To maintain driving stability, activate DSC
whenever possible.
Manually releasing and engaging the
transmission lock
If a power failure occurs, e.g., if the battery is
discharged or disconnected, the transmission
lock must be released manually, otherwise the
rear wheels are blocked and the vehicle cannot
be towed.
Release the transmission lock manually for
towing only and set the parking brake before‐
hand to prevent the vehicle from rolling. After
parking the vehicle, engage the transmission
lock again manually, refer to page 72.
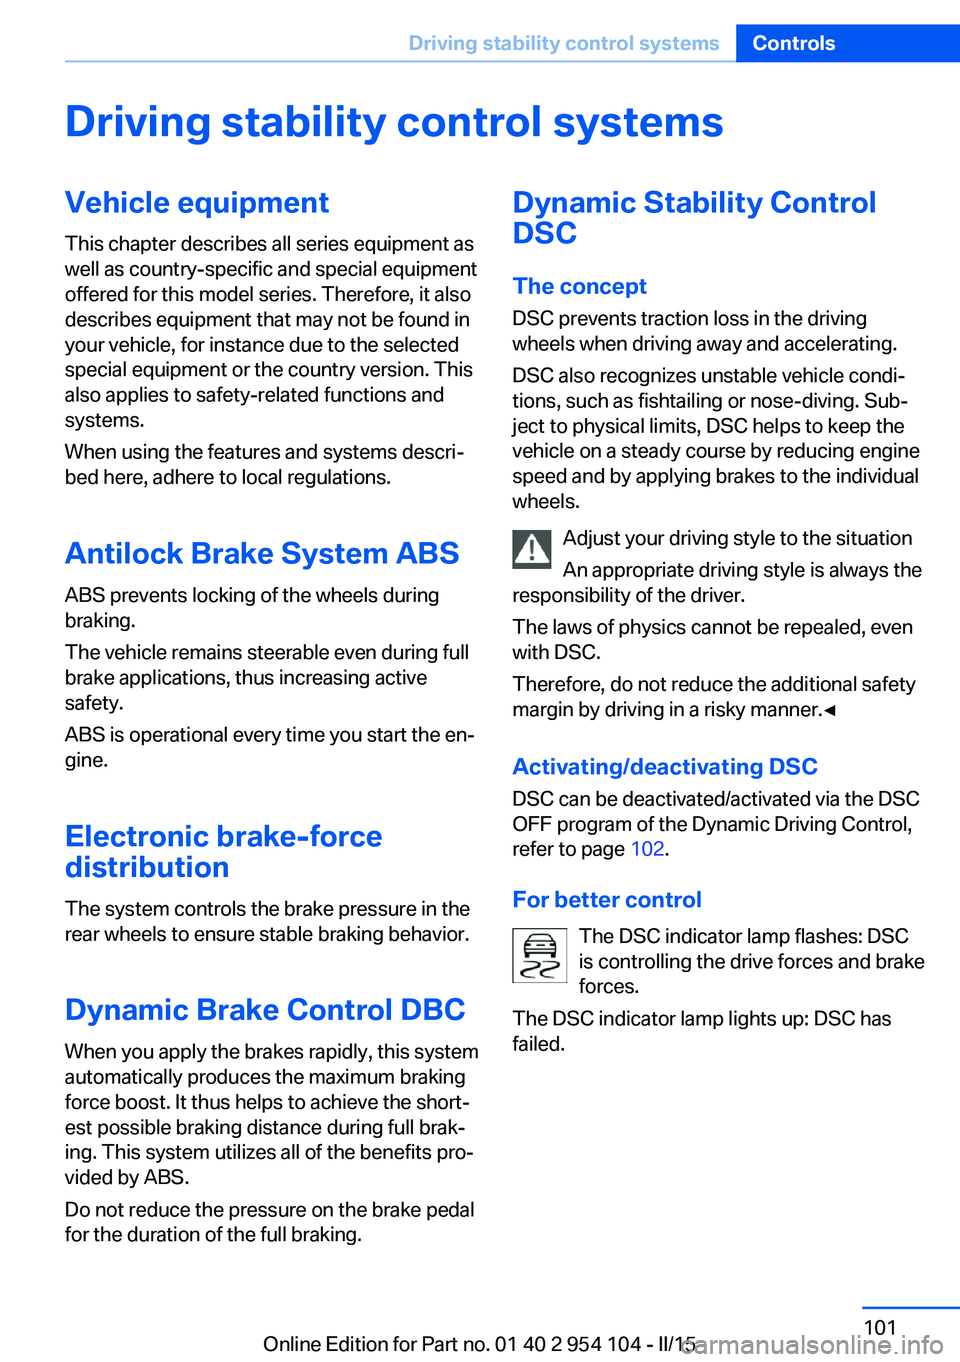
Manual release
1.Unclip the sleeve of the selector lever.2.Pull the sleeve up over the selector lever
until the sleeve is inside out.3.Unclip and raise cover frame.Seite 71DrivingControls71
Online Edition for Part no. 01 40 2 954 104 - II/15
Page 76 of 289

Tachometer
Never force the engine speed up into the red
warning field, see arrow. In this range, the fuel
supply is interrupted to protect the engine.
Coolant temperature A warning light will come on if the coolant, and
therefore the engine, becomes too hot. In addi‐
tion, a message will appear on the Control Dis‐
play.
Check the coolant level, refer to page 241.
Engine oil temperature▷Cold engine: the pointer is at the low tem‐
perature end. Drive at moderate engine
and vehicle speeds.▷Normal operating temperature: the pointer
is in the middle of the temperature display.▷Hot engine: the pointer is at the high tem‐
perature end. Switch off the engine imme‐
diately and allow it to cool down.
If the engine oil temperature is too high, a mes‐
sage appears on the Control Display.
Check the oil level, refer to page 238.
Fuel gauge
The vehicle inclination may cause the display
to vary.
Notes on refueling, refer to page 224.
Range
After the reserve range is reached:
▷A message is briefly displayed on the Con‐
trol Display.Seite 74ControlsDisplays74
Online Edition for Part no. 01 40 2 954 104 - II/15
Page 89 of 289

LampsVehicle equipment
This chapter describes all series equipment as
well as country-specific and special equipment
offered for this model series. Therefore, it also
describes equipment that may not be found in
your vehicle, for instance due to the selected
special equipment or the country version. This
also applies to safety-related functions and
systems.
When using the features and systems descri‐
bed here, adhere to local regulations.
At a glance0Lamps off
Daytime running lights1Parking lights and daytime running lights2Low-beam headlights and welcome lights3Automatic headlamp control, daytime run‐
ning lights, welcome lamps, High-beam
Assistant, and Adaptive Light Control
When you open the driver's door with the igni‐
tion switched off, the exterior lighting is auto‐
matically switched off if the light switch is in
position 0, 2, or 3.
Switch on the parking lights if necessary,
switch position 1.
Parking lamps/low beams,
headlamp control
Parking lamps Switch position
: the vehicle lamps light
up on all sides, e.g., for parking.
Do not use the parking lamps for extended pe‐
riods; otherwise, the battery may become dis‐
charged and it would then be impossible to
start the engine.
When parking, it is preferable to switch on the
one-sided roadside parking lamps, refer to
page 89.
Low beams Switch position
with the ignition switched
on: the low beams light up.
Welcome lights When parking the vehicle, leave the switch in
position
or : the parking and interior
lamps light up briefly when the vehicle is un‐
locked.
Activating/deactivating the welcome
lamps
1."Settings"2."Lighting"3."Welcome light"
The setting is stored for the remote control
currently in use.
Seite 87LampsControls87
Online Edition for Part no. 01 40 2 954 104 - II/15
Page 103 of 289

Driving stability control systemsVehicle equipmentThis chapter describes all series equipment as
well as country-specific and special equipment
offered for this model series. Therefore, it also
describes equipment that may not be found in
your vehicle, for instance due to the selected
special equipment or the country version. This
also applies to safety-related functions and
systems.
When using the features and systems descri‐
bed here, adhere to local regulations.
Antilock Brake System ABS ABS prevents locking of the wheels during
braking.
The vehicle remains steerable even during full
brake applications, thus increasing active
safety.
ABS is operational every time you start the en‐
gine.
Electronic brake-force
distribution
The system controls the brake pressure in the
rear wheels to ensure stable braking behavior.
Dynamic Brake Control DBC
When you apply the brakes rapidly, this system automatically produces the maximum braking
force boost. It thus helps to achieve the short‐
est possible braking distance during full brak‐
ing. This system utilizes all of the benefits pro‐
vided by ABS.
Do not reduce the pressure on the brake pedal
for the duration of the full braking.Dynamic Stability Control
DSC
The concept DSC prevents traction loss in the driving
wheels when driving away and accelerating.
DSC also recognizes unstable vehicle condi‐
tions, such as fishtailing or nose-diving. Sub‐
ject to physical limits, DSC helps to keep the
vehicle on a steady course by reducing engine
speed and by applying brakes to the individual
wheels.
Adjust your driving style to the situation
An appropriate driving style is always the
responsibility of the driver.
The laws of physics cannot be repealed, even
with DSC.
Therefore, do not reduce the additional safety
margin by driving in a risky manner.◀
Activating/deactivating DSC DSC can be deactivated/activated via the DSC
OFF program of the Dynamic Driving Control,
refer to page 102.
For better control The DSC indicator lamp flashes: DSC
is controlling the drive forces and brake
forces.
The DSC indicator lamp lights up: DSC has
failed.Seite 101Driving stability control systemsControls101
Online Edition for Part no. 01 40 2 954 104 - II/15
Page 111 of 289

ClimateVehicle equipmentThis chapter describes all series equipment as
well as country-specific and special equipment
offered for this model series. Therefore, it also
describes equipment that may not be found in
your vehicle, for instance due to the selectedspecial equipment or the country version. This
also applies to safety-related functions and
systems.
When using the features and systems descri‐
bed here, adhere to local regulations.
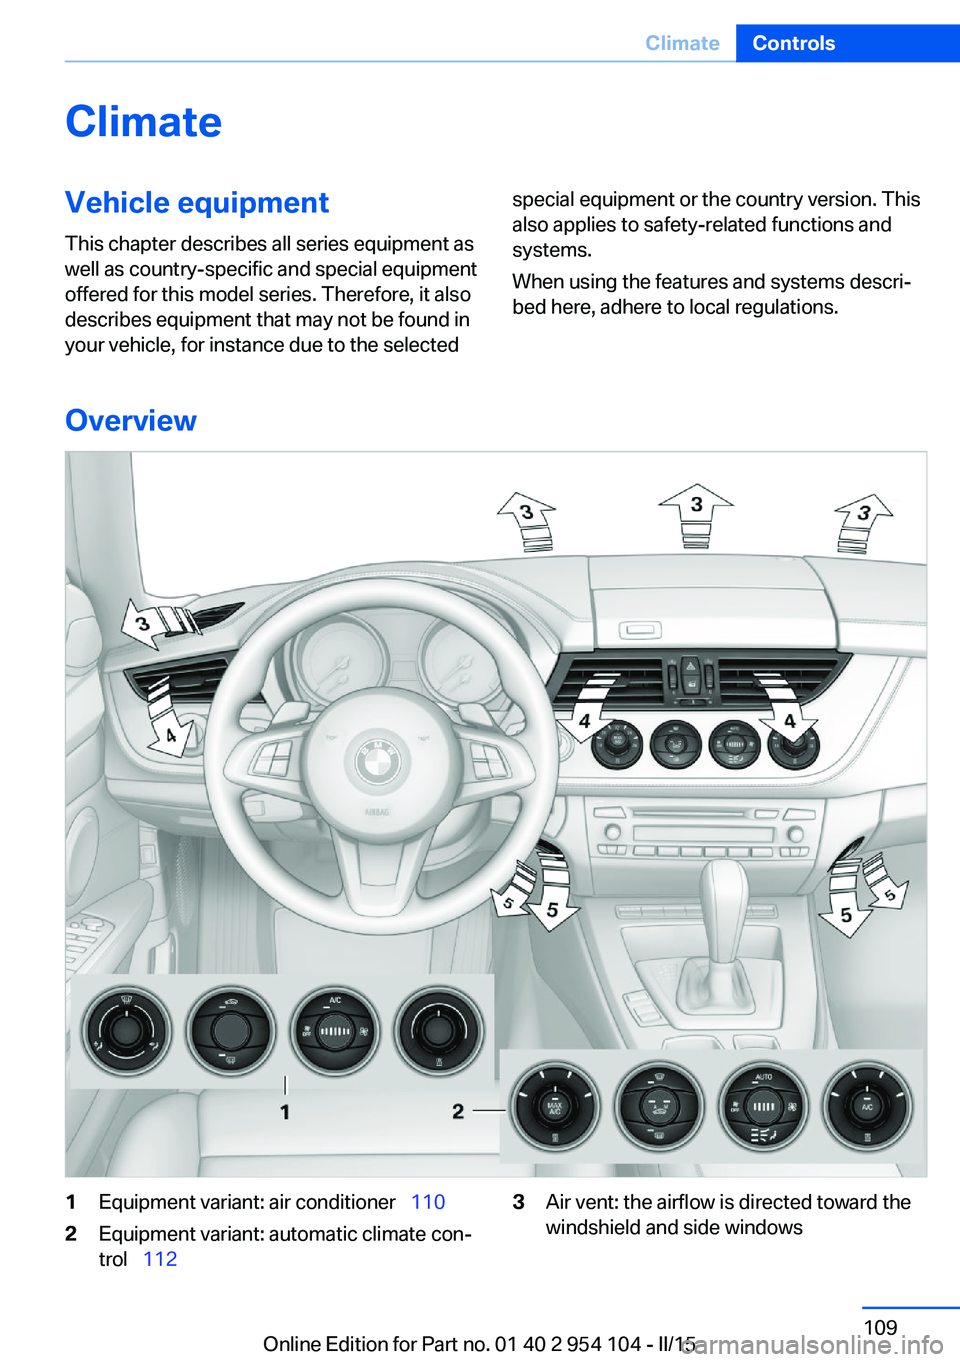
Overview
1Equipment variant: air conditioner 1102Equipment variant: automatic climate con‐
trol 1123Air vent: the airflow is directed toward the
windshield and side windowsSeite 109ClimateControls109
Online Edition for Part no. 01 40 2 954 104 - II/15
Page 113 of 289

tants, shut off the supply to the interior of the
car temporarily. The system then recirculates
the air currently within the vehicle.
The recirculated air mode can also be acti‐
vated/deactivated, refer to page 14, via a but‐
ton on the steering wheel.
Air volume Press the corresponding button.
The higher the rate, the more ef‐
fective the heating or cooling will
be.
The air flow rate may be reduced or the blower
may be switched off entirely to save on battery
power.
Vent settings Direct the flow of air to the win‐
dows
, to the upper body area
, or to the knee area and foot‐
well
. Intermediate positions
are possible. In the 6 o'clock posi‐
tion, a small amount of air is also directed to‐
ward the windows to keep them from fogging
over.
Defrosting windows and removing
condensation
1Air distribution 1 in position .2Deactivate recirculated air mode 2.3Switch on cooling function 3.4Temperature 4 to the right, red.5Set the air flow rate 5 to the maximum
level.6Switch on the rear window defroster 6 to
defrost the rear window
.
Rear window defroster
The defroster switches off auto‐
matically after a certain time or
when the hardtop is opened.
Microfilter
The microfilter removes dust and pollen from
the incoming air. The microfilter is changed by
your service center during routine mainte‐
nance work.
Ventilation
1Use the lever to change the direction of the
air flow2Use the thumbwheels to smoothly open
and close the air vents
Ventilation for cooling
Adjust the vents to direct the flow of cool air in
your direction, for instance if the interior has
become too warm.
Draft-free ventilation
Adjust the vents to let the air flow past you.
Seite 111ClimateControls111
Online Edition for Part no. 01 40 2 954 104 - II/15