2015 BMW Z4 SDRIVE28I turn signal
[x] Cancel search: turn signalPage 165 of 289
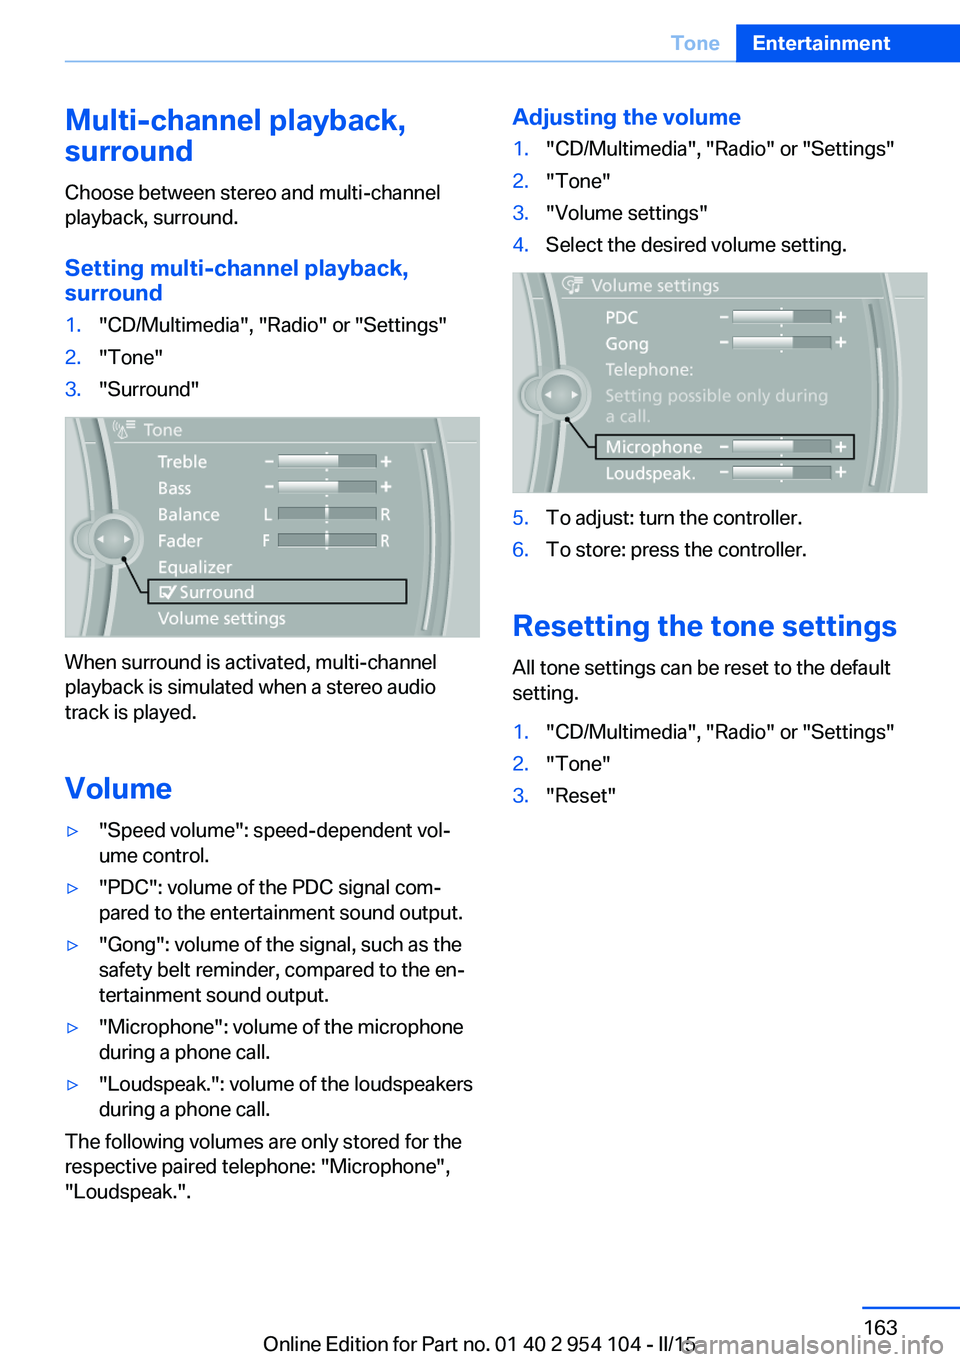
Multi-channel playback,
surround
Choose between stereo and multi-channel
playback, surround.
Setting multi-channel playback,
surround1."CD/Multimedia", "Radio" or "Settings"2."Tone"3."Surround"
When surround is activated, multi-channel
playback is simulated when a stereo audio
track is played.
Volume
▷"Speed volume": speed-dependent vol‐
ume control.▷"PDC": volume of the PDC signal com‐
pared to the entertainment sound output.▷"Gong": volume of the signal, such as the
safety belt reminder, compared to the en‐
tertainment sound output.▷"Microphone": volume of the microphone
during a phone call.▷"Loudspeak.": volume of the loudspeakers
during a phone call.
The following volumes are only stored for the
respective paired telephone: "Microphone",
"Loudspeak.".
Adjusting the volume1."CD/Multimedia", "Radio" or "Settings"2."Tone"3."Volume settings"4.Select the desired volume setting.5.To adjust: turn the controller.6.To store: press the controller.
Resetting the tone settings
All tone settings can be reset to the default
setting.
1."CD/Multimedia", "Radio" or "Settings"2."Tone"3."Reset"Seite 163ToneEntertainment163
Online Edition for Part no. 01 40 2 954 104 - II/15
Page 167 of 289
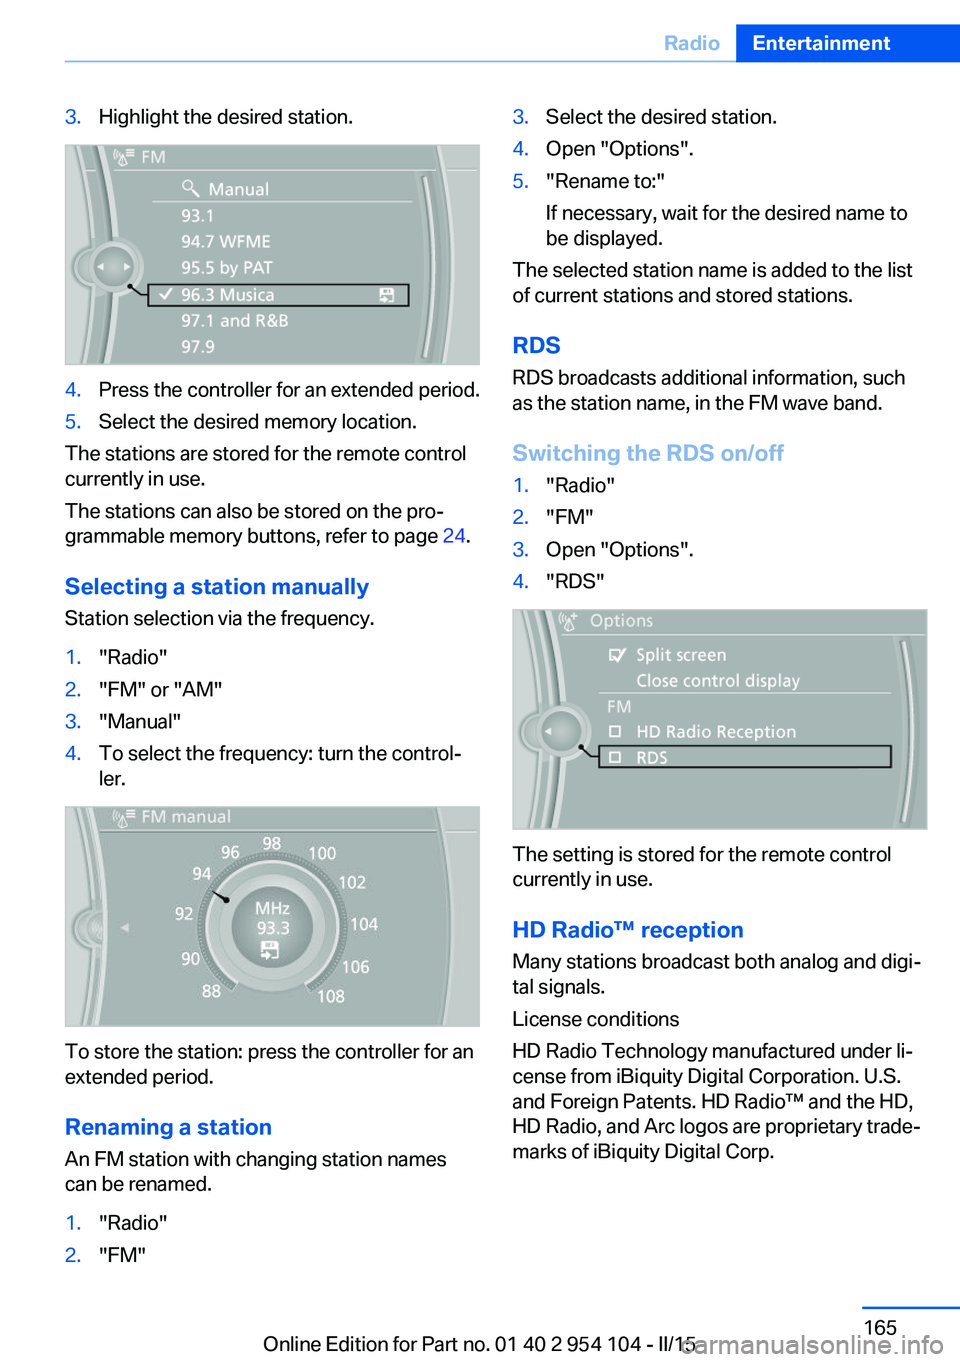
3.Highlight the desired station.4.Press the controller for an extended period.5.Select the desired memory location.
The stations are stored for the remote control
currently in use.
The stations can also be stored on the pro‐
grammable memory buttons, refer to page 24.
Selecting a station manually
Station selection via the frequency.
1."Radio"2."FM" or "AM"3."Manual"4.To select the frequency: turn the control‐
ler.
To store the station: press the controller for an
extended period.
Renaming a station An FM station with changing station names
can be renamed.
1."Radio"2."FM"3.Select the desired station.4.Open "Options".5."Rename to:"
If necessary, wait for the desired name to
be displayed.
The selected station name is added to the list
of current stations and stored stations.
RDSRDS broadcasts additional information, such
as the station name, in the FM wave band.
Switching the RDS on/off
1."Radio"2."FM"3.Open "Options".4."RDS"
The setting is stored for the remote control
currently in use.
HD Radio™ reception
Many stations broadcast both analog and digi‐
tal signals.
License conditions
HD Radio Technology manufactured under li‐
cense from iBiquity Digital Corporation. U.S.
and Foreign Patents. HD Radio™ and the HD,
HD Radio, and Arc logos are proprietary trade‐
marks of iBiquity Digital Corp.
Seite 165RadioEntertainment165
Online Edition for Part no. 01 40 2 954 104 - II/15
Page 170 of 289
Via direct channel entry1."Radio"2."Satellite radio"3. "Set channel"4.Turn the controller until the desired chan‐
nel is reached and press the controller.
Storing a channel
1."Radio"2."Satellite radio"3.If necessary, open "All channels" or the de‐
sired category.4.Select the desired channel.5.Press the controller again.6.Press the controller again to confirm the
highlighted channel.7.Select the desired memory location.
The channels are stored for the remote control
currently in use.
The channels can also be stored on the pro‐
grammable memory buttons, refer to page 24.
Changing the list view
The list view changes every time the first sym‐
bol on the navigation bar is pressed.
Information on the channel is displayed.
SymbolMeaning Channel name Artist TrackSelecting a category1."Radio"2."Satellite radio"3. "Category"4.Select the desired category.
Timeshift
Approx. one hour of the program being broad‐
cast on the channel currently being listened to
is stored in a buffer. Prerequisite: the signal
must be available.
The stored audio track can be played with a
delay following the live broadcast. When the
buffer is full, the older tracks are overwritten.
The buffer is cleared when a new channel is
selected.
Opening the timeshift function
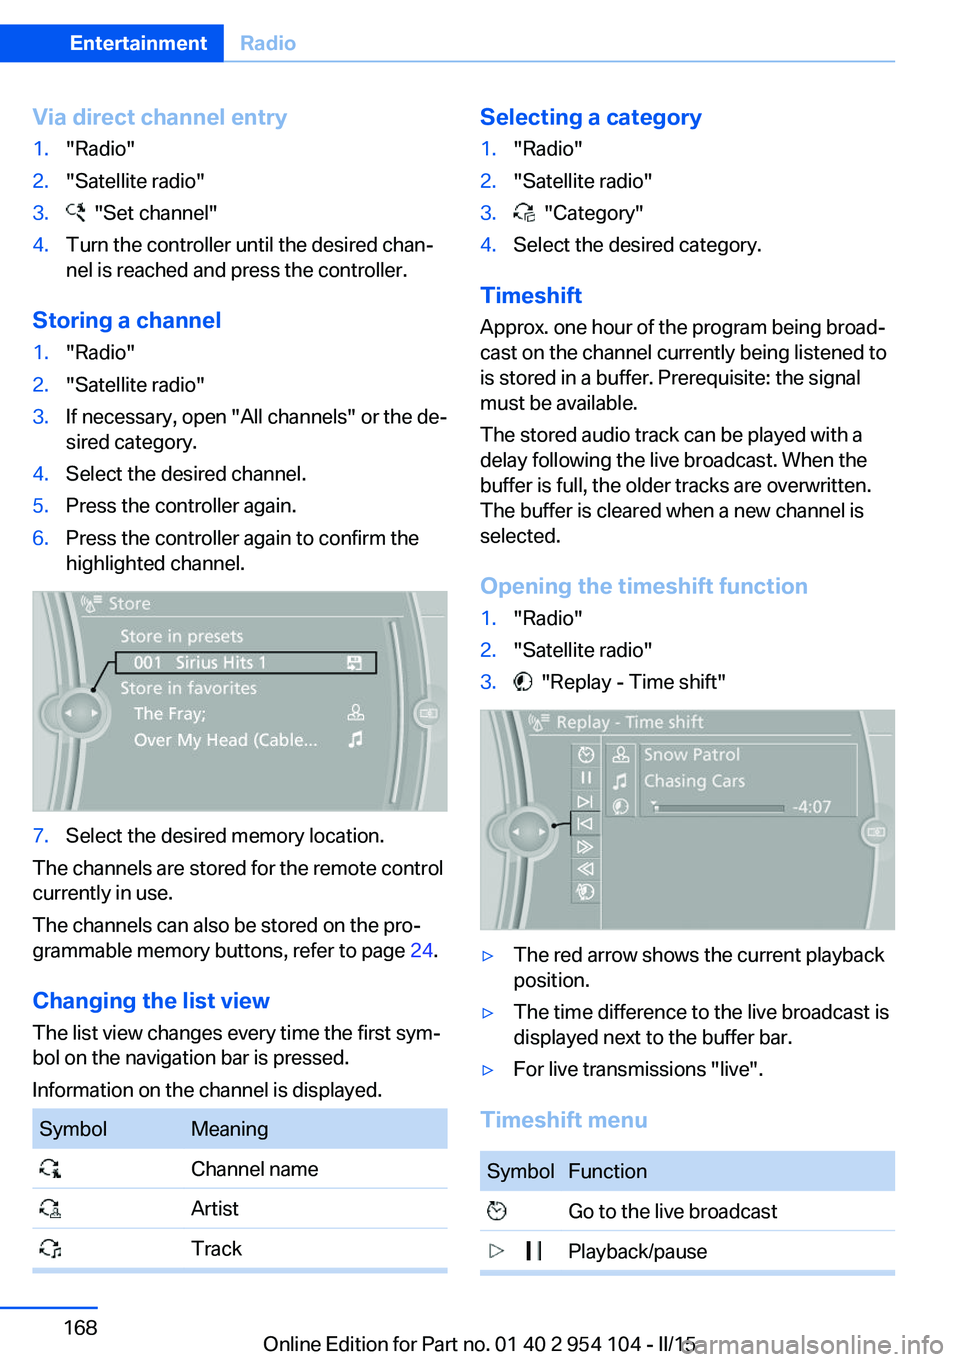
1."Radio"2."Satellite radio"3. "Replay - Time shift"▷The red arrow shows the current playback
position.▷The time difference to the live broadcast is
displayed next to the buffer bar.▷For live transmissions "live".
Timeshift menu
SymbolFunction Go to the live broadcast Playback/pauseSeite 168EntertainmentRadio168
Online Edition for Part no. 01 40 2 954 104 - II/15
Page 200 of 289
▷Switch the mobile phone off and on again.▷Is the ambient temperature too high or
low? Do not expose the mobile phone to
extreme environmental conditions.
The telephone functions are not available.
▷Is the mobile phone paired as an additional
telephone and is the additional telephone
function deactivated? Activate the func‐
tion.▷Is an outgoing call not possible? Connect
the mobile phone as a telephone.
No phone book entries or only some phone
book entries are displayed, or they are incom‐
plete.
▷Transmission of the phone book entries is
not yet complete.▷It is possible that only the phone book en‐
tries of the mobile phone or the SIM card
are transmitted.▷It may not be possible to display phone
book entries with special characters.▷The number of phone book entries to be
stored is too high.▷Is the data volume of the contact too large,
e. g., due to stored information such as
notes? Reduce the data volume of the con‐
tact.▷Is the mobile phone connected as an audio
source or additional telephone? The mo‐
bile phone must be connected as a tele‐
phone.
The phone connection quality is poor.
▷The strength of the Bluetooth signal on the
mobile phone can be adjusted, depending
on the mobile phone.▷Insert the mobile phone into the snap-in
adapter or place it in the area of the center
console.▷Adjust the volume of the microphone and
loudspeakers separately.If all points in this list have been checked and
the required function is still not available, con‐
tact Customer Relations or the service center.
Controls
Adjusting the volume
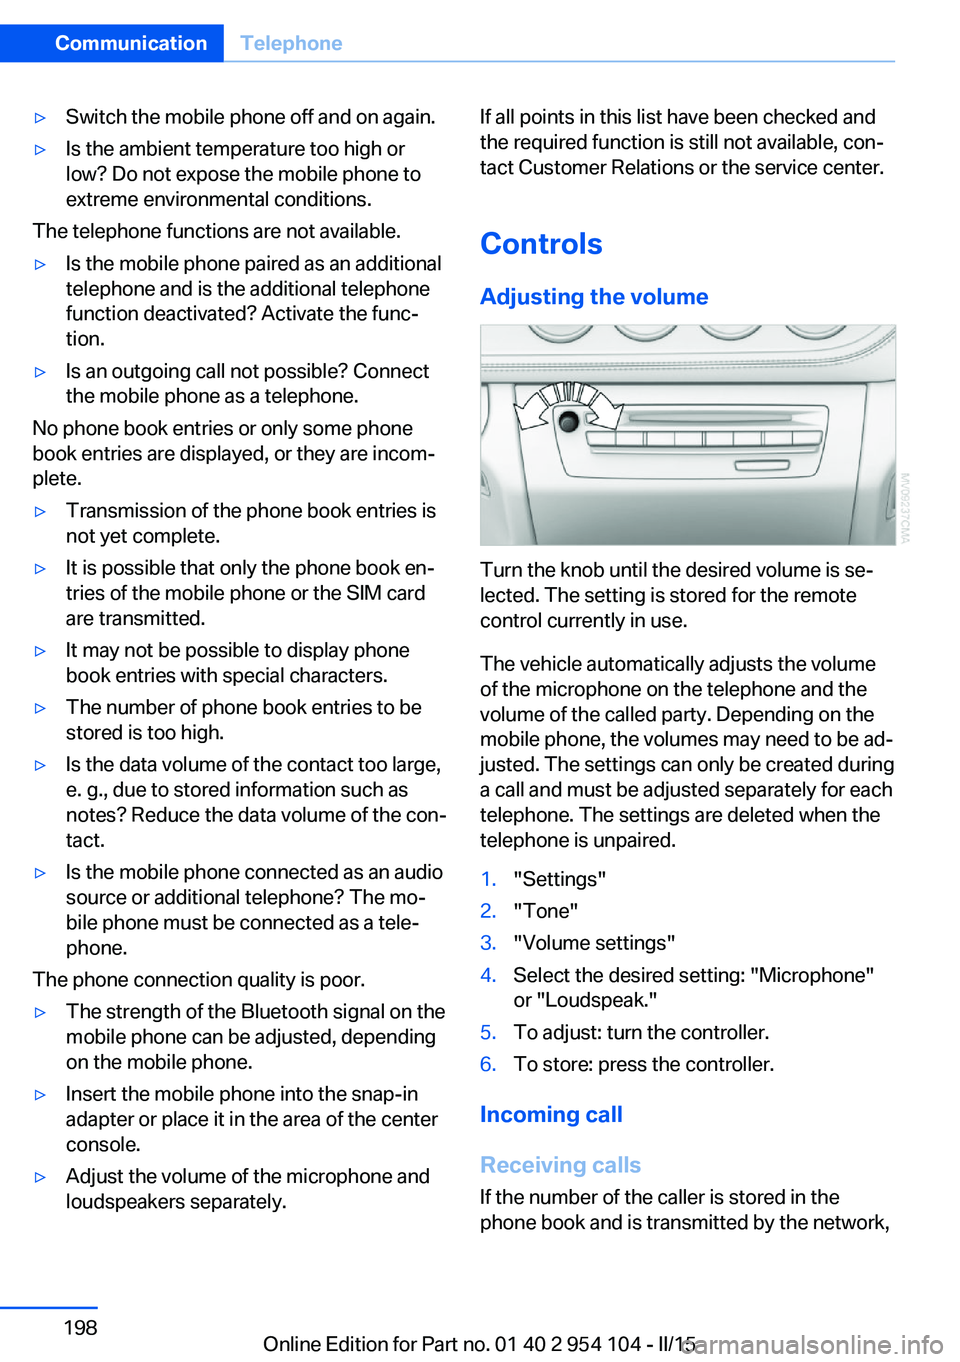
Turn the knob until the desired volume is se‐
lected. The setting is stored for the remote
control currently in use.
The vehicle automatically adjusts the volume
of the microphone on the telephone and the
volume of the called party. Depending on the
mobile phone, the volumes may need to be ad‐
justed. The settings can only be created during
a call and must be adjusted separately for each
telephone. The settings are deleted when the
telephone is unpaired.
1."Settings"2."Tone"3."Volume settings"4.Select the desired setting: "Microphone"
or "Loudspeak."5.To adjust: turn the controller.6.To store: press the controller.
Incoming call
Receiving calls If the number of the caller is stored in the
phone book and is transmitted by the network,
Seite 198CommunicationTelephone198
Online Edition for Part no. 01 40 2 954 104 - II/15
Page 202 of 289
If a second call comes in during an ongoing
call, a call waiting signal is sounded.
"Accept"
The call is accepted and the existing call is put
on hold.
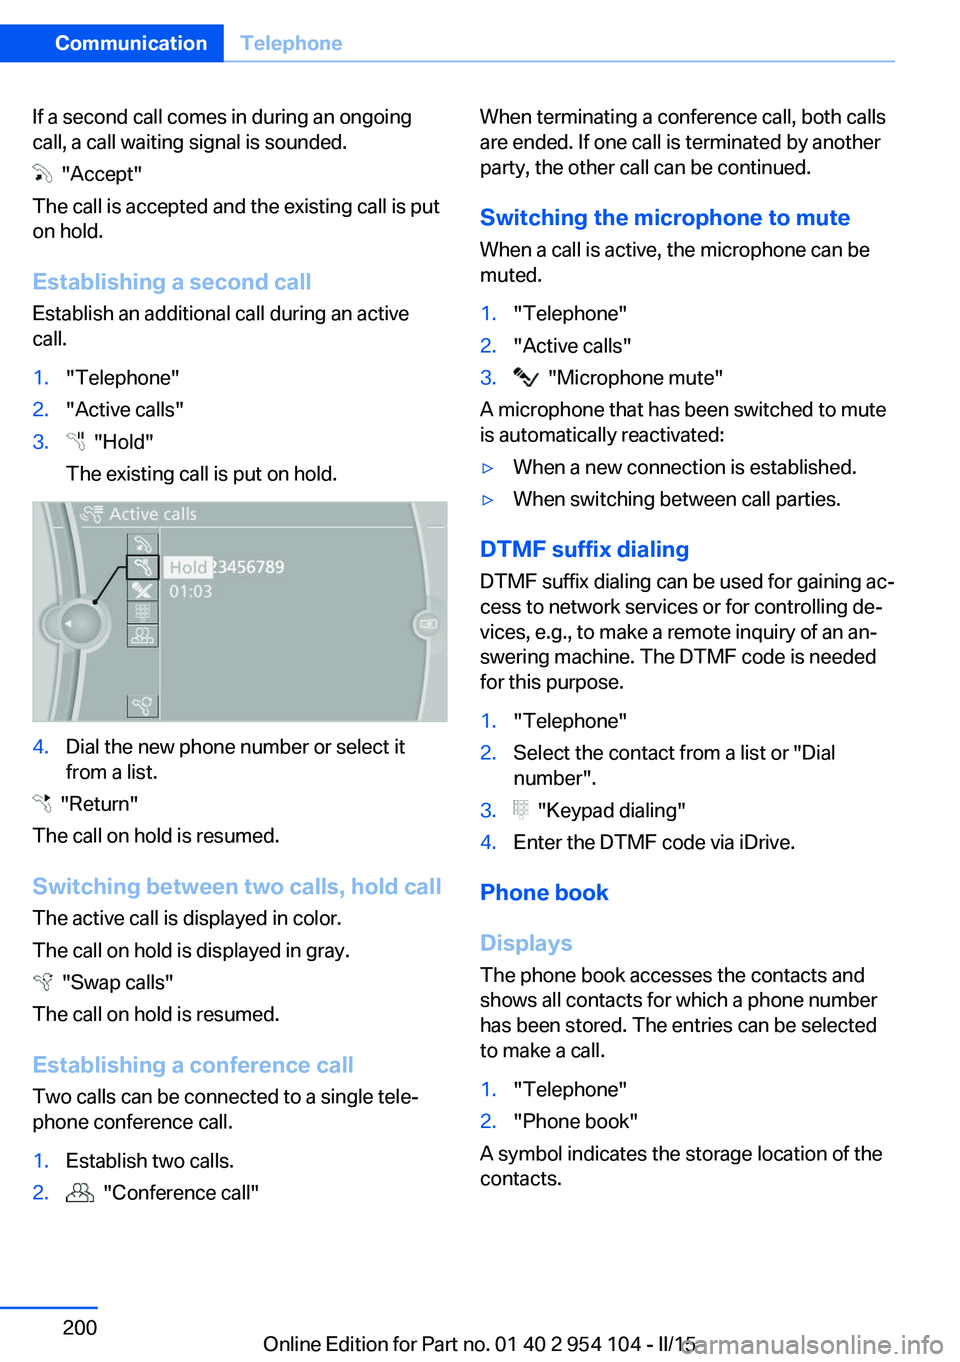
Establishing a second call
Establish an additional call during an active
call.
1."Telephone"2."Active calls"3. "Hold"
The existing call is put on hold.4.Dial the new phone number or select it
from a list.
"Return"
The call on hold is resumed.
Switching between two calls, hold call The active call is displayed in color.
The call on hold is displayed in gray.
"Swap calls"
The call on hold is resumed.
Establishing a conference call Two calls can be connected to a single tele‐
phone conference call.
1.Establish two calls.2. "Conference call"When terminating a conference call, both calls
are ended. If one call is terminated by another
party, the other call can be continued.
Switching the microphone to mute When a call is active, the microphone can be
muted.1."Telephone"2."Active calls"3. "Microphone mute"
A microphone that has been switched to mute
is automatically reactivated:
▷When a new connection is established.▷When switching between call parties.
DTMF suffix dialing
DTMF suffix dialing can be used for gaining ac‐
cess to network services or for controlling de‐
vices, e.g., to make a remote inquiry of an an‐
swering machine. The DTMF code is needed
for this purpose.
1."Telephone"2.Select the contact from a list or "Dial
number".3. "Keypad dialing"4.Enter the DTMF code via iDrive.
Phone book
Displays The phone book accesses the contacts and
shows all contacts for which a phone number
has been stored. The entries can be selected
to make a call.
1."Telephone"2."Phone book"
A symbol indicates the storage location of the
contacts.
Seite 200CommunicationTelephone200
Online Edition for Part no. 01 40 2 954 104 - II/15
Page 248 of 289
Use a clean tissue, cloth or something similar,
or hold the bulb by its base.◀
Light-emitting diodes LED
Light-emitting diodes installed behind translu‐
cent lenses serve as the light source for many
of the controls and displays in your vehicle.
These light-emitting diodes, which operate us‐
ing a concept similar to that applied in conven‐
tional lasers, are officially designated as
Class 1 light-emitting diodes.
Do not remove the covers
Do not remove the covers, and never
stare into the unfiltered light for several hours;
otherwise, irritation of the retina could result.◀
Headlight glass
Condensation can form on the inside of the ex‐
ternal lights in cool or humid weather. When
you drive with the lights switched on, the con‐
densation evaporates after a short time. The
headlight glasses do not need to be changed.
If the condensation in the headlights does not
evaporate after trips with the lights switched
on, and the amount of moisture in the head‐
lights increases, for example if water droplets
form, have them checked by your service cen‐
ter.
Headlight setting
Changing the bulbs and lights may influence
the headlight settings. Have the headlight set‐
ting checked by a service center and corrected
if necessary after changing bulbs or lights.Xenon headlights
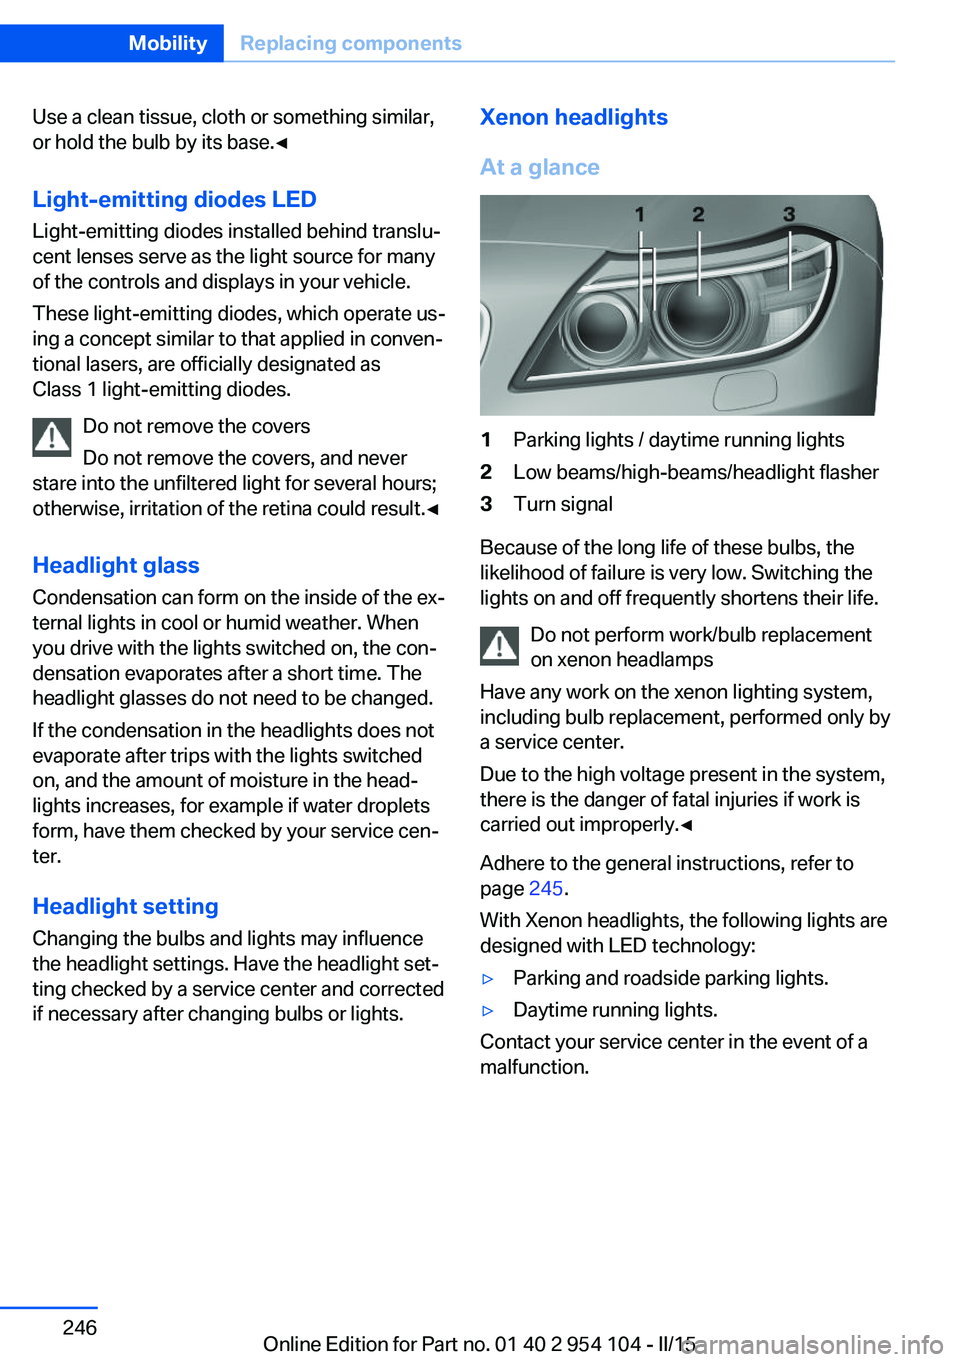
At a glance1Parking lights / daytime running lights2Low beams/high-beams/headlight flasher3Turn signal
Because of the long life of these bulbs, the
likelihood of failure is very low. Switching the
lights on and off frequently shortens their life.
Do not perform work/bulb replacement
on xenon headlamps
Have any work on the xenon lighting system,
including bulb replacement, performed only by
a service center.
Due to the high voltage present in the system,
there is the danger of fatal injuries if work is
carried out improperly.◀
Adhere to the general instructions, refer to
page 245.
With Xenon headlights, the following lights are
designed with LED technology:
▷Parking and roadside parking lights.▷Daytime running lights.
Contact your service center in the event of a
malfunction.
Seite 246MobilityReplacing components246
Online Edition for Part no. 01 40 2 954 104 - II/15
Page 249 of 289
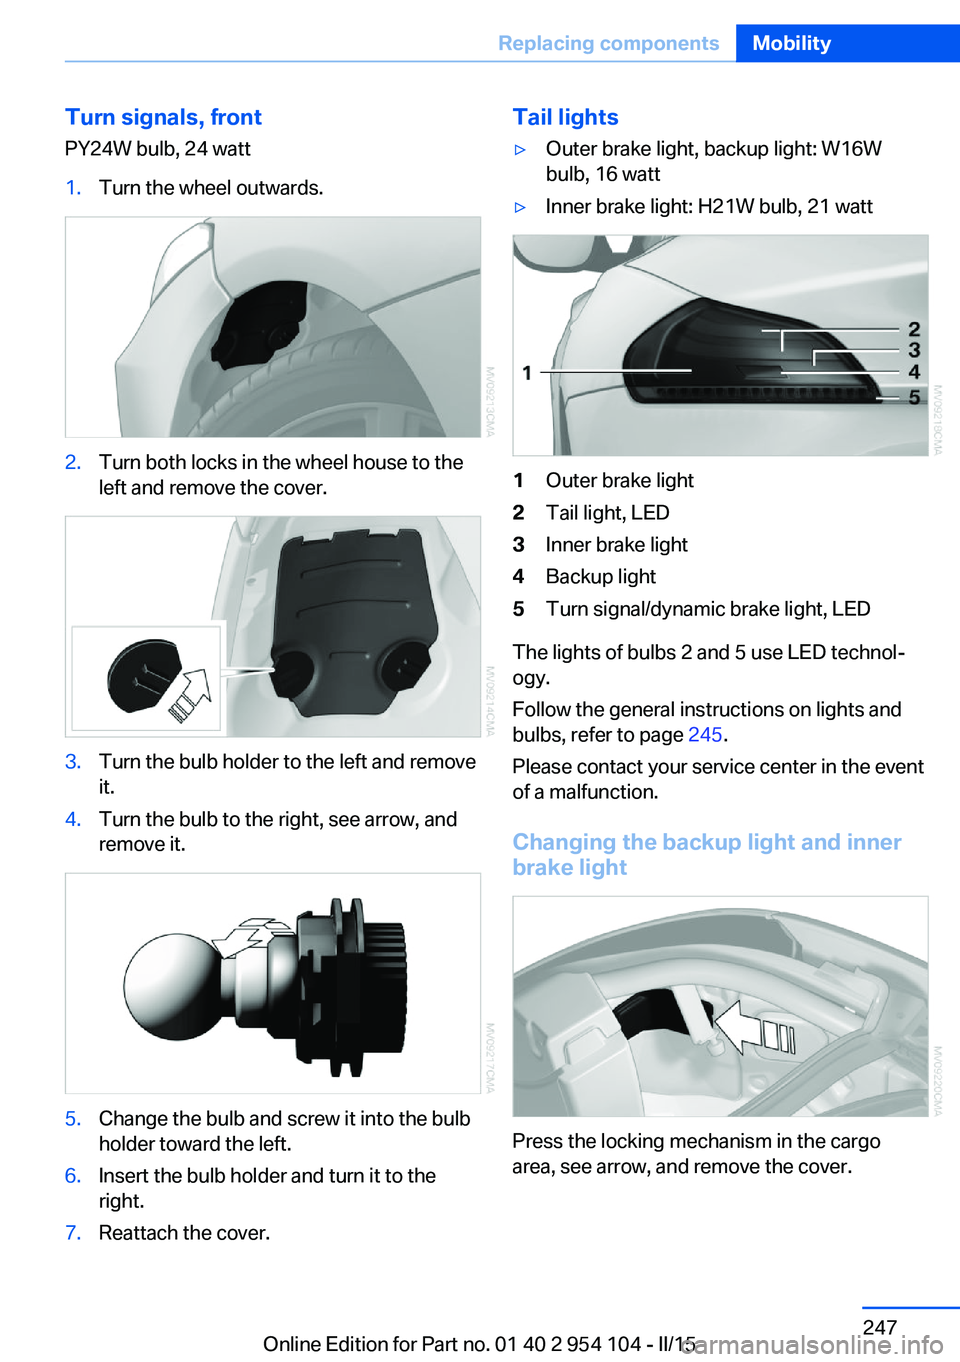
Turn signals, frontPY24W bulb, 24 watt1.Turn the wheel outwards.2.Turn both locks in the wheel house to the
left and remove the cover.3.Turn the bulb holder to the left and remove
it.4.Turn the bulb to the right, see arrow, and
remove it.5.Change the bulb and screw it into the bulb
holder toward the left.6.Insert the bulb holder and turn it to the
right.7.Reattach the cover.Tail lights▷Outer brake light, backup light: W16W
bulb, 16 watt▷Inner brake light: H21W bulb, 21 watt1Outer brake light2Tail light, LED3Inner brake light4Backup light5Turn signal/dynamic brake light, LED
The lights of bulbs 2 and 5 use LED technol‐
ogy.
Follow the general instructions on lights and
bulbs, refer to page 245.
Please contact your service center in the event
of a malfunction.
Changing the backup light and inner brake light
Press the locking mechanism in the cargo
area, see arrow, and remove the cover.
Seite 247Replacing componentsMobility247
Online Edition for Part no. 01 40 2 954 104 - II/15
Page 250 of 289
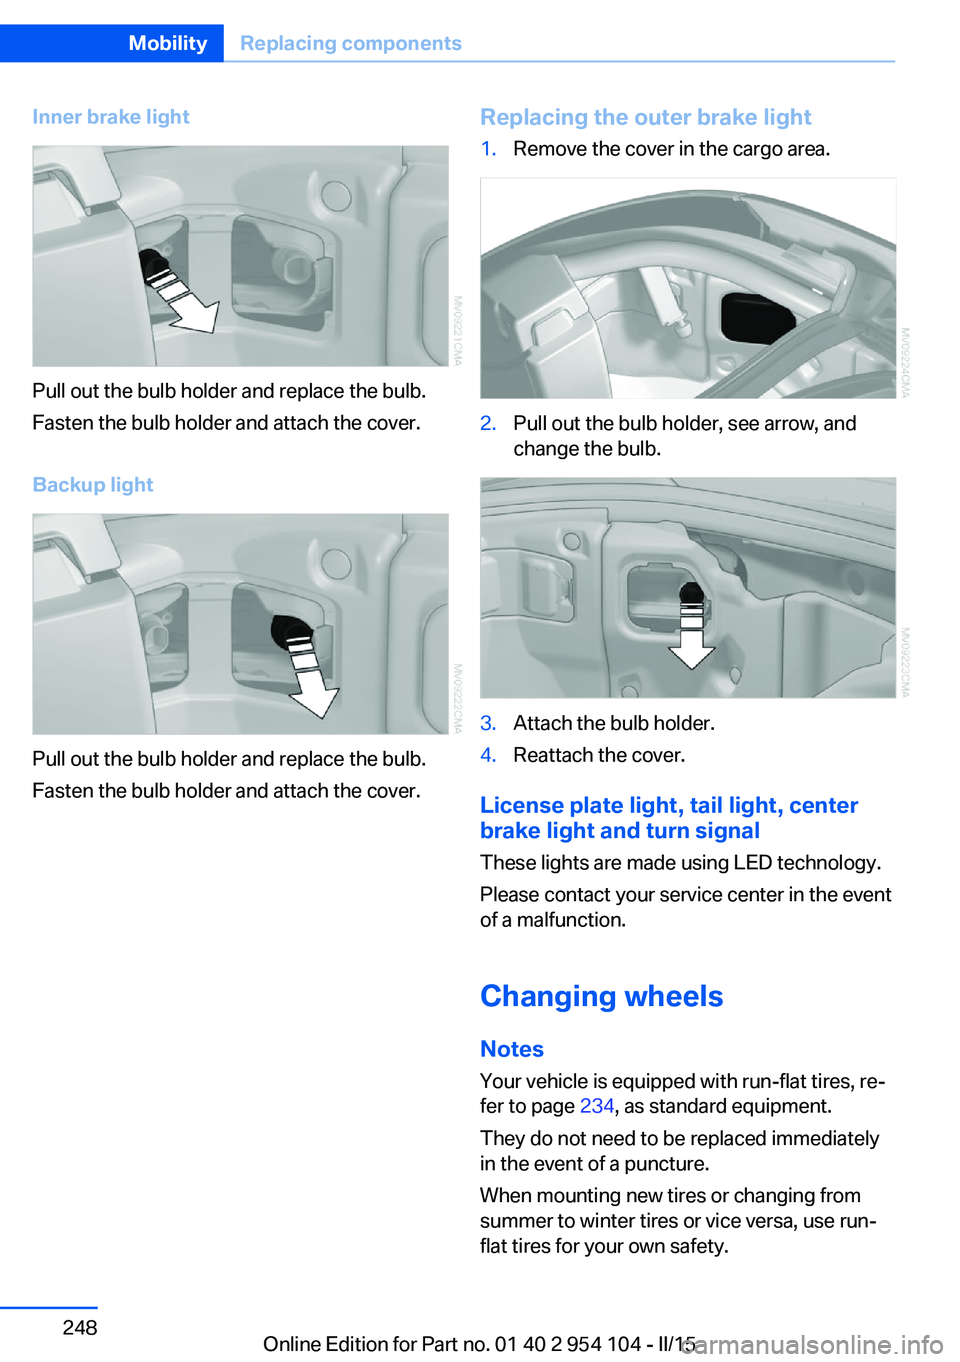
Inner brake light
Pull out the bulb holder and replace the bulb.
Fasten the bulb holder and attach the cover.
Backup light
Pull out the bulb holder and replace the bulb.
Fasten the bulb holder and attach the cover.
Replacing the outer brake light1.Remove the cover in the cargo area.2.Pull out the bulb holder, see arrow, and
change the bulb.3.Attach the bulb holder.4.Reattach the cover.
License plate light, tail light, center
brake light and turn signal
These lights are made using LED technology.
Please contact your service center in the event
of a malfunction.
Changing wheels Notes
Your vehicle is equipped with run-flat tires, re‐
fer to page 234, as standard equipment.
They do not need to be replaced immediately
in the event of a puncture.
When mounting new tires or changing from
summer to winter tires or vice versa, use run-
flat tires for your own safety.
Seite 248MobilityReplacing components248
Online Edition for Part no. 01 40 2 954 104 - II/15