2015 BMW X6 wheel
[x] Cancel search: wheelPage 158 of 265

2.Turn the controller until the desired setting
is reached, and press the controller.
Displaying the turning radius and
pathway lines
▷The static, red turning radius line shows
the space needed to the side of the vehicle
when the steering wheel is turned all the
way.▷The variable, green pathway line assists
you in assessing the amount of space ac‐
tually needed to the side of the vehicle.
The lane line depends on the engaged
gear and the current steering angle. The
track line is continuously adjusted for the
steering wheel movement.
"Parking aid lines"
Turning circle and pathway lines are displayed.
System limits
A Check Control message is displayed when a
camera is not working.
Side View The concept
Side View provides an early look at cross traffic
at blind driveways and intersections. Road
users concealed by obstacles to the left and
right of the vehicle can only be detected rela‐
tively late from the driver's seat. To improve
the viewing, each camera, front and rear on the
vehicle, detects the traffic area on the side.
Which camera is active is shown on the top
edge of the screen.
Information The images of the cameras are displayed, de‐
pending on the gear selected, on the Control
Display.
WARNING
The system does not relieve from the
personal responsibility to correctly assess the
traffic situation. There is risk of an accident.
Adjust the driving style to the traffic condi‐
tions. Watch traffic and vehicle surroundings
closely and actively interfere in the respective
situations.◀
Overview
Button in the vehicle
Side View
Cameras
Front camera
Seite 158ControlsDriving comfort158
Online Edition for Part no. 01 40 2 963 464 - VI/15
Page 162 of 265

Parking using the parking assistantWARNING
The system does not relieve from the
personal responsibility to correctly assess the
traffic situation. There is risk of an accident.
Adjust the driving style to the traffic condi‐
tions. Watch traffic and vehicle surroundings
closely and actively interfere in the respective
situations.◀1.Switch on the parking assistant and acti‐
vate it if needed.
The status of the parking space search is
indicated on the Control Display.2.Follow the instructions on the Control Dis‐
play.
The end of the parking procedure is indi‐
cated on the Control Display.3.Adjust the parking position yourself if
needed.
Interrupting manually
The parking assistant can be interrupted at any
time:
▷ "Parking Assistant" Select the symbol
on the Control Display.▷Press button.
Interrupting automatically
The system is interrupted automatically in the
following situations:
▷If the driver grasps the steering wheel or if
he takes over steering.▷Possible on snow-covered or slippery road
surfaces.▷When there are obstacles that are hard to
overcome, such as curbs.▷When there are obstacles that suddenly
arise.▷If the Park Distance Control PDC displays
clearances that are too small.▷If a maximum number of parking attempts
or the time taken for parking is exceeded.▷When switching to another function on the
Control Display.▷When the button is released.▷If the tailgate is open.▷If doors are open.▷When setting the parking brake.▷During acceleration.▷When braking.▷When unfastening the driver's safety belt.
A Check Control message is displayed.
Resume An interrupted parking procedure can be con‐
tinued if needed.
Follow the instructions on the Control Display
to do this.
System limits
No parking assistance
The parking assistant does not offer assis‐
tance in the following situations:
▷In tight curves.
Functional limitations
The system may not be fully functional in the
following situations:
▷On bumpy road surfaces such as gravel
roads.▷On slippery ground.▷On steep uphill or downhill grades.▷With accumulations of leaves/snow in the
parking space.
Limits of ultrasonic measurement
Ultrasonic measuring might not function under
the following circumstances:
▷For small children and animals.Seite 162ControlsDriving comfort162
Online Edition for Part no. 01 40 2 963 464 - VI/15
Page 167 of 265

Switching on1.Switch off the ignition.2. Press the right side of the button
on the driver's side.
The symbol appears on the automatic cli‐
mate Control Display.
The interior temperature, air volume and air
distribution can be adjusted with the ignition
switched on.
Switch off
At the lowest fan speed, press the left side of
the button on the driver's side.
The symbol on the display of the automatic
climate control flashes.
Defrosts windows and removes
condensation
Press button.
Ice and condensation are quickly re‐
moved from the windshield and the front side
windows.
For this purpose, point the side vents onto the
side windows as needed.
Adjust air flow with the program active.
If the windows are fogged over, you can also
switch on the cooling function or press the AUTO button to utilize the condensation sen‐
sor.
Rear window defroster Press button.
The rear window defroster switches
off automatically after a certain period of time.
Microfilter/activated-charcoal filter
The microfilter removes dust and pollen from
the incoming air.
The activated-charcoal filter removes gaseous
pollutants from the outside air that enters the
vehicle.
This combined filter should be replaced during
scheduled maintenance, refer to page 228, of
your vehicle.
Ventilation
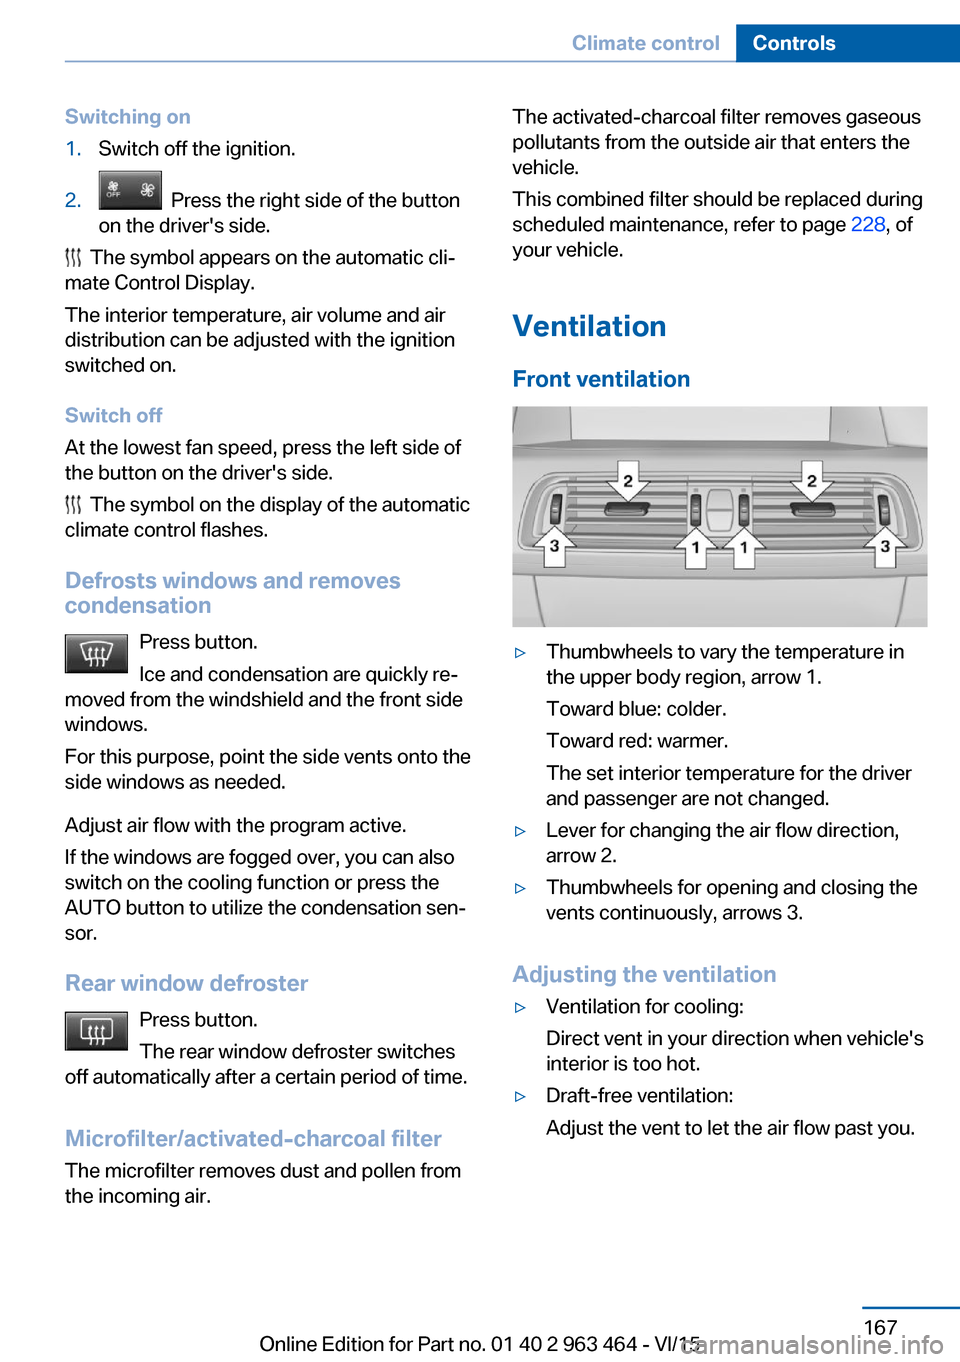
Front ventilation▷Thumbwheels to vary the temperature in
the upper body region, arrow 1.
Toward blue: colder.
Toward red: warmer.
The set interior temperature for the driver
and passenger are not changed.▷Lever for changing the air flow direction,
arrow 2.▷Thumbwheels for opening and closing the
vents continuously, arrows 3.
Adjusting the ventilation
▷Ventilation for cooling:
Direct vent in your direction when vehicle's
interior is too hot.▷Draft-free ventilation:
Adjust the vent to let the air flow past you.Seite 167Climate controlControls167
Online Edition for Part no. 01 40 2 963 464 - VI/15
Page 168 of 265

Ventilation in rear, center▷Thumbwheels to vary the temperature, ar‐
row 1.
Toward blue: colder.
Toward red: warmer.▷Lever for changing the air flow direction,
arrow 2.▷Thumbwheels for continuous opening and
closing of the vents, arrow 3.
Rear automatic climate
control
Overview
1Temperature2AUTO program3Vent settings4Air flow, AUTO intensity5Display6Maximum cooling7Seat heating 55Switching the rear automatic climate
control on/off1."Settings"2."Climate"3."Rear climate"
The rear automatic climate control is not op‐
erational if the automatic climate control is
switched off or if the function for defrosting or
defogging the windows is active.
Switching the system on/off
Switching on Press any button except:
▷Left side of Air volume button.▷Seat heating.
Switch off
Press and hold the left button.
Temperature Turn the ring to set the desired
temperature.
The automatic climate control achieves this
temperature as quickly as possible, if needed
by using the maximum cooling or heating ca‐
pacity, and then keeps it constant.
Do not rapidly switch between different tem‐
perature settings. The automatic climate con‐
trol will not have sufficient time to adjust the
set temperature.
Maximum cooling Press button.
The system is set to the lowest tem‐
perature, maximum air flow and air circulation
mode.
Seite 168ControlsClimate control168
Online Edition for Part no. 01 40 2 963 464 - VI/15
Page 190 of 265

Objects in the movement area around
pedals and floor area
WARNING
Objects in the driver's floor area can limit
the pedal distance or block a depressed pedal.
There is risk of an accident. Stow objects in
the vehicle such that they are secured and
cannot enter into the driver's floor area. Use
floor mats that are suitable for the vehicle and
can be safely attached to the floor. Do not use
loose floor mats and do not layer several floor
mats. Make sure that there is sufficient clear‐
ance for the pedals. Ensure that the floor mats
are securely fastened again after they were re‐
moved, e.g. for cleaning.◀
Driving in wet conditionsWhen roads are wet, salted, or in heavy rain,
press brake pedal ever so gently every few
miles.
Ensure that this action does not endanger
other traffic.
The heat generated in this process helps dry
the brake discs and pads.
In this way braking efficiency will be available
when you need it.
Hills WARNING
Light but consistent brake pressure can
lead to high temperatures, brakes wearing out
and possibly even brake failure. There is risk of
an accident. Avoid placing excessive stress on
the brake system.◀
WARNING
In idle or with the engine switched off,
safety-relevant functions are restricted or not
available anymore, e.g. braking effect of the
engine or braking force and steering support.
There is risk of an accident. Do not drive in idle
or with the engine switched off.◀Drive long or steep downhill gradients in the
gear that requires least braking efforts. Other‐
wise the brakes may overheat and reduce
brake efficiency.
You can increase the engine's braking effect
by shifting down, going all the way to first gear,
if needed.
Brake disc corrosion
Corrosion on the brake discs and contamina‐
tion on the brake pads are furthered by the fol‐
lowing circumstances:▷Low mileage.▷Extended periods when the vehicle is not
used at all.▷Infrequent use of the brakes.
Corrosion will built up when the maximum
pressure applied to the brake pads during
braking is not reached - thus discs don't get
cleaned.
Corrosion buildup on the brake discs will cause
a pulsating effect on the brakes in their re‐
sponse - generally that cannot be corrected.
Condensation under the parked
vehicle
When using the automatic climate control,
condensation water develops collecting under‐
neath the vehicle.
These traces of water under the vehicle are
normal.
Driving on poor roads The vehicle combines all-wheel drive with the
advantages of a normal automobile.
CAUTION
Objects in unpaved areas, e.g. stones or
branches, can damage the vehicle. There is
risk of property damage. Do not drive on un‐
paved terrain.◀
Seite 190Driving tipsThings to remember when driving190
Online Edition for Part no. 01 40 2 963 464 - VI/15
Page 191 of 265

For your own safety, for the safety of passen‐
gers and of the vehicle, heed the following
points:▷Become familiar with the vehicle before
starting a trip; do not take risks in driving.▷Adjust the speed to the road surface con‐
ditions. The steeper and more uneven the
road surface, the slower the speed should
be.▷When driving on steep uphill or downhill
grades: add engine oil and coolant up to
near the MAX mark. Uphill and downhill
grades can be traveled up to no more than
50 %.▷On steep downhill grades, use Hill Descent
Control HDC, refer to page 137.
Starting out is possible on uphill grades up
to 32 %. The permissible side tilt is 50 %.▷Avoid that the chassis bottom coming in
contact with the ground.
The ground clearance is no more than 7.8
inches/20 cm and can vary according to
the vehicle's load.▷When wheels continue to spin, depress the
accelerator so that driving stability control
systems can distribute the driving force to
the wheels. Activate DTC Dynamic Trac‐
tion Control if available.
After a trip on poor roads
After a trip on poor roads, check wheels and
tires for damage to maintain driving safety.
Clear heavy soiling from the body.
Seite 191Things to remember when drivingDriving tips191
Online Edition for Part no. 01 40 2 963 464 - VI/15
Page 203 of 265

Mobility
In order to always ensure your mobility, you will find important information on operating fluids,wheels and tires, maintenance and Roadside Assistance in the following.Online Edition for Part no. 01 40 2 963 464 - VI/15
Page 208 of 265

Wheels and tiresVehicle features and options
This chapter describes all standard, country-
specific and optional features offered with the
series. It also describes features that are not
necessarily available in your car, e. g., due to
the selected options or country versions. This
also applies to safety-related functions and
systems. The respectively applicable country
provisions must be observed when using the
respective features and systems.
Tire inflation pressure Safety information
The tire characteristics and tire inflation pres‐
sure influence the following:▷The service life of the tires.▷Road safety.▷Driving comfort.
Checking the tire inflation pressure
WARNING
A tire with low or missing tire inflation
pressure impacts handling, such as steering
and braking response. There is risk of an acci‐
dent. Regularly check the tire inflation pres‐
sure, and correct it as needed, e.g. twice a
month and before a long trip.◀
Also check the tire inflation pressure of the
emergency wheel in the trunk regularly, and
correct it as needed.
Tires have a natural, consistent loss of tire in‐
flation pressure.
Tires heat up while driving, and the tire infla‐
tion pressure increases along with the tire's
temperature. The tire inflation pressure speci‐
fications relate to cold tires or tires with the
ambient temperature.
Only check the tire inflation pressure when the
tires are cold. This means after driving no more
than 1.25 miles/2 km or when the vehicle has
been parked for at least 2 hours.
The displays of inflation devices may under-
read by up to 0.1 bar, 2 psi.
For Flat Tire Monitor: after correcting the tire
inflation pressure, reinitialize the Flat Tire
Monitor.
For Tire Pressure Monitor: after correcting the
tire inflation pressure, reset the Tire Pressure
Monitor.
Tire inflation pressure specifications
The tire inflation pressure table, refer to
page 209, contains all tire inflation pressure
specifications for the specified tire sizes at the
ambient temperature. The tire inflation pres‐
sure values apply to tire sizes approved by the
manufacturer of the vehicle for the vehicle
type.
To identify the correct tire inflation pressure,
please note the following:▷Tire sizes of your vehicle.▷Maximum permitted driving speed.
Tire inflation pressures up to
100 mph/160 km/h
For speeds of up to 100 mph/160 km/h and for
optimum driving comfort, note the pressure
values in the tire inflation pressure table, refer
to page 209, and adjust as necessary.
Seite 208MobilityWheels and tires208
Online Edition for Part no. 01 40 2 963 464 - VI/15