2015 BMW X4 run flat
[x] Cancel search: run flatPage 205 of 253

7.With the ignition turned on or the engine
running, switch on the compressor.
CAUTION
The compressor can overheat during ex‐
tended operation. There is risk of property
damage. Do not run the compressor for more
than 10 min.◀
Let the compressor run for approx. 3 to 8 mi‐
nutes to fill the tire with sealant and achieve a
tire inflation pressure of approx. 2.5 bar.
While the tire is being filled with sealant, the
tire inflation pressure may sporadically reach
approx. 5 bar. Do not switch off the compres‐
sor at this point.
If a tire inflation pressure of 2 bar is not
reached:
1.Switch off the compressor.2.Unscrew the filling hose from the wheel.3.Drive 33 ft/10 m forward and back to dis‐
tribute the sealant in the tire.4.Inflate the tire again using the compressor.
If a tire inflation pressure of 2 bar cannot be
reached, contact your dealer’s service cen‐
ter or another qualified service center or
repair shop.
Stowing the Mobility System
1.Unscrew the filling hose of the sealant con‐
tainer from the wheel.2.Unscrew the connection hose of the com‐
pressor from the sealant container.3.Connect the filling hose of the sealant con‐
tainer previously connected to the tirevalve with the available connector on the
sealant container.
This prevents leftover sealant from escap‐
ing from the container.4.Wrap the empty sealant container in suita‐
ble material to avoid dirtying the trunk.5.Stow the Mobility System back in the vehi‐
cle.
Distributing the sealant
Immediately drive approx. 5 miles/10 km to en‐
sure that the sealant is evenly distributed in the
tire.
Do not exceed a speed of 50 mph/80 km/h.
If possible, do not drive at speeds less than
12 mph/20 km/h.
To correct the tire inflation pressure
1.Stop at a suitable location.2.Screw the connection hose of the com‐
pressor directly onto the tire valve stem.3.Insert the connector into the power socket
inside the vehicle.4.Correct the tire inflation pressure to
2.5 bar.▷Increase pressure: with the ignition
turned on or the engine running, switch
on the compressor.▷To reduce the pressure: press the but‐
ton on the compressor.
Continuing the trip
Do not exceed the maximum permissible
speed of 50 mph/80 km/h.
Reinitialize the Flat Tire Monitor.
Reinitialize the Tire Pressure Monitor.
Replace the nonworking tire and the sealant
container of the Mobility System as soon as
possible.
Seite 205Wheels and tiresMobility205
Online Edition for Part no. 01 40 2 964 144 - VI/15
Page 220 of 253

3.Install the new bulb in reverse order of re‐
moval.4.Place the cover according to the arrow
markings on the headlight housing.5.Close the headlight housing with the lid.
Xenon headlights
Information
Because of the long service life of these bulbs,
the likelihood of failure is very low. Switching
the lights on and off frequently shortens their
service life.
If a bulb fails, turn on the front fog lights and
continue the trip with great care. Comply with
local regulations.
DANGER
There can be high voltage in the lighting
system. There is danger to life. The manufac‐
turer of your vehicle recommends that the
work on the lighting system including bulb re‐
placement be performed by a dealer’s service
center or another qualified service center or re‐
pair shop.◀
For checking and adjusting headlamp aim,
contact a dealer’s service center or another
qualified service center or repair shop.
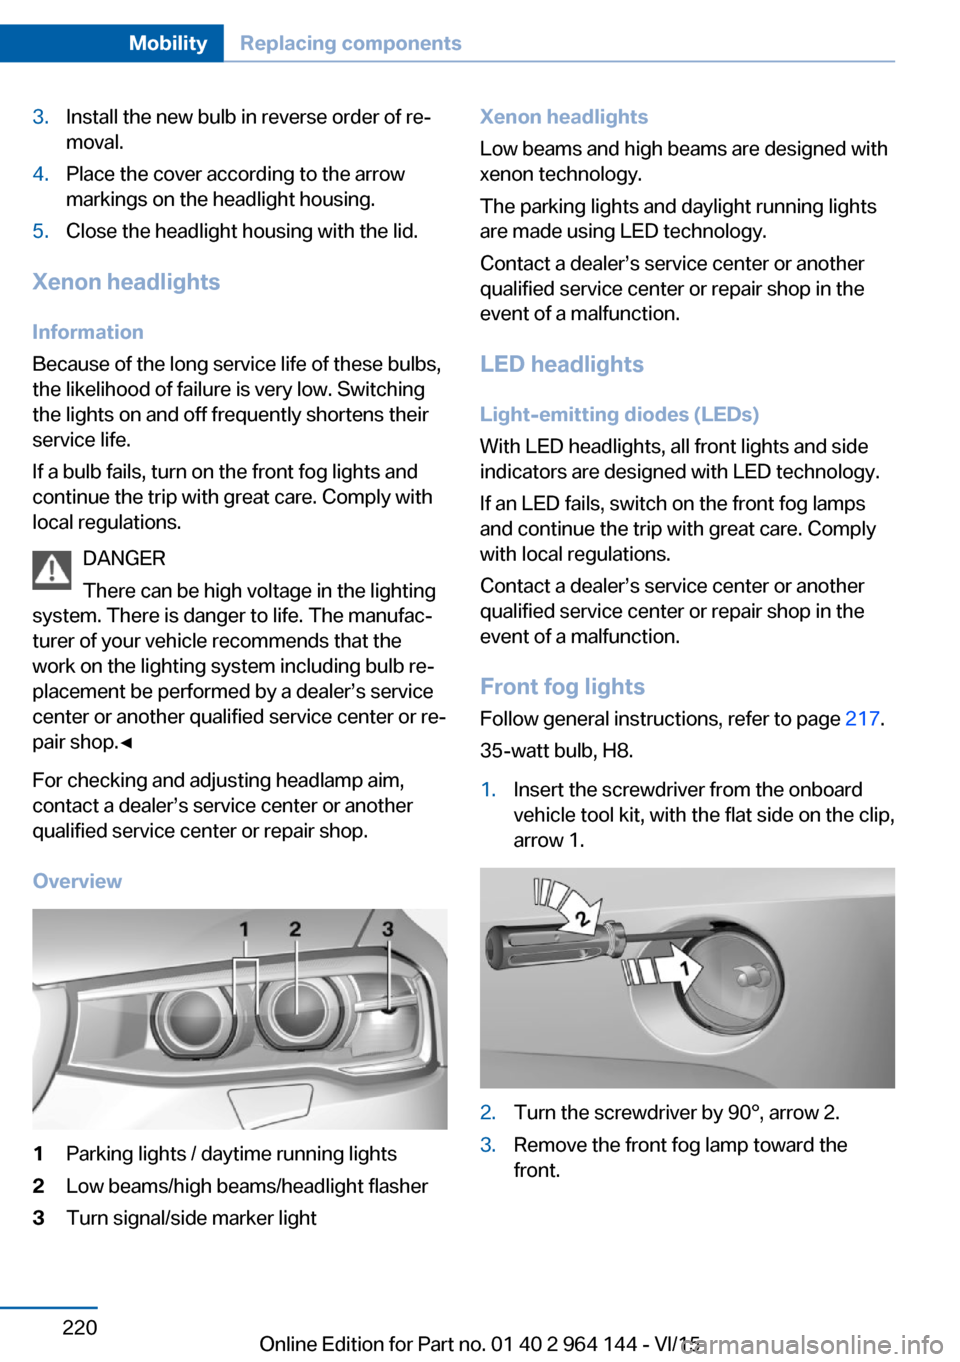
Overview
1Parking lights / daytime running lights2Low beams/high beams/headlight flasher3Turn signal/side marker lightXenon headlights
Low beams and high beams are designed with
xenon technology.
The parking lights and daylight running lights
are made using LED technology.
Contact a dealer’s service center or another
qualified service center or repair shop in the
event of a malfunction.
LED headlights Light-emitting diodes (LEDs)
With LED headlights, all front lights and side
indicators are designed with LED technology.
If an LED fails, switch on the front fog lamps
and continue the trip with great care. Comply with local regulations.
Contact a dealer’s service center or another
qualified service center or repair shop in the
event of a malfunction.
Front fog lights
Follow general instructions, refer to page 217.
35-watt bulb, H8.1.Insert the screwdriver from the onboard
vehicle tool kit, with the flat side on the clip,
arrow 1.2.Turn the screwdriver by 90°, arrow 2.3.Remove the front fog lamp toward the
front.Seite 220MobilityReplacing components220
Online Edition for Part no. 01 40 2 964 144 - VI/15
Page 223 of 253

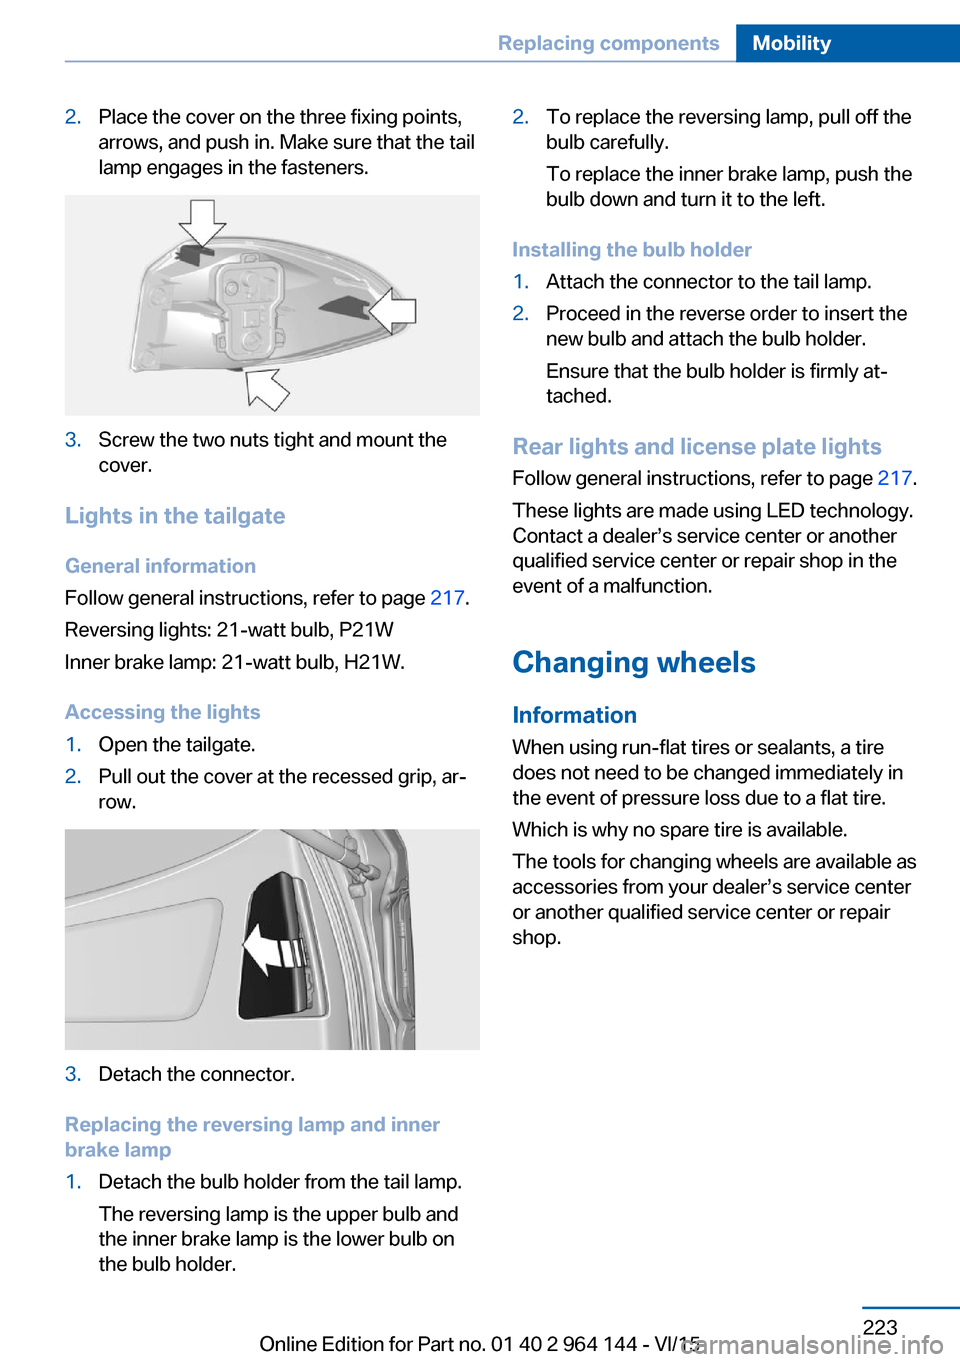
2.Place the cover on the three fixing points,
arrows, and push in. Make sure that the tail
lamp engages in the fasteners.3.Screw the two nuts tight and mount the
cover.
Lights in the tailgate
General information
Follow general instructions, refer to page 217.
Reversing lights: 21-watt bulb, P21W
Inner brake lamp: 21-watt bulb, H21W.
Accessing the lights
1.Open the tailgate.2.Pull out the cover at the recessed grip, ar‐
row.3.Detach the connector.
Replacing the reversing lamp and inner
brake lamp
1.Detach the bulb holder from the tail lamp.
The reversing lamp is the upper bulb and
the inner brake lamp is the lower bulb on
the bulb holder.2.To replace the reversing lamp, pull off the
bulb carefully.
To replace the inner brake lamp, push the
bulb down and turn it to the left.
Installing the bulb holder
1.Attach the connector to the tail lamp.2.Proceed in the reverse order to insert the
new bulb and attach the bulb holder.
Ensure that the bulb holder is firmly at‐
tached.
Rear lights and license plate lights
Follow general instructions, refer to page 217.
These lights are made using LED technology.
Contact a dealer’s service center or another
qualified service center or repair shop in the
event of a malfunction.
Changing wheels
Information When using run-flat tires or sealants, a tire
does not need to be changed immediately in
the event of pressure loss due to a flat tire.
Which is why no spare tire is available.
The tools for changing wheels are available as
accessories from your dealer’s service center
or another qualified service center or repair
shop.
Seite 223Replacing componentsMobility223
Online Edition for Part no. 01 40 2 964 144 - VI/15
Page 247 of 253

Luggage rack, refer to Roof-mounted luggage rack 182
Lumbar support 54
M
Maintenance 215
Maintenance require‐ ments 215
Maintenance, service require‐ ments 89
Maintenance system, BMW 215
Make-up mirror 165
Malfunction displays, see Check Control 83
Manual air distribu‐ tion 157, 160
Manual air flow 157, 160
Manual brake, see Parking brake 71
Manual mode, Steptronic transmission 78
Manual operation, door lock 39
Manual operation, exterior mirrors 60
Manual operation, fuel filler flap 192
Manual operation, Park Dis‐ tance Control PDC 143
Manual operation, rearview camera 145
Manual operation, Top View 148
Marking, run-flat tires 202
Master key, see Remote con‐ trol 34
Maximum cooling 159
Maximum speed, display 90
Maximum speed, winter tires 202
Measurement, units of 95
Medical kit 227
Memory, seat, mirror 58
Menu, EfficientDynamics 186 Menu in instrument clus‐
ter 91
Menus, operating, iDrive 18
Menus, refer to iDrive operat‐ ing concept 20
Messages, see Check Con‐ trol 83
Microfilter 157, 160
Minimum tread, tires 200
Mirror 59
Mirror memory 58
Mobile communication devi‐ ces in the vehicle 177
Mobility System 203
Modifications, technical, see Own Safety 7
Moisture in headlight 218
Monitor, see Control Dis‐ play 18
Mounting of child restraint systems 64
Moving sun visor 165
Multifunction steering wheel, buttons 14
N
Navigation, see user's manual for Navigation, Entertain‐
ment and Communication
Neck restraints, front, see Head restraints 57
Neck restraints, rear, see Head restraints 58
Neutral cleaner, see wheel cleaner 233
New wheels and tires 201
Nylon rope for tow-starting/ towing 229
O OBD Onboard Diagnosis 216
OBD, see OBD Onboard Di‐ agnosis 216 Obstacle marking, rearview
camera 146
Octane rating, see Recom‐ mended fuel grade 194
Odometer 87
Office, see user's manual for Navigation, Entertainment
and Communication
Offroad trips 176
Oil 209
Oil, adding 210
Oil additives 211
Oil change 211
Oil change interval, service requirements 89
Oil filler neck 210
Oil types, alternative 211
Oil types, suitable 211
Old batteries, disposal 225
On-board computer 92
On-board computer, refer to On-board computer 92
Onboard monitor, see Control Display 18
Onboard vehicle tool kit 217
Opening/closing via door lock 39
Opening and closing 34
Opening and closing, without remote control 39
Opening and closing, with re‐ mote control 37
Opening the tailgate with no- touch activation 44
Operating concept, iDrive 18
Optional equipment, standard equipment 7
Outside air, refer to Auto‐ matic recirculated-air con‐
trol 159
Overheating of engine, see Coolant temperature 87
Own Safety 7 Seite 247Everything from A to ZReference247
Online Edition for Part no. 01 40 2 964 144 - VI/15
Page 248 of 253

PPaint, vehicle 232
Parallel parking assistant 151
Park Distance Control PDC 142
Parked-car ventilation 161
Parked vehicle, condensa‐ tion 179
Parking aid, see PDC 142
Parking assistant 151
Parking brake 71
Parking lights 98
Parking lights, bulb replace‐ ment 219
Parking with Automatic Hold 72
Parts and accessories 7
Passenger side mirror, tilting downward 60
Pathway lines, rearview cam‐ era 146
PDC Park Distance Con‐ trol 142
Pedestrian warning with city braking function 119
Performance Control 128
Personal Profile 35
Personal Profile, exporting profiles 36
Personal Profile, importing profiles 37
Pinch protection system, glass sunroof 50
Pinch protection system, win‐ dows 48
Plastic, care 233
Power failure 224
Power sunroof, glass 49
Power windows 48
Prescribed engine oil types 211
Pressure, tire air pres‐ sure 196
Pressure warning, tires 110 Profile, see Personal Pro‐
file 35
Programmable memory but‐ tons, iDrive 24
Protective function, glass sunroof 50
Protective function, win‐ dows 48
Push-and-turn switch, see Controller 19
R Radiator fluid 213
Radio-operated key, see Re‐ mote control 34
Radio ready state 67
Radio, see user's manual for Navigation, Entertainment
and Communication
Rain sensor 75
Rear lights 221
Rear socket 167
Rearview camera 144
Rearview mirror 59
Rear window de‐ froster 157, 160
Recirculated-air filter 160
Recirculated-air mode 156, 159
Recommended fuel grade 194
Recommended tire brands 201
Refueling 192
Remaining range 88
Remote control/key 34
Remote control, malfunc‐ tion 39
Remote control, univer‐ sal 163
Replacement fuse 225
Replacing parts 217
Replacing wheels/tires 201
Reporting safety malfunc‐ tions 10 RES button 136
RES button, see Active Cruise Control, ACC 133
RES button, see Cruise con‐ trol 139
Reserve warning, see Range 88
Reset, Tire Pressure Monitor TPM 107
Retaining straps, securing cargo 181
Retreaded tires 202
Roadside parking lights 99
RON recommended fuel grade 194
Roofliner 17
Roof load capacity 239
Roof-mounted luggage rack 182
Rope for tow-starting/ towing 229
RSC Run Flat System Com‐ ponent, see Run-flat
tires 202
Rubber components, care 233
Run-flat tires 202
S Safe braking 178
Safety belt reminder for driv‐ er's seat and front passen‐
ger seat 56
Safety belts 55
Safety belts, care 233
Safety switch, windows 49
Safety systems, airbags 103
Saving fuel 183
Screen, see Control Dis‐ play 18
Screwdriver, see Onboard ve‐ hicle tool kit 217
Screw thread, refer to Screw thread for tow fitting, screw
thread for tow fitting 230 Seite 248ReferenceEverything from A to Z248
Online Edition for Part no. 01 40 2 964 144 - VI/15
Page 250 of 253

Time of arrival 93
Tire damage 201
Tire identification marks 199
Tire inflation pressure 196
Tire inflation pressure moni‐ tor, refer to FTM 110
Tire Pressure Monitor TPM 106
Tires, changing 201
Tire sealant 203
Tires, everything on wheels and tires 196
Tires, run-flat tires 202
Tire tread 200
Tone, see user's manual for Navigation, Entertainment
and Communication
Tool 217
Top View 147
Total vehicle weight 239
Touchpad 21
Tow fitting 230
Towing 228
Tow lug, see Tow fitting 230
Tow-starting 228
TPM Tire Pressure Moni‐ tor 106
Traction control 127
TRACTION, driving dynam‐ ics 127
Transmission lock, electronic unlocking 80
Transmission, Steptronic transmission 77
Transporting children safely 63
Tread, tires 200
Triple turn signal activa‐ tion 74
Trip odometer 87
Trip on-board computer 93
Trip recorder, see Trip odom‐ eter 87
Turning circle lines, rearview camera 146
Turn signals, operation 73 U
Unintentional alarm 47
Units of measurement 95
Universal remote control 163
Unlock button, Steptronic transmission 78
Unlocking/locking via door lock 39
Unlocking/locking with re‐ mote control 37
Unlocking, settings 45
Unpaved roads, cross-coun‐ try trips 176
Updates made after the edito‐ rial deadline 7
Upholstery care 233
USB interface 167
V
Vanity mirror 165
Variable sport steering 129
Vehicle battery 224
Vehicle battery, replac‐ ing 224
Vehicle, break-in 176
Vehicle care 232
Vehicle features and op‐ tions 7
Vehicle identification num‐ ber 10
Vehicle jack 224
Vehicle paint 232
Vehicle storage 234
Vehicle wash 231
Ventilation 161
Ventilation, see Parked-car ventilation 161
VIN, see vehicle identification number 10
Voice activation system 27 W
Warning and indicator lamps, see Check Control 83
Warning displays, see Check Control 83
Warning lamp in the exterior mirror, see Active Blind Spot
Detection 123
Warning messages, see Check Control 83
Warning triangle 227
Warranty 7
Washer fluid 76
Washer fluid reservoir, ca‐ pacity 239
Washer nozzles, wind‐ shield 76
Washer system 74
Washing, vehicle 231
Water on roads 177
Weights 239
Welcome lamps during un‐ locking 37
Welcome lights 99
Wheel cleaner 233
Wheels, changing 201
Wheels, everything on wheels and tires 196
Wheels, Flat Tire Monitor FTM 110
Wheels, Tire Pressure Moni‐ tor TPM 106
Window defroster, rear 157, 160
Windows, powered 48
Windshield washer fluid 76
Windshield washer noz‐ zles 76
Windshield washer sys‐ tem 74
Windshield washer system, see washer/wiper sys‐
tem 74
Windshield wiper, see wiper system 74 Seite 250ReferenceEverything from A to Z250
Online Edition for Part no. 01 40 2 964 144 - VI/15