2015 BMW X4 display
[x] Cancel search: displayPage 210 of 253
Different messages appear on the display de‐
pending on the engine oil level. Pay attention
to these messages.
If the engine oil level is too low, within the next
125 miles/200 km Add engine oil, refer to
page 210.
Detailed measurement
The concept In the detailed measurement the engine oil
level is checked and displayed via a scale.
Gasoline engine:
If the engine oil level reaches the minimum
level, a check control message is displayed.
During the measurement, the idle speed is in‐
creased somewhat.
General information A detailed measurement is only possible with
certain engines.
Requirements▷Vehicle is on level road.▷Steptronic transmission: selector lever in
selector lever position N or P and accelera‐
tor pedal not depressed.▷Engine is running and is at operating tem‐
perature.
Performing a detailed measurement
In order to perform a detailed measurement of
the engine oil level:
1."Vehicle info"2."Vehicle status"3. "Measure engine oil level"4."Start measurement"
The engine oil level is checked and displayed
via a scale.
Time: approx. 1 minute.
Adding engine oil
Information CAUTION
A too low engine oil level causes engine
damage. There is risk of property damage.
Add engine oil within the next
125 miles/200 km.◀
CAUTION
Too much engine oil can damage the en‐
gine or the catalytic converter. There is risk of
property damage. Do not add too much engine
oil. Have too much engine oil siphoned off by a
dealer’s service center or another qualified
service center or repair shop.◀
WARNING
Operating materials, e.g. oils, greases,
coolants, fuels, can contain harmful ingredi‐
ents. There is risk of injuries or danger to life.
Observe the instructions on the containers.
Avoid the contact of articles of clothing, skin or
eyes with operating materials. Do not refill op‐
erating materials into different bottles. Store
operating materials out of reach of children.◀
General information
Only add engine oil when the message is dis‐
played in the instrument cluster. The quantity
to be added is indicated in the message dis‐
played in the instrument cluster.
Switch off the ignition and safely park the vehi‐
cle before engine oil is added.
Overview
The oil filler neck is located in the engine com‐
partment, refer to page 207.
Opening the oil filler neck1.Opening the hood, refer to page 207Seite 210MobilityEngine oil210
Online Edition for Part no. 01 40 2 964 144 - VI/15
Page 215 of 253
MaintenanceVehicle features and options
This chapter describes all standard, country-
specific and optional features offered with the
series. It also describes features that are not
necessarily available in your car, e. g., due to
the selected options or country versions. This
also applies to safety-related functions and
systems. The respectively applicable country
provisions must be observed when using the
respective features and systems.
BMW maintenance system The maintenance system indicates required
maintenance measures, and thereby provides
support in maintaining road safety and the op‐
erational reliability of the vehicle.
In some cases scopes and intervals may vary
according to the country-specific version. Re‐
placement work, spare parts, fuels and lubri‐
cants and wear materials are calculated sepa‐
rately. Further information is available from a
dealer’s service center or another qualified
service center or repair shop.
Condition Based ServiceCBS
Sensors and special algorithms take into ac‐
count the driving conditions of your vehicle.
Based on this, Condition Based Service recog‐
nizes the maintenance requirements.
The system makes it possible to adapt the
amount of maintenance corresponding to your
user profile.
Detailed information on service requirements,
refer to page 89, can be displayed on the Con‐
trol Display.Service data in the remote control
Information on the required maintenance is
continuously stored in the remote control. The dealer’s service center can read this data out
and suggest an optimized maintenance scope
for your vehicle.
Therefore, hand the service advisor the remote
control with which the vehicle was driven most
recently.
Storage periods Storage periods during which the vehicle bat‐
tery was disconnected are not taken into ac‐
count.
If this occurs, have a dealer's service center or
another qualified service center or repair shop
update the time-dependent maintenance pro‐
cedures, such as checking brake fluid and, if
necessary, changing the engine oil and the mi‐
crofilter/activated-charcoal filter.
Service and WarrantyInformation Booklet for US
models and Warranty and
Service Guide Booklet for
Canadian models
Please consult your Service and Warranty In‐
formation Booklet for US models and Warranty
and Service Guide Booklet for Canadian mod‐
els for additional information on service re‐
quirements.
The manufacturer of your vehicle recommends
that maintenance and repair be performed by a
dealer’s service center or another qualified
service center or repair shop. Records of regu‐
lar maintenance and repair work should be re‐
tained.Seite 215MaintenanceMobility215
Online Edition for Part no. 01 40 2 964 144 - VI/15
Page 224 of 253
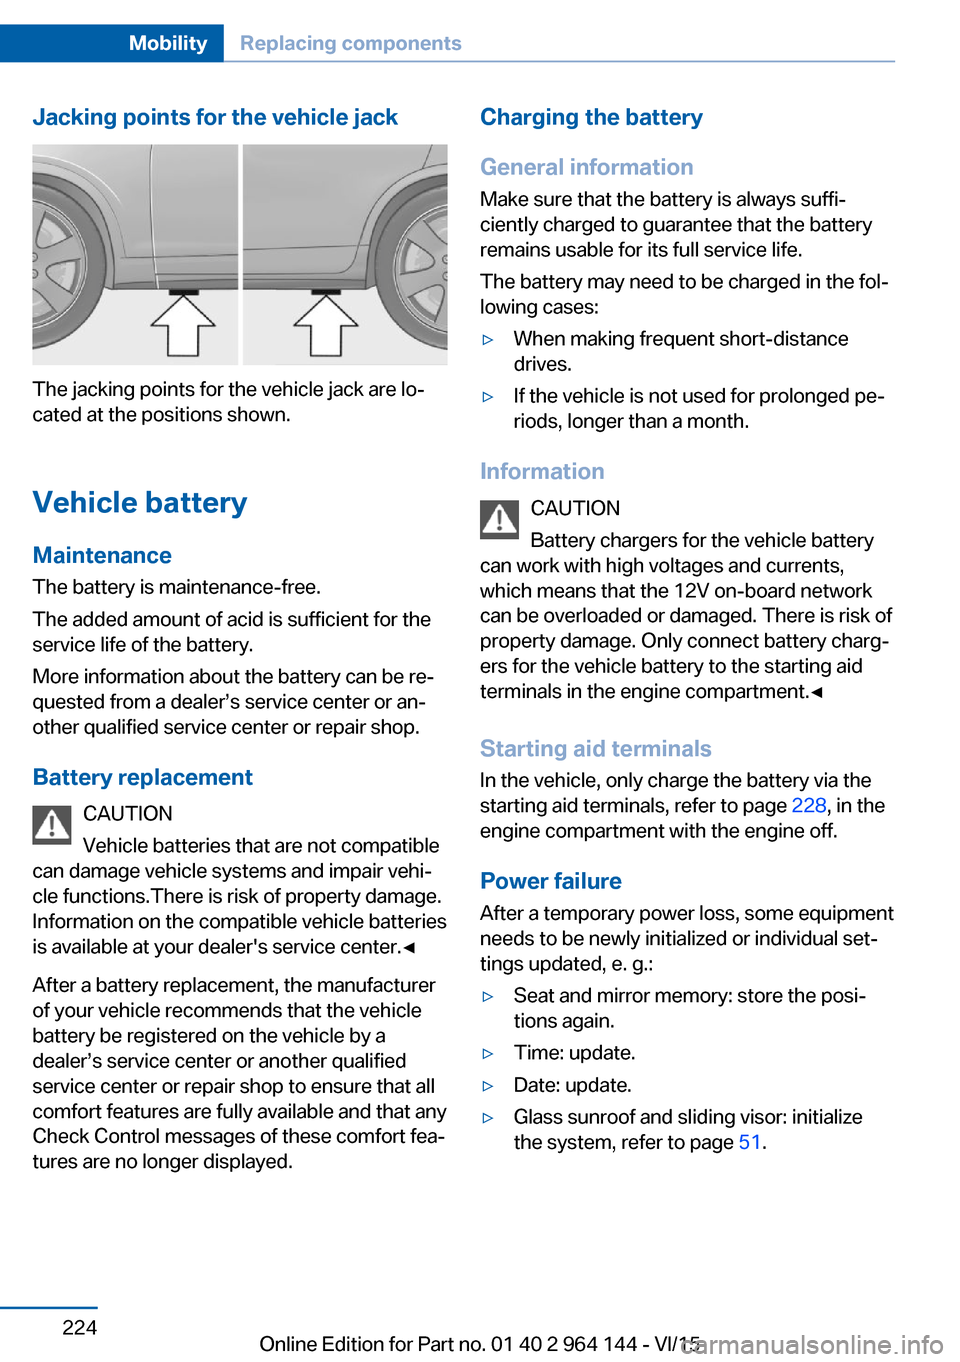
Jacking points for the vehicle jack
The jacking points for the vehicle jack are lo‐
cated at the positions shown.
Vehicle battery Maintenance
The battery is maintenance-free.
The added amount of acid is sufficient for the
service life of the battery.
More information about the battery can be re‐
quested from a dealer’s service center or an‐
other qualified service center or repair shop.
Battery replacement CAUTION
Vehicle batteries that are not compatible
can damage vehicle systems and impair vehi‐
cle functions.There is risk of property damage.
Information on the compatible vehicle batteries
is available at your dealer's service center.◀
After a battery replacement, the manufacturer
of your vehicle recommends that the vehicle
battery be registered on the vehicle by a
dealer’s service center or another qualified
service center or repair shop to ensure that all
comfort features are fully available and that any
Check Control messages of these comfort fea‐
tures are no longer displayed.
Charging the battery
General information
Make sure that the battery is always suffi‐
ciently charged to guarantee that the battery
remains usable for its full service life.
The battery may need to be charged in the fol‐
lowing cases:▷When making frequent short-distance
drives.▷If the vehicle is not used for prolonged pe‐
riods, longer than a month.
Information
CAUTION
Battery chargers for the vehicle battery
can work with high voltages and currents,
which means that the 12V on-board network
can be overloaded or damaged. There is risk of
property damage. Only connect battery charg‐
ers for the vehicle battery to the starting aid
terminals in the engine compartment.◀
Starting aid terminals
In the vehicle, only charge the battery via the
starting aid terminals, refer to page 228, in the
engine compartment with the engine off.
Power failure
After a temporary power loss, some equipment
needs to be newly initialized or individual set‐
tings updated, e. g.:
▷Seat and mirror memory: store the posi‐
tions again.▷Time: update.▷Date: update.▷Glass sunroof and sliding visor: initialize
the system, refer to page 51.Seite 224MobilityReplacing components224
Online Edition for Part no. 01 40 2 964 144 - VI/15
Page 226 of 253
Breakdown assistanceVehicle features and options
This chapter describes all standard, country-
specific and optional features offered with the
series. It also describes features that are not
necessarily available in your car, e. g., due to
the selected options or country versions. This
also applies to safety-related functions and
systems. The respectively applicable country
provisions must be observed when using the
respective features and systems.
Hazard warning flashers
The button is located in the center console.
Intelligent Emergency
Request
The concept In case of an emergency, an Emergency Re‐
quest can be made through this system.
General information
Only press the SOS button in an emergency.
For technical reasons, the Emergency Request
cannot be guaranteed under unfavorable con‐
ditions.
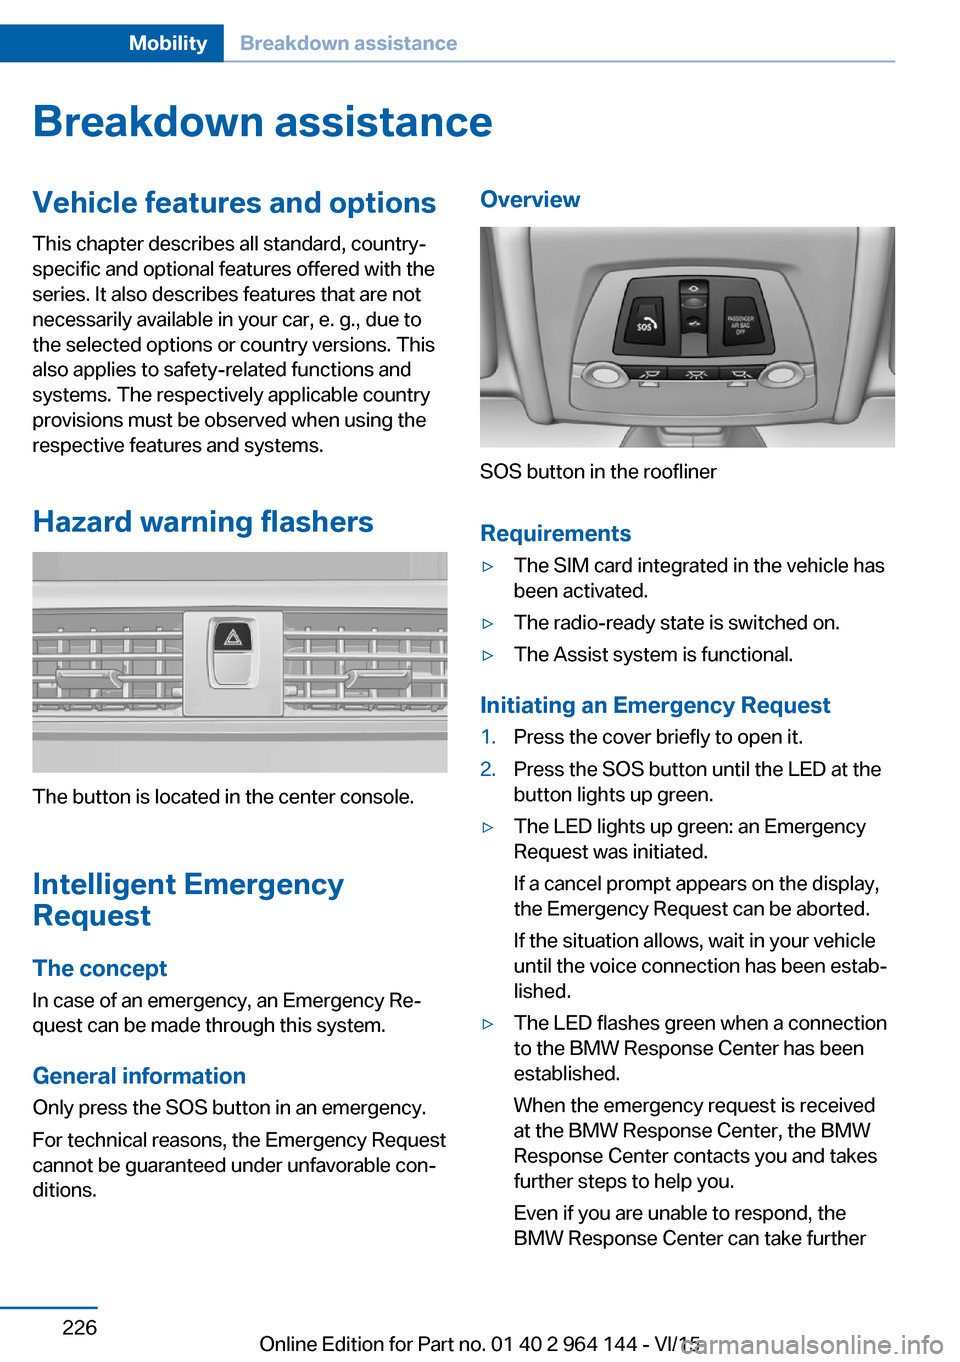
Overview
SOS button in the roofliner
Requirements
▷The SIM card integrated in the vehicle has
been activated.▷The radio-ready state is switched on.▷The Assist system is functional.
Initiating an Emergency Request
1.Press the cover briefly to open it.2.Press the SOS button until the LED at the
button lights up green.▷The LED lights up green: an Emergency
Request was initiated.
If a cancel prompt appears on the display,
the Emergency Request can be aborted.
If the situation allows, wait in your vehicle
until the voice connection has been estab‐
lished.▷The LED flashes green when a connection
to the BMW Response Center has been
established.
When the emergency request is received
at the BMW Response Center, the BMW
Response Center contacts you and takes
further steps to help you.
Even if you are unable to respond, the
BMW Response Center can take furtherSeite 226MobilityBreakdown assistance226
Online Edition for Part no. 01 40 2 964 144 - VI/15
Page 234 of 253
WARNING
Chemical cleansers can destroy the
safety belt webbing. Missing protective effect
of the safety belts. There is risk of injuries or
danger to life. Use only a mild soapy solution
for cleaning the safety belts.◀
Use only a mild soapy solution, with the safety
belts clipped into their buckles.
Do not allow the switchs to retract the safety
belts until they are dry.
Carpets and floor mats WARNING
Objects in the driver's floor area can limit
the pedal distance or block a depressed pedal.
There is risk of an accident. Stow objects in
the vehicle such that they are secured and
cannot enter into the driver's floor area. Use
floor mats that are suitable for the vehicle and
can be safely attached to the floor. Do not use
loose floor mats and do not layer several floor
mats. Make sure that there is sufficient clear‐
ance for the pedals. Ensure that the floor mats
are securely fastened again after they were re‐
moved, e.g. for cleaning.◀
Floor mats can be removed from the car's inte‐
rior for cleaning.
If the floor carpets are very dirty, clean with a
microfiber cloth and water or a textile cleaner.
To prevent matting of the carpet, rub back and
forth in the direction of travel only.
Sensor/camera lenses
To clean sensors and camera lenses, use a
cloth moistened with a small amount of glass
detergent.Displays/Screens/protective glass of
the Head-up Display
CAUTION
Chemical cleansers, moisture or fluids of
any kind can damage the surface of displays
and screens. There is risk of property damage.
Clean with a clean, antistatic microfiber cloth.◀
CAUTION
The surface of displays can be damaged
with improper cleaning. There is risk of prop‐
erty damage. Avoid pressure that is too high
and do not use any scratching materials.◀
Clean with a clean, antistatic microfiber cloth.
Clean the protective glass of the Head-up Dis‐
play using a microfiber cloth and commercially
available dish-washing soap.
Long-term
When the vehicle is shut down for longer than
three months, special measures must be
taken. Further information is available from a
dealer’s service center or another qualified
service center or repair shop.Seite 234MobilityCare234
Online Edition for Part no. 01 40 2 964 144 - VI/15
Page 242 of 253

Everything from A to Z
IndexA ABS, Antilock Brake Sys‐ tem 126
ACC, Active Cruise Control with Stop & Go 133
Acceleration Assistant, refer to Launch Control 80
Accessories and parts 7
Activated-charcoal filter 160
Active Blind Spot Detec‐ tion 123
Active Cruise Control with Stop & Go, ACC 133
Adaptive brake lights, see Brake force display 125
Adaptive Light Control 100
Additives, oil 211
Adjustments, seats/head re‐ straints 52
After washing vehicle 232
Airbags 103
Airbags, indicator/warning light 104
Air circulation, refer to Recir‐ culated-air mode 159
Air circulation, see Recircu‐ lated-air mode 156
Air, dehumidifying, see Cool‐ ing function 156, 159
Air distribution, manual 157, 160
Air flow, automatic climate control 157, 160
Air pressure, tires 196
Air vents, refer to Ventila‐ tion 161
Alarm system 46
Alarm, unintentional 47
All around the center con‐ sole 16 All around the roofliner 17
All around the steering wheel 14
All-season tires, see Winter tires 202
All-wheel-drive 128
Alternating-code hand-held transmitter 164
Alternative oil types 211
Ambient light 102
Antifreeze, washer fluid 76
Antilock Brake System, ABS 126
Anti-slip control, see DSC 126
Approved axle load 239
Armrest, refer to Center arm‐ rest 171
Arrival time 93
Ash tray 165
Assistance when driving off 132
Assist system, see Intelligent Safety 112
AUTO H button 72
AUTO H button, refer to Au‐ tomatic Hold 72
AUTO intensity 159
Automatic car wash 231
Automatic climate con‐ trol 155
Automatic Cruise Control with Stop & Go 133
Automatic Curb Monitor 60
Automatic deactivation, Front-seat passenger air‐
bags 105
Automatic headlight con‐ trol 99
Automatic Hold 72
Automatic locking 46 Automatic recirculated-air
control 159
Automatic tailgate 40
Automatic transmission, see Steptronic transmission 77
AUTO program, automatic cli‐ mate control 159
AUTO program, climate con‐ trol 156
AUTO program, intensity 159
Auto Start/Stop function 69
Average fuel consumption 92
Average speed 92
Axle loads, weights 239
B Backrest curvature, refer to Lumbar support 54
Backrest, width 54
Bad road trips 176
Band-aids, see First-aid kit 227
Bar for tow-starting/ towing 229
Battery replacement, vehicle battery 224
Battery replacement, vehicle remote control 35
Battery, vehicle 224
Belts, safety belts 55
Beverage holder, cu‐ pholder 171
BMW Assist, see user's manual for Navigation, En‐
tertainment and Communi‐
cation
BMW Driver’s Guide App 6
BMW Homepage 6
BMW Internet page 6 Seite 242ReferenceEverything from A to Z242
Online Edition for Part no. 01 40 2 964 144 - VI/15
Page 243 of 253
BMW maintenance sys‐tem 215
Bonus range, ECO PRO 185
Bottle holder, see Cu‐ pholder 171
Brake assistant 126
Brake discs, break-in 176
Brake force display 125
Brake lights, adaptive 125
Brake lights, brake force dis‐ play 125
Brake pads, break-in 176
Braking, hints 178
Breakdown assistance 226
Break-in 176
Brightness of Control Dis‐ play 95
Bulb replacement 217
Bulb replacement, front 218
Bulb replacement, rear 221
Bulbs and lights 217
Button, RES 136
Button, Start/Stop 67
Bypassing, see Jump-start‐ ing 227
C
California Proposition 65 Warning 8
Camera lenses, care 234
Camera, rearview cam‐ era 145
Camera, Side View 149
Camera, Top View 148
Can holder, see Cu‐ pholder 171
Car battery 224
Car care products 232
Care, displays 234
Care, vehicle 232
Cargo 180
Cargo area 168
Cargo area, enlarging 168
Cargo area, storage compart‐ ments 172 Cargo cover 168
Cargo, securing 181
Cargo straps, securing cargo 181
Car key, see Remote con‐ trol 34
Carpet, care 234
Car wash 231
Catalytic converter, see Hot exhaust system 177
CBS Condition Based Serv‐ ice 215
CD/Multimedia, see user's manual for Navigation, En‐
tertainment and Communi‐
cation
Center armrest 171
Center console 16
Central locking system 40
Central screen, see Control Display 18
Changes, technical, see Own Safety 7
Changing parts 217
Changing wheels 223
Changing wheels/tires 201
Chassis number, see vehicle identification number 10
Check Control 83
Checking the oil level elec‐ tronically 209
Children, seating position 63
Children, transporting safely 63
Child restraint fixing sys‐ tem 63
Child restraint fixing system LATCH 65
Child restraint fixing systems, mounting 64
Child safety locks 66
Child seat, mounting 64
Child seats 63
Chrome parts, care 233
Cigarette lighter 165
Cleaning displays 234 Climate control 155, 158
Clock 87
Closing/opening via door lock 39
Closing/opening with remote control 37
Closing the tailgate with no- touch activation 44
Clothes hooks 172
Coasting 187
Coasting with engine decou‐ pled, coasting 187
Coasting with idling en‐ gine 187
Cockpit 14
Combination switch, see Turn signals 73
Combination switch, see Wiper system 74
Comfort Access 42
COMFORT program, Dy‐ namic Driving Control 131
Compartments in the doors 171
Compass 93
Compressor 203
Condensation on win‐ dows 157, 160
Condensation under the vehi‐ cle 179
Condition Based Service CBS 215
Confirmation signal 45
ConnectedDrive, see user's manual for Navigation, En‐
tertainment and Communi‐
cation
ConnectedDrive Services
Connecting electrical devi‐ ces 166
Continued driving with a flat tire 108 , 111
Control Display 18
Control Display, settings 94
Controller 19 Seite 243Everything from A to ZReference243
Online Edition for Part no. 01 40 2 964 144 - VI/15
Page 244 of 253

Control systems, driving sta‐bility 126
Convenient opening with the remote control 38
Coolant 213
Coolant temperature 87
Cooling function 156, 159
Cooling, maximum 159
Cooling system 213
Cornering light 100
Corrosion on brake discs 178
Cosmetic mirror 165
Courtesy lamps during un‐ locking 37
Courtesy lamps with the vehi‐ cle locked 38
Cruise control 139
Cruise control, active with Stop & Go 133
Cruising range 88
Cupholder 171
Current fuel consumption 88
D
Damage, tires 201
Damping control, dy‐ namic 129
Data, technical 238
Date 88
Daytime running lights 100
Daytime running lights, bulb replacement 219
Defrosting, see Windows, de‐ frosting 157, 160
Dehumidifying, air 156, 159
Deleting personal data 25
Deletion of personal data 25
Destination distance 93
Digital clock 87
Dimensions 238
Dimmable exterior mirrors 61
Dimmable interior rearview mirror 61
Direction indicator, see Turn signals 73 Display, electronic, instru‐
ment cluster 82
Display in windshield 95
Display lighting, see Instru‐ ment lighting 102
Displays, cleaning 234
Disposal, coolant 214
Disposal, vehicle battery 225
Distance control, see PDC 142
Distance to destination 93
Divided screen view, split screen 23
Door lock 39
Door lock, see Remote con‐ trol 34
Downhill control 128
Drive-off assistant 132
Drive-off assistant, see DSC 126
Driving Dynamics Con‐ trol 130
Driving instructions, break- in 176
Driving mode 130
Driving notes, general 177
Driving on bad roads 176
Driving stability control sys‐ tems 126
Driving tips 177
DSC Dynamic Stability Con‐ trol 126
DTC Dynamic Traction Con‐ trol 127
Dynamic Damping Con‐ trol 129
Dynamic Stability Control DSC 126
Dynamic Traction Control DTC 127
E ECO PRO 184
ECO PRO, bonus range 185
ECO PRO display 184 ECO PRO driving mode 184
ECO PRO mode 184
ECO PRO Tip - driving in‐ struction 186
EfficientDynamics 186
Electronic displays, instru‐ ment cluster 82
Electronic oil measure‐ ment 209
Electronic Stability Program ESP, see DSC 126
Emergency detection, remote control 35
Emergency release, fuel filler flap 192
Emergency Request 226
Emergency start function, en‐ gine start 35
Emergency unlocking, tail‐ gate 42
Emergency unlocking, trans‐ mission lock 80
Energy Control 88
Energy recovery 88
Engine, automatic Start/Stop function 69
Engine, automatic switch- off 69
Engine compartment 207
Engine compartment, work‐ ing in 207
Engine coolant 213
Engine idling when driving, coasting 187
Engine oil 209
Engine oil, adding 210
Engine oil additives 211
Engine oil change 211
Engine oil filler neck 210
Engine oil temperature 87
Engine oil types, alterna‐ tive 211
Engine oil types, suitable 211
Engine start during malfunc‐ tion 35 Seite 244ReferenceEverything from A to Z244
Online Edition for Part no. 01 40 2 964 144 - VI/15