2015 BMW X4 ESP
[x] Cancel search: ESPPage 218 of 253
service center or repair shop if you are unfami‐
liar with it or if it has not been described here.
A spare lamp box is available from a dealer’s
service center or another qualified service cen‐
ter or repair shop.
WARNING
Bulbs can get hot during operation. Con‐
tact with the bulbs can cause burns. There is
risk of injuries. Only change bulbs after they
have cooled off.◀
WARNING
Work on switched-on lighting systems
can cause short circuits. There is risk of inju‐
ries or risk of property damage. When working
on the lighting system, switch off the lamps in
question. If necessary, heed the bulb manufac‐
turer's instructions.◀
DANGER
There can be high voltage in the lighting
system. There is danger to life. The manufac‐
turer of your vehicle recommends that the
work on the lighting system including bulb re‐
placement be performed by a dealer’s service
center or another qualified service center or re‐
pair shop.◀
CAUTION
Contaminated bulbs reduce their service
life. There is risk of property damage. Do not
hold new bulbs with your bare hands. Use a
clean cloth or something similar, or hold the
bulb by its base.◀
Light-emitting diodes (LEDs)
Some items of equipment use light-emitting
diodes installed behind a cover as a light
source.
These light-emitting diodes, which are related
to conventional lasers, are officially designated
as Class 1 light-emitting diodes.WARNING
Too intensive brightness can irritate or
damage the retina of the eye. There is risk of
injuries. Do not look directly into the headlights
or other light sources for an extended period of
time. Do not remove the LED covers.◀
Headlight glass
Condensation can form on the inside of the ex‐
ternal lights in cool or humid weather. When
driving with the lights switched on, the con‐
densation evaporates after a short time. The
headlight glass does not need to be changed.
If despite driving with the lights switched on,
increasing humidity forms, e. g. water droplets
in the lamp, the manufacturer of your vehicle
recommends having it checked by a dealer’s
service center or another qualified service cen‐
ter or repair shop.
Headlight setting
The headlight adjustments can be affected by
changing lights and bulbs. After the headlight
adjustment was changed, have it checked and,
if necessary, corrected by a dealer’s service
center or another qualified service center or re‐
pair shop.
Front lights, bulb replacement
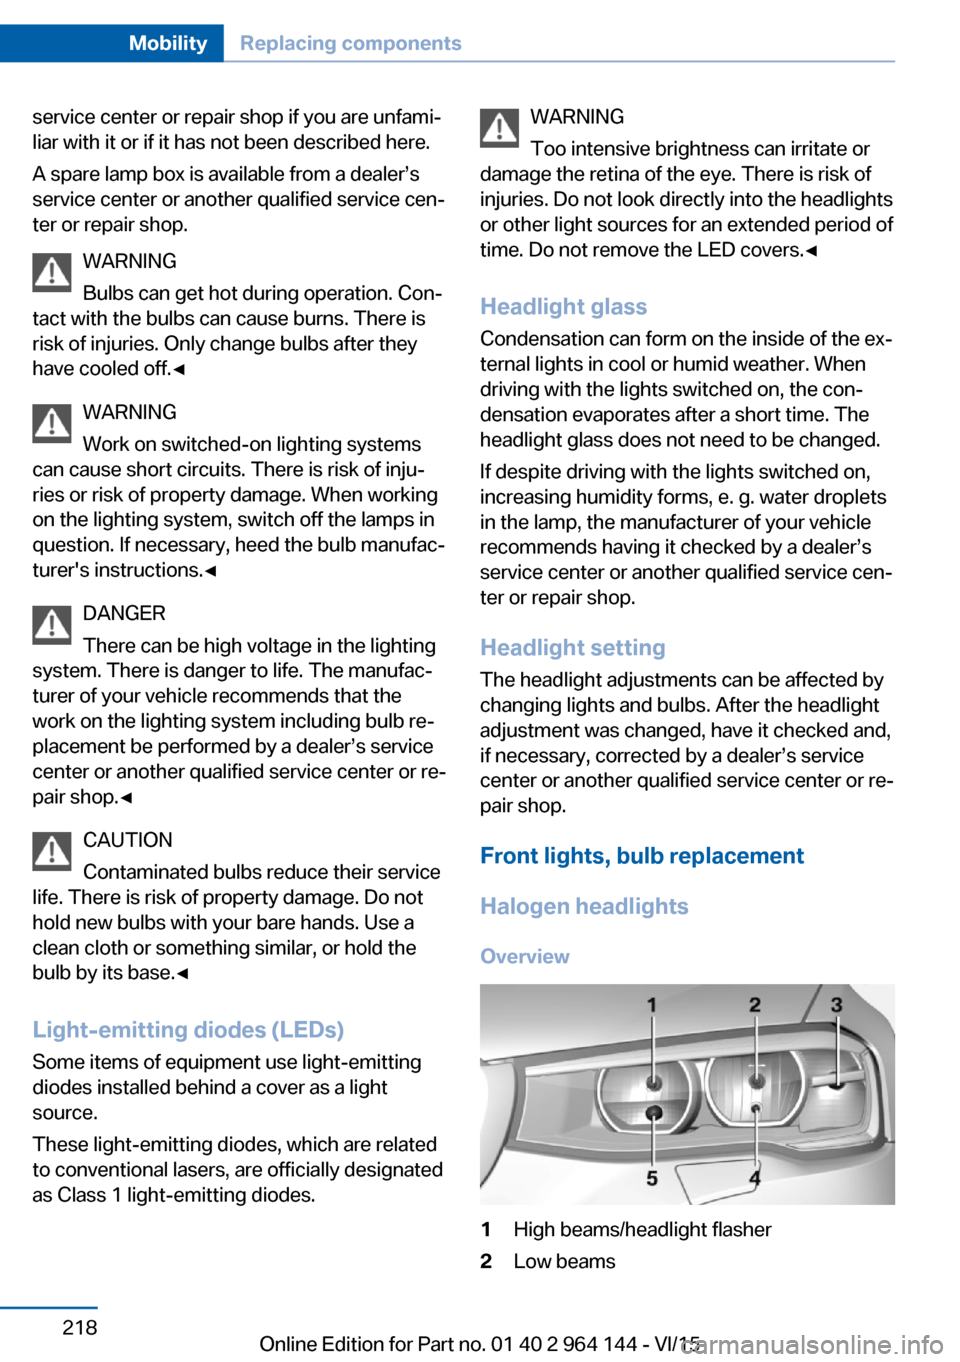
Halogen headlights Overview1High beams/headlight flasher2Low beamsSeite 218MobilityReplacing components218
Online Edition for Part no. 01 40 2 964 144 - VI/15
Page 226 of 253
Breakdown assistanceVehicle features and options
This chapter describes all standard, country-
specific and optional features offered with the
series. It also describes features that are not
necessarily available in your car, e. g., due to
the selected options or country versions. This
also applies to safety-related functions and
systems. The respectively applicable country
provisions must be observed when using the
respective features and systems.
Hazard warning flashers
The button is located in the center console.
Intelligent Emergency
Request
The concept In case of an emergency, an Emergency Re‐
quest can be made through this system.
General information
Only press the SOS button in an emergency.
For technical reasons, the Emergency Request
cannot be guaranteed under unfavorable con‐
ditions.
Overview
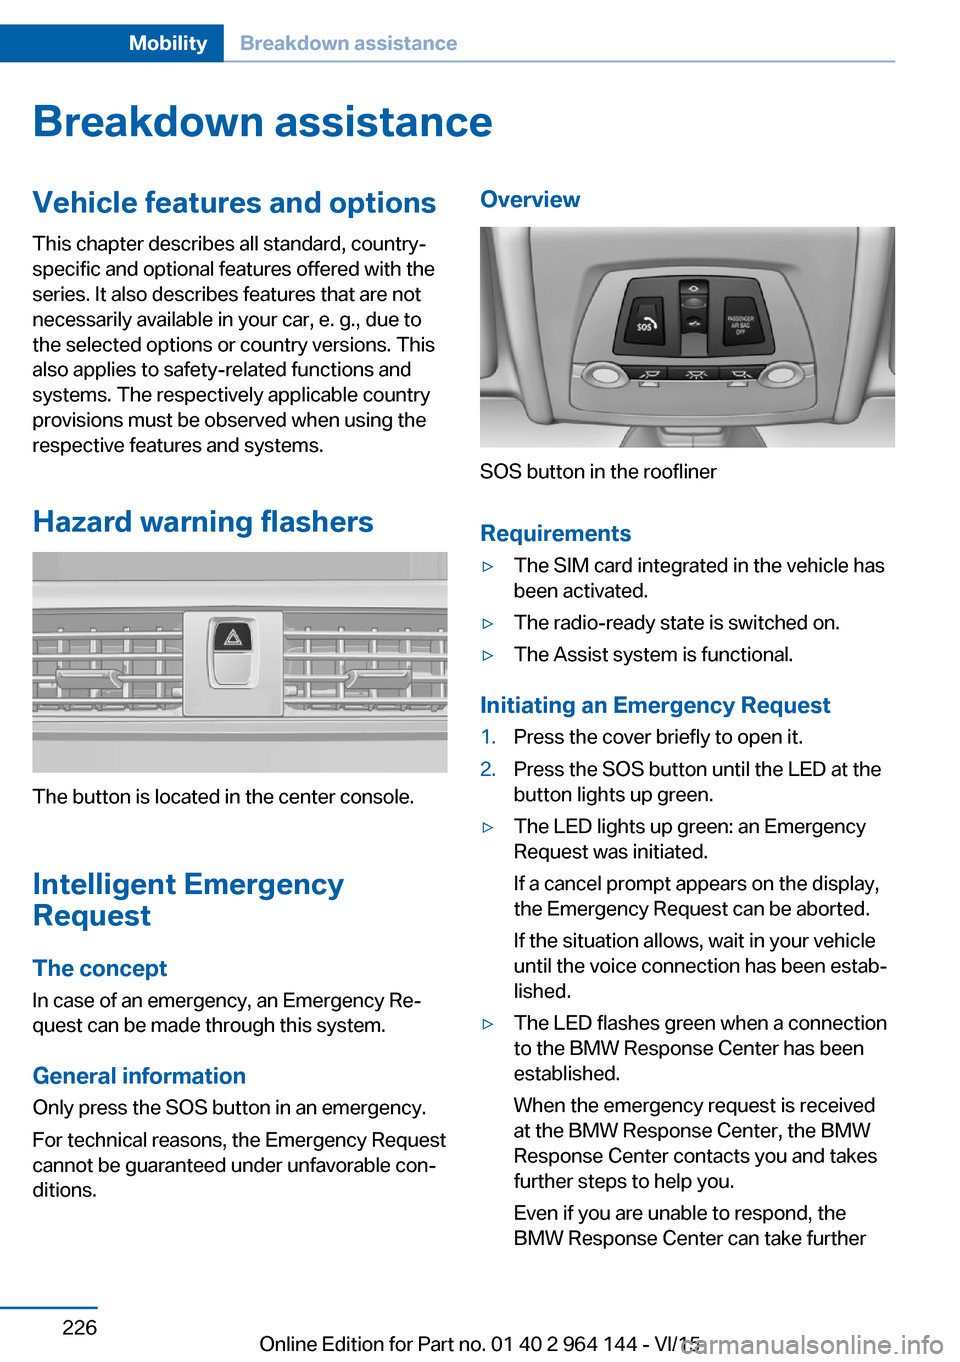
SOS button in the roofliner
Requirements
▷The SIM card integrated in the vehicle has
been activated.▷The radio-ready state is switched on.▷The Assist system is functional.
Initiating an Emergency Request
1.Press the cover briefly to open it.2.Press the SOS button until the LED at the
button lights up green.▷The LED lights up green: an Emergency
Request was initiated.
If a cancel prompt appears on the display,
the Emergency Request can be aborted.
If the situation allows, wait in your vehicle
until the voice connection has been estab‐
lished.▷The LED flashes green when a connection
to the BMW Response Center has been
established.
When the emergency request is received
at the BMW Response Center, the BMW
Response Center contacts you and takes
further steps to help you.
Even if you are unable to respond, the
BMW Response Center can take furtherSeite 226MobilityBreakdown assistance226
Online Edition for Part no. 01 40 2 964 144 - VI/15
Page 227 of 253
steps to help you under certain circum‐
stances.
For this, data are transmitted to the BMW
Response Center which serve to deter‐
mine the necessary rescue measures. E. g.
the current position of the vehicle, if it can
be established.▷If the LED is flashing green, but the BMW
Response Center can no longer be heard
via the speaker, you can nevertheless still
be heard at the BMW Response Center.
Initiating an Emergency Request
automatically
Under certain conditions, an Emergency Re‐
quest is automatically initiated immediately af‐
ter a severe accident. Automatic Collision Noti‐
fication is not affected by pressing the SOS
button.
Warning triangle
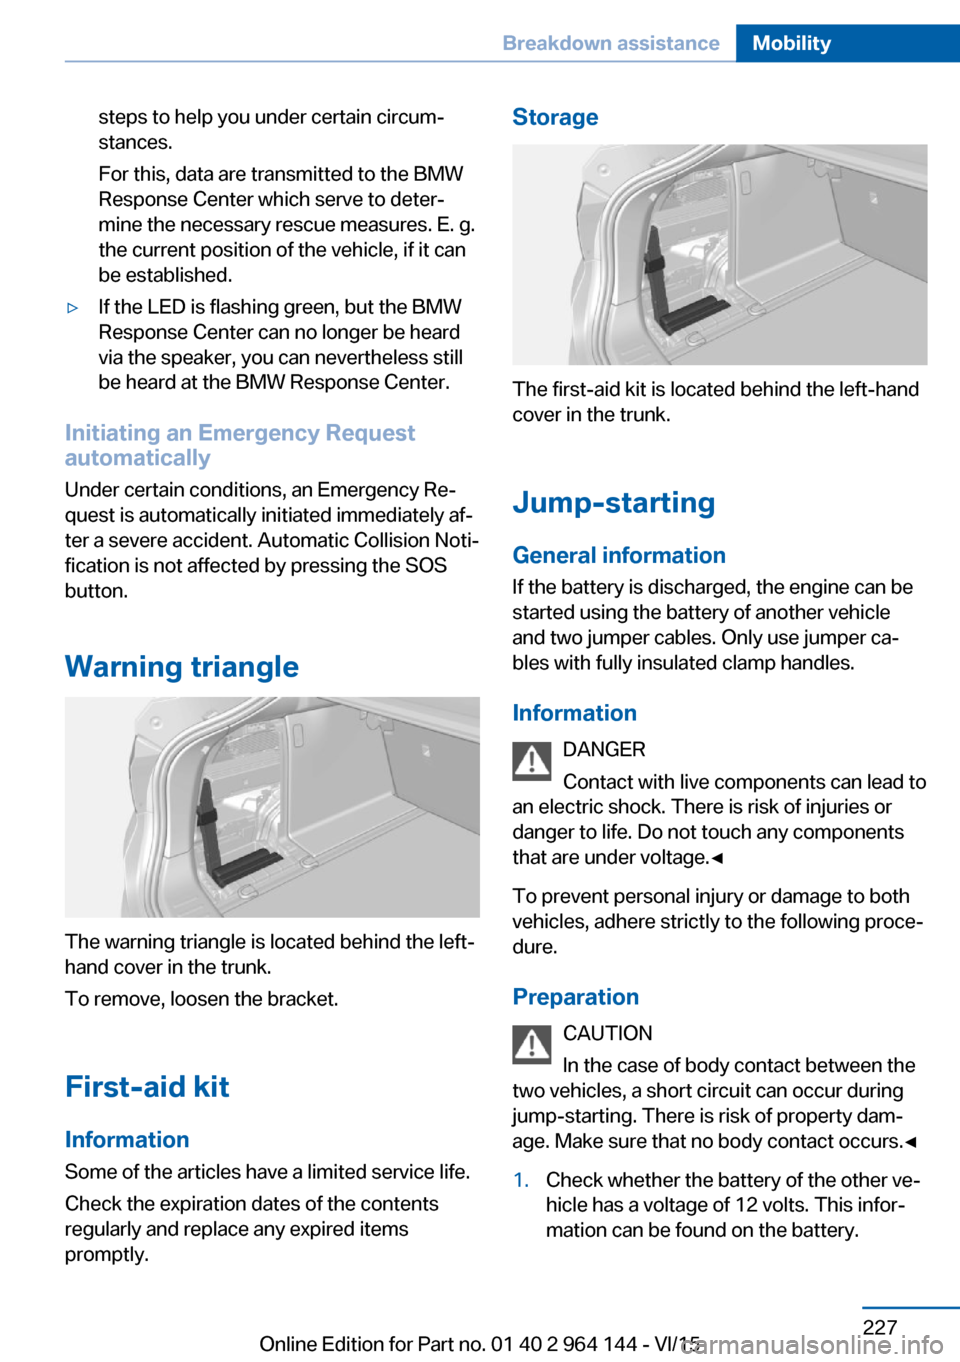
The warning triangle is located behind the left-
hand cover in the trunk.
To remove, loosen the bracket.
First-aid kit InformationSome of the articles have a limited service life.
Check the expiration dates of the contents
regularly and replace any expired items
promptly.
Storage
The first-aid kit is located behind the left-hand
cover in the trunk.
Jump-starting
General information If the battery is discharged, the engine can be
started using the battery of another vehicle and two jumper cables. Only use jumper ca‐
bles with fully insulated clamp handles.
Information DANGER
Contact with live components can lead to
an electric shock. There is risk of injuries or
danger to life. Do not touch any components
that are under voltage.◀
To prevent personal injury or damage to both
vehicles, adhere strictly to the following proce‐
dure.
Preparation CAUTION
In the case of body contact between the
two vehicles, a short circuit can occur during jump-starting. There is risk of property dam‐
age. Make sure that no body contact occurs.◀
1.Check whether the battery of the other ve‐
hicle has a voltage of 12 volts. This infor‐
mation can be found on the battery.Seite 227Breakdown assistanceMobility227
Online Edition for Part no. 01 40 2 964 144 - VI/15
Page 228 of 253

2.Switch off the engine of the assisting vehi‐
cle.3.Switch off any electronic systems/power
consumers in both vehicles.
Starting aid terminals
WARNING
If the jumper cables are connected in the
incorrect order, sparks formation can occur.
There is risk of injuries. Pay attention to the
correct order during connection.◀
The so-called starting aid terminal in the en‐
gine compartment acts as the battery's posi‐
tive terminal.
The body ground or a special nut acts as the
battery negative terminal.
Connecting the cables
1.Pull off the lid of the BMW starting aid ter‐
minal.2.Attach one terminal clamp of the positive
jumper cable to the positive terminal of the
battery, or to the corresponding startingaid terminal of the vehicle providing assis‐
tance.3.Attach the terminal clamp on the other end
of the cable to the positive terminal of the
battery, or to the corresponding starting
aid terminal of the vehicle to be started.4.Attach one terminal clamp of the negative
jumper cable to the negative terminal of
the battery, or to the corresponding engine
or body ground of assisting vehicle.5.Attach the second terminal clamp to the
negative terminal of the battery, or to the
corresponding engine or body ground of
the vehicle to be started.
Starting the engine
Never use spray fluids to start the engine.
1.Start the engine of the assisting vehicle
and let it run for several minutes at an in‐
creased idle speed.2.Start the engine of the vehicle that is to be
started in the usual way.
If the first starting attempt is not success‐
ful, wait a few minutes before making an‐
other attempt in order to allow the dis‐
charged battery to recharge.3.Let both engines run for several minutes.4.Disconnect the jumper cables in the re‐
verse order.
Check the battery and recharge if needed.
Tow-starting and towing Information WARNING
Due to system limits, individual functions
can malfunction during tow-starting/towing
with the Intelligent Safety systems activated,
e.g. approach control warning with light brak‐
ing function. There is risk of an accident.
Seite 228MobilityBreakdown assistance228
Online Edition for Part no. 01 40 2 964 144 - VI/15
Page 231 of 253
CareVehicle features and optionsThis chapter describes all standard, country-
specific and optional features offered with the
series. It also describes features that are not
necessarily available in your car, e. g., due to
the selected options or country versions. This
also applies to safety-related functions and
systems. The respectively applicable country
provisions must be observed when using the
respective features and systems.
Car washes General information
Regularly remove foreign objects such as
leaves in the area below the windshield when
the hood is raised.
Wash your vehicle frequently, particularly in
winter. Intense soiling and road salt can dam‐
age the vehicle.
Steam blaster and high-pressure
washer
Information CAUTION
When cleaning with high-pressure wash‐
ers, components can be damaged due to the
pressure or temperatures being too high.
There is risk of property damage. Maintain suf‐
ficient distance and do not spray too long con‐
tinuously. Follow the user's manual for the
high-pressure washer.◀
Distances and temperature▷Maximum temperature: 140 ℉/60 ℃.▷Minimum distance from sensors, cameras,
seals: 12 in/30 cm.▷Minimum distance from glass sunroof:
31.5 inches/80 cm.
Automatic car washes
Information
▷Give preference to cloth car washes or
those that use soft brushes in order to
avoid paint damage.▷Make sure that the wheels and tires are not
damaged by the transport mechanisms.▷Fold in the exterior mirrors; otherwise, they
may be damaged, depending on the width
of the vehicle.▷Deactivate the rain sensor, refer to
page 75, to avoid unintentional wiper acti‐
vation.▷In some cases, an unintentional alarm can
be triggered by the interior motion sensor
of the alarm system. Follow the instruc‐
tions on avoiding an unintentional alarm,
refer to page 47.
CAUTION
Too high guide rails in car washes can
damage body parts. There is risk of property
damage. Avoid car washes with guide rails
higher than 4 in/10 cm.◀
Before driving into a car wash In order to ensure that the vehicle can roll in a
car wash, take the following steps:
Steptronic transmission:
1.Drive into the car wash.2.Engage selector lever position N.3.Deactivating Automatic Hold, refer to
page 72.4.Release the parking brake.5.Switch the engine off.Seite 231CareMobility231
Online Edition for Part no. 01 40 2 964 144 - VI/15
Page 233 of 253
Clean light-colored leather more frequently be‐
cause soiling on such surfaces is substantially
more visible.
Use leather care products; otherwise, dirt and
grease will gradually break down the protective
layer of the leather surface.
Suitable care products are available from a
dealer’s service center or another qualified
service center or repair shop.
Upholstery material careVacuum regularly with a vacuum cleaner.
If upholstery is very dirty, e.g., with beverage
stains, use a soft sponge or microfiber cloth
with a suitable interior cleaner.
Clean the upholstery down to the seams using
large sweeping motions. Avoid rubbing the
material vigorously.
CAUTION
Open Velcro® fasteners on articles of
clothing can damage the seat covers. There is
risk of property damage. Ensure that any Vel‐
cro® fasteners are closed.◀
Caring for special components
Light-alloy wheels When cleaning the vehicle, use only neutral
wheel cleaners having a pH value from 5 to 9.
Do not use abrasive cleaning agents or steam jets above 140 ℉/60 ℃. Follow the manufac‐
turer's instructions.
Aggressive, acidic or alkaline cleaning agents
can destroy the protective layer of adjacent
components, such as the brake disk.
Chrome surfaces
Carefully clean components such as the radia‐
tor grille or door handles with an ample supply
of water, possibly with shampoo added, partic‐
ularly when they have been exposed to road
salt.Rubber components
Environmental influences can cause surface
soiling of rubber parts and a loss of gloss. For
cleaning, use only water and suitable care
products, the manufacturer of your vehicle rec‐
ommends original BMW care products.
Treat especially worn rubber parts with rubber
care agents at regular intervals. When cleaning
rubber seals, do not use any silicon-containing
car care products in order to avoid damage or
noises.
Fine wood partsClean fine wood facing and fine wood compo‐
nents only with a moist rag. Then dry with a
soft cloth.
Plastic components
These include:▷Imitation leather surfaces.▷Roofliner.▷Lamp lenses.▷Instrument cluster cover.▷Matt black spray-coated components.▷Painted parts in the interior.
Clean with a microfiber cloth.
Dampen cloth lightly with water.
Do not soak the roofliner.
CAUTION
Cleansers that contain alcohol or sol‐
vents, such as lacquer thinners, heavy-duty
grease removers, fuel, or such, can damage
plastic parts. There is risk of property damage.
Clean with a microfiber cloth. Dampen cloth
lightly with water.◀
Safety belts
Dirty belt straps impede the reeling action and
thus have a negative impact on safety.
Seite 233CareMobility233
Online Edition for Part no. 01 40 2 964 144 - VI/15
Page 238 of 253

Technical dataVehicle features and options
This chapter describes all standard, country-
specific and optional features offered with the
series. It also describes features that are not
necessarily available in your car, e. g., due tothe selected options or country versions. This
also applies to safety-related functions and
systems. The respectively applicable country
provisions must be observed when using the
respective features and systems.
Information
The technical data and specifications in this
Owner's Manual are used as guidance values.
The vehicle-specific data can deviate from this,
for example, due to the selected special equip‐
ment, country version or country-specific
measurement method. Detailed values can befound in the approval documents, on labels on
the vehicle or can be obtained from a dealer’s
service center or another qualified service cen‐
ter or repair shop.
The information in the vehicle documents al‐
ways has priority.
Dimensions
The dimensions can vary depending on the
model version, equipment or country-specific
measurement method.
The specified heights do not take into account
attached parts, for example, a roof antenna,roof racks or spoiler. The heights can deviate,
for example, due to the selected special equip‐
ment, tires, load and chassis version. X4Width with mirrorsinches/mm82.3/2,089Width without mirrorsinches/mm74.1/1,881Heightinches/mm63.9/1,624Lengthinches/mm184.3/4,680Wheelbaseinches/mm110.6/2,810Smallest turning radius diam.ft/m39/11.9Seite 238ReferenceTechnical data238
Online Edition for Part no. 01 40 2 964 144 - VI/15
Page 244 of 253

Control systems, driving sta‐bility 126
Convenient opening with the remote control 38
Coolant 213
Coolant temperature 87
Cooling function 156, 159
Cooling, maximum 159
Cooling system 213
Cornering light 100
Corrosion on brake discs 178
Cosmetic mirror 165
Courtesy lamps during un‐ locking 37
Courtesy lamps with the vehi‐ cle locked 38
Cruise control 139
Cruise control, active with Stop & Go 133
Cruising range 88
Cupholder 171
Current fuel consumption 88
D
Damage, tires 201
Damping control, dy‐ namic 129
Data, technical 238
Date 88
Daytime running lights 100
Daytime running lights, bulb replacement 219
Defrosting, see Windows, de‐ frosting 157, 160
Dehumidifying, air 156, 159
Deleting personal data 25
Deletion of personal data 25
Destination distance 93
Digital clock 87
Dimensions 238
Dimmable exterior mirrors 61
Dimmable interior rearview mirror 61
Direction indicator, see Turn signals 73 Display, electronic, instru‐
ment cluster 82
Display in windshield 95
Display lighting, see Instru‐ ment lighting 102
Displays, cleaning 234
Disposal, coolant 214
Disposal, vehicle battery 225
Distance control, see PDC 142
Distance to destination 93
Divided screen view, split screen 23
Door lock 39
Door lock, see Remote con‐ trol 34
Downhill control 128
Drive-off assistant 132
Drive-off assistant, see DSC 126
Driving Dynamics Con‐ trol 130
Driving instructions, break- in 176
Driving mode 130
Driving notes, general 177
Driving on bad roads 176
Driving stability control sys‐ tems 126
Driving tips 177
DSC Dynamic Stability Con‐ trol 126
DTC Dynamic Traction Con‐ trol 127
Dynamic Damping Con‐ trol 129
Dynamic Stability Control DSC 126
Dynamic Traction Control DTC 127
E ECO PRO 184
ECO PRO, bonus range 185
ECO PRO display 184 ECO PRO driving mode 184
ECO PRO mode 184
ECO PRO Tip - driving in‐ struction 186
EfficientDynamics 186
Electronic displays, instru‐ ment cluster 82
Electronic oil measure‐ ment 209
Electronic Stability Program ESP, see DSC 126
Emergency detection, remote control 35
Emergency release, fuel filler flap 192
Emergency Request 226
Emergency start function, en‐ gine start 35
Emergency unlocking, tail‐ gate 42
Emergency unlocking, trans‐ mission lock 80
Energy Control 88
Energy recovery 88
Engine, automatic Start/Stop function 69
Engine, automatic switch- off 69
Engine compartment 207
Engine compartment, work‐ ing in 207
Engine coolant 213
Engine idling when driving, coasting 187
Engine oil 209
Engine oil, adding 210
Engine oil additives 211
Engine oil change 211
Engine oil filler neck 210
Engine oil temperature 87
Engine oil types, alterna‐ tive 211
Engine oil types, suitable 211
Engine start during malfunc‐ tion 35 Seite 244ReferenceEverything from A to Z244
Online Edition for Part no. 01 40 2 964 144 - VI/15