2015 BMW X1 SDRIVE28I language
[x] Cancel search: languagePage 119 of 297
Canada: if the LED does not flash rapidly
after approx. 60 seconds, change the dis‐
tance and repeat the step. If programming
was aborted by the hand-held transmitter,
hold down the memory button and press
and release the button on the hand-held
transmitter several times for 2 seconds.
Controls
Prior to operation
Before operating a unit with the Universal
Garage Door Opener, ensure that there are no
people, animals, or objects in the range of
movement of the system; otherwise, there is a
risk of injury or damage.
Also follow the safety instructions of the hand-
held transmitter.◀
The system, such as the garage door, can be
operated using the button on the interior rear‐
view mirror with the engine running or the igni‐
tion switched on. When you are within the re‐
ception range of the system, press and hold
the button until the function is initiated. The
LED on the interior rearview mirror lights up
continuously while the radio signal is being
transmitted.
Deleting stored functions Press the right and left buttons on the interior
rearview mirror simultaneously for approx.
20 seconds until the LED flashes rapidly. All
stored functions are deleted. The functions
cannot be deleted individually.
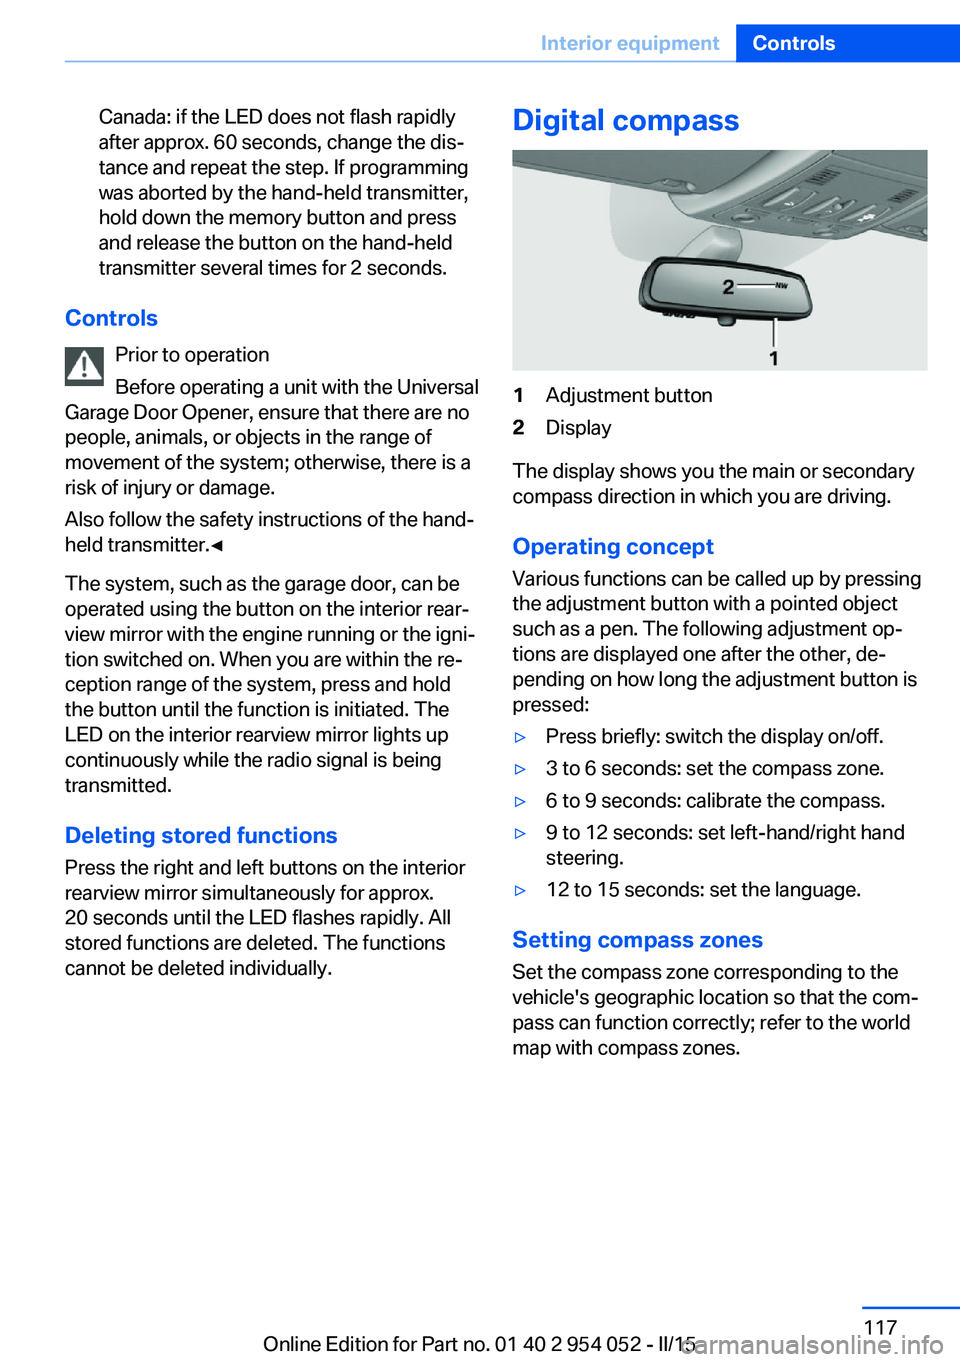
Digital compass1Adjustment button2Display
The display shows you the main or secondary
compass direction in which you are driving.
Operating concept
Various functions can be called up by pressing
the adjustment button with a pointed object
such as a pen. The following adjustment op‐
tions are displayed one after the other, de‐
pending on how long the adjustment button is
pressed:
▷Press briefly: switch the display on/off.▷3 to 6 seconds: set the compass zone.▷6 to 9 seconds: calibrate the compass.▷9 to 12 seconds: set left-hand/right hand
steering.▷12 to 15 seconds: set the language.
Setting compass zones
Set the compass zone corresponding to the
vehicle's geographic location so that the com‐
pass can function correctly; refer to the world
map with compass zones.
Seite 117Interior equipmentControls117
Online Edition for Part no. 01 40 2 954 052 - II/15
Page 120 of 297
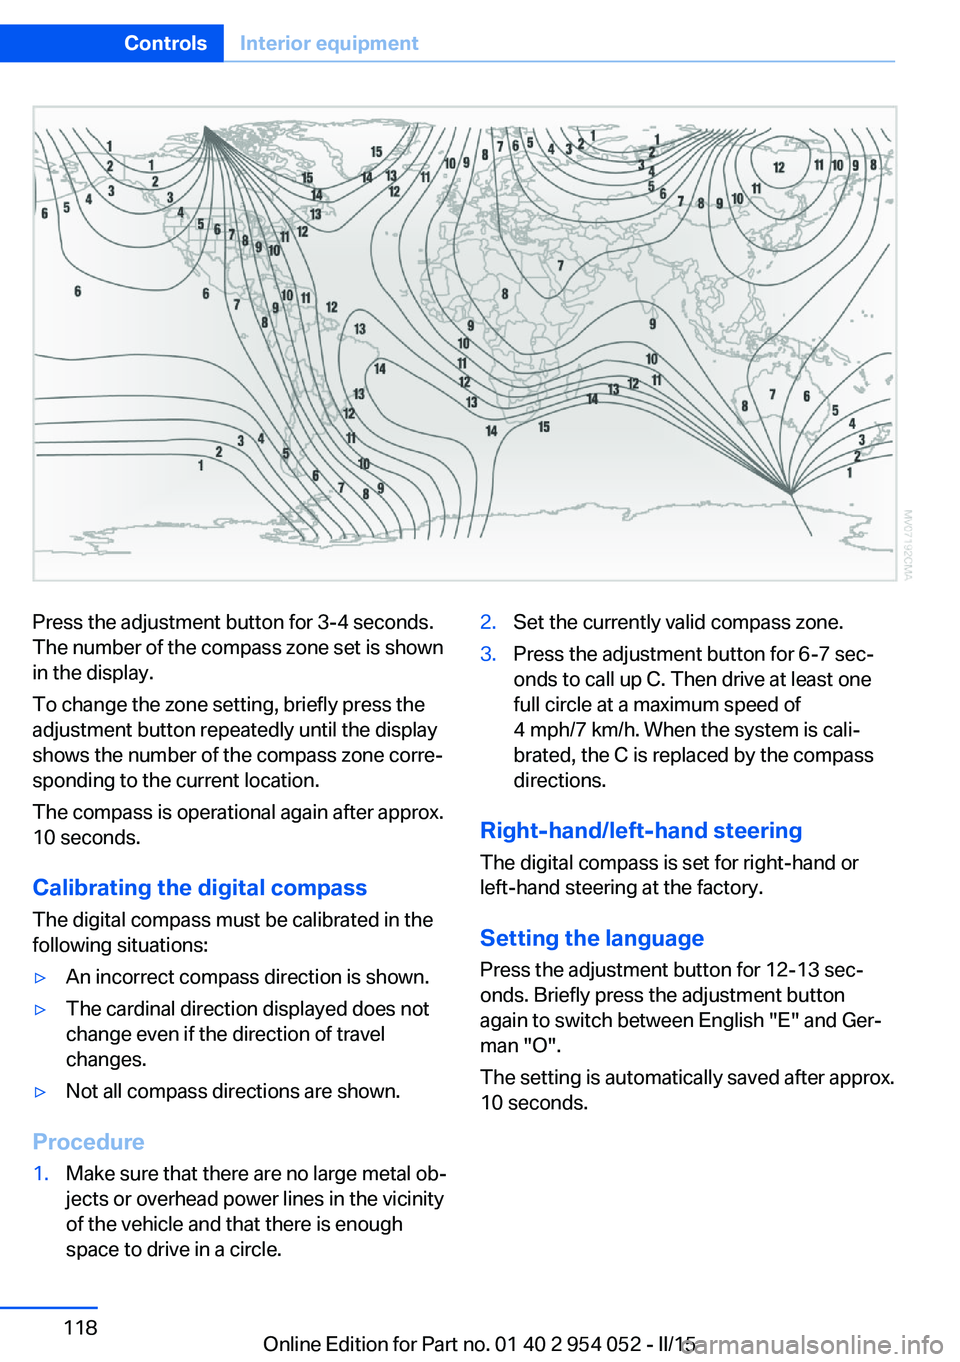
Press the adjustment button for 3‑4 seconds.
The number of the compass zone set is shown
in the display.
To change the zone setting, briefly press the
adjustment button repeatedly until the display
shows the number of the compass zone corre‐
sponding to the current location.
The compass is operational again after approx.
10 seconds.
Calibrating the digital compass
The digital compass must be calibrated in the
following situations:▷An incorrect compass direction is shown.▷The cardinal direction displayed does not
change even if the direction of travel
changes.▷Not all compass directions are shown.
Procedure
1.Make sure that there are no large metal ob‐
jects or overhead power lines in the vicinity
of the vehicle and that there is enough
space to drive in a circle.2.Set the currently valid compass zone.3.Press the adjustment button for 6‑7 sec‐
onds to call up C. Then drive at least one
full circle at a maximum speed of
4 mph/7 km/h. When the system is cali‐
brated, the C is replaced by the compass
directions.
Right-hand/left-hand steering
The digital compass is set for right-hand or
left-hand steering at the factory.
Setting the language Press the adjustment button for 12‑13 sec‐
onds. Briefly press the adjustment button
again to switch between English "E" and Ger‐
man "O".
The setting is automatically saved after approx.
10 seconds.
Seite 118ControlsInterior equipment118
Online Edition for Part no. 01 40 2 954 052 - II/15
Page 154 of 297
Destination entry by voiceGeneral information▷Instructions for voice activation system, re‐
fer to page 27.▷When making a destination entry by voice,
you can change between voice operation
and iDrive.▷To have the available spoken instructions
read out loud: ›Voice commands‹.
Saying the entries
▷The town/city, street, and house number
can be entered using a single command.▷Countries, towns and cities, streets, and
intersections can be said as whole words
or spelled in the language of the system,
refer to page 79.
Example: to enter a destination in a US
state as a whole word, the system lan‐
guage must be English.▷Spell the entry if the spoken language and
the language of the system differ.▷Say the letters smoothly, and avoid exag‐
gerating the pronunciation and inserting
lengthy pauses between the letters.▷The methods of entry depend on the navi‐
gation data in use and the country and lan‐
guage settings.
Entering the address in a command
1. Press the button on the steering
wheel.2.›Enter address‹3.Wait for a request from the system.4.Say the address in the suggested order.5.Continue making the entry as prompted by
the system.
If necessary, individually name the sepa‐
rate components of the address, e.g., the
town/city.Entering a town/city separately
The town/city can be said as a complete word.
With the destination entry menu displayed:1. Press the button on the steering
wheel.2.›City‹ or ›Spell city‹3.Wait for the system to prompt you for the
town/city.4.Say the name of the town/city, or name at
least the first three letters.
Depending on the entry, up to 20 towns/
cities may be suggested.5.Select a location:▷Select a recommended town/
city: ›Yes‹.▷Select a different town/city: ›New
entry‹.▷Select an entry: ›Entry ...‹, for instance,
entry 2.▷Spell an entry: ›Spell city‹.6.Continue making the entry as prompted by
the system.
If there are several towns/cities with the same
name:
Towns/cities of the same name are grouped in
a list and displayed as one location followed by
an ellipsis.
1.Select an entry: ›Yes‹ or ›Entry ...‹, e. g., En‐
try 2.2.Select the desired town/city.
Entering a street or intersection
separately
Enter a street and intersection in the same way
as you would enter a town/city.
Seite 152NavigationDestination entry152
Online Edition for Part no. 01 40 2 954 052 - II/15
Page 181 of 297
In fast forward/reverse: the speed increases
every time the controller is pressed. To stop,
start playback.
DVD menu1.If necessary, turn the controller to open the
video menu.2. "DVD menu"
The DVD menu is displayed. The display
depends on the contents of the DVD.3.To select menu items: move the controller
and press it.
To change to the video menu: turn the control‐
ler and press it.
DVD settingsFor some DVDs, settings can only be made via
the DVD menu; refer also to the information on
the DVD.
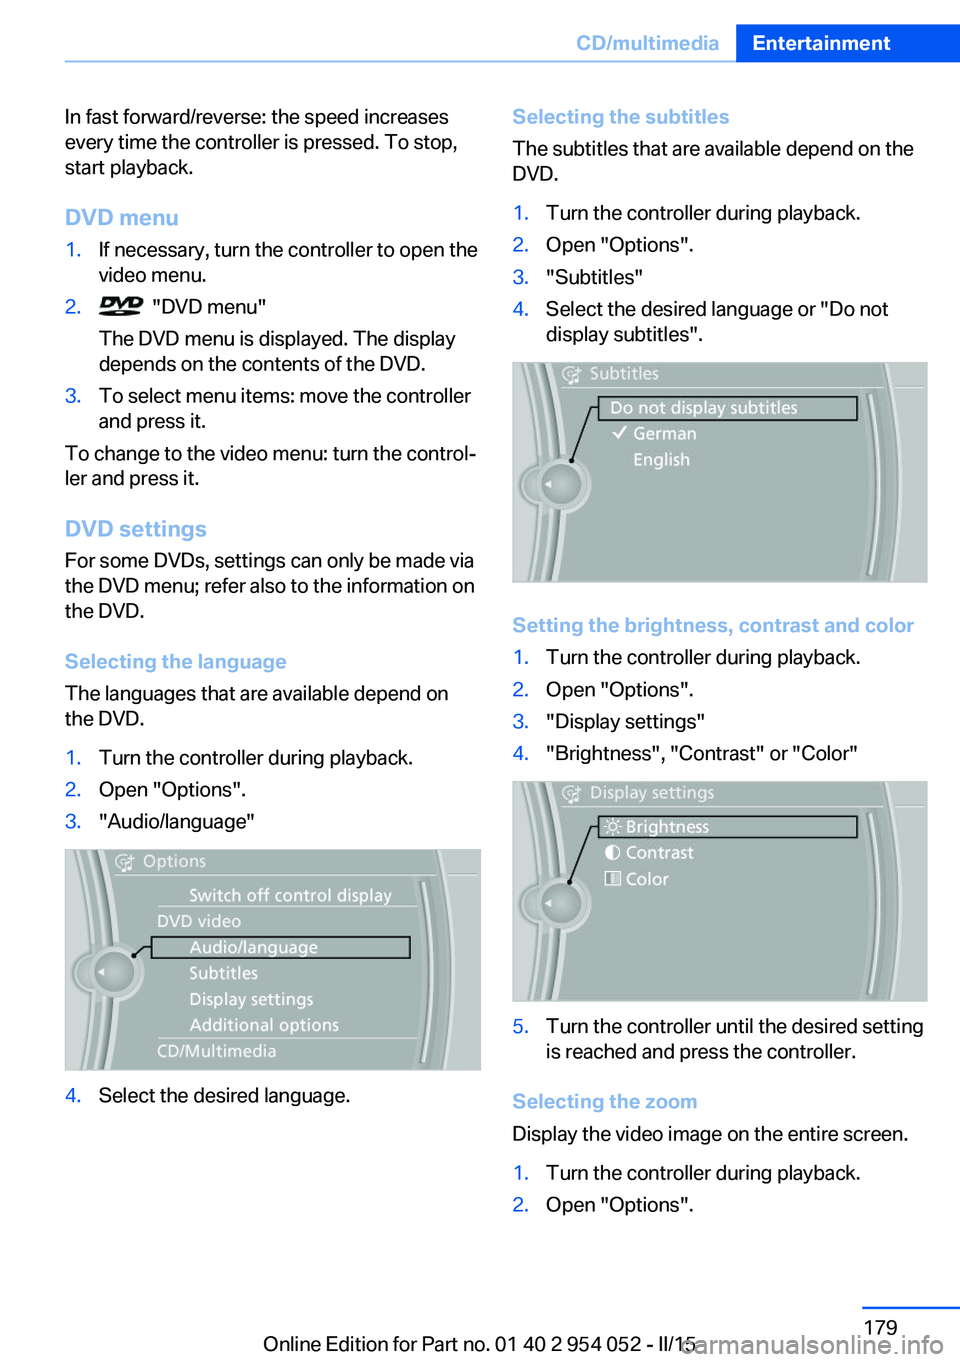
Selecting the language
The languages that are available depend on
the DVD.
1.Turn the controller during playback.2.Open "Options".3."Audio/language"4.Select the desired language.Selecting the subtitles
The subtitles that are available depend on the
DVD.1.Turn the controller during playback.2.Open "Options".3."Subtitles"4.Select the desired language or "Do not
display subtitles".
Setting the brightness, contrast and color
1.Turn the controller during playback.2.Open "Options".3."Display settings"4."Brightness", "Contrast" or "Color"5.Turn the controller until the desired setting
is reached and press the controller.
Selecting the zoom
Display the video image on the entire screen.
1.Turn the controller during playback.2.Open "Options".Seite 179CD/multimediaEntertainment179
Online Edition for Part no. 01 40 2 954 052 - II/15
Page 274 of 297
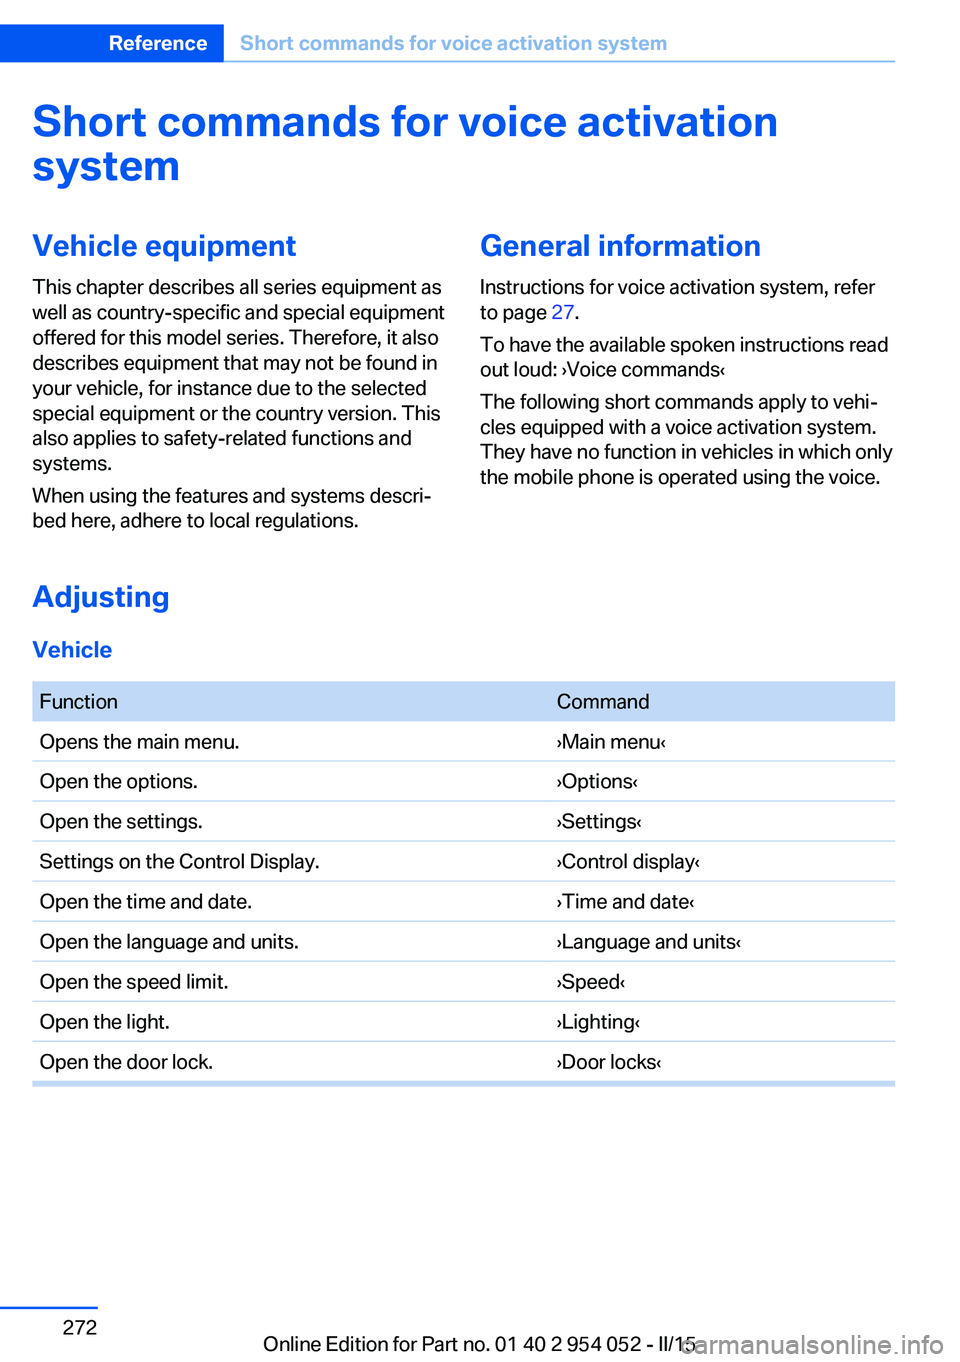
Short commands for voice activationsystemVehicle equipment
This chapter describes all series equipment as
well as country-specific and special equipment
offered for this model series. Therefore, it also
describes equipment that may not be found in
your vehicle, for instance due to the selected
special equipment or the country version. This
also applies to safety-related functions and
systems.
When using the features and systems descri‐
bed here, adhere to local regulations.General information
Instructions for voice activation system, refer
to page 27.
To have the available spoken instructions read
out loud: ›Voice commands‹
The following short commands apply to vehi‐
cles equipped with a voice activation system.
They have no function in vehicles in which only
the mobile phone is operated using the voice.
Adjusting
Vehicle
FunctionCommandOpens the main menu.›Main menu‹Open the options.›Options‹Open the settings.›Settings‹Settings on the Control Display.›Control display‹Open the time and date.›Time and date‹Open the language and units.›Language and units‹Open the speed limit.›Speed‹Open the light.›Lighting‹Open the door lock.›Door locks‹Seite 272ReferenceShort commands for voice activation system272
Online Edition for Part no. 01 40 2 954 052 - II/15
Page 288 of 297

IIce warning, refer to External temperature warning 73
Icy roads, refer to External temperature warning 73
Identification marks, tires 237
Identification number, refer to Engine compartment 242
iDrive 20
iDrive, changing settings 79
iDrive, changing the date and time 78
iDrive, changing the lan‐ guage 79
iDrive, changing the units of measure and display for‐
mat 77
iDrive, setting the bright‐ ness 80
Ignition 60
Ignition key position 1, refer to Radio ready state 59
Ignition key position 2, refer to Ignition on 60
Ignition key, refer to Remote control with integrated
key 32
Ignition lock 59
Ignition, switched off 60
Ignition, switched on 60
Indication of a flat tire 94, 96
Indicator and warning lights 17
Individual settings, refer to Personal Profile 32
Inflation pressure monitor, re‐ fer to Flat Tire Monitor 93
Inflation pressure, refer to Tire inflation pressure 232
Information on the navigation data 144
Initialization after power fail‐ ure 256
Initializing– Refer to Setting the time
and date 78Initializing, compass, refer to
Calibrating 118
Initializing, Flat Tire Monitor FTM 93
Initializing panoramic glass sunroof 45
Initializing, Tire Pressure Monitor TPM 96
Inside brake lamps, bulb re‐ placement 254
Installation location, tele‐ phone 126
Instrument cluster 16
Instrument lighting 89
Instrument panel, refer to In‐ strument cluster 16
Instruments, refer to Cock‐ pit 14
Integrated key 32
Integrated universal remote control 115
Interactive map 151
Interior equipment 115
Interior lights 89
Interior lights, remote con‐ trol 35
Interior mirror 52
Interior motion sensor 42
Interior rearview mirror, auto‐ matic dimming 52
Interior rearview mirror, com‐ pass 117
Interior temperature, setting, automatic climate con‐
trol 110
Interlock, refer to Disengag‐ ing the remote control 67
Intermediate destina‐ tions 153
Internet page 6
Intersection, entering for navi‐ gation 147 J
Jacking points for the vehicle jack 255
Jack, refer to Vehicle jack 255
Joystick, refer to Selector lever 70
Jump-starting 258
K
Keyless Go, refer to Comfort Access 39
Keyless opening and closing, refer to Comfort Access 39
Key Memory, refer to Per‐ sonal Profile 32
Key, refer to Integrated key/ remote control 32
Kickdown, automatic trans‐ mission with Step‐
tronic 68, 70
Knee airbag 90
Knocking control 230
L Label, run-flat tire 241
Lamp and bulb replacement, light replacement 250
Lamps 85
Lamps, automatic headlight control 86
Lamps, High-beam Assis‐ tant 87
Lamps, replacing, refer to Lamp and bulb replace‐
ment 250
Language, changing on the Control Display 79
Lap-and-shoulder belt, refer to Safety belts 48
Lashing eyes, securing cargo 137 Seite 286ReferenceEverything from A to Z286
Online Edition for Part no. 01 40 2 954 052 - II/15
Page 292 of 297
Run-flat tires 241
Run-flat tires, tire inflation pressure 232
S Safe braking 133
Safety 7
Safety belts, care 265
Safety belts, damage 49
Safety belts, indicator/warn‐ ing lamp 49
Safety belts, reminder 49
Safety switch for rear win‐ dows 43
Safety systems, airbags 90
Safety systems, safety belts 48
Safety tires, refer to Run-flat tires 241
Satellite radio 170
Saving fuel 139
Scale, changing during navi‐ gation 158
Screen, refer to Control Dis‐ play 20
Search, refer to BMW On‐ line 222
Seat adjustment, electric 47
Seat adjustment, manual 46
Seat and mirror memory 50
Seat belts 48
Seat heating 48
Seats 46
Seats, adjusting 46
Seats, memory, refer to Seat and mirror memory 50
Seats, sitting safely 46
Selector lever, automatic transmission with Step‐
tronic 68, 70
Selector lever lock, overrid‐ ing 69
Selector lever lock, refer to Changing the selector lever
positions, shiftlock 68 Selector lever lock, releas‐
ing 70
Selector lever positions, auto‐ matic transmission with
Steptronic 68
Sensors, care 266
Service and warranty 8
Service data in the remote control 247
Service interval display, refer to Condition Based Service
CBS 247
Service interval display, refer to Service requirements 80
Service requirements 80
Service requirements, CBS Condition Based Serv‐
ice 247
Services, remote 225
Servotronic 102
Settings and information 76
Settings, changing on the Control Display 79
Settings, clock, 12h/24h mode 78
Settings, DVD 179
Settings, language 79
Settings, refer to Personal Profile 32
Shifting, automatic transmis‐ sion with Steptronic 68, 71
Shift lever, automatic trans‐ mission with Steptronic 68
Shift paddles 71
Shift paddles on the steering wheel 69
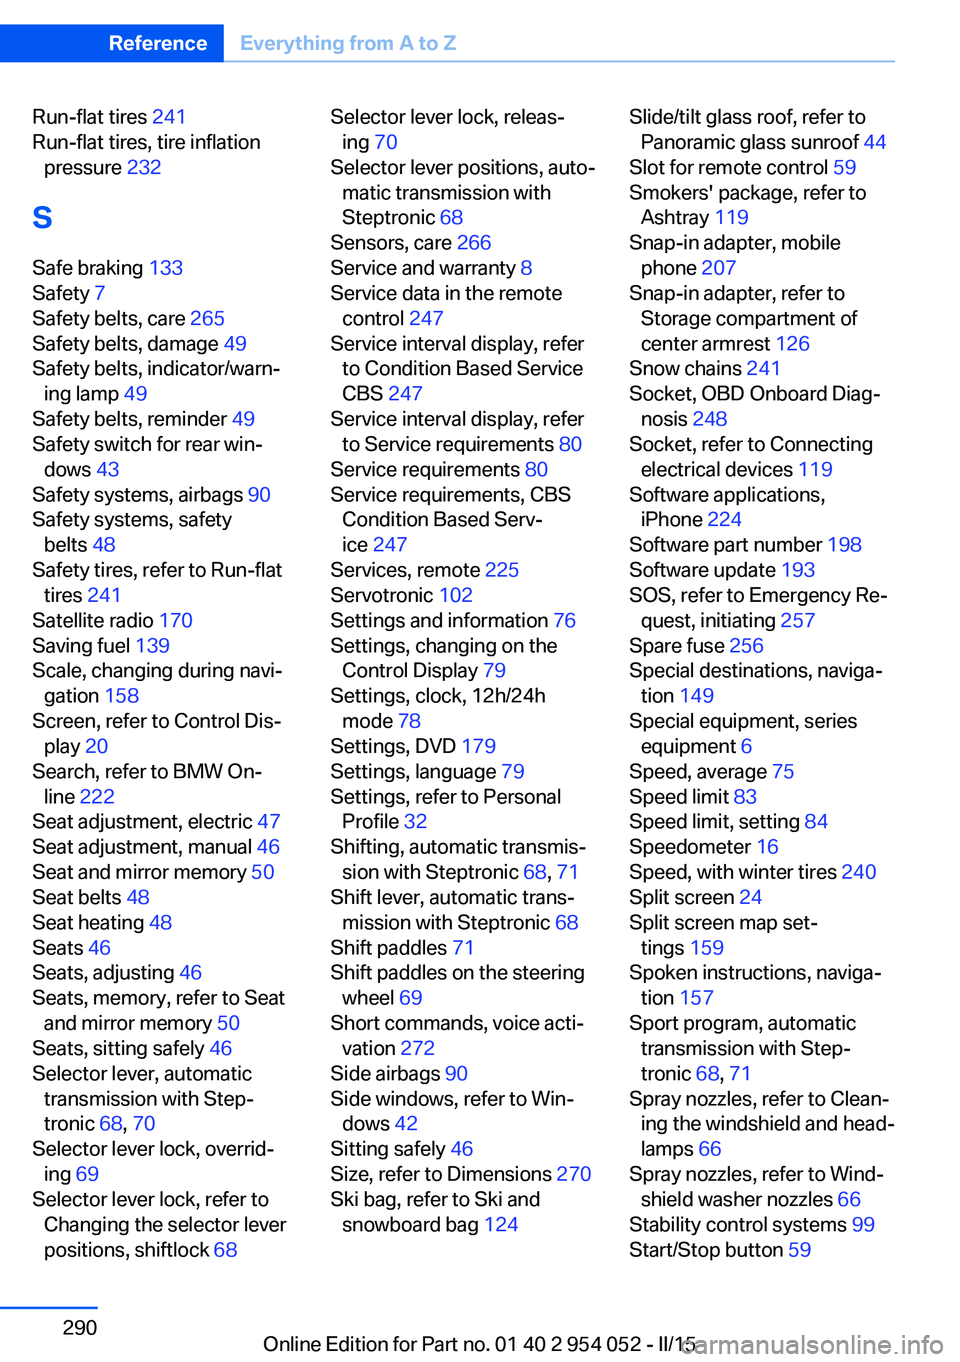
Short commands, voice acti‐ vation 272
Side airbags 90
Side windows, refer to Win‐ dows 42
Sitting safely 46
Size, refer to Dimensions 270
Ski bag, refer to Ski and snowboard bag 124 Slide/tilt glass roof, refer to
Panoramic glass sunroof 44
Slot for remote control 59
Smokers' package, refer to Ashtray 119
Snap-in adapter, mobile phone 207
Snap-in adapter, refer to Storage compartment of
center armrest 126
Snow chains 241
Socket, OBD Onboard Diag‐ nosis 248
Socket, refer to Connecting electrical devices 119
Software applications, iPhone 224
Software part number 198
Software update 193
SOS, refer to Emergency Re‐ quest, initiating 257
Spare fuse 256
Special destinations, naviga‐ tion 149
Special equipment, series equipment 6
Speed, average 75
Speed limit 83
Speed limit, setting 84
Speedometer 16
Speed, with winter tires 240
Split screen 24
Split screen map set‐ tings 159
Spoken instructions, naviga‐ tion 157
Sport program, automatic transmission with Step‐
tronic 68, 71
Spray nozzles, refer to Clean‐ ing the windshield and head‐
lamps 66
Spray nozzles, refer to Wind‐ shield washer nozzles 66
Stability control systems 99
Start/Stop button 59 Seite 290ReferenceEverything from A to Z290
Online Edition for Part no. 01 40 2 954 052 - II/15