2015 BMW M4 COUPE media
[x] Cancel search: mediaPage 184 of 228

This prevents leftover sealant from escap‐
ing from the container.4.Wrap the empty sealant container in suita‐
ble material to avoid dirtying the cargo
area.5.Stow the Mobility System back in the vehi‐
cle.
Distributing the sealant
Immediately drive approx. 5 miles/10 km to en‐
sure that the sealant is evenly distributed in the
tire.
Do not exceed a speed of 50 mph/80 km/h.
If possible, do not drive at speeds less than
12 mph/20 km/h.
To correct the tire inflation pressure
1.Stop at a suitable location.2.Screw the connection hose of the com‐
pressor directly onto the tire valve stem.3.Insert the connector into the power socket
inside the vehicle.4.Correct the tire inflation pressure to
2.5 bar.▷Increase pressure: with the ignition
turned on or the engine running, reel
on the compressor.▷To reduce the pressure: press the but‐
ton on the compressor.
Continuing the trip
Do not exceed the maximum permissible
speed of 50 mph/80 km/h.
Reinitialize the Tire Pressure Monitor.
Replace the defective tire and the sealant con‐
tainer of the Mobility System as soon as possi‐
ble.
Snow chains
Fine-link snow chains Only certain types of fine-link snow chains
have been tested by the manufacturer of the
vehicle, classified as road-safe and approved.
Information about the approved snow chains
are available from the service center.
Use Use only in pairs on the rear wheels, equipped
with the tires of the following size:▷255/40 R 18▷255/35 R 19
Follow the snow chain manufacturer's instruc‐
tions.
Make sure that the snow chains are always
sufficiently tight. Retighten as needed accord‐
ing to the chain manufacturer's instructions.
Do not initialize the Tire Pressure Monitor after
mounting snow chains, as doing so may result
in incorrect readings.
When driving with snow chains, if needed
briefly activate M Dynamic Mode.
Maximum speed with snow chains
Do not exceed a speed of 30 mph/50 km/h
when using snow chains.
Seite 180MobilityWheels and tires180
Online Edition for Part no. 01 40 2 960 786 - II/15
Page 186 of 228

Never reach into the engine compart‐
ment
Never reach into spaces or gaps in the engine
compartment; otherwise, there is a risk of in‐
jury, e.g., from rotating or hot parts.◀
Fold down wiper arm
Before opening the hood, ensure that the
wiper arms are against the windshield, or this
may result in damage.◀
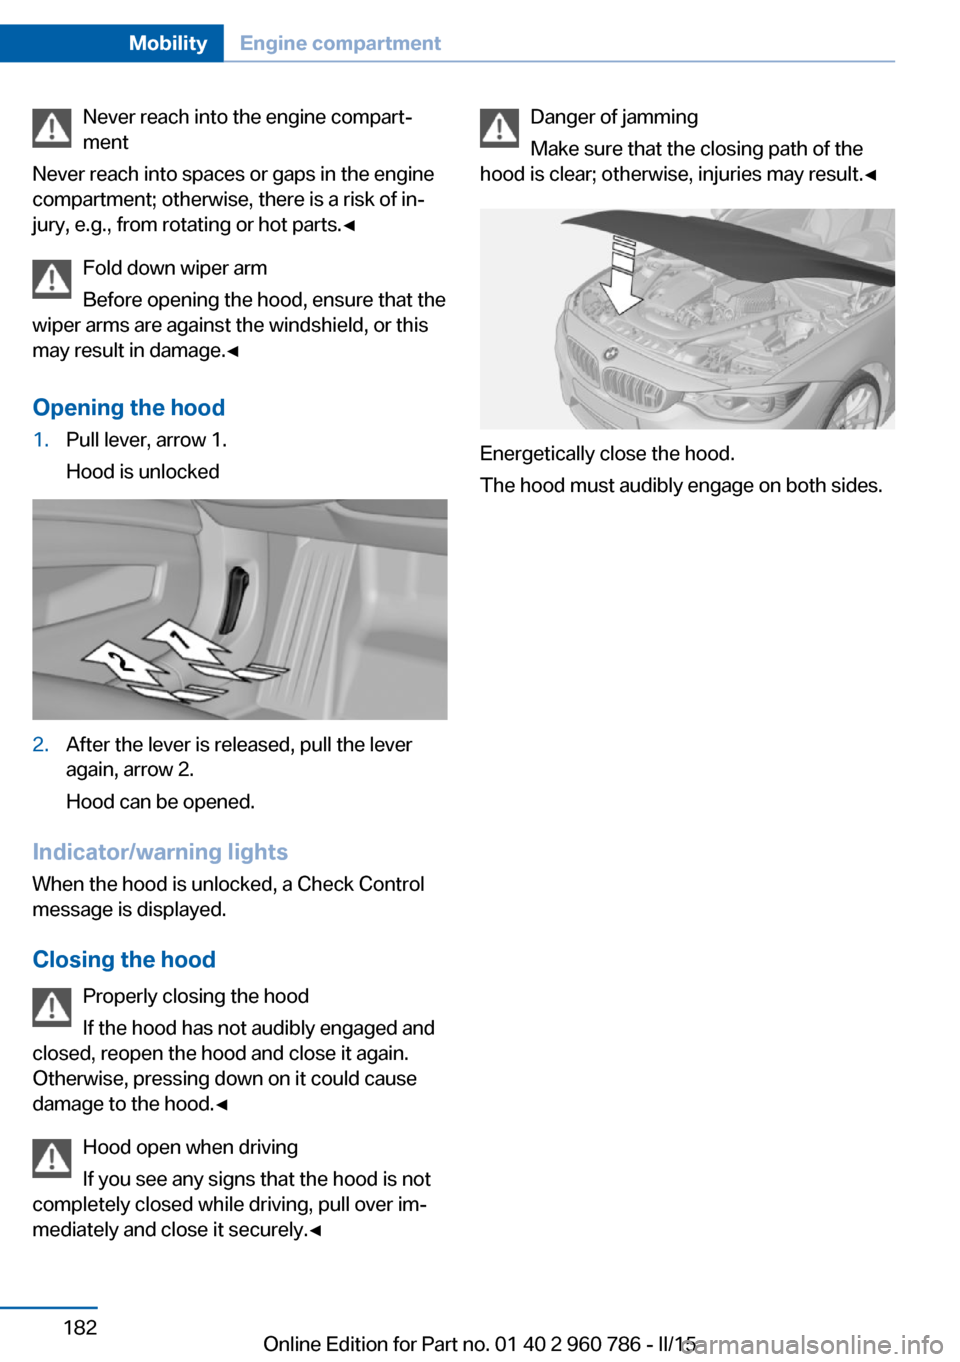
Opening the hood1.Pull lever, arrow 1.
Hood is unlocked2.After the lever is released, pull the lever
again, arrow 2.
Hood can be opened.
Indicator/warning lights
When the hood is unlocked, a Check Control
message is displayed.
Closing the hood Properly closing the hood
If the hood has not audibly engaged and
closed, reopen the hood and close it again.
Otherwise, pressing down on it could cause
damage to the hood.◀
Hood open when driving
If you see any signs that the hood is not
completely closed while driving, pull over im‐
mediately and close it securely.◀
Danger of jamming
Make sure that the closing path of the
hood is clear; otherwise, injuries may result.◀
Energetically close the hood.
The hood must audibly engage on both sides.
Seite 182MobilityEngine compartment182
Online Edition for Part no. 01 40 2 960 786 - II/15
Page 187 of 228

Engine oilVehicle features and options
This chapter describes all standard, country-
specific and optional features offered with the
series. It also describes features that are not
necessarily available in your car, e. g., due to
the selected options or country versions. This
also applies to safety-related functions and
systems. The respectively applicable country
provisions must be observed when using the
respective features and systems.
General information The engine oil consumption is dependent on
the driving style and driving conditions.
The engine oil consumption can increase in
case of, for example:▷Sporty driving.▷Break-in the engine.▷Idling of the engine.▷Usage of non-approved engine oil grades.
Therefore, regularly check the engine oil level
after refueling.
When a dynamic driving style is used, such as
when cornering fast, the system is unable to
measure the engine oil level. With this driving
style, measure the engine oil level using a de‐
tailed measurement, refer to page 184.
The vehicle is equipped with electronic oil
measurement.
The electronic oil measurement has two meas‐
uring principles:
▷Status display▷Detailed measurementElectronic oil measurement
Status display
The concept
The engine oil level is monitored electronically
while driving and shown on the Control Dis‐
play.
If the engine oil level reaches the minimum
level, a check control message is displayed.
Requirements
A current measured value is available after ap‐
prox. 30 minutes of driving. During a shorter
trip, the status of the last, sufficiently long trip
is displayed.
With frequent short-distance trips, regularly
perform a detailed measurement.
Displaying the engine oil level
On the Control Display:1."Vehicle info"2."Vehicle status"3. "Engine oil level"
Engine oil level display messages
Different messages appear on the display de‐
pending on the engine oil level. Pay attention
to these messages.
If the engine oil level is too low, within the next
125 miles/200 km Add engine oil, refer to
page 184.
Engine oil level too low
Add engine oil immediately; otherwise,
an insufficient amount of engine oil could re‐
sult in engine damage.◀
Take care not to add too much engine oil.
Seite 183Engine oilMobility183
Online Edition for Part no. 01 40 2 960 786 - II/15
Page 188 of 228

Too much engine oil
Have the vehicle checked immediately;
otherwise, surplus engine oil can lead to en‐
gine damage.◀
Detailed measurement
The concept In the detailed measurement the engine oil
level is checked and displayed via a scale.
Gasoline engine:
If the engine oil level reaches the minimum
level, a check control message is displayed.
Diesel engine:
During the measurement, the idle speed is in‐
creased somewhat.
Requirements▷Vehicle is on level road.▷Manual transmission: shift lever in neutral
position, clutch and accelerator pedals not
depressed.▷M Double clutch transmission: selector
lever in selector lever position N and accel‐
erator pedal not depressed.▷Engine is running and is at operating tem‐
perature.
Performing a detailed measurement
In order to perform a detailed measurement of
the engine oil level:
1."Vehicle info"2."Vehicle status"3. "Measure engine oil level"4."Start measurement"
The engine oil level is checked and displayed
via a scale.
Time: approx. 1 minute.
Adding engine oil
General information
Switch off the ignition and safely park the vehi‐
cle before engine oil is added.
Spilled engine oil can damage carbon parts.
Wipe up spilled motor oil using a lint-free cloth.
Oil filler neck
Only add engine oil when the message is dis‐
played in the instrument cluster. The quantity
to be added is indicated in the message dis‐
played in the instrument cluster.
Adding engine oil
Add oil within the next 125 miles/200 km;
otherwise, this may cause engine damage.◀
Do not add too much engine oil
When too much engine oil is added, im‐
mediately have the vehicle checked, otherwise,
this may cause engine damage.◀
Protect children
Keep oil, grease, etc., out of reach of chil‐
dren and observe the warnings on the contain‐
ers to prevent health risks.◀
Seite 184MobilityEngine oil184
Online Edition for Part no. 01 40 2 960 786 - II/15
Page 193 of 228

Socket for OBD Onboard
Diagnosis
Note Socket for Onboard Diagnosis
The socket for onboard diagnostics may
only be used by the service center or a work‐
shop that operates in accordance with the
specifications of the vehicle manufacturer with
correspondingly trained personnel and other
authorized persons. Otherwise, use may result
in operating problems for the vehicle.◀
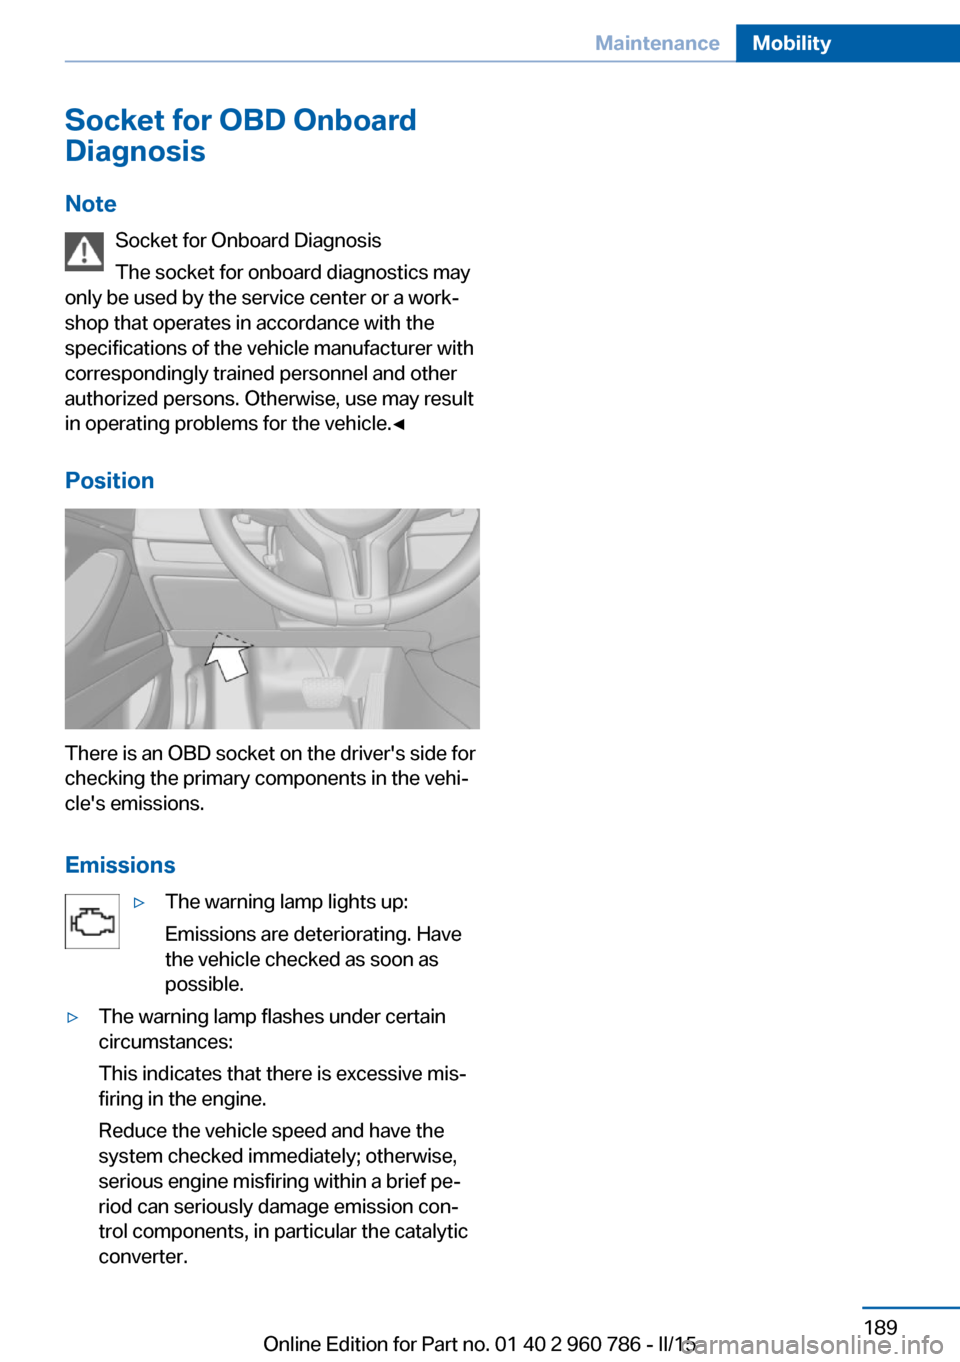
Position
There is an OBD socket on the driver's side for
checking the primary components in the vehi‐
cle's emissions.
Emissions
▷The warning lamp lights up:
Emissions are deteriorating. Have
the vehicle checked as soon as
possible.▷The warning lamp flashes under certain
circumstances:
This indicates that there is excessive mis‐
firing in the engine.
Reduce the vehicle speed and have the
system checked immediately; otherwise,
serious engine misfiring within a brief pe‐
riod can seriously damage emission con‐
trol components, in particular the catalytic
converter.Seite 189MaintenanceMobility189
Online Edition for Part no. 01 40 2 960 786 - II/15
Page 199 of 228

4.Press together hinge trim, see arrow, to re‐
lease the clips.
Grasp the trim, pull the hinge trim down‐
ward and remove it.5.Carefully loosen the trim from the trunk lid,
starting at the edge and working toward
the area around the recessed grips. Make
sure that the trim does not become stuck.6.Carefully swing out the trim.
Replacing the reversing lamp and inner
brake lamp
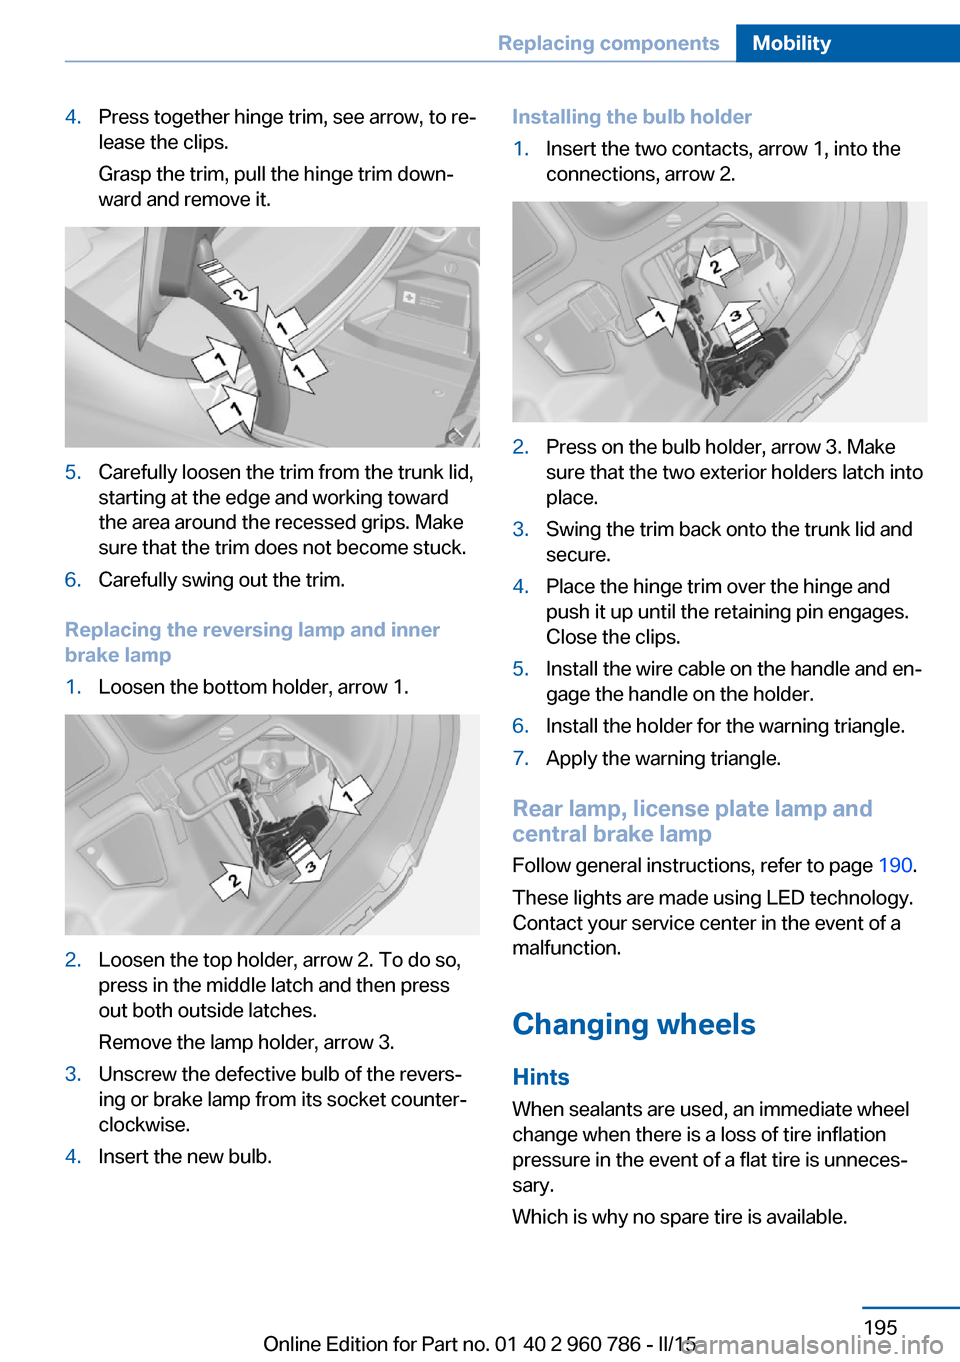
1.Loosen the bottom holder, arrow 1.2.Loosen the top holder, arrow 2. To do so,
press in the middle latch and then press
out both outside latches.
Remove the lamp holder, arrow 3.3.Unscrew the defective bulb of the revers‐
ing or brake lamp from its socket counter‐
clockwise.4.Insert the new bulb.Installing the bulb holder1.Insert the two contacts, arrow 1, into the
connections, arrow 2.2.Press on the bulb holder, arrow 3. Make
sure that the two exterior holders latch into
place.3.Swing the trim back onto the trunk lid and
secure.4.Place the hinge trim over the hinge and
push it up until the retaining pin engages.
Close the clips.5.Install the wire cable on the handle and en‐
gage the handle on the holder.6.Install the holder for the warning triangle.7.Apply the warning triangle.
Rear lamp, license plate lamp and
central brake lamp
Follow general instructions, refer to page 190.
These lights are made using LED technology.
Contact your service center in the event of a
malfunction.
Changing wheels
Hints When sealants are used, an immediate wheel
change when there is a loss of tire inflation
pressure in the event of a flat tire is unneces‐
sary.
Which is why no spare tire is available.
Seite 195Replacing componentsMobility195
Online Edition for Part no. 01 40 2 960 786 - II/15
Page 204 of 228

When the emergency request is received
at the BMW Response Center, the BMW
Response Center contacts you and takes
further steps to help you.
Even if you are unable to respond, the
BMW Response Center can take further
steps to help you under certain circum‐
stances.
For this, data are transmitted to the BMW
Response Center which serve to deter‐
mine the necessary rescue measures. E. g.
the current position of the vehicle, if it can
be established.▷If the LED is flashing green, but the BMW
Response Center can no longer be heard
via the speaker, you can nevertheless still
be heard at the BMW Response Center.
Initiating an Emergency Request
automatically
Under certain conditions, an Emergency Re‐
quest is automatically initiated immediately af‐
ter a severe accident. Automatic Collision Noti‐
fication is not affected by pressing the SOS
button.
Warning triangle
The warning triangle is located on the inside of
the trunk lid.
To remove, loosen the bracket.
First aid kit
Note
Some of the articles have a limited service life.
Check the expiration dates of the contents
regularly and replace any expired items
promptly.
Storage
The first aid kit is located in the trunk in a stor‐
age compartment.
Jump-starting General information
If the battery is discharged, the engine can be
started using the battery of another vehicle
and two jumper cables. Only use jumper ca‐
bles with fully insulated clamp handles.
Hints Do not touch live parts
To avoid the risk of potentially fatal in‐
jury, always avoid all contact with electrical
components while the engine is running.◀
To prevent personal injury or damage to both
vehicles, adhere strictly to the following proce‐
dure.
Seite 200MobilityBreakdown assistance200
Online Edition for Part no. 01 40 2 960 786 - II/15
Page 210 of 228

Manual transmission:1.Drive into the car wash.2.Shift to neutral.3.Switch the engine off.4.Switch on the ignition.
M double-clutch transmission:
1.Drive into the car wash.2.Engage selector lever position N.3.Switch the engine off.
In this way, the ignition remains switched
on, and a Check-Control message is dis‐
played.
The vehicle cannot be locked from the outside
when in selector lever position N. A signal
sounds when an attempt is made to lock the
vehicle.
To start the engine with manual transmission:
1.Press on the clutch pedal.2.Press the Start/Stop button.
To start the engine with a M double clutch
transmission:
1.Depress the brake pedal.2.Press the Start/Stop button.
Pressing the Start/Stop button without step‐
ping on the brake turns the ignition off.
Transmission position
Transmission position P is engaged automati‐
cally:
▷When the ignition is switched off.▷After approx. 15 minutes.
Headlights
▷Do not rub dry and do not use abrasive or
acidic cleansers.▷Soak areas that have been dirtied e. g.,
from insects, with shampoo and wash off
with water.▷Thaw ice with de-icing spray; do not use an
ice scraper.
After washing the vehicle
After washing the vehicle, apply the brakes
briefly to dry them; otherwise, braking action
can be reduced and corrosion of the brake
discs can occur.
Completely remove all residues on the win‐
dows, to minimize loss of visibility due to
smearing and to reduce wiper noises and
wiper blade wear.
Vehicle care
Car care products BMW recommends using care and cleaning
products from BMW, since these have been
tested and approved.
Car care and cleaning products
Follow the instructions on the container.
When cleaning the interior, open the doors or
windows.
Only use products intended for cleaning vehi‐
cles.
Cleansers can contain substances that are
dangerous and harmful to your health.◀
Vehicle paint
Regular care contributes to driving safety and
value retention. Environmental influences in
areas with elevated air pollution or natural con‐
taminants, such as tree resin or pollen can af‐
fect the vehicle's paintwork. Tailor the fre‐
quency and extent of your car care to these
influences.
Aggressive substances such as spilled fuel, oil,
grease or bird droppings, must be removed im‐
mediately to prevent the finish from being al‐
tered or discolored.
Only use respectively approved cleaning and
care products for vehicles with matte finish.
Seite 206MobilityCare206
Online Edition for Part no. 01 40 2 960 786 - II/15