2015 BMW I8 tow
[x] Cancel search: towPage 159 of 224
Load
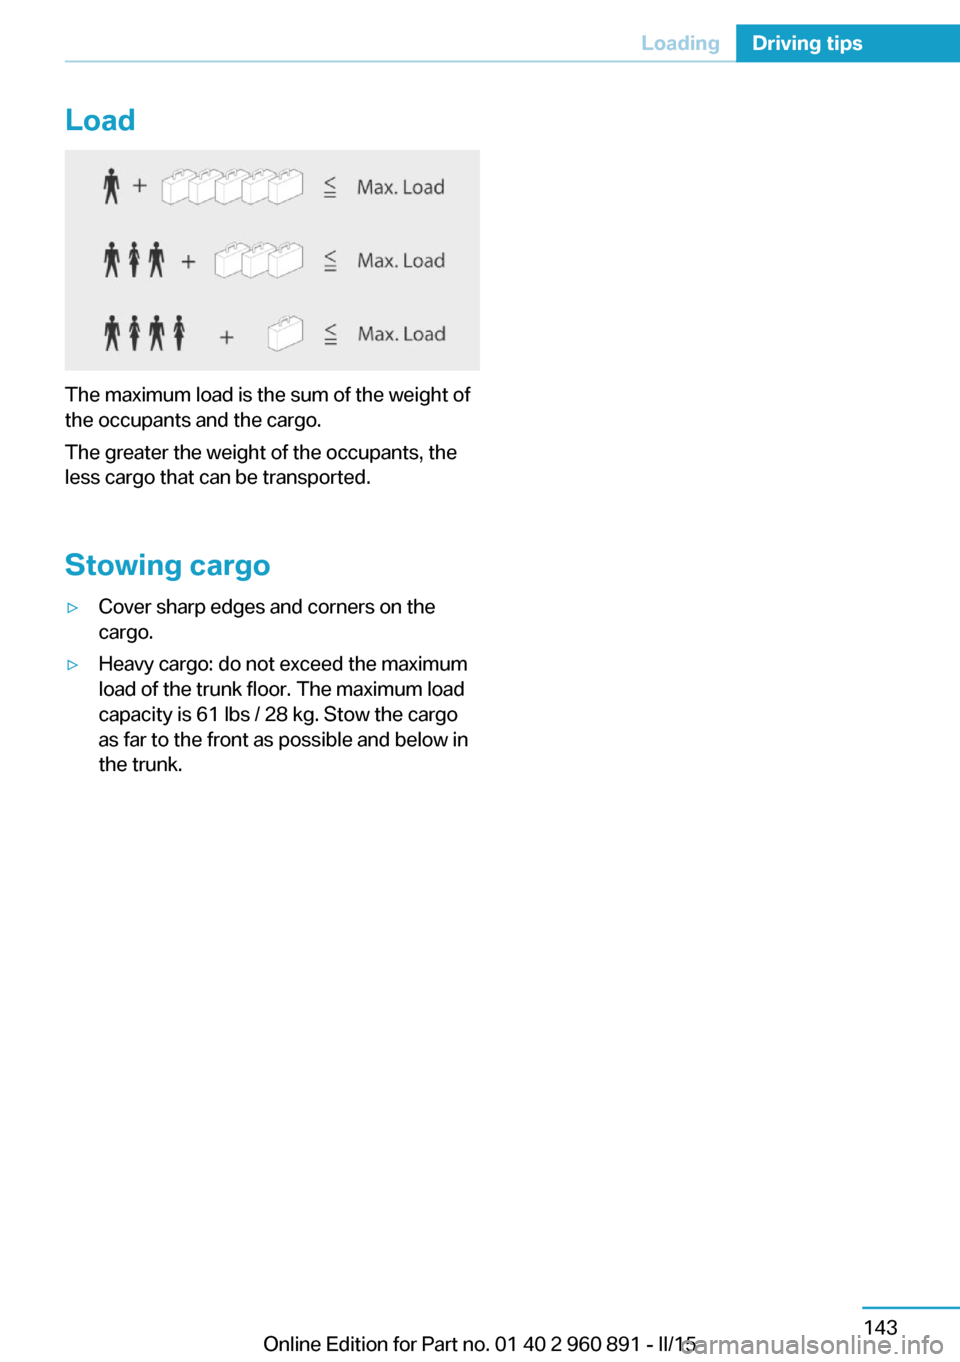
The maximum load is the sum of the weight of
the occupants and the cargo.
The greater the weight of the occupants, the
less cargo that can be transported.
Stowing cargo
▷Cover sharp edges and corners on the
cargo.▷Heavy cargo: do not exceed the maximum
load of the trunk floor. The maximum load
capacity is 61 lbs / 28 kg. Stow the cargo
as far to the front as possible and below in
the trunk.Seite 143LoadingDriving tips143
Online Edition for Part no. 01 40 2 960 891 - II/15
Page 169 of 224
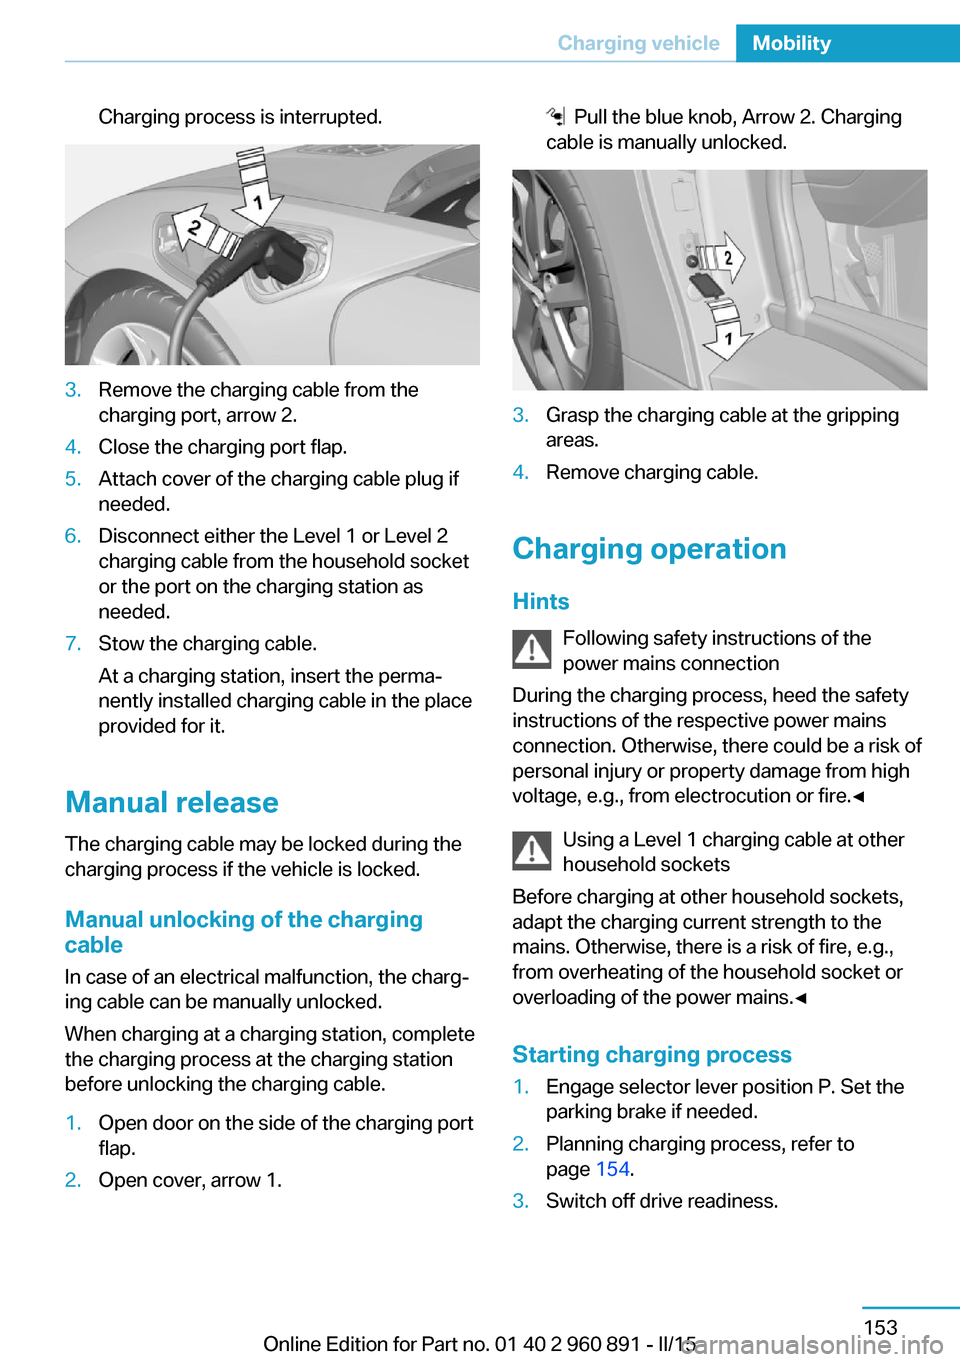
Charging process is interrupted.3.Remove the charging cable from the
charging port, arrow 2.4.Close the charging port flap.5.Attach cover of the charging cable plug if
needed.6.Disconnect either the Level 1 or Level 2
charging cable from the household socket
or the port on the charging station as
needed.7.Stow the charging cable.
At a charging station, insert the perma‐
nently installed charging cable in the place
provided for it.
Manual release
The charging cable may be locked during the
charging process if the vehicle is locked.
Manual unlocking of the charging
cable
In case of an electrical malfunction, the charg‐
ing cable can be manually unlocked.
When charging at a charging station, complete
the charging process at the charging station
before unlocking the charging cable.
1.Open door on the side of the charging port
flap.2.Open cover, arrow 1. Pull the blue knob, Arrow 2. Charging
cable is manually unlocked.3.Grasp the charging cable at the gripping
areas.4.Remove charging cable.
Charging operation
Hints Following safety instructions of the
power mains connection
During the charging process, heed the safety
instructions of the respective power mains
connection. Otherwise, there could be a risk of
personal injury or property damage from high
voltage, e.g., from electrocution or fire.◀
Using a Level 1 charging cable at other
household sockets
Before charging at other household sockets,
adapt the charging current strength to the
mains. Otherwise, there is a risk of fire, e.g.,
from overheating of the household socket or
overloading of the power mains.◀
Starting charging process
1.Engage selector lever position P. Set the
parking brake if needed.2.Planning charging process, refer to
page 154.3.Switch off drive readiness.Seite 153Charging vehicleMobility153
Online Edition for Part no. 01 40 2 960 891 - II/15
Page 171 of 224
4.Set rate begin. Turn the controller until the
desired time is set and press the controller.5.Set rate end. Turn the controller until the
desired time is set and press the controller.
Setting charging via a
Level 1 charging cable
Depending on the electrical mains, the vehicle
must be charged with a different charging cur‐
rent strength, refer to page 150.
1."Settings"2."Charging"3."AC charging power:"
Settings are stored. When you change charg‐
ing locations you also might need to change
the setting for charging.
Set the charge current strength at other
household sockets to "Low".
Stopping charging process The charging operation can be stopped at any
time by removing the charging cable and con‐
tinued at a later time by connecting the charg‐
ing cable in order to use other loads on the
power connection or to prevent simultaneous
high power from multiple loads.
The charging operation is interrupted when the
vehicle is unlocked and automatically resumed
after a brief time or when it is locked.
Continue charging operation If the charging operation is interrupted, e.g.,
through a temporary power failure, the charg‐
ing operation is automatically continued after
the interruption.
Terminating charging process
1.Removing the charging cable from the ve‐
hicle, refer to page 152.2.Stow the charging cable as required.3.Close the charging port flap.4.Lock vehicle if it is unlocked.Displays in the instrument
cluster
The charging state indicator light, refer to page 77, shows the charging state of the high-
voltage battery in the instrument cluster, if op‐
erating readiness is switched on. If all seg‐
ments are filled, the high-voltage battery is
fully charged.
Even if no segments are filled, the high-voltage
system is still under high voltage.
Information regarding the charging process are
shown on the charging screen, refer to
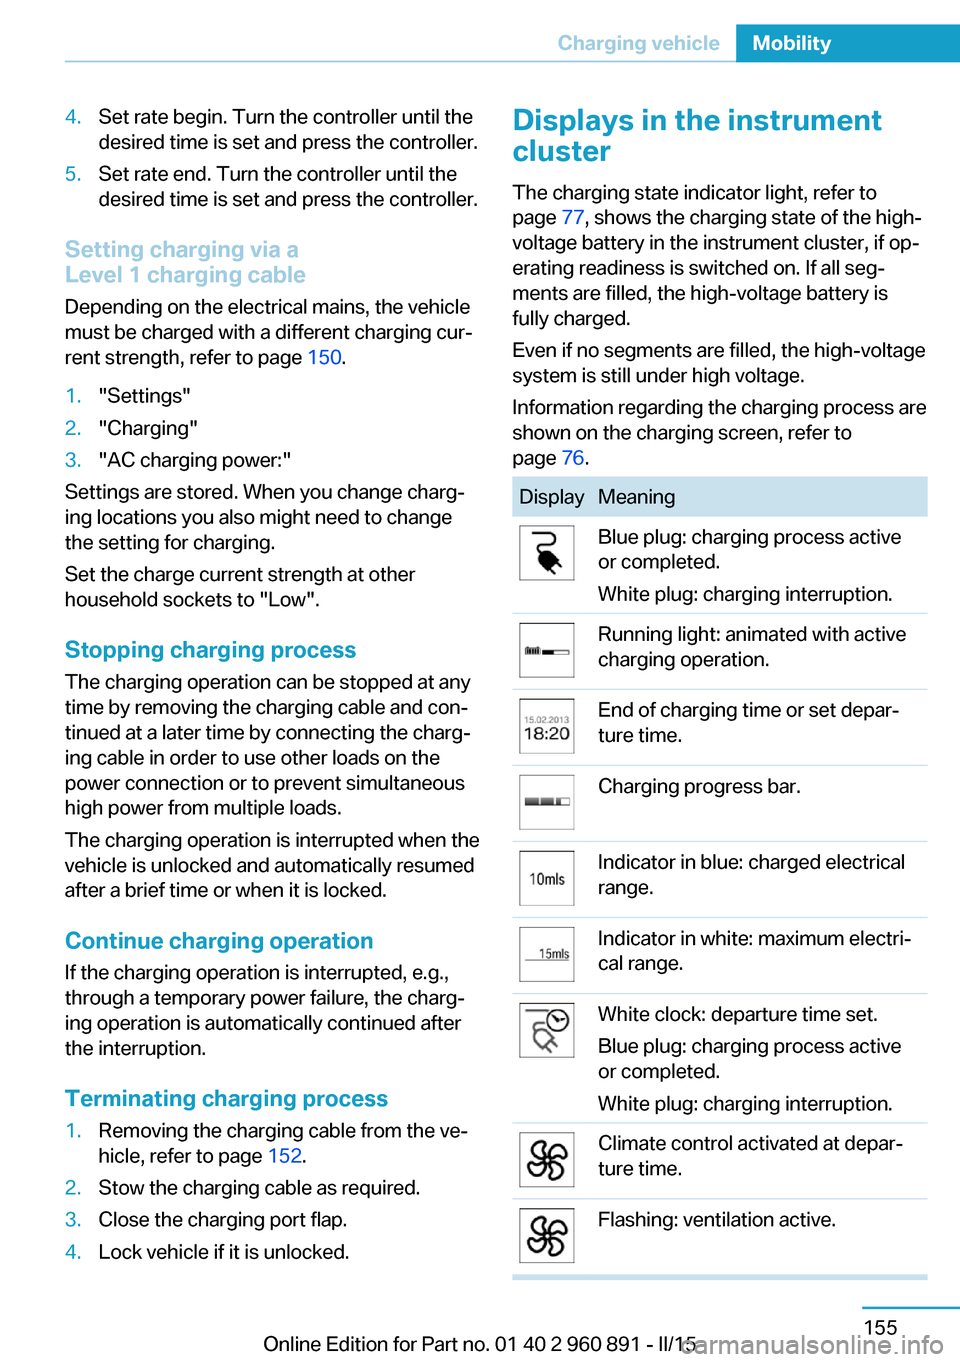
page 76.DisplayMeaningBlue plug: charging process active
or completed.
White plug: charging interruption.Running light: animated with active
charging operation.End of charging time or set depar‐
ture time.Charging progress bar.Indicator in blue: charged electrical
range.Indicator in white: maximum electri‐
cal range.White clock: departure time set.
Blue plug: charging process active
or completed.
White plug: charging interruption.Climate control activated at depar‐
ture time.Flashing: ventilation active.Seite 155Charging vehicleMobility155
Online Edition for Part no. 01 40 2 960 891 - II/15
Page 182 of 224
A represent higher levels of performance on
the laboratory test wheel than the minimum re‐
quired by law.
Temperature grade for this tire
The temperature grade for this tire is es‐
tablished for a tire that is properly inflated and
not overloaded. Excessive speed, underinfla‐
tion, or excessive loading, either separately or
in combination, can cause heat buildup and
possible tire failure.
If necessary, have the vehicle towed.◀
M+S
Winter and all-season tires with better cold
weather performance than summer tires.
Tire tread Summer tires Do not drive with a tire tread depth of less than
0.12 in/3 mm.
There is an increased danger of hydroplaning if
the tire tread depth is less than 0.12 in/3 mm.
Winter tires
Do not drive with a tire tread depth of less than
0.16 in/4 mm.
Below a tread depth of 0.16 in/4 mm, tires are
less suitable for winter operation.Minimum tread depth
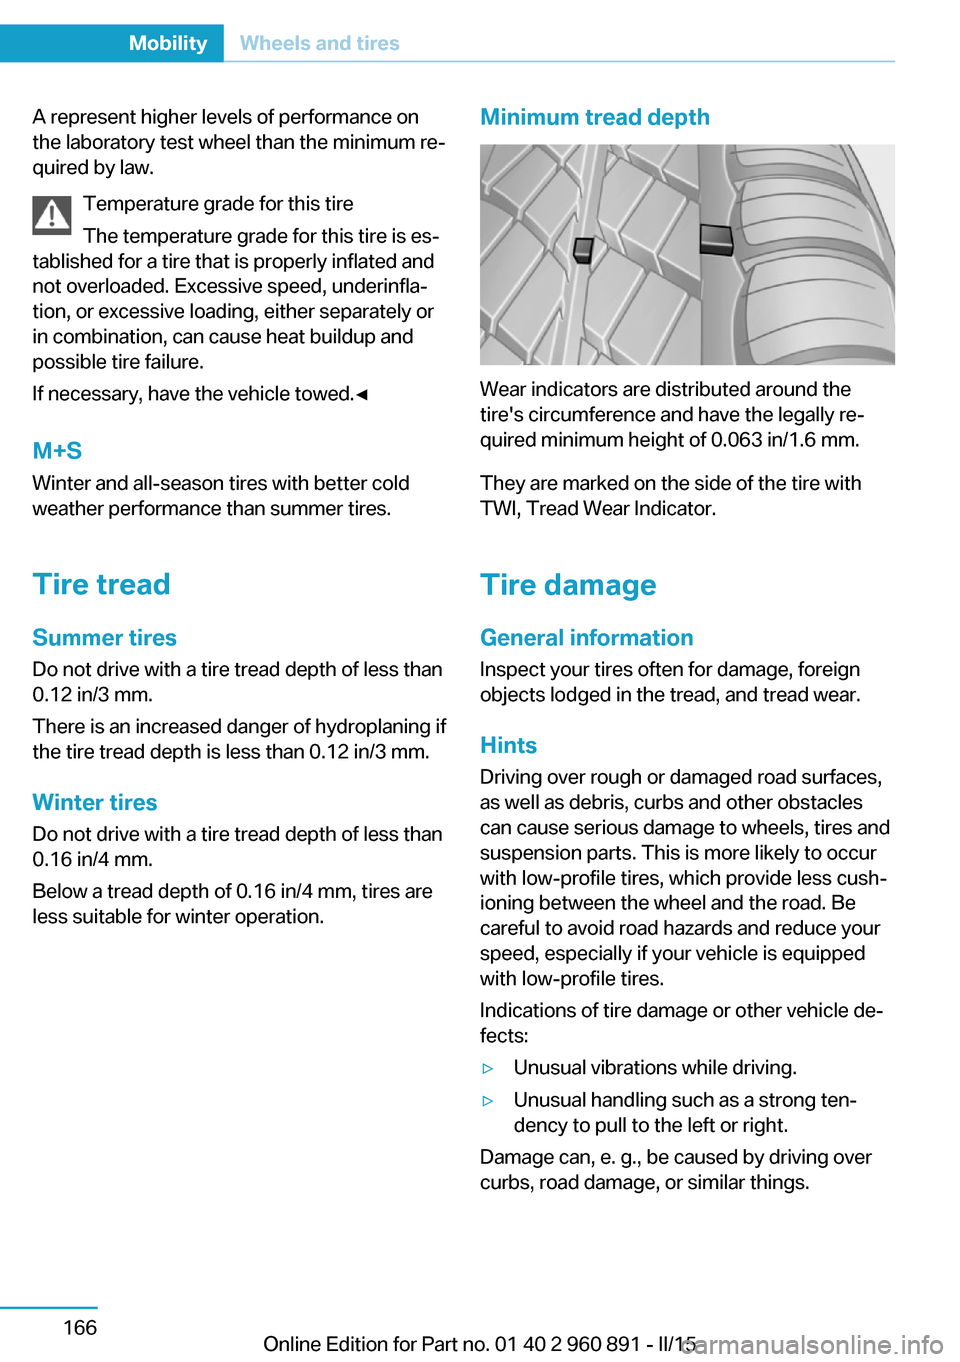
Wear indicators are distributed around the
tire's circumference and have the legally re‐
quired minimum height of 0.063 in/1.6 mm.
They are marked on the side of the tire with
TWI, Tread Wear Indicator.
Tire damage
General information
Inspect your tires often for damage, foreign
objects lodged in the tread, and tread wear.
Hints
Driving over rough or damaged road surfaces,
as well as debris, curbs and other obstacles
can cause serious damage to wheels, tires and
suspension parts. This is more likely to occur
with low-profile tires, which provide less cush‐
ioning between the wheel and the road. Be
careful to avoid road hazards and reduce your
speed, especially if your vehicle is equipped
with low-profile tires.
Indications of tire damage or other vehicle de‐
fects:
▷Unusual vibrations while driving.▷Unusual handling such as a strong ten‐
dency to pull to the left or right.
Damage can, e. g., be caused by driving over
curbs, road damage, or similar things.
Seite 166MobilityWheels and tires166
Online Edition for Part no. 01 40 2 960 891 - II/15
Page 183 of 224
In case of tire damage
If there are indications of tire damage, re‐
duce your speed immediately and have the
rims and tires checked right away; otherwise,
there is the increased risk of an accident.
Drive carefully to the nearest service center. If
necessary, have the vehicle towed or trans‐
ported there. Otherwise, tire damage can be‐
come life threatening for vehicle occupants
and also other traffic.◀
Repair of tire damage
For safety reasons, the manufacturer of
your vehicle recommends that you do not have
damaged tires repaired; they should be re‐
placed. Otherwise, damage can occur as a re‐
sult.◀
Changing wheels and tires
Mounting Information on mounting tires
Have mounting and balancing performed
only by a service center.
If work is not carried out properly, there is a
danger of subsequent damage and related
safety hazards.◀
Wheel and tire combination
You can ask the service center about the right
wheel/tire combination and wheel rim versions
for the vehicle.
Incorrect wheel and tire combinations impair
the function of a variety of systems such as
ABS or DSC.
To maintain good handling and vehicle re‐
sponse, use only tires with a single tread con‐
figuration from a single manufacturer.
Following tire damage, have the original wheel
and tire combination remounted on the vehicle
as soon as possible.Approved wheels and tires
You should only use wheels and tires
that have been approved by the vehicle manu‐
facturer for your vehicle type; otherwise, e.g.,
despite having the same official size ratings,
variations can lead to chassis contact and with
it, the risk of severe accidents
The manufacturer of your vehicle cannot eval‐
uate non-approved wheels and tires to deter‐
mine if they are suited for use, and therefore
cannot guarantee the operating safety of the
vehicle.◀
Recommended tire brands
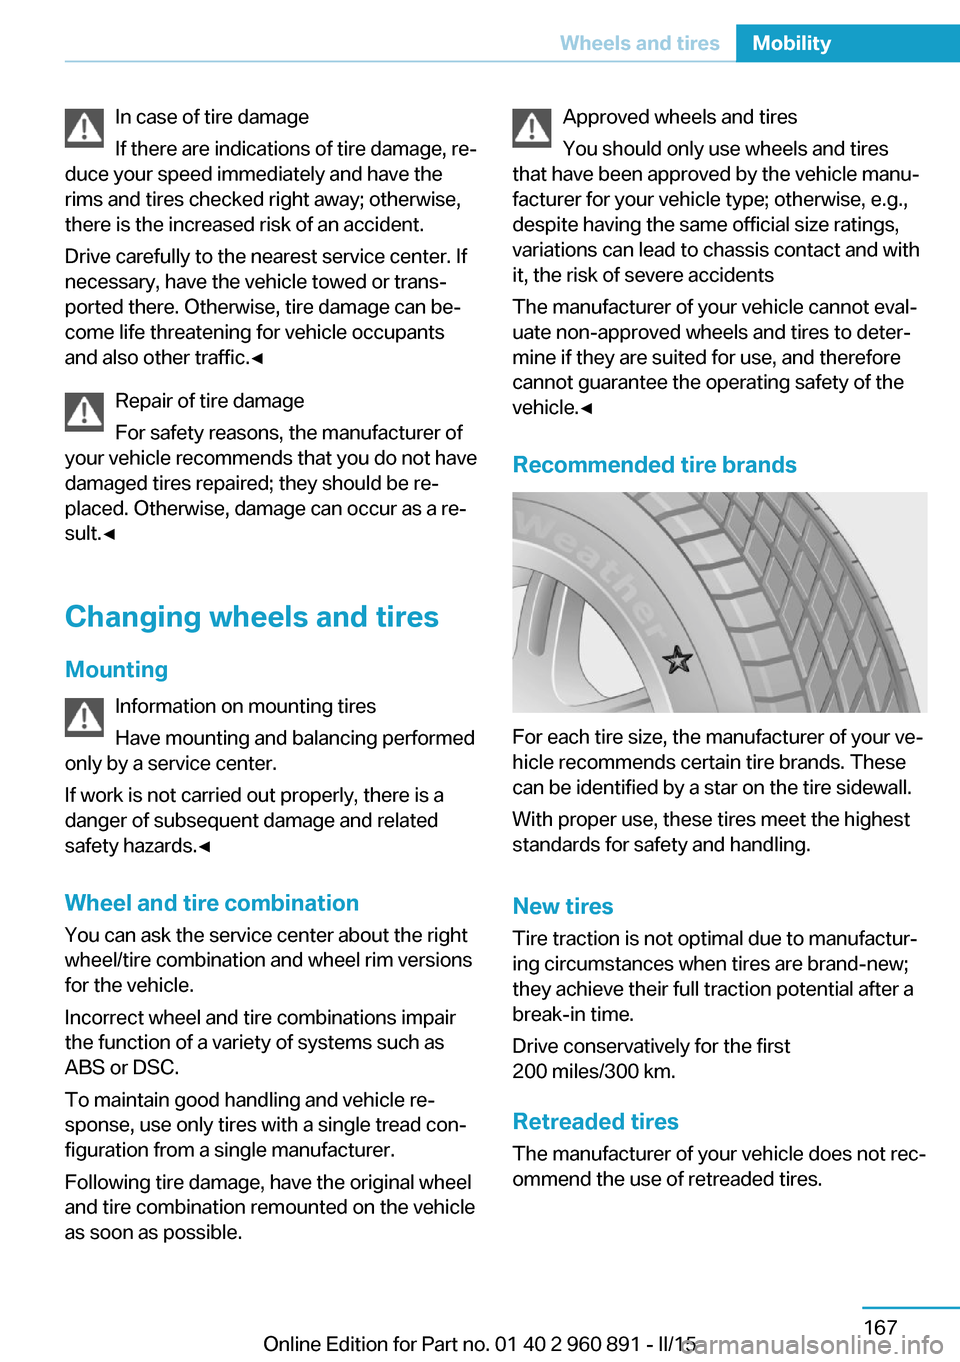
For each tire size, the manufacturer of your ve‐
hicle recommends certain tire brands. These
can be identified by a star on the tire sidewall.
With proper use, these tires meet the highest
standards for safety and handling.
New tires Tire traction is not optimal due to manufactur‐
ing circumstances when tires are brand-new;
they achieve their full traction potential after a
break-in time.
Drive conservatively for the first
200 miles/300 km.
Retreaded tires
The manufacturer of your vehicle does not rec‐
ommend the use of retreaded tires.
Seite 167Wheels and tiresMobility167
Online Edition for Part no. 01 40 2 960 891 - II/15
Page 185 of 224
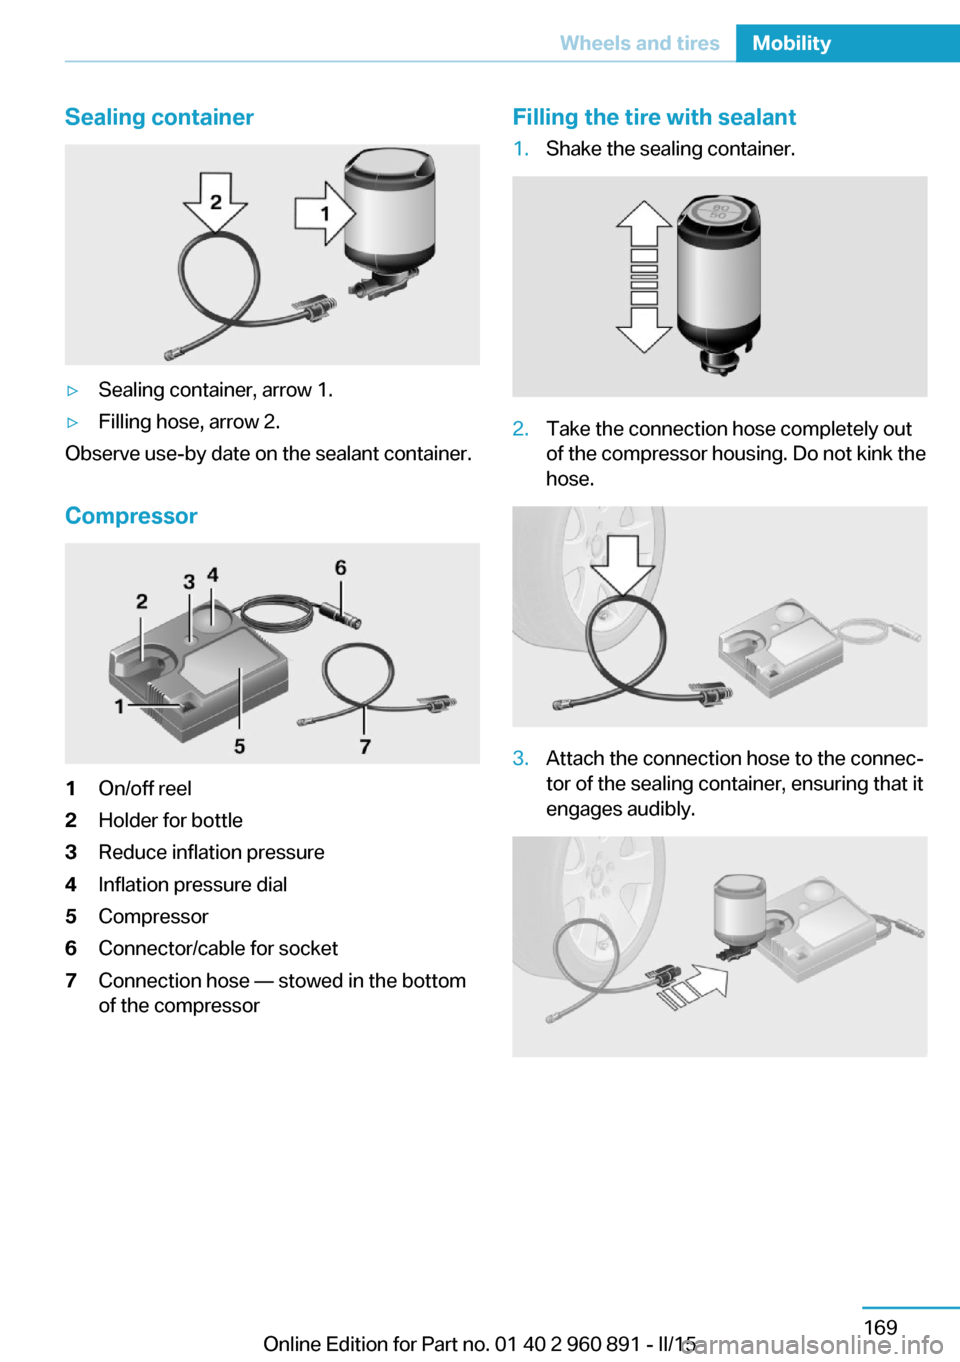
Sealing container▷Sealing container, arrow 1.▷Filling hose, arrow 2.
Observe use-by date on the sealant container.
Compressor
1On/off reel2Holder for bottle3Reduce inflation pressure4Inflation pressure dial5Compressor6Connector/cable for socket7Connection hose — stowed in the bottom
of the compressorFilling the tire with sealant1.Shake the sealing container.2.Take the connection hose completely out
of the compressor housing. Do not kink the
hose.3.Attach the connection hose to the connec‐
tor of the sealing container, ensuring that it
engages audibly.Seite 169Wheels and tiresMobility169
Online Edition for Part no. 01 40 2 960 891 - II/15
Page 186 of 224

4.Slide the sealing container upright into the
holder on the compressor housing, ensur‐
ing that it engages audibly.5.Screw the connection hose onto the tire
valve of the defective wheel.6.With the compressor switched off, insert
the plug into a power socket inside the ve‐
hicle.7.With operating readiness or drive readi‐
ness switched on, reel on the compressor.
Switch off the compressor after 10 mi‐
nutes
Do not allow the compressor to run longer than
10 minutes; otherwise, the device will overheat
and may be damaged.◀
Let the compressor run for approx. 3 to 8 mi‐
nutes to fill the tire with sealant and achieve a
tire inflation pressure of approx. 2.5 bar.
While the tire is being filled with sealant, the
tire inflation pressure may sporadically reach
approx. 5 bar. Do not reel off the compressor at
this point.
If a tire inflation pressure of 2 bar is not
reached:
1.Switch off the compressor.2.Unscrew the filling hose from the wheel.3.Drive 33 ft/10 m forward and back to dis‐
tribute the sealant in the tire.4.Inflate the tire again using the compressor.
If a tire inflation pressure of 2 bar cannot be
reached, contact your service center.
Stowing the Mobility System
1.Remove the connection hose of the seal‐
ant container from the wheel.2.Remove the connection hose from the
sealant container.Seite 170MobilityWheels and tires170
Online Edition for Part no. 01 40 2 960 891 - II/15
Page 187 of 224
3.Wrap the empty sealant container and con‐
nection hose in suitable material to avoid
dirtying the cargo area.4.Stow the Mobility System back in the vehi‐
cle.
Distributing the sealant
Immediately drive approx. 5 miles/10 km to en‐
sure that the sealant is evenly distributed in the
tire.
Do not exceed a speed of 50 mph/80 km/h.
If possible, do not drive at speeds less than
12 mph/20 km/h.
To correct the tire inflation pressure
1.Stop at a suitable location.2.Screw the connection hose onto the tire
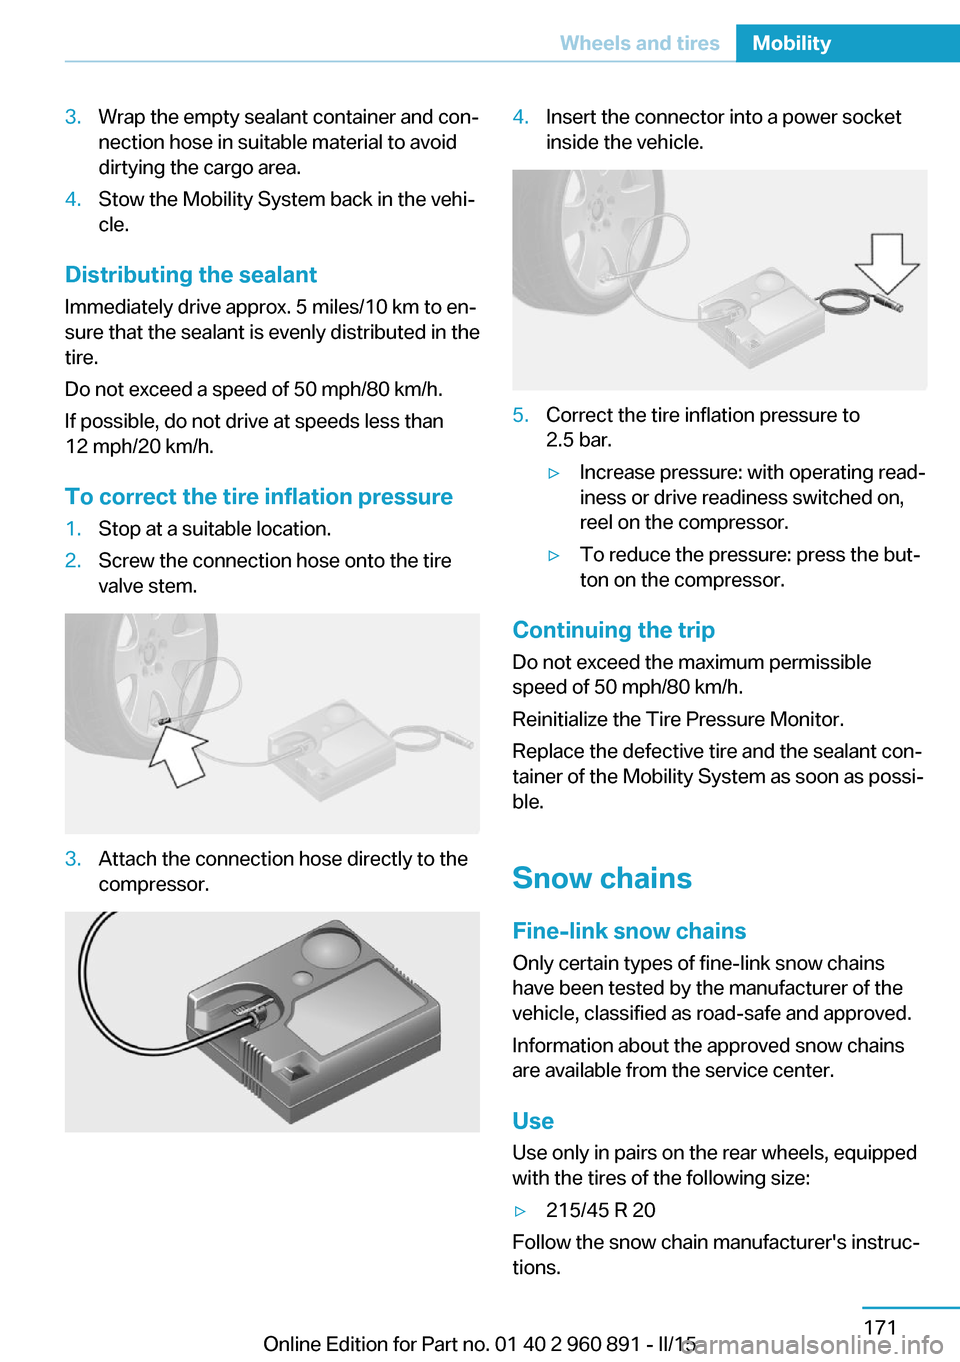
valve stem.3.Attach the connection hose directly to the
compressor.4.Insert the connector into a power socket
inside the vehicle.5.Correct the tire inflation pressure to
2.5 bar.▷Increase pressure: with operating read‐
iness or drive readiness switched on,
reel on the compressor.▷To reduce the pressure: press the but‐
ton on the compressor.
Continuing the trip
Do not exceed the maximum permissible
speed of 50 mph/80 km/h.
Reinitialize the Tire Pressure Monitor.
Replace the defective tire and the sealant con‐
tainer of the Mobility System as soon as possi‐
ble.
Snow chains Fine-link snow chains
Only certain types of fine-link snow chains
have been tested by the manufacturer of the
vehicle, classified as road-safe and approved.
Information about the approved snow chains
are available from the service center.
Use
Use only in pairs on the rear wheels, equipped
with the tires of the following size:
▷215/45 R 20
Follow the snow chain manufacturer's instruc‐
tions.
Seite 171Wheels and tiresMobility171
Online Edition for Part no. 01 40 2 960 891 - II/15