2015 BMW 740I SEDAN USB port
[x] Cancel search: USB portPage 28 of 314
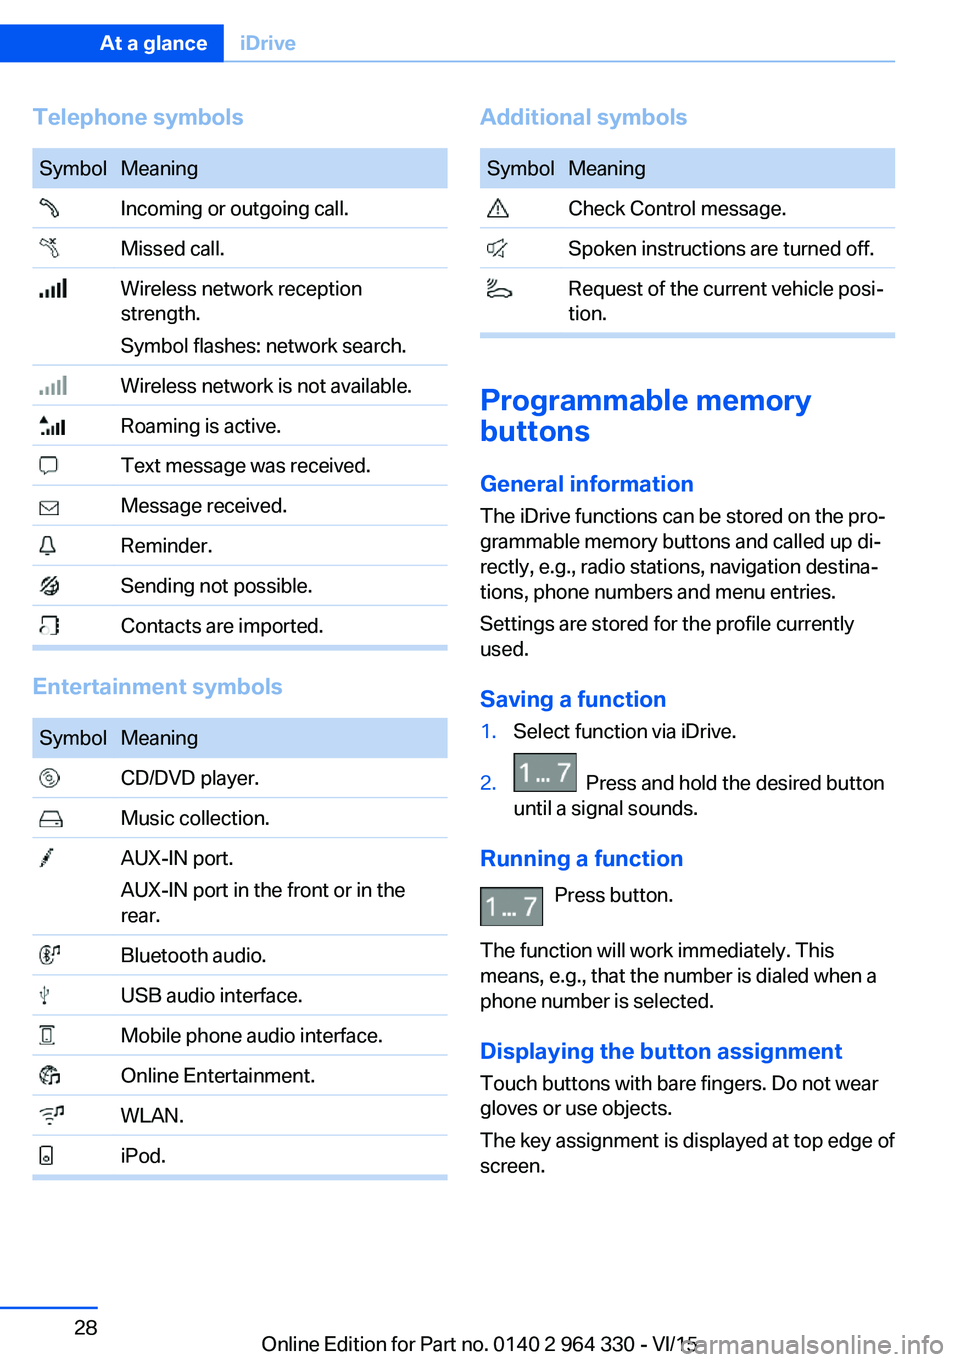
Telephone symbolsSymbolMeaning Incoming or outgoing call. Missed call. Wireless network reception
strength.
Symbol flashes: network search. Wireless network is not available. Roaming is active. Text message was received. Message received. Reminder. Sending not possible. Contacts are imported.
Entertainment symbols
SymbolMeaning CD/DVD player. Music collection. AUX-IN port.
AUX-IN port in the front or in the
rear. Bluetooth audio. USB audio interface. Mobile phone audio interface. Online Entertainment. WLAN. iPod.Additional symbolsSymbolMeaning Check Control message. Spoken instructions are turned off. Request of the current vehicle posi‐
tion.
Programmable memory
buttons
General information
The iDrive functions can be stored on the pro‐
grammable memory buttons and called up di‐
rectly, e.g., radio stations, navigation destina‐
tions, phone numbers and menu entries.
Settings are stored for the profile currently
used.
Saving a function
1.Select function via iDrive.2. Press and hold the desired button
until a signal sounds.
Running a function
Press button.
The function will work immediately. This
means, e.g., that the number is dialed when a
phone number is selected.
Displaying the button assignment Touch buttons with bare fingers. Do not wear
gloves or use objects.
The key assignment is displayed at top edge of
screen.
Seite 28At a glanceiDrive28
Online Edition for Part no. 0140 2 964 330 - VI/15
Page 46 of 314
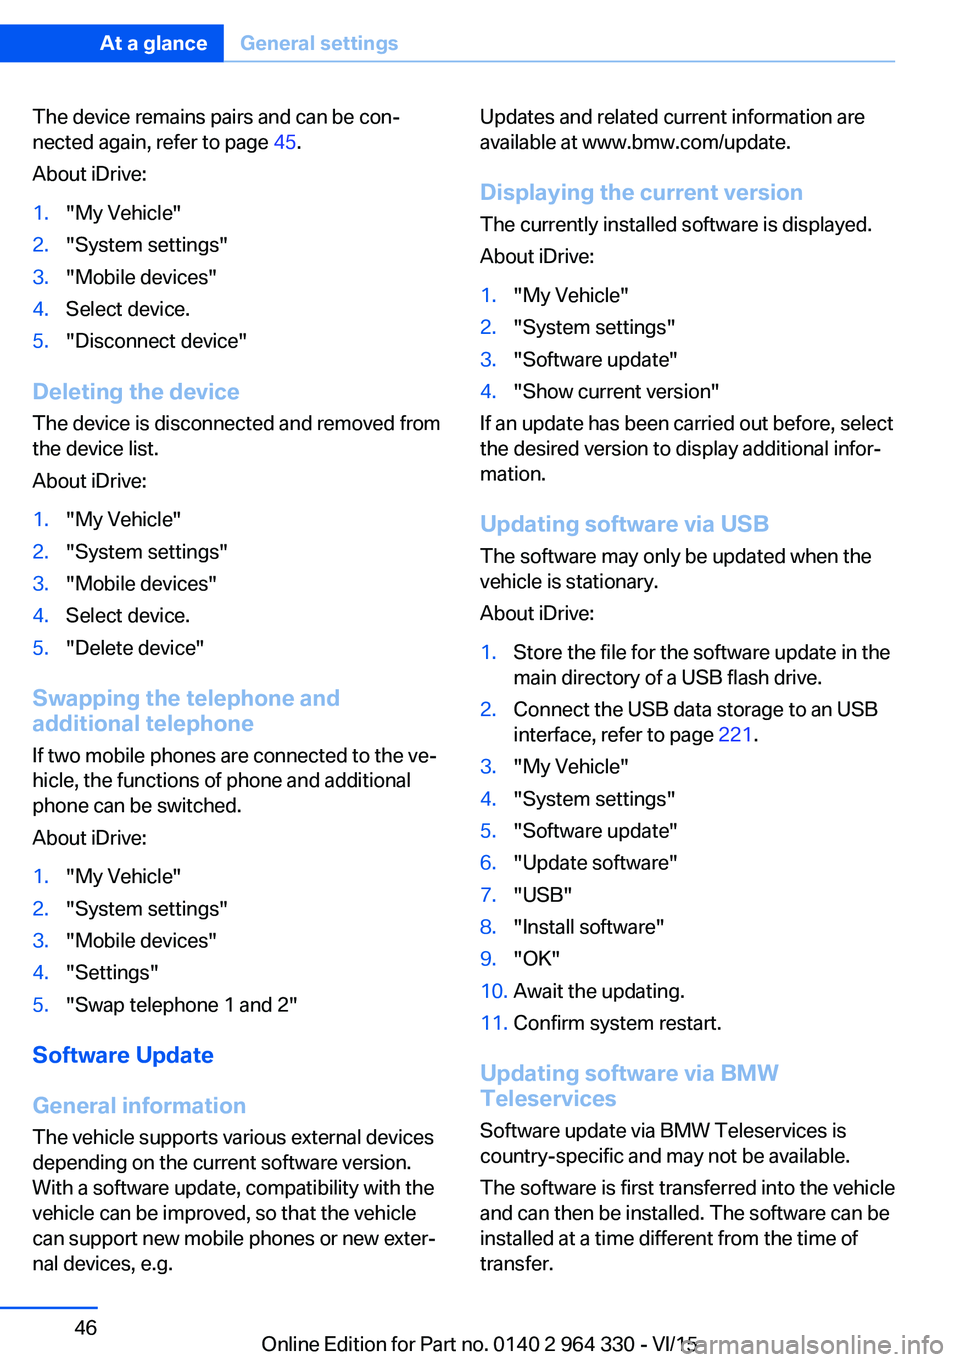
The device remains pairs and can be con‐
nected again, refer to page 45.
About iDrive:1."My Vehicle"2."System settings"3."Mobile devices"4.Select device.5."Disconnect device"
Deleting the device
The device is disconnected and removed from
the device list.
About iDrive:
1."My Vehicle"2."System settings"3."Mobile devices"4.Select device.5."Delete device"
Swapping the telephone and
additional telephone
If two mobile phones are connected to the ve‐
hicle, the functions of phone and additional
phone can be switched.
About iDrive:
1."My Vehicle"2."System settings"3."Mobile devices"4."Settings"5."Swap telephone 1 and 2"
Software Update
General information
The vehicle supports various external devices
depending on the current software version.
With a software update, compatibility with the
vehicle can be improved, so that the vehicle
can support new mobile phones or new exter‐
nal devices, e.g.
Updates and related current information are
available at www.bmw.com/update.
Displaying the current version The currently installed software is displayed.
About iDrive:1."My Vehicle"2."System settings"3."Software update"4."Show current version"
If an update has been carried out before, select
the desired version to display additional infor‐
mation.
Updating software via USB
The software may only be updated when the
vehicle is stationary.
About iDrive:
1.Store the file for the software update in the
main directory of a USB flash drive.2.Connect the USB data storage to an USB
interface, refer to page 221.3."My Vehicle"4."System settings"5."Software update"6."Update software"7."USB"8."Install software"9."OK"10.Await the updating.11.Confirm system restart.
Updating software via BMW
Teleservices
Software update via BMW Teleservices is
country-specific and may not be available.
The software is first transferred into the vehicle
and can then be installed. The software can be
installed at a time different from the time of
transfer.
Seite 46At a glanceGeneral settings46
Online Edition for Part no. 0140 2 964 330 - VI/15
Page 56 of 314
The BMW display key supports all functions of
the standard remote control. Beyond that, the
following functions are available.▷Display status of doors and windows.▷Display status of the alarm system.▷With parked-car heating: operate parked-
car heating.
Without parked-car heating: operate
parked-car ventilation.▷Call up range with available fuel.▷Display service information.
Emergency detection of the BMW
display key
The description for the emergency detection
of the remote control, refer to page 55, also
applies for the BMW display key. However, the
locking button should be at the height of the
marking.
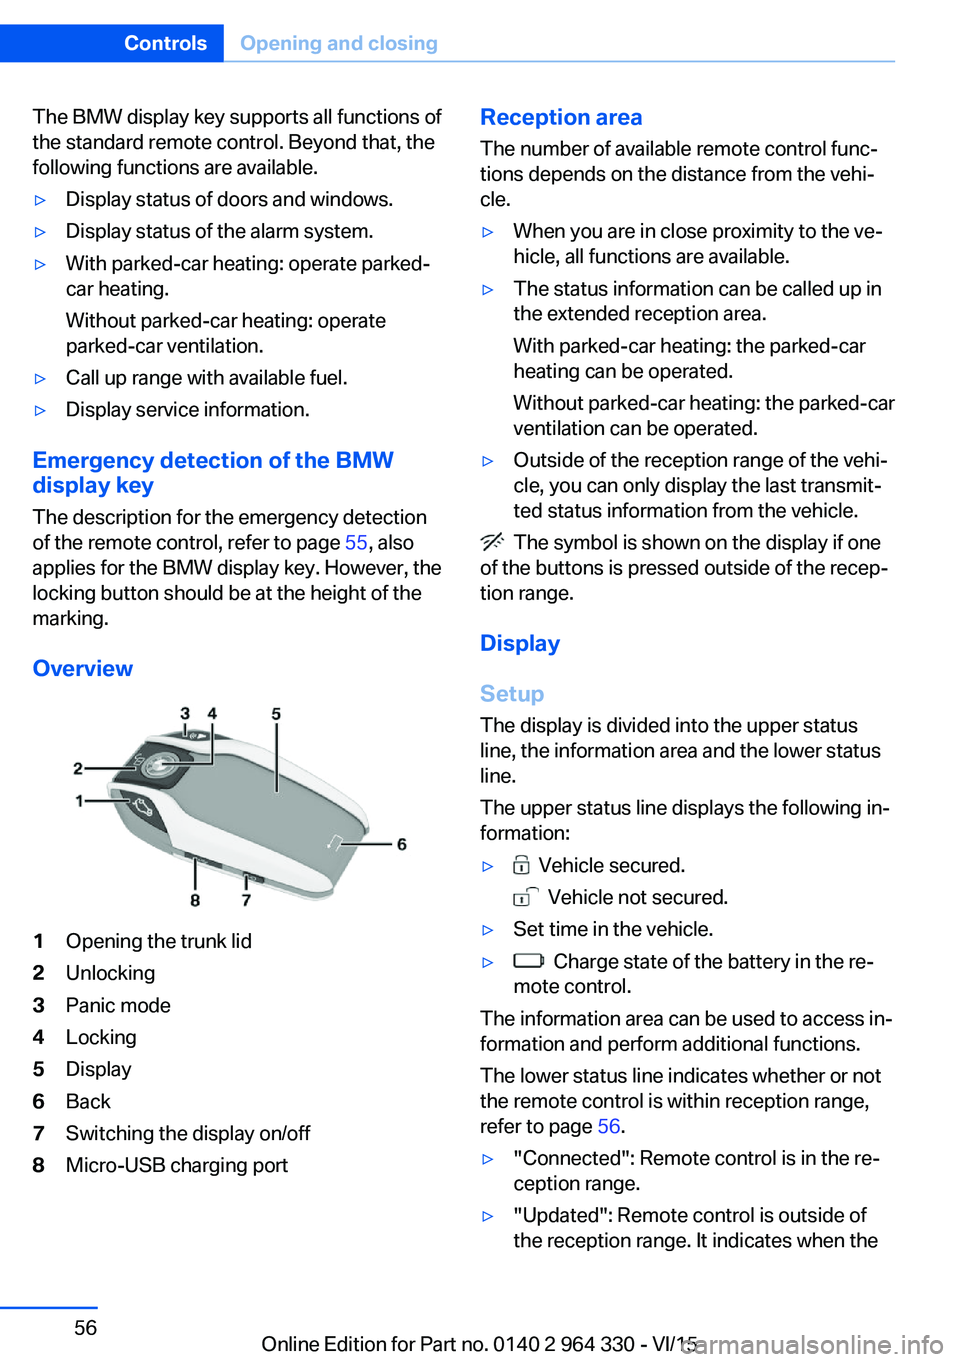
Overview
1Opening the trunk lid2Unlocking3Panic mode4Locking5Display6Back7Switching the display on/off8Micro-USB charging portReception area
The number of available remote control func‐
tions depends on the distance from the vehi‐
cle.▷When you are in close proximity to the ve‐
hicle, all functions are available.▷The status information can be called up in
the extended reception area.
With parked-car heating: the parked-car
heating can be operated.
Without parked-car heating: the parked-car
ventilation can be operated.▷Outside of the reception range of the vehi‐
cle, you can only display the last transmit‐
ted status information from the vehicle.
The symbol is shown on the display if one
of the buttons is pressed outside of the recep‐
tion range.
Display
Setup The display is divided into the upper status
line, the information area and the lower status
line.
The upper status line displays the following in‐
formation:
▷ Vehicle secured.
Vehicle not secured.
▷Set time in the vehicle.▷ Charge state of the battery in the re‐
mote control.
The information area can be used to access in‐
formation and perform additional functions.
The lower status line indicates whether or not
the remote control is within reception range,
refer to page 56.
▷"Connected": Remote control is in the re‐
ception range.▷"Updated": Remote control is outside of
the reception range. It indicates when theSeite 56ControlsOpening and closing56
Online Edition for Part no. 0140 2 964 330 - VI/15
Page 58 of 314
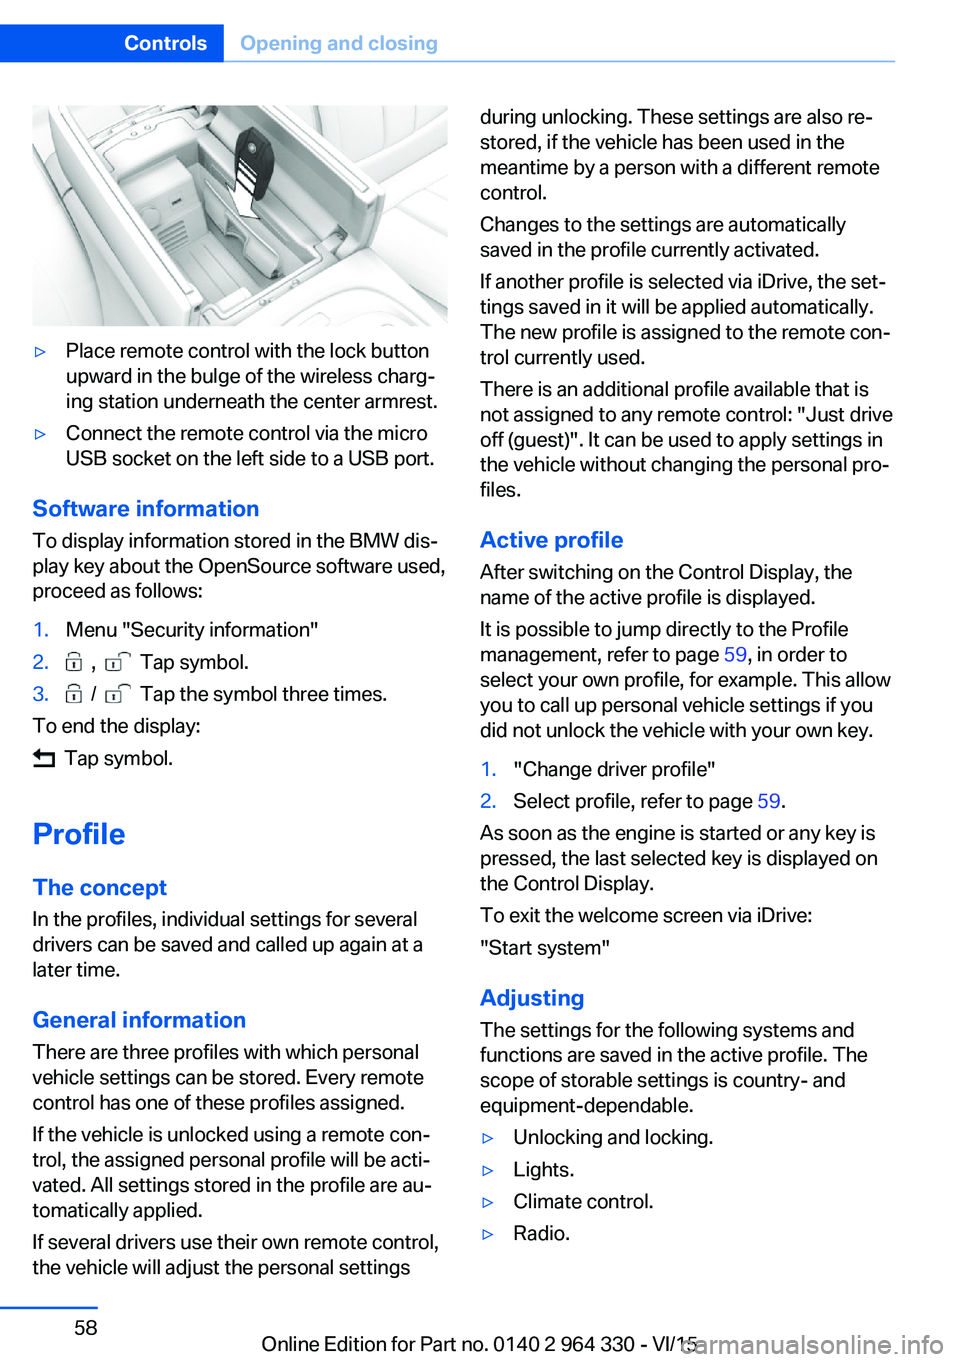
▷Place remote control with the lock button
upward in the bulge of the wireless charg‐
ing station underneath the center armrest.▷Connect the remote control via the micro
USB socket on the left side to a USB port.
Software information
To display information stored in the BMW dis‐
play key about the OpenSource software used,
proceed as follows:
1.Menu "Security information"2. , Tap symbol.3. / Tap the symbol three times.
To end the display:
Tap symbol.
Profile The concept In the profiles, individual settings for several
drivers can be saved and called up again at a
later time.
General information
There are three profiles with which personal
vehicle settings can be stored. Every remote
control has one of these profiles assigned.
If the vehicle is unlocked using a remote con‐
trol, the assigned personal profile will be acti‐
vated. All settings stored in the profile are au‐
tomatically applied.
If several drivers use their own remote control,
the vehicle will adjust the personal settings
during unlocking. These settings are also re‐
stored, if the vehicle has been used in the
meantime by a person with a different remote
control.
Changes to the settings are automatically
saved in the profile currently activated.
If another profile is selected via iDrive, the set‐
tings saved in it will be applied automatically.
The new profile is assigned to the remote con‐
trol currently used.
There is an additional profile available that is
not assigned to any remote control: "Just drive
off (guest)". It can be used to apply settings in
the vehicle without changing the personal pro‐
files.
Active profile
After switching on the Control Display, the
name of the active profile is displayed.
It is possible to jump directly to the Profile
management, refer to page 59, in order to
select your own profile, for example. This allow
you to call up personal vehicle settings if you
did not unlock the vehicle with your own key.1."Change driver profile"2.Select profile, refer to page 59.
As soon as the engine is started or any key is
pressed, the last selected key is displayed on
the Control Display.
To exit the welcome screen via iDrive:
"Start system"
Adjusting The settings for the following systems and
functions are saved in the active profile. The
scope of storable settings is country- and
equipment-dependable.
▷Unlocking and locking.▷Lights.▷Climate control.▷Radio.Seite 58ControlsOpening and closing58
Online Edition for Part no. 0140 2 964 330 - VI/15
Page 60 of 314
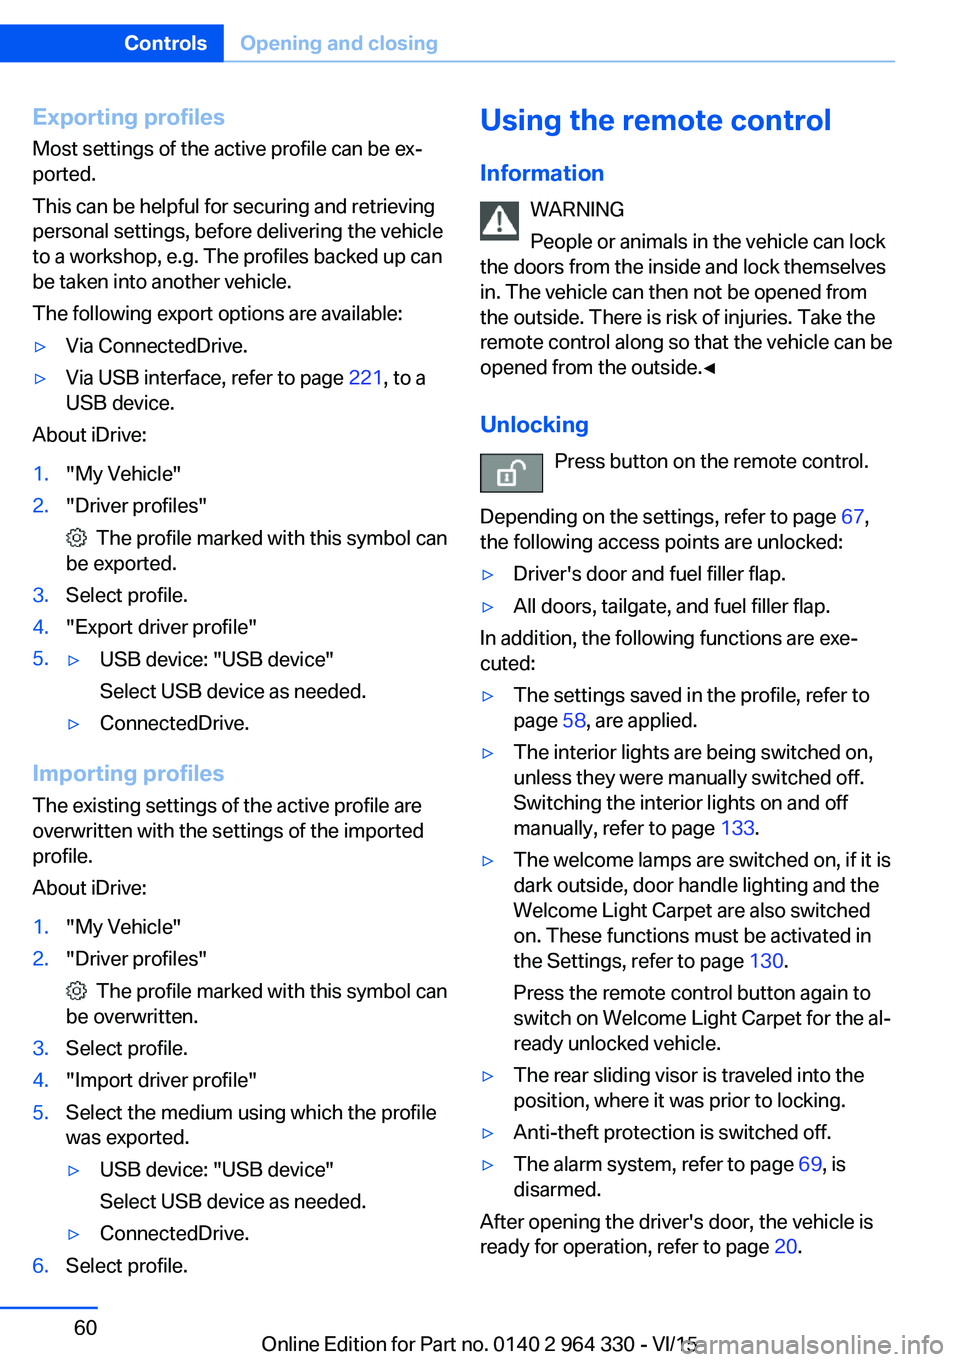
Exporting profilesMost settings of the active profile can be ex‐
ported.
This can be helpful for securing and retrieving
personal settings, before delivering the vehicle
to a workshop, e.g. The profiles backed up can
be taken into another vehicle.
The following export options are available:▷Via ConnectedDrive.▷Via USB interface, refer to page 221, to a
USB device.
About iDrive:
1."My Vehicle"2."Driver profiles"
The profile marked with this symbol can
be exported.
3.Select profile.4."Export driver profile"5.▷USB device: "USB device"
Select USB device as needed.▷ConnectedDrive.
Importing profiles
The existing settings of the active profile are
overwritten with the settings of the imported
profile.
About iDrive:
1."My Vehicle"2."Driver profiles"
The profile marked with this symbol can
be overwritten.
3.Select profile.4."Import driver profile"5.Select the medium using which the profile
was exported.▷USB device: "USB device"
Select USB device as needed.▷ConnectedDrive.6.Select profile.Using the remote control
Information WARNING
People or animals in the vehicle can lock
the doors from the inside and lock themselves
in. The vehicle can then not be opened from
the outside. There is risk of injuries. Take the
remote control along so that the vehicle can be
opened from the outside.◀
Unlocking Press button on the remote control.
Depending on the settings, refer to page 67,
the following access points are unlocked:▷Driver's door and fuel filler flap.▷All doors, tailgate, and fuel filler flap.
In addition, the following functions are exe‐
cuted:
▷The settings saved in the profile, refer to
page 58, are applied.▷The interior lights are being switched on,
unless they were manually switched off.
Switching the interior lights on and off
manually, refer to page 133.▷The welcome lamps are switched on, if it is
dark outside, door handle lighting and the
Welcome Light Carpet are also switched
on. These functions must be activated in
the Settings, refer to page 130.
Press the remote control button again to
switch on Welcome Light Carpet for the al‐
ready unlocked vehicle.▷The rear sliding visor is traveled into the
position, where it was prior to locking.▷Anti-theft protection is switched off.▷The alarm system, refer to page 69, is
disarmed.
After opening the driver's door, the vehicle is
ready for operation, refer to page 20.
Seite 60ControlsOpening and closing60
Online Edition for Part no. 0140 2 964 330 - VI/15
Page 221 of 314
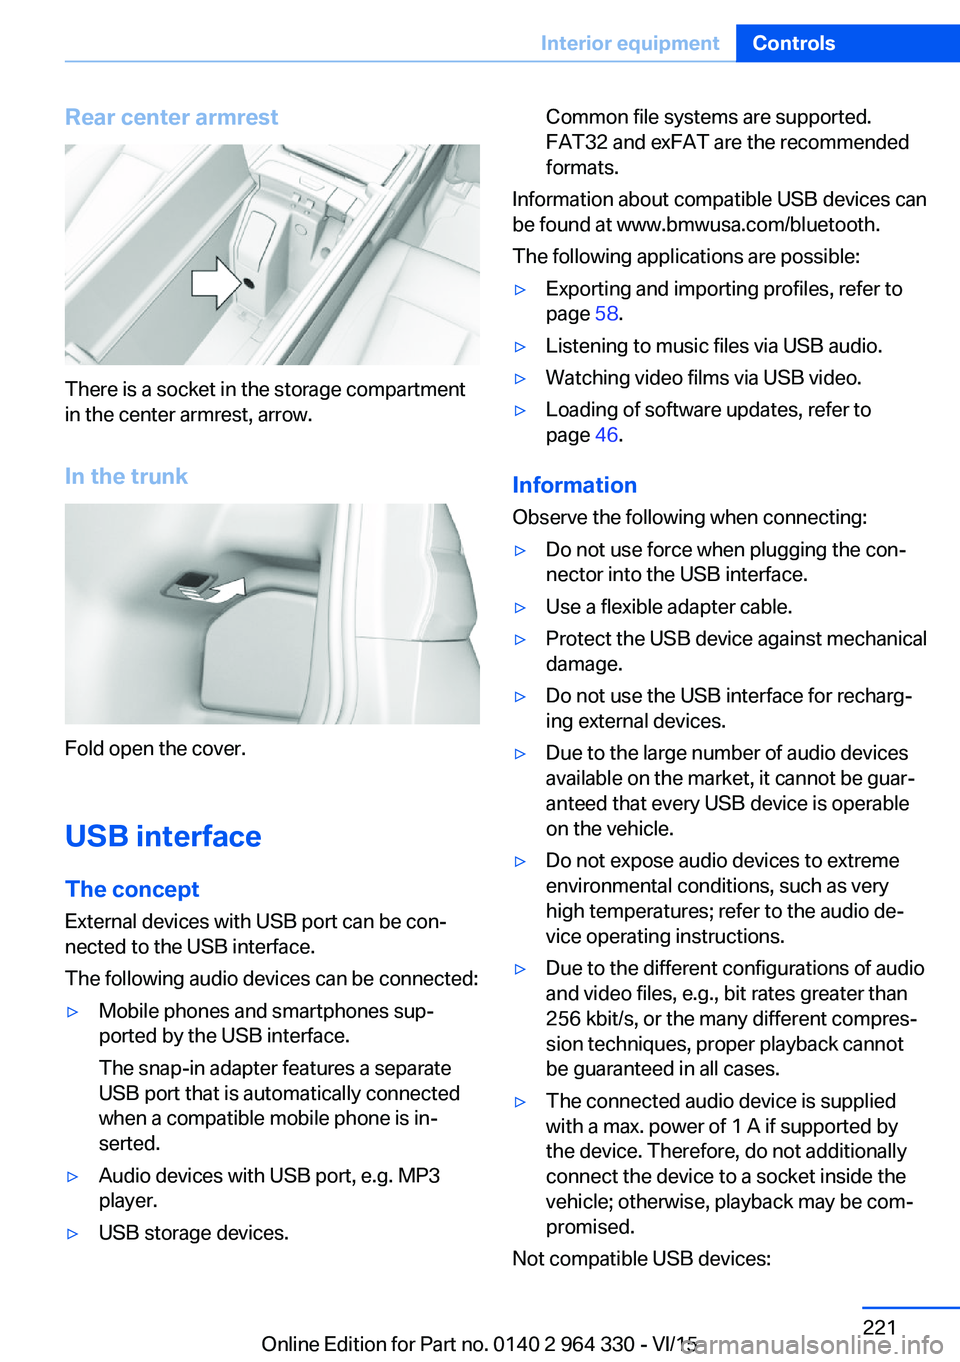
Rear center armrest
There is a socket in the storage compartment
in the center armrest, arrow.
In the trunk
Fold open the cover.
USB interface The concept
External devices with USB port can be con‐
nected to the USB interface.
The following audio devices can be connected:
▷Mobile phones and smartphones sup‐
ported by the USB interface.
The snap-in adapter features a separate
USB port that is automatically connected
when a compatible mobile phone is in‐
serted.▷Audio devices with USB port, e.g. MP3
player.▷USB storage devices.Common file systems are supported.
FAT32 and exFAT are the recommended
formats.
Information about compatible USB devices can
be found at www.bmwusa.com/bluetooth.
The following applications are possible:
▷Exporting and importing profiles, refer to
page 58.▷Listening to music files via USB audio.▷Watching video films via USB video.▷Loading of software updates, refer to
page 46.
Information
Observe the following when connecting:
▷Do not use force when plugging the con‐
nector into the USB interface.▷Use a flexible adapter cable.▷Protect the USB device against mechanical
damage.▷Do not use the USB interface for recharg‐
ing external devices.▷Due to the large number of audio devices
available on the market, it cannot be guar‐
anteed that every USB device is operable
on the vehicle.▷Do not expose audio devices to extreme
environmental conditions, such as very
high temperatures; refer to the audio de‐
vice operating instructions.▷Due to the different configurations of audio
and video files, e.g., bit rates greater than
256 kbit/s, or the many different compres‐
sion techniques, proper playback cannot
be guaranteed in all cases.▷The connected audio device is supplied
with a max. power of 1 A if supported by
the device. Therefore, do not additionally
connect the device to a socket inside the
vehicle; otherwise, playback may be com‐
promised.
Not compatible USB devices:
Seite 221Interior equipmentControls221
Online Edition for Part no. 0140 2 964 330 - VI/15
Page 222 of 314
▷USB hard drives.▷USB hubs.▷USB memory card readers with multiple in‐
serts.▷HFS-formatted USB devices.▷MTP devices.▷Devices such as fans or lights.
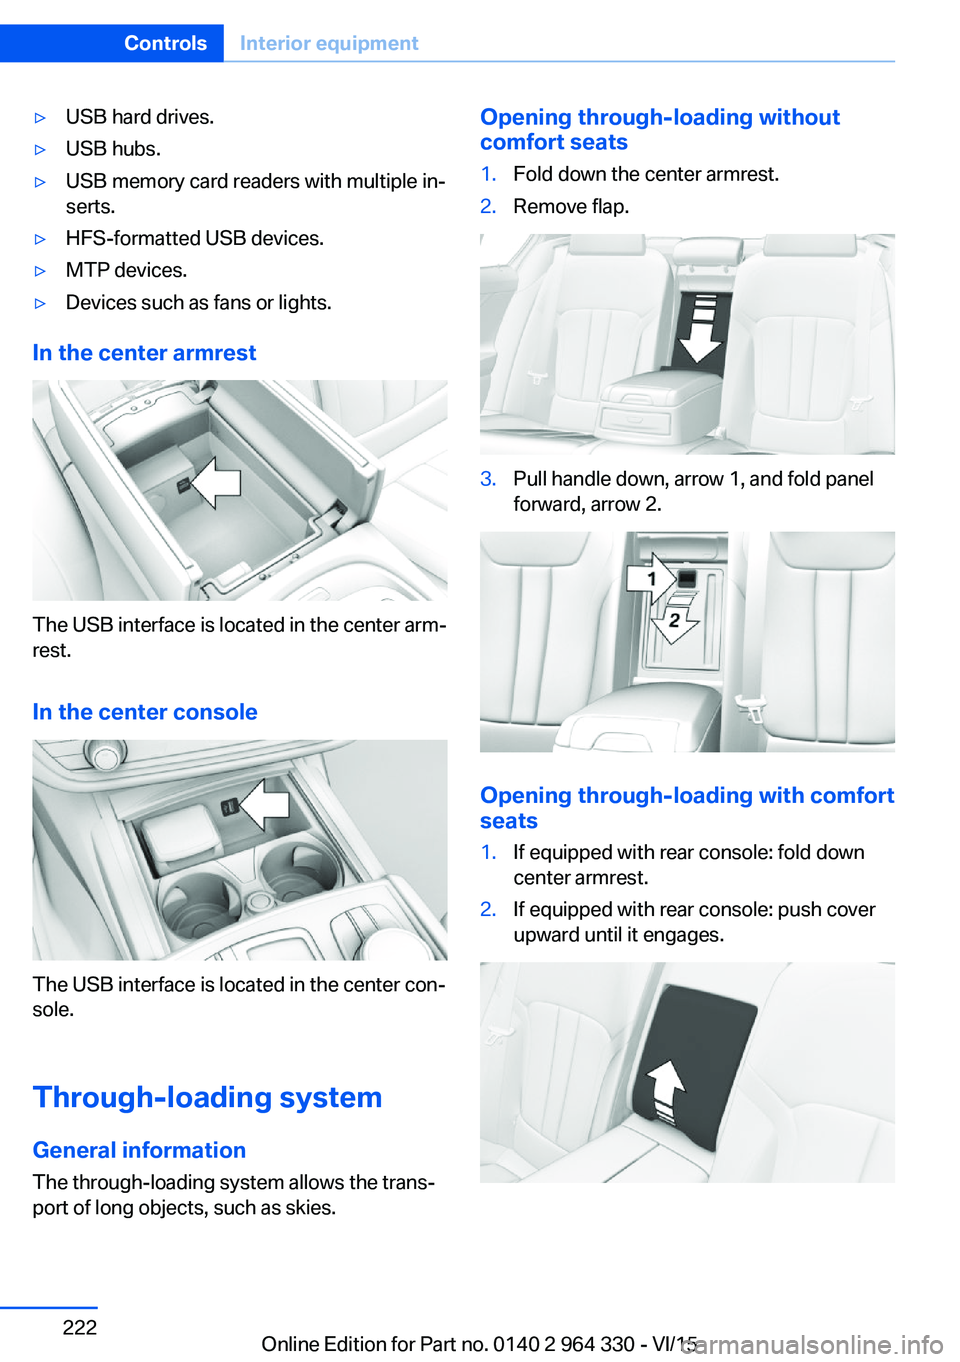
In the center armrest
The USB interface is located in the center arm‐
rest.
In the center console
The USB interface is located in the center con‐
sole.
Through-loading system General information The through-loading system allows the trans‐port of long objects, such as skies.
Opening through-loading without
comfort seats1.Fold down the center armrest.2.Remove flap.3.Pull handle down, arrow 1, and fold panel
forward, arrow 2.
Opening through-loading with comfort
seats
1.If equipped with rear console: fold down
center armrest.2.If equipped with rear console: push cover
upward until it engages.Seite 222ControlsInterior equipment222
Online Edition for Part no. 0140 2 964 330 - VI/15
Page 311 of 314
Tire sealant 260
Tires, everything on wheels and tires 254
Tires, run-flat tires 260
Tire tread 258
Tone 6
Tool 281
Top View, see Surround View 187
Total vehicle weight 299
Touchpad 26
Touchscreen 25
Tow fitting see tow-starting/ towing 289
Towing 289
Towing, see tow-starting/ towing 289
Tow-starting 289
TPM Tire Pressure Moni‐ tor 264
Traction control 164
TRACTION, driving dynam‐ ics 164
Traffic Jam Assist, see Steer‐ ing and lane guidance assis‐
tant 177
Transmission lock, electronic unlocking 106
Transmission, see Steptronic transmission 106
Transporting children safely 93
Tread, tires 258
Trip computer 125
Trip information, see onboard computer on the Control
Display 125
Triple turn signal activa‐ tion 103
Trip odometer 123
Trip recorder, see Trip odom‐ eter 123
Trunk lid, closing with no- touch activation 66
Trunk lid, emergency unlock‐ ing 65 Trunk lid, hotel function 65
Trunk lid, opening with no- touch activation 66
Trunk lid via remote con‐ trol 61
Turn signal, bulb replace‐ ment 282
Turn signals, operation 103
U
Unintentional alarm 70
Units of measurement 39
Universal remote control 215
Unlock button, Steptronic transmission 106
Unlocking, automatic 68
Unlocking, settings 67
Unlocking via door lock 62
Updates made after the edito‐ rial deadline 7
Updating software 46
Upholstery care 293
USB interface 221
V
Vanity mirror 217
Variable steering, Integral Ac‐ tive Steering 166
Vehicle battery 284
Vehicle battery, replac‐ ing 284
Vehicle, break-in 234
Vehicle care 292
Vehicle features and op‐ tions 7
Vehicle identification num‐ ber 10
Vehicle jack 282
Vehicle paint 292
Vehicle status 126
Vehicle storage 294
Vehicle wash 291
Ventilation 206
Venting, see ventilation 206 Vent, see ventilation 206
Video 6
VIN, see vehicle identification number 10
Vitality programs 90
Vitalization programs, see Vi‐ tality programs 90
Voice activation system 33
W Warning against cross traf‐ fic 197
Warning and indicator lamps, see Check Control 114
Warning displays, see Check Control 114
Warning lamp in the exterior mirror, see Active Blind Spot
Detection 153
Warning lamp in the exterior mirror, see crossing traffic
warning 197
Warning messages, see Check Control 114
Warning triangle 287
Warranty 7
Washer fluid 106
Washer nozzles, wind‐ shield 105
Washer system 103
Washing, vehicle 291
Water on roads 235
Weights 299
Welcome lamps during un‐ locking 60
Welcome Light Carpet, see welcome lights 130
Welcome lights 130
Welcome screen 58
Wheel cleaner 293
Wheels, changing 258
Wheels, everything on wheels and tires 254
Wheels, Flat Tire Monitor FTM 268 Seite 311Everything from A to ZReference311
Online Edition for Part no. 0140 2 964 330 - VI/15