2015 BMW 5 SERIES Lighting
[x] Cancel search: LightingPage 19 of 277

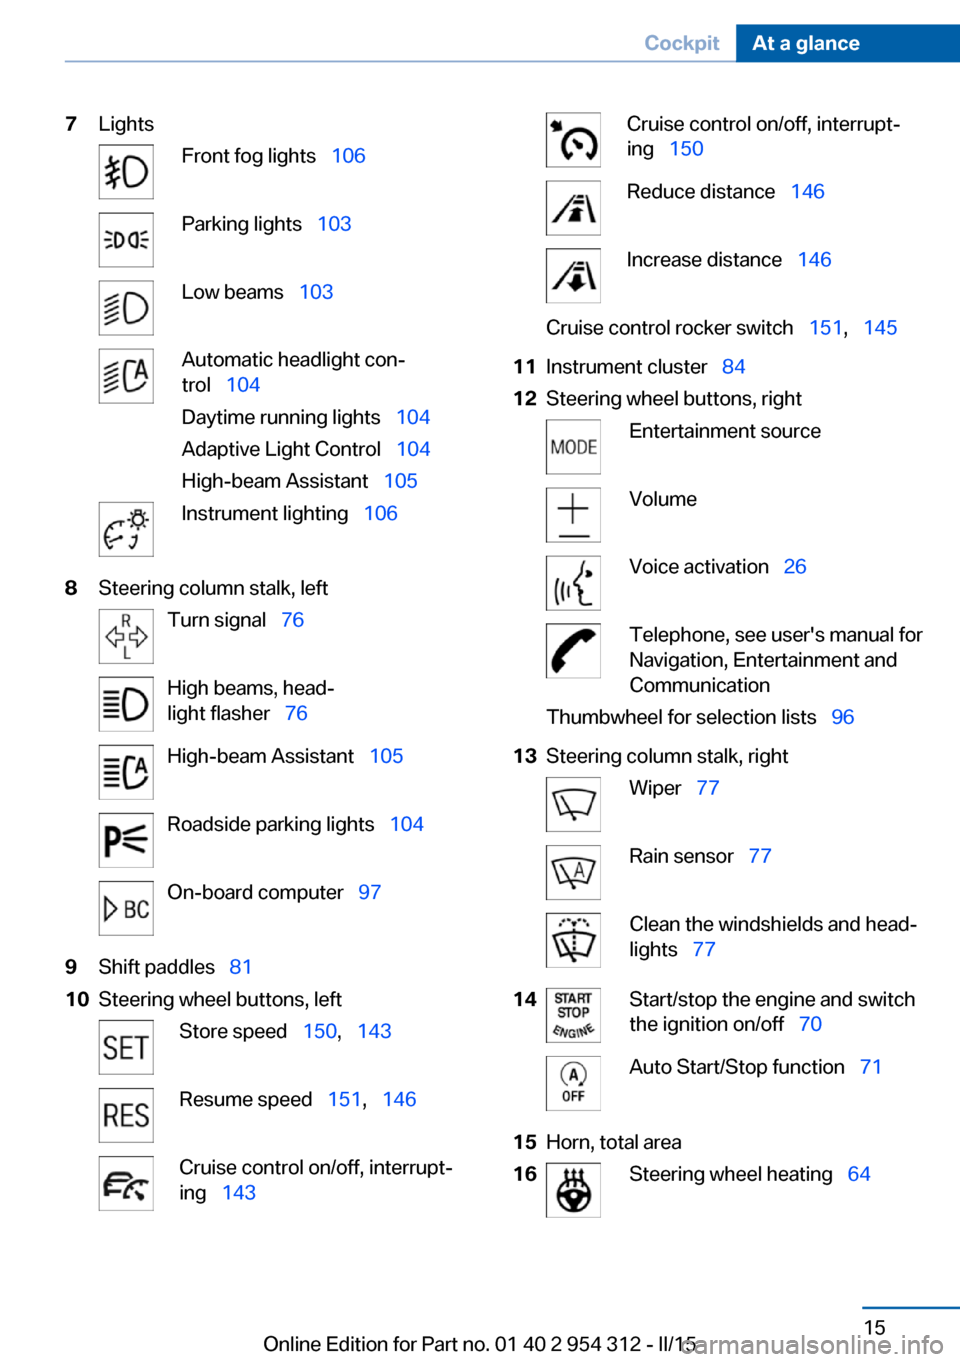
7LightsFront fog lights 106Parking lights 103Low beams 103Automatic headlight con‐
trol 104
Daytime running lights 104
Adaptive Light Control 104
High-beam Assistant 105Instrument lighting 1068Steering column stalk, leftTurn signal 76High beams, head‐
light flasher 76High-beam Assistant 105Roadside parking lights 104On-board computer 979Shift paddles 8110Steering wheel buttons, leftStore speed 150, 143Resume speed 151, 146Cruise control on/off, interrupt‐
ing 143Cruise control on/off, interrupt‐
ing 150Reduce distance 146Increase distance 146Cruise control rocker switch 151, 14511Instrument cluster 8412Steering wheel buttons, rightEntertainment sourceVolumeVoice activation 26Telephone, see user's manual for
Navigation, Entertainment and
CommunicationThumbwheel for selection lists 9613Steering column stalk, rightWiper 77Rain sensor 77Clean the windshields and head‐
lights 7714Start/stop the engine and switch
the ignition on/off 70Auto Start/Stop function 7115Horn, total area16Steering wheel heating 64Seite 15CockpitAt a glance15
Online Edition for Part no. 01 40 2 954 312 - II/15
Page 80 of 277

After a power failure
Putting the parking brake into
operation1.Switch on the ignition.2. Press the reel while stepping on the
brake pedal or selector lever position P is
set.
It may take several seconds for the brake to be
put into operation. Any sounds associated with
this are normal.
The indicator lamp in the instrument
cluster goes out as soon as the parking
brake is ready for operation.
Turn signal, high beams,
headlight flasher
Turn signal
Hints Do not adjust the exterior mirrors
Do not adjust the exterior mirror while
driving and when turn signals/hazard warning
flashers are on, or else the additional turn sig‐
nal lights in the exterior mirror are out of posi‐
tion and can't be seen.◀
Using turn signals
Press the lever beyond the resistance point.
To switch off manually, press the lever to the
resistance point.
Unusually rapid flashing of the indicator lamp
indicates that a turn signal bulb has failed.
Triple turn signal activation Press the lever to the resistance point.
The turn signal flashes three times.
The function can be activated or deactivated.
On the Control Display:1."Settings"2."Lighting"3."Triple turn signal"
Settings are stored for the profile currently in
use.
Signaling briefly
Press the lever to the resistance point and hold
it there for as long as you want the turn signal
to flash.
High beams, headlight flasher
▷High beams, arrow 1.▷Headlight flasher, arrow 2.Seite 76ControlsDriving76
Online Edition for Part no. 01 40 2 954 312 - II/15
Page 106 of 277

On the Control Display:1."Settings"2."Head-Up Display"3."Brightness"4.Turn the controller.
When the low beams are activated, the bright‐
ness of the Head-up Display can be addition‐
ally influenced using the instrument lighting.
Settings are stored for the profile currently in
use.
Adjusting the height
On the Control Display:
1."Settings"2."Head-Up Display"3."Height"4.Turn the controller.
Settings are stored for the profile currently in
use.
Setting the rotation
On the Control Display:
1."Settings"2."Head-Up Display"3."Rotation"4.Turn the controller.
Settings are stored for the profile currently in
use.
Special windshield
The windshield is part of the system.
The shape of the windshield makes it possible
to display a precise image.
A film in the windshield prevents double im‐
ages from being displayed.
Therefore, have the special windshield re‐
placed by a service center only.
Seite 102ControlsDisplays102
Online Edition for Part no. 01 40 2 954 312 - II/15
Page 107 of 277

LightsVehicle features and optionsThis chapter describes all standard, country-
specific and optional features offered with the
series. It also describes features that are not
necessarily available in your car, e. g., due to
the selected options or country versions. This
also applies to safety-related functions and
systems. The respectively applicable country
provisions must be observed when using the
respective features and systems.
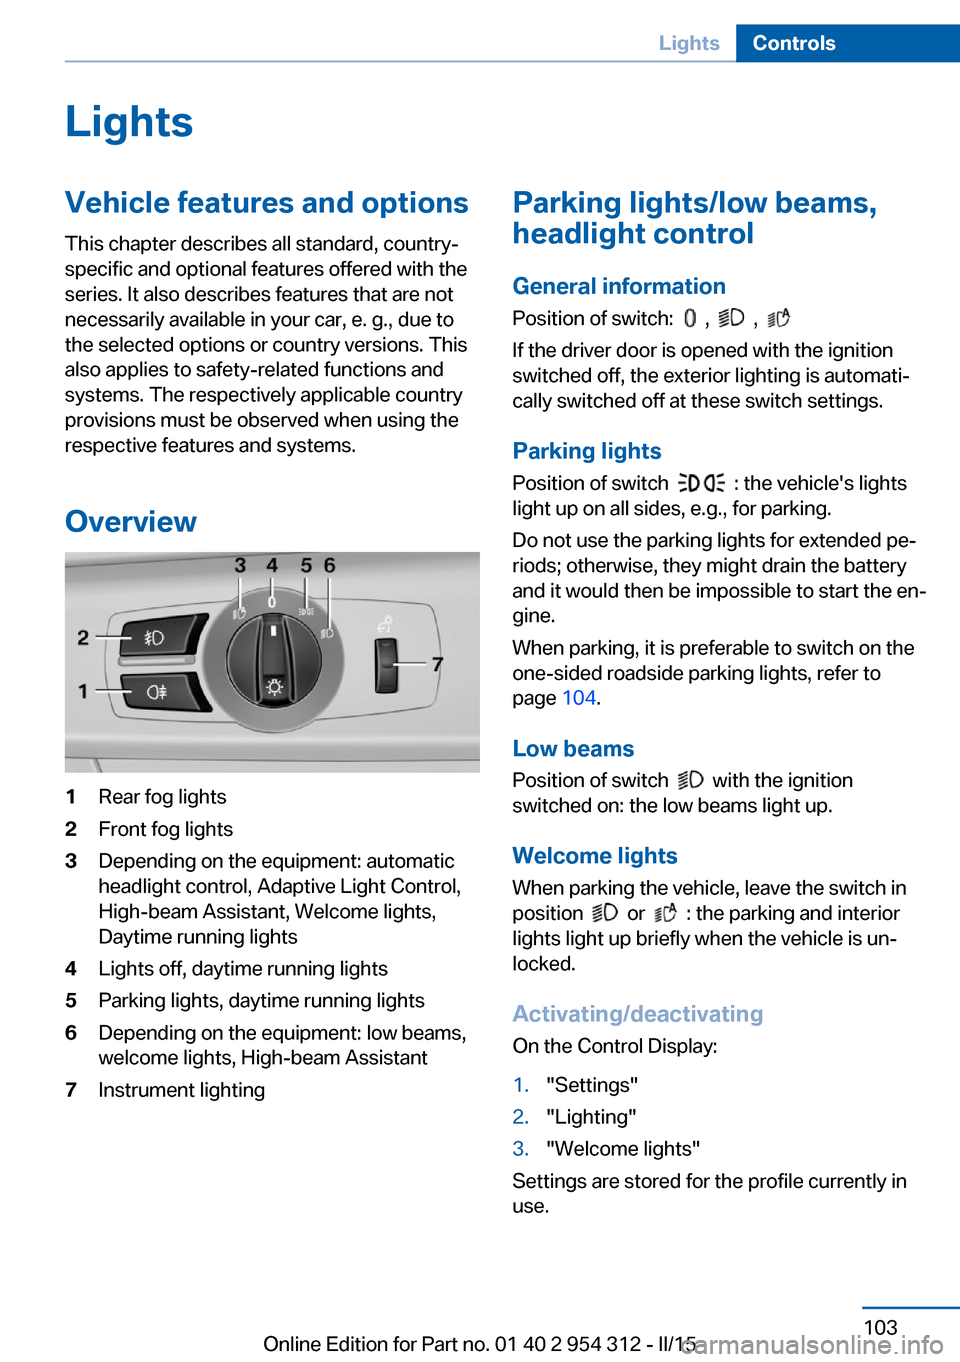
Overview1Rear fog lights2Front fog lights3Depending on the equipment: automatic
headlight control, Adaptive Light Control,
High-beam Assistant, Welcome lights,
Daytime running lights4Lights off, daytime running lights5Parking lights, daytime running lights6Depending on the equipment: low beams,
welcome lights, High-beam Assistant7Instrument lightingParking lights/low beams,
headlight control
General information
Position of switch:
, ,
If the driver door is opened with the ignition
switched off, the exterior lighting is automati‐
cally switched off at these switch settings.
Parking lights
Position of switch
: the vehicle's lights
light up on all sides, e.g., for parking.
Do not use the parking lights for extended pe‐
riods; otherwise, they might drain the battery
and it would then be impossible to start the en‐
gine.
When parking, it is preferable to switch on the
one-sided roadside parking lights, refer to
page 104.
Low beams Position of switch
with the ignition
switched on: the low beams light up.
Welcome lights
When parking the vehicle, leave the switch in
position
or : the parking and interior
lights light up briefly when the vehicle is un‐
locked.
Activating/deactivating
On the Control Display:
1."Settings"2."Lighting"3."Welcome lights"
Settings are stored for the profile currently in
use.
Seite 103LightsControls103
Online Edition for Part no. 01 40 2 954 312 - II/15
Page 108 of 277

Headlight courtesy delay featureThe low beams stay lit for a short while after
the radio-ready state is switched off if the
lights are turned off and the headlight flasher is
switched on.
Setting the duration
On the Control Display:1."Settings"2."Lighting"3."Pathway lighting:"4.Set length of time.
Settings are stored for the profile currently in
use.
Automatic headlight control
Position of switch
: the low beams are acti‐
vated and off automatically, e.g., in tunnels, in
twilight or if there is precipitation. The indicator
lamp in the instrument cluster lights up.
When emerging from a tunnel during the day,
the low beams are not switched off immedi‐
ately but instead only after approx. 2 minutes.
A blue sky with the sun low on the horizon can
cause the lights to be switched on.
The low beams always stay on when the fog
lights are activated.
Personal responsibility
The automatic headlight control cannot
serve as a substitute for your personal judg‐
ment in determining when to turn the lights on
in response to ambient lighting conditions.
E. g. the sensors are unable to detect fog or
hazy weather. To avoid safety risks under
these conditions, you should always switch on
the lights manually.◀
Daytime running lights With the ignition switched on, the daytime run‐
ning lights light up in position
, or
. After the ignition is switched off, the park‐
ing lights light up in position
.
Activating/deactivating
In some countries, daytime running lights are
mandatory, so it may not be possible to deacti‐
vate the daytime running lights.
On the Control Display:1."Settings"2."Lighting"3."Daytime running lamps"
Settings are stored for the profile currently in
use.
Roadside parking lights
The vehicle can be illuminated on one side.
Switching on With the ignition switched off, press the lever
either up or down past the resistance point for
approx. 2 seconds.
Switch off Briefly press the lever to the resistance point in
the opposite direction.
Adaptive Light Control The concept
Adaptive Light Control is a variable headlight
control system that enables dynamic illumina‐
tion of the road surface.
Depending on the steering angle and other pa‐ rameters, the light from the headlight follows
the course of the road.
Seite 104ControlsLights104
Online Edition for Part no. 01 40 2 954 312 - II/15
Page 110 of 277

Switching the high beams on and off
manually▷High beams on, arrow 1.▷High beams off/headlight flasher, arrow 2.
The High-beam Assistant can be switched off
when manually adjusting the light. To reacti‐
vate the High-beam Assistant, press the but‐
ton on the turn signal lever.
System limits
The system is not fully functional in situations such as the following, and driver intervention
may be necessary:
▷In very unfavorable weather conditions,
such as fog or heavy precipitation.▷When detecting poorly-lit road users such
as pedestrians, cyclists, horseback riders
and wagons; when driving close to train or
ship traffic; and at animal crossings.▷In tight curves, on hilltops or in depres‐
sions, in cross traffic or half-obscured on‐
coming traffic on freeways.▷In poorly-lit towns and cities and in the
presence of highly reflective signs.▷At low speeds.▷When the windshield behind the interior
rearview mirror is fogged over, dirty or cov‐
ered with stickers, etc.Fog lights
Front fog lights
The parking lights or low beams must be
switched on.
Press button. The green indicator
lamp lights up.
If the automatic headlight control, refer to
page 104, is activated, the low beams will
come on automatically when you switch on the
front fog lights.
When the high beams or headlight flasher are
activated, the front fog lights are not switched
on.
Instrument lighting Adjusting The parking lights or low beams
must be switched on to adjust
the brightness.
Adjust the brightness with the
thumbwheel.
Interior lights
General information The interior lights, footwell lights, access lights
and courtesy lights are controlled automati‐
cally.
Thumb wheel for the instrument lighting con‐
trols brightness of some of these features.Seite 106ControlsLights106
Online Edition for Part no. 01 40 2 954 312 - II/15
Page 111 of 277

Overview1Interior lights2Reading lamp
Switching the interior lights on and offPress button.
To reel off permanently: press the button for
approx. 3 seconds.
Switch back on: press button.
Reading lights Press button.
Reading lights are located at the front and rear
next to the interior lights.
Bang & Olufsen High End Surround
Sound System
Adjusting speaker lighting Some speakers in the vehicle are illuminated.
The lighting can be individually set.
1."Settings"2."Lighting"3."B&O"4.Select the desired lighting setting.▷"Off": no lighting.▷"Reduced": the speakers in the field of
view are faded while driving.▷"On": the speakers are always illumi‐
nated.Ambient light
Depending on the equipment, the lighting can
be individually adjusted in the interior for some
lights.
Selecting color scheme1."Settings"2."Lighting"3."Ambient:"4.Select desired setting.
With a color scheme selected and welcome
lights activated they illuminate in the line's
color when vehicle is unlocked.
Setting the brightness The brightness of the ambient light can be ad‐
justed via the thumbwheel for the instrument
lighting or on the Control Display.
1."Settings"2."Lighting"3."Brightness:"4.Adjust the brightness.Seite 107LightsControls107
Online Edition for Part no. 01 40 2 954 312 - II/15
Page 176 of 277

Interior equipmentVehicle features and optionsThis chapter describes all standard, country-
specific and optional features offered with the
series. It also describes features that are not
necessarily available in your car, e. g., due to
the selected options or country versions. This
also applies to safety-related functions and
systems. The respectively applicable country
provisions must be observed when using the
respective features and systems.
Universal Integrated Remote Control
The concept The universal garage door opener can operate
up to 3 functions of remote-controlled sys‐
tems such as garage door drives or lighting
systems. The universal garage door opener re‐
places up to 3 different hand-held transmitters.
To operate the remote control, the buttons on
the interior rearview mirror must be program‐
med with the desired functions. The hand-held
transmitter for the particular system is required
in order to program the remote control.
During programming
During programming and before activat‐
ing a device using the universal garage door
opener, ensure that there are no people, ani‐
mals or objects in the area of the remote-con‐
trolled device; otherwise, there is a risk of in‐
jury or damage.
Also follow the safety instructions of the hand-
held transmitter.◀
Before selling the vehicle, delete the stored
functions for the sake of security.Compatibility
If this symbol is printed on the packag‐
ing or in the instructions of the system
to be controlled, the system is gener‐
ally compatible with the universal garage door opener.
If you have any questions, please contact:▷Your service center.▷www.homelink.com on the Internet.
HomeLink is a registered trademark of Gentex
Corporation.
Control elements on the interior
rearview mirror
▷LED, arrow 1.▷Buttons, arrow 2.▷The hand-held transmitter, arrow 3, is re‐
quired for programming.
Programming
General information
1.Switch on the ignition.2.Initial setup:
Press and hold the left and right button on
the interior rearview mirror simultaneously
for approximately 20 seconds until the LED
on the interior rearview mirror flashes. ThisSeite 172ControlsInterior equipment172
Online Edition for Part no. 01 40 2 954 312 - II/15