2015 BMW 320i XDRIVE SEDAN Adjust seats
[x] Cancel search: Adjust seatsPage 54 of 257
AdjustingVehicle features and options
This chapter describes all standard, country-
specific and optional features offered with the
series. It also describes features that are not
necessarily available in your car, e. g., due to
the selected options or country versions. This
also applies to safety-related functions and
systems. The respectively applicable country
provisions must be observed when using the
respective features and systems.
Sitting safely The ideal seating position can make a vital
contribution to relaxed, fatigue-free driving.
The seating position plays an important role in
an accident in combination with:▷Safety belts, refer to page 53.▷Head restraints, refer to page 54.▷Airbags, refer to page 97.
Seats
Hints Do not adjust the seat while driving
Do not adjust the driver's seat while driv‐
ing, or the seat could respond with unexpected
movement and the ensuing loss of vehicle
control could lead to an accident.◀
Do not incline the backrest too far to the
rear
Do not incline the backrest too far to the rear
while driving, or there is a risk of slipping under
the safety belt in the event of an accident. This
would eliminate the protection normally pro‐
vided by the belt.◀
Keep the movement area unobstructed
When changing the seat position, keep
the seat's area of movement unobstructed;
otherwise, people might get injured or objects
damaged.◀
Manually adjustable seats
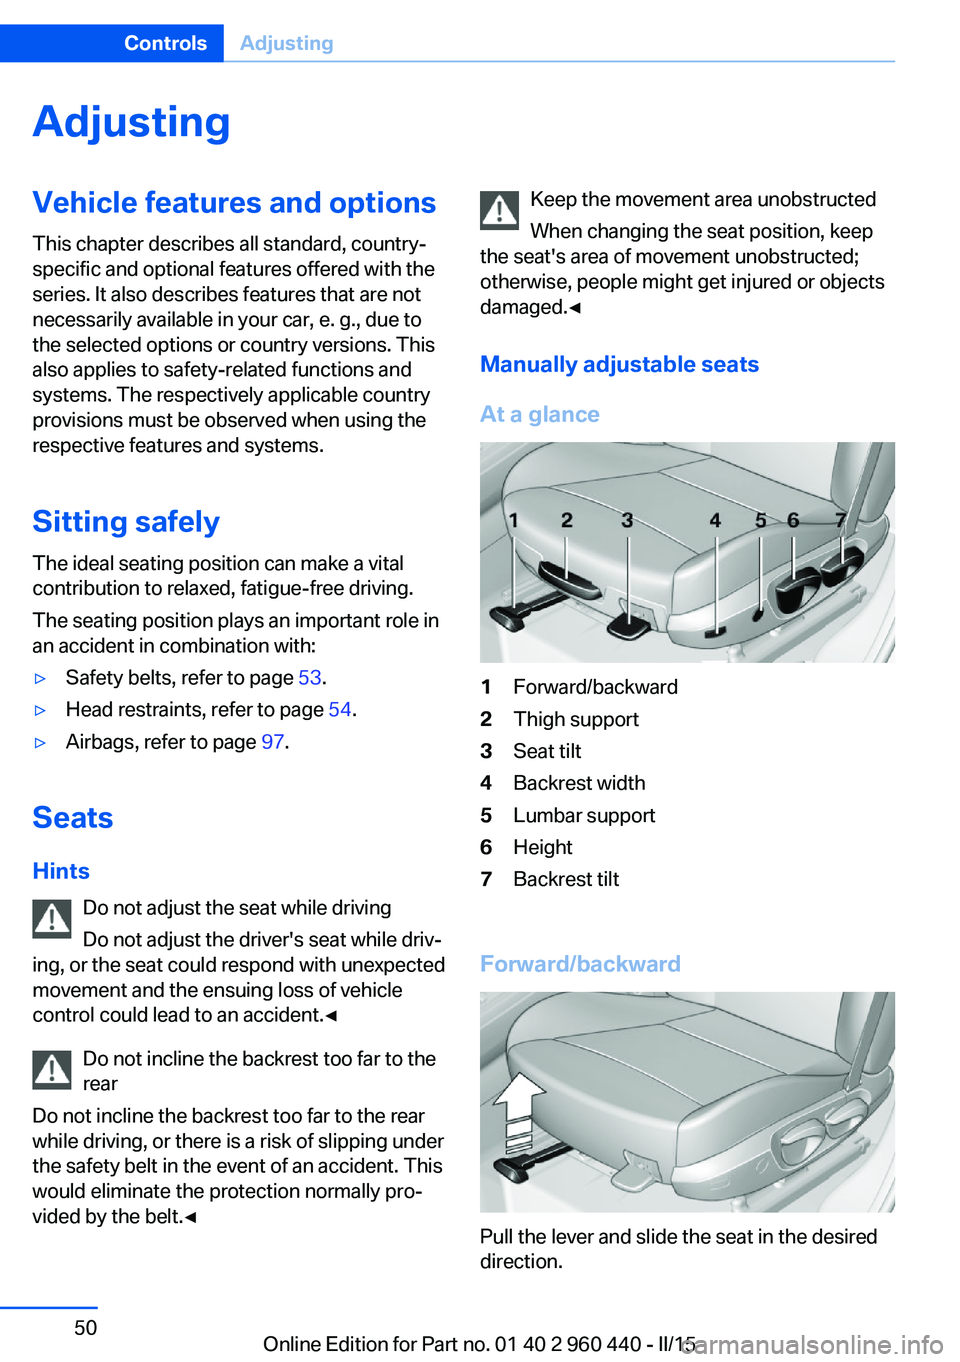
At a glance1Forward/backward2Thigh support3Seat tilt4Backrest width5Lumbar support6Height7Backrest tilt
Forward/backward
Pull the lever and slide the seat in the desired
direction.
Seite 50ControlsAdjusting50
Online Edition for Part no. 01 40 2 960 440 - II/15
Page 55 of 257
After releasing the lever, move the seat for‐
ward or back slightly making sure it engages
properly.
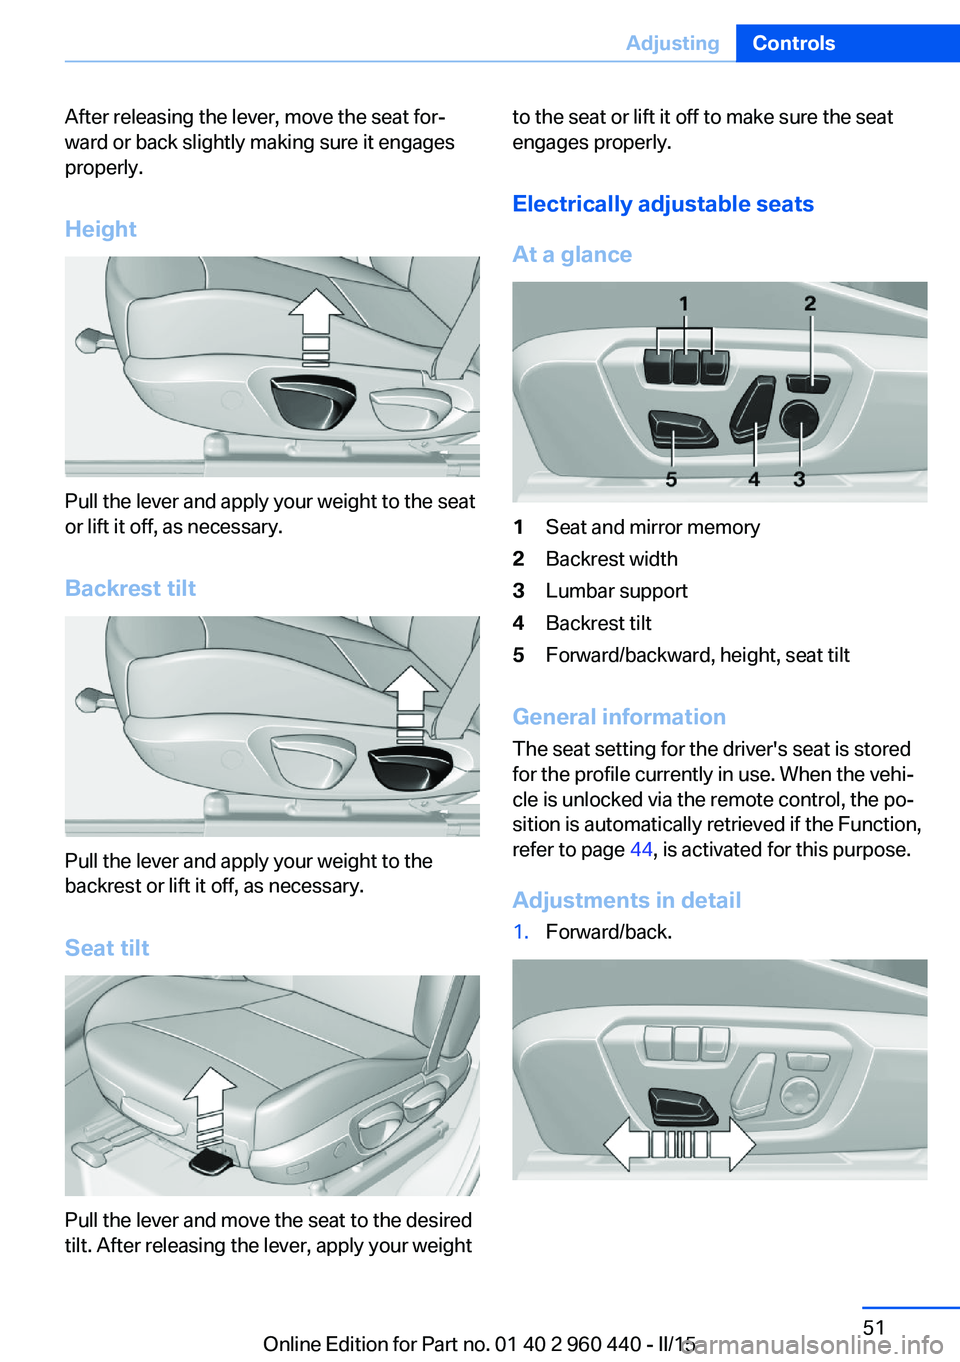
Height
Pull the lever and apply your weight to the seat
or lift it off, as necessary.
Backrest tilt
Pull the lever and apply your weight to the
backrest or lift it off, as necessary.
Seat tilt
Pull the lever and move the seat to the desired
tilt. After releasing the lever, apply your weight
to the seat or lift it off to make sure the seat
engages properly.
Electrically adjustable seats
At a glance1Seat and mirror memory2Backrest width3Lumbar support4Backrest tilt5Forward/backward, height, seat tilt
General information
The seat setting for the driver's seat is stored
for the profile currently in use. When the vehi‐
cle is unlocked via the remote control, the po‐
sition is automatically retrieved if the Function,
refer to page 44, is activated for this purpose.
Adjustments in detail
1.Forward/back.Seite 51AdjustingControls51
Online Edition for Part no. 01 40 2 960 440 - II/15
Page 57 of 257
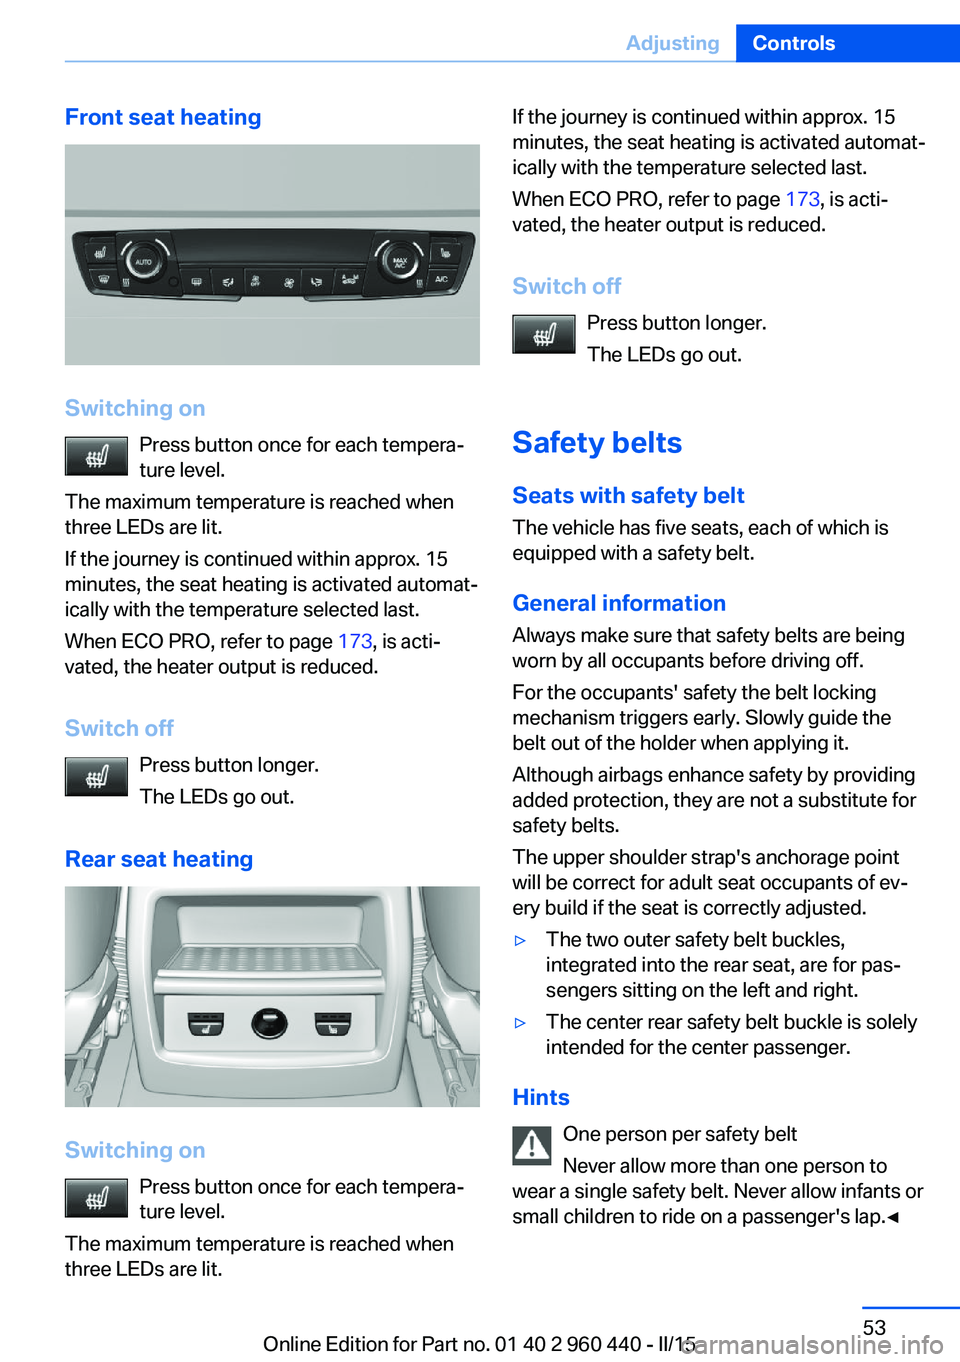
Front seat heating
Switching onPress button once for each tempera‐
ture level.
The maximum temperature is reached when
three LEDs are lit.
If the journey is continued within approx. 15
minutes, the seat heating is activated automat‐
ically with the temperature selected last.
When ECO PRO, refer to page 173, is acti‐
vated, the heater output is reduced.
Switch off Press button longer.
The LEDs go out.
Rear seat heating
Switching on Press button once for each tempera‐
ture level.
The maximum temperature is reached when
three LEDs are lit.
If the journey is continued within approx. 15
minutes, the seat heating is activated automat‐
ically with the temperature selected last.
When ECO PRO, refer to page 173, is acti‐
vated, the heater output is reduced.
Switch off Press button longer.
The LEDs go out.
Safety belts
Seats with safety belt The vehicle has five seats, each of which is
equipped with a safety belt.
General information
Always make sure that safety belts are being
worn by all occupants before driving off.
For the occupants' safety the belt locking
mechanism triggers early. Slowly guide the
belt out of the holder when applying it.
Although airbags enhance safety by providing
added protection, they are not a substitute for
safety belts.
The upper shoulder strap's anchorage point
will be correct for adult seat occupants of ev‐
ery build if the seat is correctly adjusted.▷The two outer safety belt buckles,
integrated into the rear seat, are for pas‐
sengers sitting on the left and right.▷The center rear safety belt buckle is solely
intended for the center passenger.
Hints
One person per safety belt
Never allow more than one person to
wear a single safety belt. Never allow infants or
small children to ride on a passenger's lap.◀
Seite 53AdjustingControls53
Online Edition for Part no. 01 40 2 960 440 - II/15
Page 58 of 257
Putting on the belt
Lay the belt, without twisting, snugly
across the lap and shoulders, as close to the
body as possible. Make sure that the belt lies
low around the hips in the lap area and does
not press on the abdomen. Otherwise, the belt
can slip over the hips in a frontal impact and in‐
jure the abdomen.
The safety belt must not lie across the neck,
rub on sharp edges, be routed over breakable
objects, or be pinched.◀
What reduces the restraining effect
Avoid wearing bulky clothing, and pull
the shoulder belt periodically to readjust the
tension. Make sure that the belt is not jammed;
otherwise, the belt can be damaged and the
restraining effect is reduced.◀
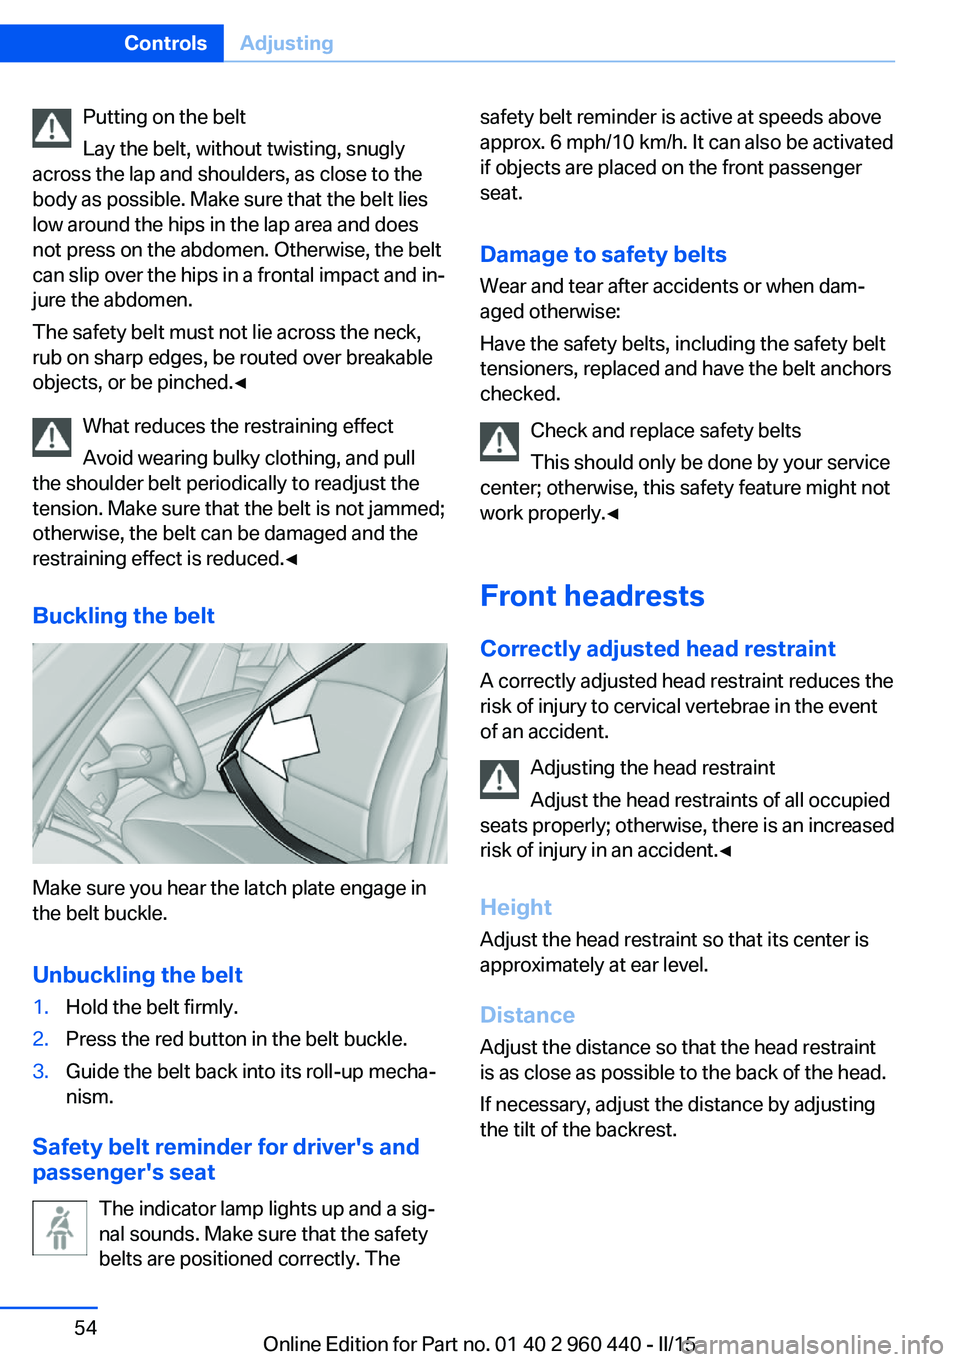
Buckling the belt
Make sure you hear the latch plate engage in
the belt buckle.
Unbuckling the belt
1.Hold the belt firmly.2.Press the red button in the belt buckle.3.Guide the belt back into its roll-up mecha‐
nism.
Safety belt reminder for driver's and
passenger's seat
The indicator lamp lights up and a sig‐
nal sounds. Make sure that the safety
belts are positioned correctly. The
safety belt reminder is active at speeds above
approx. 6 mph/10 km/h. It can also be activated
if objects are placed on the front passenger
seat.
Damage to safety belts Wear and tear after accidents or when dam‐
aged otherwise:
Have the safety belts, including the safety belt
tensioners, replaced and have the belt anchors checked.
Check and replace safety belts
This should only be done by your service
center; otherwise, this safety feature might not
work properly.◀
Front headrests Correctly adjusted head restraint
A correctly adjusted head restraint reduces the
risk of injury to cervical vertebrae in the event
of an accident.
Adjusting the head restraint
Adjust the head restraints of all occupied
seats properly; otherwise, there is an increased
risk of injury in an accident.◀
Height
Adjust the head restraint so that its center is
approximately at ear level.
Distance
Adjust the distance so that the head restraint
is as close as possible to the back of the head.
If necessary, adjust the distance by adjusting
the tilt of the backrest.Seite 54ControlsAdjusting54
Online Edition for Part no. 01 40 2 960 440 - II/15
Page 59 of 257
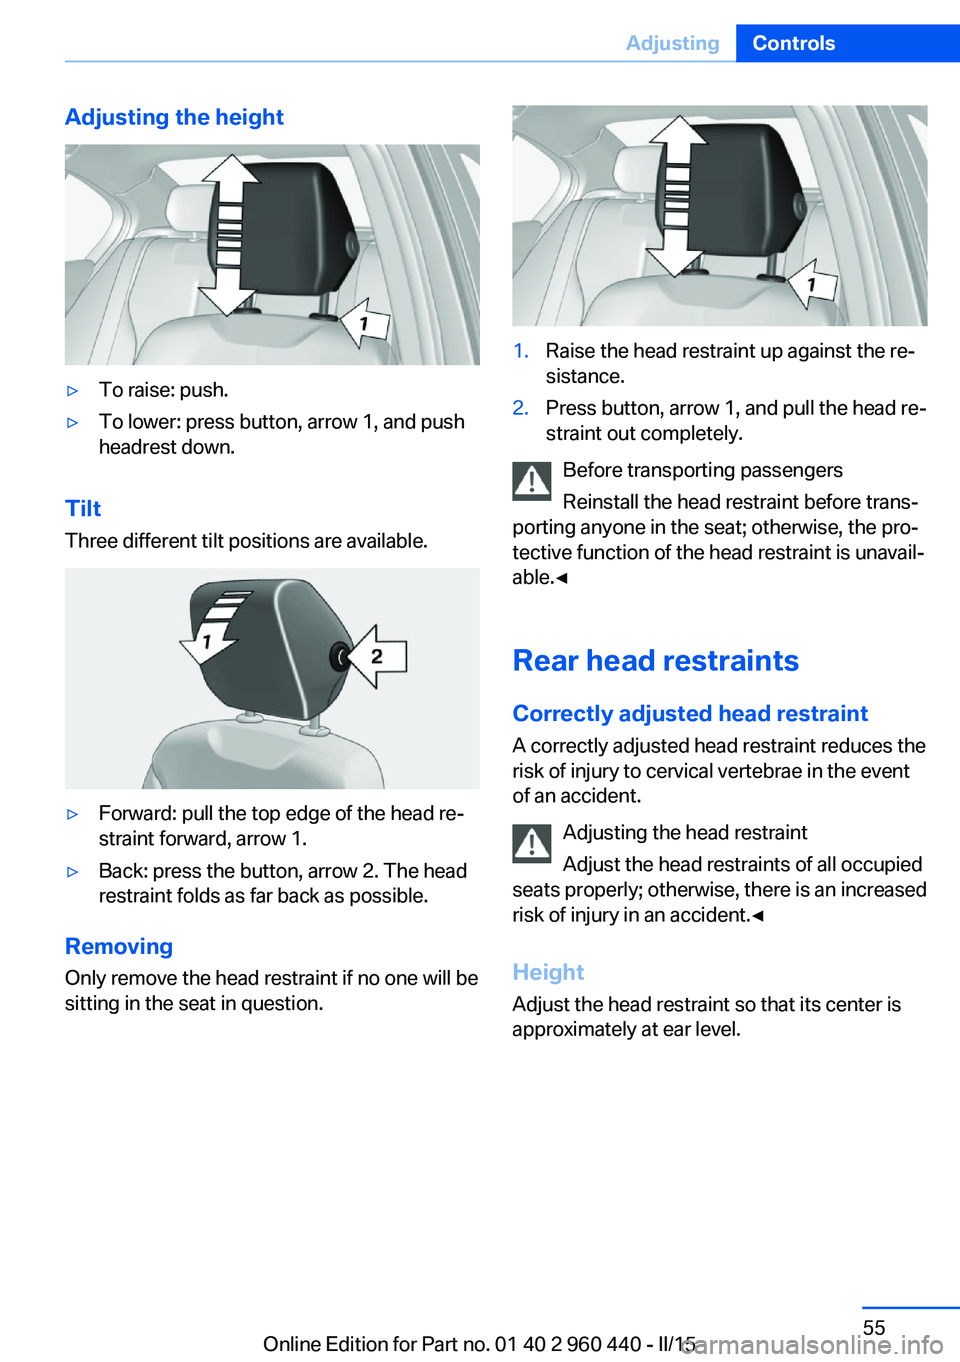
Adjusting the height▷To raise: push.▷To lower: press button, arrow 1, and push
headrest down.
Tilt
Three different tilt positions are available.
▷Forward: pull the top edge of the head re‐
straint forward, arrow 1.▷Back: press the button, arrow 2. The head
restraint folds as far back as possible.
Removing
Only remove the head restraint if no one will be
sitting in the seat in question.
1.Raise the head restraint up against the re‐
sistance.2.Press button, arrow 1, and pull the head re‐
straint out completely.
Before transporting passengers
Reinstall the head restraint before trans‐
porting anyone in the seat; otherwise, the pro‐
tective function of the head restraint is unavail‐
able.◀
Rear head restraints
Correctly adjusted head restraint
A correctly adjusted head restraint reduces the
risk of injury to cervical vertebrae in the event
of an accident.
Adjusting the head restraint
Adjust the head restraints of all occupied
seats properly; otherwise, there is an increased
risk of injury in an accident.◀
Height
Adjust the head restraint so that its center is
approximately at ear level.
Seite 55AdjustingControls55
Online Edition for Part no. 01 40 2 960 440 - II/15
Page 104 of 257

size is detected on the seat. The airbags
on the front passenger side are activated.
Detected child seats
The system generally detects children seated
in a child seat, particularly in child seats re‐
quired by NHTSA when the vehicle was manu‐ factured. After installing a child seat, make
sure that the indicator lamp for the front-seat
passenger airbags lights up. This indicates
that the child seat has been detected and the
front-seat passenger airbags are not activated.
Strength of the driver's and front-seat
passenger airbag
The explosive power that activates driver's/
front passenger's airbags very much depends
on the positions of the driver's/front passeng‐ er's seat.
With a respective message appearing on Con‐
trol Display calibrate the front seats to keep the accuracy of this function over the long-
term.
Calibrating the front seats
A corresponding message appears on the
Control Display.
1.Press the reel and move the respective
seat all the way forward.2.Press the reel forward again. The seat still
moves forward slightly.3.Readjust the seat to the desired position.
The calibration procedure is completed when
the message on the Control Display disap‐
pears.
If the message continues to be displayed, re‐
peat the calibration.
If the message does not disappear after a re‐
peat calibration, have the system checked as
soon as possible.
Unobstructed area of movement
Ensure that the area of movement of the
seats is unobstructed to avoid personal injury
or damage to objects.◀
Tire Pressure Monitor TPM The concept
The system monitors tire inflation pressure in
the four mounted tires. The system warns you
if there is a significant loss of pressure in one
or more tires. For this purpose, sensors in the
tire valves measure the tire inflation pressure
and tire temperature.
Hints Tire damage due to external factors
Sudden tire damage caused by external
circumstances cannot be recognized in ad‐
vance.◀
With use of the system observe further infor‐
mation found under Tire inflation pressure, re‐
fer to page 189.
Functional requirements
The system must have been reset with the
correct tire inflation pressure; otherwise, relia‐
ble signaling of tire inflation pressure loss is
not assured.
Reset the system after each adjustment of the
tire inflation pressure and after every tire or
wheel change.
Always use wheels with TPM electronics to
ensure that the system will operate properly.
Status display
The current status of the Tire Pressure Moni‐
tor TPM can be displayed on the Control Dis‐
play, e.g., whether or not the TPM is active.
On the Control Display:1."Vehicle info"Seite 100ControlsSafety100
Online Edition for Part no. 01 40 2 960 440 - II/15
Page 246 of 257
Everything from A to Z
IndexA ABS, Antilock Brake Sys‐ tem 119
ACC, Active Cruise Control with Stop & Go 124
Acceleration Assistant, refer to Launch Control 75
Accessories and parts 7
Activated-charcoal filter 150
Active Blind Spot Detec‐ tion 116
Active Cruise Control with Stop & Go, ACC 124
Adaptive brake lights, refer to Brake force display 118
Adaptive Light Control 93
Additives, oil 208
Adjustments, seats/head re‐ straints 50
After washing vehicle 230
Airbags 97
Airbags, indicator/warning light 98
Air circulation, refer to Recir‐ culated-air mode 146, 149
Air, dehumidifying, refer to Cooling function 146, 149
Air distribution, manual 146, 149
Air flow, air conditioner 146
Air flow, automatic climate control 149
Air pressure, tires 189
Air vents, refer to Ventila‐ tion 150
Alarm system 44
Alarm, unintentional 45
All around the center con‐ sole 16
All around the roofliner 17 All around the steering
wheel 14
All-season tires, refer to Win‐ ter tires 198
All-wheel-drive 120
Alternating-code hand-held transmitter 153
Alternative oil types 208
Ambient light 96
Antifreeze, washer fluid 71
Antilock Brake System, ABS 119
Anti-slip control, refer to DSC 119
Approved axle load 236
Approved engine oils, see Suitable engine oil
types 208
Arrival time 88
Ash tray 156
Assistance when driving off 123
Assist system information, on Control Display 90
Attentiveness assistant 118
AUTO intensity 148
Automatic car wash 229
Automatic climate con‐ trol 145
Automatic climate control with enhanced features 147
Automatic Cruise Control with Stop & Go 124
Automatic Curb Monitor 58
Automatic deactivation, front- seat passenger airbags 99
Automatic headlight con‐ trol 93
Automatic locking 44
Automatic recirculated-air control 149 Automatic transmission, see
Steptronic transmission 72
AUTO program, automatic cli‐ mate control 148
AUTO program, climate con‐ trol 146
AUTO program, intensity 148
Auto Start/Stop function 66
Average fuel consumption 87
Average speed 87
Axle loads, weights 236
B Backrest curvature, refer to Lumbar support 52
Backrest, width 52
Band-aids, refer to First aid kit 224
Bar for tow-starting/ towing 227
Battery replacement, vehicle battery 221
Battery replacement, vehicle remote control 35
Battery, vehicle 220
Belts, safety belts 53
Beverage holder, cu‐ pholder 162
Blinds, sun protection 47
BMW Advanced Diesel 185
BMW Assist, see user's manual for Navigation, En‐
tertainment and Communi‐
cation
BMW Driver’s Guide App 6
BMW Homepage 6
BMW Internet page 6
BMW maintenance sys‐ tem 210
Bonus range, ECO PRO 174 Seite 242ReferenceEverything from A to Z242
Online Edition for Part no. 01 40 2 960 440 - II/15
Page 253 of 257
Safety belt reminder for driv‐er's seat and front passen‐
ger seat 54
Safety belts 53
Safety belts, care 232
Safety switch, windows 47
Safety systems, airbags 97
Saving fuel 172
Screen, refer to Control Dis‐ play 18
Screwdriver, see Onboard ve‐ hicle tool kit 212
Screw thread, see screw thread for tow fitting, screw
thread for tow fitting 228
Sealant 199
Seat and mirror memory 56
Seat belts, refer to Safety belts 53
Seat heating, front 53
Seat heating, rear 53
Seating position for chil‐ dren 60
Seats 50
Selection list in instrument cluster 86
Selector lever, Steptronic transmission 73
Sensors, care 232
Service and warranty 8
Service requirements, Condi‐ tion Based Service
CBS 210
Service requirements, dis‐ play 83
Services, ConnectedDrive
Servotronic 123
SET button, see Active Cruise Control, ACC 124
SET button, see Cruise con‐ trol 130
Settings, locking/unlock‐ ing 43
Settings on Control Dis‐ play 89 Settings, storing for seat, mir‐
ror 56
Shift paddles on the steering wheel 74
Side airbags 97
Side View 137
Signaling, horn 14
Signals when unlocking 44
Sitting safely 50
Size 236
Slide/tilt glass roof 47
Smallest turning radius 236
Snow chains 202
Socket 156
Socket, OBD Onboard Diag‐ nostics 211
Soot particulate filter 167
SOS button 223
Spare fuse 221
Specified engine oil types 208
Speed, average 87
Speed limit detection, on- board computer 88
Speed limiter, display 85
Speed Limit Information 85
Speed warning 88
Split screen 23
SPORT+ - program, Dynamic Driving Control 122
Sport displays, torque dis‐ play, performance dis‐
play 88
SPORT program, Dynamic Driving Control 122
Sport program, transmis‐ sion 74
Sport steering, variable 121
Stability control systems 119
Start/stop, automatic func‐ tion 66
Start/Stop button 64
Start function during malfunc‐ tion 35
Starting the engine 65 Status control display,
tires 101
Status information, iDrive 23
Status of Owner's Manual 7
Steering assistance 123
Steering wheel, adjusting 59
Steering wheel heating 59
Steptronic Sport transmis‐ sion, refer to Steptronic
transmission 72
Steptronic transmission 72
Stopping the engine 66
Storage compartment in the rear 162
Storage compartments 160
Storage compartments, loca‐ tions 160
Storage, tires 199
Storing the vehicle 232
Suitable engine oils 208
Summer tires, tread 197
Sun visor 156
Supplementary text mes‐ sage 81
Surround View 135
Switch for Dynamic Driv‐ ing 121
Switch-on times, parked-car ventilation 151
Switch, refer to Cockpit 14
Symbols 6
Symbols in the status field 23
T Tachometer 81
Tail lights 218
Technical changes, refer to Safety 7
Technical data 236
Telephone, see user's manual for Navigation, Entertain‐
ment and Communication
Temperature, automatic cli‐ mate control 146, 148 Seite 249Everything from A to ZReference249
Online Edition for Part no. 01 40 2 960 440 - II/15