2015 BMW 3 SERIES SEDAN steering wheel
[x] Cancel search: steering wheelPage 140 of 257

Switching on/off manuallyPress button.▷On: the LED lights up.▷Off: the LED goes out.
The PDC is shown on the Control Display.
Switching the view via iDrive With PDC activated or Top View switched on:
"Rear view camera"
The rearview camera image is displayed.
Display on the Control Display
Functional requirement
▷The rearview camera is switched on.▷The trunk lid is fully closed.
Activating assistance functions
More than one assistance function can be ac‐
tive at the same time.
▷Parking aid lines
"Parking aid lines"
Lanes and turning radius are indicated.
▷Obstacle marking
"Obstacle marking"
Spatially-shaped markings are displayed.
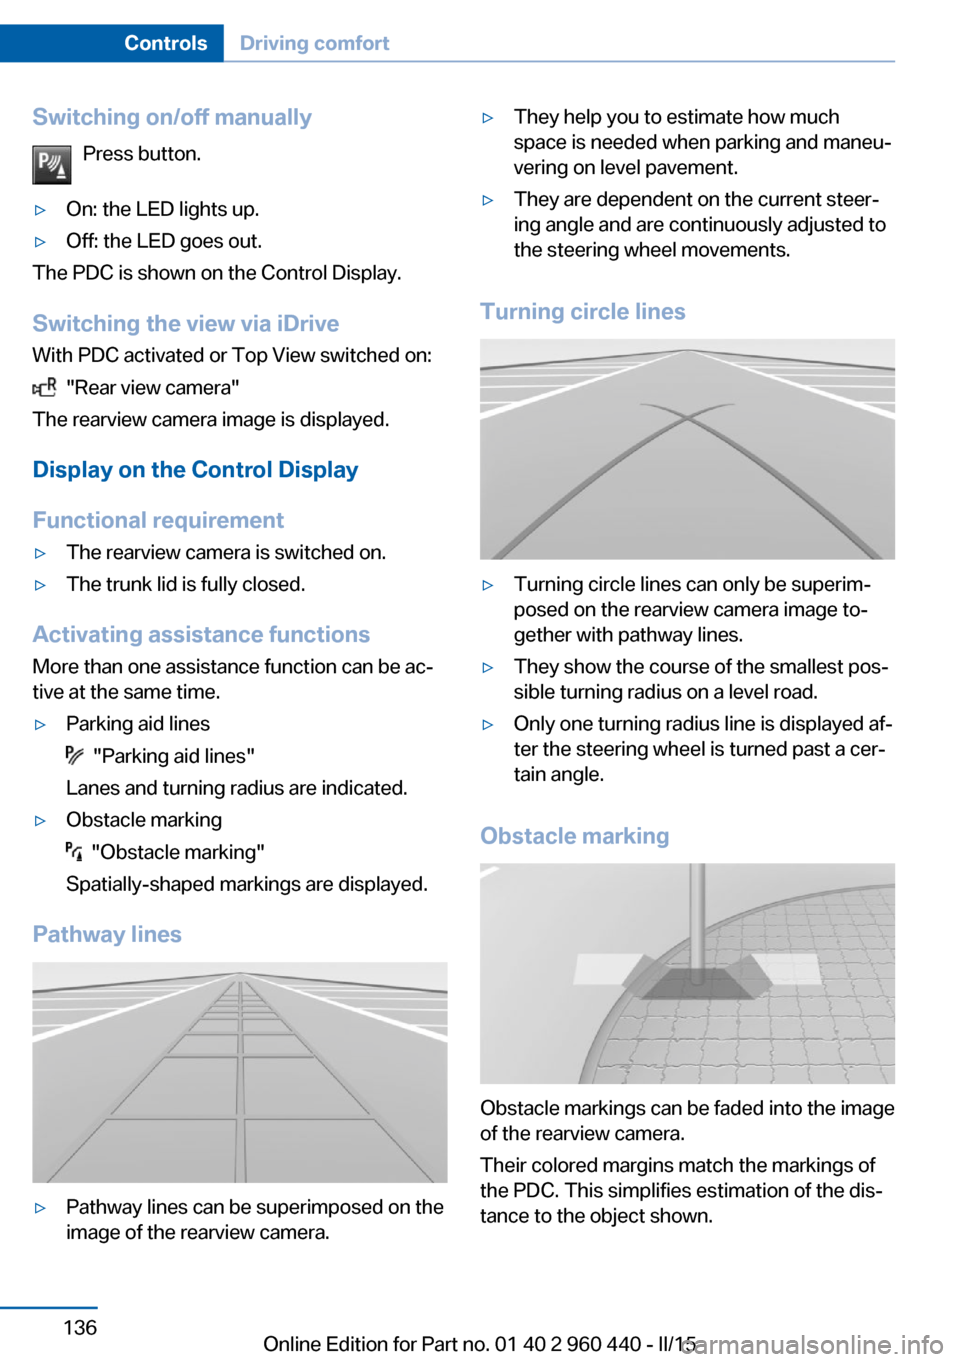
Pathway lines
▷Pathway lines can be superimposed on the
image of the rearview camera.▷They help you to estimate how much
space is needed when parking and maneu‐
vering on level pavement.▷They are dependent on the current steer‐
ing angle and are continuously adjusted to
the steering wheel movements.
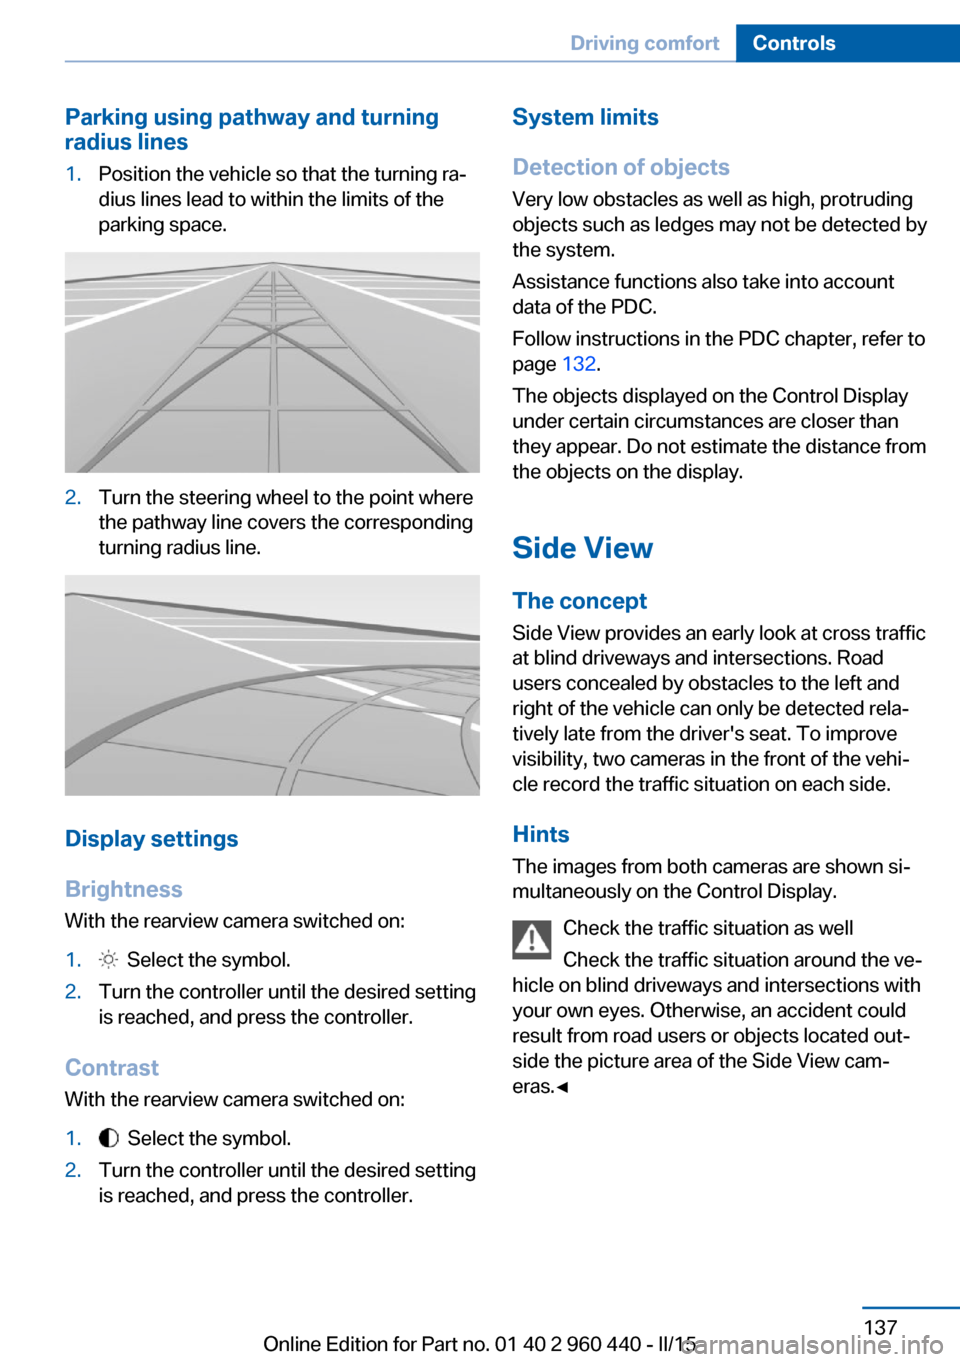
Turning circle lines
▷Turning circle lines can only be superim‐
posed on the rearview camera image to‐
gether with pathway lines.▷They show the course of the smallest pos‐
sible turning radius on a level road.▷Only one turning radius line is displayed af‐
ter the steering wheel is turned past a cer‐
tain angle.
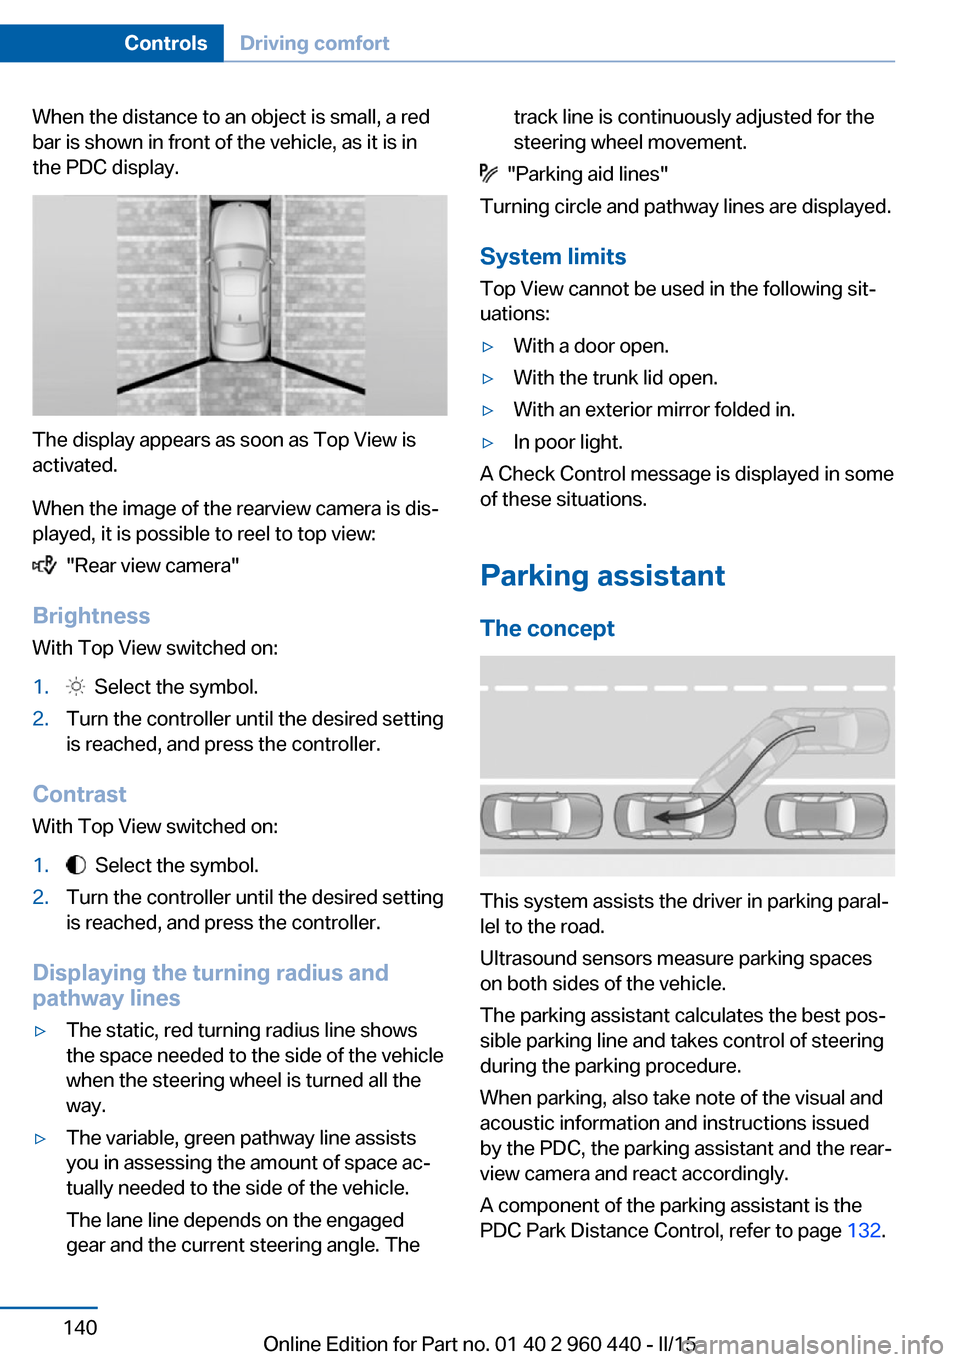
Obstacle marking
Obstacle markings can be faded into the image
of the rearview camera.
Their colored margins match the markings of
the PDC. This simplifies estimation of the dis‐
tance to the object shown.
Seite 136ControlsDriving comfort136
Online Edition for Part no. 01 40 2 960 440 - II/15
Page 141 of 257

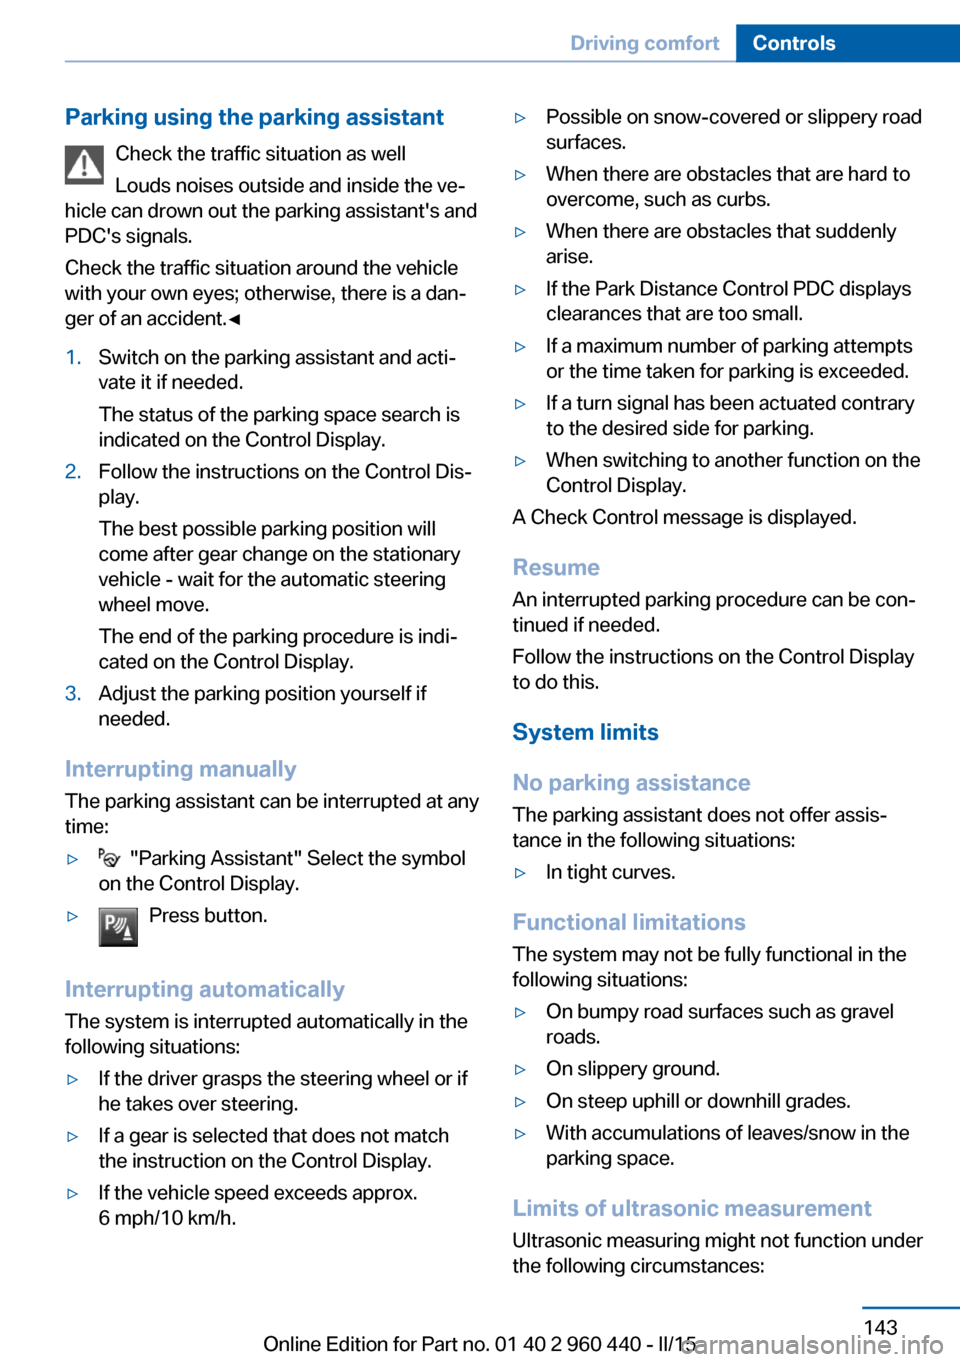
Parking using pathway and turning
radius lines1.Position the vehicle so that the turning ra‐
dius lines lead to within the limits of the
parking space.2.Turn the steering wheel to the point where
the pathway line covers the corresponding
turning radius line.
Display settings
Brightness
With the rearview camera switched on:
1. Select the symbol.2.Turn the controller until the desired setting
is reached, and press the controller.
Contrast
With the rearview camera switched on:
1. Select the symbol.2.Turn the controller until the desired setting
is reached, and press the controller.System limits
Detection of objects
Very low obstacles as well as high, protruding
objects such as ledges may not be detected by
the system.
Assistance functions also take into account
data of the PDC.
Follow instructions in the PDC chapter, refer to
page 132.
The objects displayed on the Control Display
under certain circumstances are closer than
they appear. Do not estimate the distance from
the objects on the display.
Side View The concept Side View provides an early look at cross traffic
at blind driveways and intersections. Road
users concealed by obstacles to the left and
right of the vehicle can only be detected rela‐
tively late from the driver's seat. To improve
visibility, two cameras in the front of the vehi‐
cle record the traffic situation on each side.
Hints
The images from both cameras are shown si‐
multaneously on the Control Display.
Check the traffic situation as well
Check the traffic situation around the ve‐
hicle on blind driveways and intersections with
your own eyes. Otherwise, an accident could
result from road users or objects located out‐
side the picture area of the Side View cam‐
eras.◀Seite 137Driving comfortControls137
Online Edition for Part no. 01 40 2 960 440 - II/15
Page 144 of 257

When the distance to an object is small, a red
bar is shown in front of the vehicle, as it is in
the PDC display.
The display appears as soon as Top View is
activated.
When the image of the rearview camera is dis‐
played, it is possible to reel to top view:
"Rear view camera"
Brightness
With Top View switched on:
1. Select the symbol.2.Turn the controller until the desired setting
is reached, and press the controller.
Contrast
With Top View switched on:
1. Select the symbol.2.Turn the controller until the desired setting
is reached, and press the controller.
Displaying the turning radius and
pathway lines
▷The static, red turning radius line shows
the space needed to the side of the vehicle
when the steering wheel is turned all the
way.▷The variable, green pathway line assists
you in assessing the amount of space ac‐
tually needed to the side of the vehicle.
The lane line depends on the engaged
gear and the current steering angle. Thetrack line is continuously adjusted for the
steering wheel movement.
"Parking aid lines"
Turning circle and pathway lines are displayed.
System limits
Top View cannot be used in the following sit‐
uations:
▷With a door open.▷With the trunk lid open.▷With an exterior mirror folded in.▷In poor light.
A Check Control message is displayed in some
of these situations.
Parking assistant The concept
This system assists the driver in parking paral‐
lel to the road.
Ultrasound sensors measure parking spaces
on both sides of the vehicle.
The parking assistant calculates the best pos‐
sible parking line and takes control of steering
during the parking procedure.
When parking, also take note of the visual and
acoustic information and instructions issued
by the PDC, the parking assistant and the rear‐
view camera and react accordingly.
A component of the parking assistant is the
PDC Park Distance Control, refer to page 132.
Seite 140ControlsDriving comfort140
Online Edition for Part no. 01 40 2 960 440 - II/15
Page 147 of 257

Parking using the parking assistantCheck the traffic situation as well
Louds noises outside and inside the ve‐
hicle can drown out the parking assistant's and
PDC's signals.
Check the traffic situation around the vehicle
with your own eyes; otherwise, there is a dan‐
ger of an accident.◀1.Switch on the parking assistant and acti‐
vate it if needed.
The status of the parking space search is
indicated on the Control Display.2.Follow the instructions on the Control Dis‐
play.
The best possible parking position will
come after gear change on the stationary
vehicle - wait for the automatic steering
wheel move.
The end of the parking procedure is indi‐
cated on the Control Display.3.Adjust the parking position yourself if
needed.
Interrupting manually
The parking assistant can be interrupted at any
time:
▷ "Parking Assistant" Select the symbol
on the Control Display.▷Press button.
Interrupting automatically
The system is interrupted automatically in the
following situations:
▷If the driver grasps the steering wheel or if
he takes over steering.▷If a gear is selected that does not match
the instruction on the Control Display.▷If the vehicle speed exceeds approx.
6 mph/10 km/h.▷Possible on snow-covered or slippery road
surfaces.▷When there are obstacles that are hard to
overcome, such as curbs.▷When there are obstacles that suddenly
arise.▷If the Park Distance Control PDC displays
clearances that are too small.▷If a maximum number of parking attempts
or the time taken for parking is exceeded.▷If a turn signal has been actuated contrary
to the desired side for parking.▷When switching to another function on the
Control Display.
A Check Control message is displayed.
Resume An interrupted parking procedure can be con‐
tinued if needed.
Follow the instructions on the Control Display
to do this.
System limits
No parking assistance
The parking assistant does not offer assis‐
tance in the following situations:
▷In tight curves.
Functional limitations
The system may not be fully functional in the
following situations:
▷On bumpy road surfaces such as gravel
roads.▷On slippery ground.▷On steep uphill or downhill grades.▷With accumulations of leaves/snow in the
parking space.
Limits of ultrasonic measurement
Ultrasonic measuring might not function under
the following circumstances:
Seite 143Driving comfortControls143
Online Edition for Part no. 01 40 2 960 440 - II/15
Page 203 of 257

Rotating wheels between axlesDifferent wear patterns can occur on the frontand rear axles depending on individual driving
conditions. The tires can be rotated between
the axles to achieve even wear. Your service
center will be glad to advise you. After rotating,
check the tire pressure and correct if needed.
Rotating the tires is not permissible on vehi‐
cles with different tire sizes or rim sizes on the
front and rear axles.
Storage
Store wheels and tires in a cool, dry place with
as little exposure to light as possible.
Always protect tires against all contact with oil,
grease and fuels.
Do not exceed the maximum tire inflation pres‐
sure indicated on the side wall of the tire.
Run-flat tires
Label
RSC label on the tire sidewall.
The wheels consist of tires that are self-sup‐
porting, to a limited degree, and possibly spe‐
cial rims.
The support of the sidewall allows the tire to
remain drivable to a restricted degree in the
event of a tire inflation pressure loss.
Follow the instructions for continued driving
with a flat tire.
Changing run-flat tires
For your own safety, only use run-flat tires. No
spare tire is available in the case of a flat tire.
Your service center will be glad to advise you.
Mobility System
The concept With the Mobility System, minor tire damagecan be sealed quickly to enable continued
travel. To accomplish this, sealant is pumped
into the tires, which seals the damage from the
inside.
The compressor can be used to check the tire
inflation pressure.
Hints▷Follow the instructions on using the Mobi‐
lity System found on the compressor and
sealant container.▷Use of the Mobility System may be ineffec‐
tive if the tire puncture measures approx.
1/8 in/4 mm or more.▷Contact the nearest service center if the
tire cannot be made drivable.▷If possible, do not remove foreign bodies
that have penetrated the tire.▷Pull the speed limit sticker off the sealant
container and apply it to the steering
wheel.▷The use of a sealant can damage the TPM
wheel electronics. In this case, have the
electronics checked at the next opportu‐
nity and have them replaced if needed.
Enclosed areas
Do not let the engine run in enclosed
areas, since breathing in exhaust fumes may
lead to loss of consciousness and death. The
exhaust gases contain carbon monoxide, an
odorless and colorless but highly toxic gas.◀
Seite 199Wheels and tiresMobility199
Online Edition for Part no. 01 40 2 960 440 - II/15
Page 230 of 257

Tow-starting and towingNote Tow-starting and towing
For tow-starting or towing, switch off the
Intelligent Safety systems; otherwise malfunc‐
tions of the individual braking systems might
lead to accidents.◀
Manual transmission Gearshift lever in neutral position.
Towing Follow the towing instructions
Follow all towing instructions; otherwise,
vehicle damage or accidents may occur.◀▷Make sure that the ignition is switched on;
otherwise, the low beams, tail lights, turn
signals, and wipers may be unavailable.▷Do not tow the vehicle with the rear axle
tilted, as the front wheels could turn.▷When the engine is stopped, there is no
power assist. Consequently, more force
needs to be applied when braking and
steering.▷Larger steering wheel movements are re‐
quired.▷The towing vehicle must not be lighter
than the vehicle being towed; otherwise,
it will not be possible to control the vehi‐
cle's response.Tow truck
With rear-wheel drive
Your vehicle should be transported with a tow
truck with a so-called lift bar or on a flat bed.
Do not lift the vehicle
Do not lift the vehicle by the tow fitting or
body and chassis parts; otherwise, damage
may result.◀
With xDrive
The vehicle should only be transported on a
loading platform.
Do not tow with only the front or rear axle
raised
Do not tow the BMW with just the front or rear
axle raised; otherwise, the wheels could lock
up and the transfer case could be damaged.◀
Do not lift the vehicle
Do not lift the vehicle by the tow fitting or
body and chassis parts; otherwise, damage
may result.◀
Seite 226MobilityBreakdown assistance226
Online Edition for Part no. 01 40 2 960 440 - II/15
Page 246 of 257

Everything from A to Z
IndexA ABS, Antilock Brake Sys‐ tem 119
ACC, Active Cruise Control with Stop & Go 124
Acceleration Assistant, refer to Launch Control 75
Accessories and parts 7
Activated-charcoal filter 150
Active Blind Spot Detec‐ tion 116
Active Cruise Control with Stop & Go, ACC 124
Adaptive brake lights, refer to Brake force display 118
Adaptive Light Control 93
Additives, oil 208
Adjustments, seats/head re‐ straints 50
After washing vehicle 230
Airbags 97
Airbags, indicator/warning light 98
Air circulation, refer to Recir‐ culated-air mode 146, 149
Air, dehumidifying, refer to Cooling function 146, 149
Air distribution, manual 146, 149
Air flow, air conditioner 146
Air flow, automatic climate control 149
Air pressure, tires 189
Air vents, refer to Ventila‐ tion 150
Alarm system 44
Alarm, unintentional 45
All around the center con‐ sole 16
All around the roofliner 17 All around the steering
wheel 14
All-season tires, refer to Win‐ ter tires 198
All-wheel-drive 120
Alternating-code hand-held transmitter 153
Alternative oil types 208
Ambient light 96
Antifreeze, washer fluid 71
Antilock Brake System, ABS 119
Anti-slip control, refer to DSC 119
Approved axle load 236
Approved engine oils, see Suitable engine oil
types 208
Arrival time 88
Ash tray 156
Assistance when driving off 123
Assist system information, on Control Display 90
Attentiveness assistant 118
AUTO intensity 148
Automatic car wash 229
Automatic climate con‐ trol 145
Automatic climate control with enhanced features 147
Automatic Cruise Control with Stop & Go 124
Automatic Curb Monitor 58
Automatic deactivation, front- seat passenger airbags 99
Automatic headlight con‐ trol 93
Automatic locking 44
Automatic recirculated-air control 149 Automatic transmission, see
Steptronic transmission 72
AUTO program, automatic cli‐ mate control 148
AUTO program, climate con‐ trol 146
AUTO program, intensity 148
Auto Start/Stop function 66
Average fuel consumption 87
Average speed 87
Axle loads, weights 236
B Backrest curvature, refer to Lumbar support 52
Backrest, width 52
Band-aids, refer to First aid kit 224
Bar for tow-starting/ towing 227
Battery replacement, vehicle battery 221
Battery replacement, vehicle remote control 35
Battery, vehicle 220
Belts, safety belts 53
Beverage holder, cu‐ pholder 162
Blinds, sun protection 47
BMW Advanced Diesel 185
BMW Assist, see user's manual for Navigation, En‐
tertainment and Communi‐
cation
BMW Driver’s Guide App 6
BMW Homepage 6
BMW Internet page 6
BMW maintenance sys‐ tem 210
Bonus range, ECO PRO 174 Seite 242ReferenceEverything from A to Z242
Online Edition for Part no. 01 40 2 960 440 - II/15
Page 251 of 257

Lock, door 39
Locking/unlocking via door lock 39
Locking/unlocking with re‐ mote control 37
Locking, automatic 44
Locking, settings 43
Locking via trunk lid 40
Lock, power window 47
Locks, doors, and win‐ dows 63
Low beams 92
Low beams, automatic, refer to High-beam Assistant 94
Lower back support 52
Low-Sulfur Diesel 185
Luggage rack, see Roof- mounted luggage rack 171
Lumbar support 52
M
Maintenance 210
Maintenance require‐ ments 210
Maintenance, service require‐ ments 83
Maintenance system, BMW 210
Make-up mirror 156
Malfunction displays, see Check Control 78
Manual air distribu‐ tion 146, 149
Manual air flow 146, 149
Manual mode, Steptronic transmission 74
Manual operation, door lock 39
Manual operation, exterior mirrors 58
Manual operation, fuel filler flap 182
Manual operation, Park Dis‐ tance Control PDC 133 Manual operation, rearview
camera 136
Manual operation, Side View 138
Manual operation, Top View 139
Manual transmission 72
Marking on approved tires 198
Marking, run-flat tires 199
Master key, refer to Remote control 34
Maximum cooling 148
Maximum speed, display 85
Maximum speed, winter tires 198
Measure, units of 90
Medical kit 224
Memory, seat, mirror 56
Menu, EfficientDynamics 176
Menu in instrument clus‐ ter 86
Menus, operating, iDrive 18
Menus, refer to iDrive operat‐ ing concept 20
Messages, see Check Con‐ trol 78
Microfilter 147, 150
Minimum tread, tires 197
Mirror 57
Mirror memory 56
Mobile communication devi‐ ces in the vehicle 167
Mobility System 199
Modifications, technical, refer to Safety 7
Moisture in headlight 213
Monitor, refer to Control Dis‐ play 18
Mounting of child restraint systems 60
Multifunction steering wheel, buttons 14 N
Navigation, see user's manual for Navigation, Entertain‐
ment and Communication
Neck restraints, front, refer to Head restraints 54
Neck restraints, rear, refer to Head restraints 55
Neutral cleaner, see wheel cleaner 231
New wheels and tires 197
Nylon rope for tow-starting/ towing 227
O OBD Onboard Diagnosis 211
OBD, see OBD Onboard Di‐ agnosis 211
Obstacle marking, rearview camera 136
Octane rating, refer to Rec‐ ommended fuel grade 184
Odometer 82
Office, see user's manual for Navigation, Entertainment
and Communication
Oil 206
Oil, adding 207
Oil additives 208
Oil change 208
Oil change interval, service requirements 83
Oil filler neck 207
Oil types, alternative 208
Oil types, approved 208
Old batteries, disposal 221
On-board computer 86
Onboard monitor, refer to Control Display 18
Onboard vehicle tool kit 212
Opening/closing via door lock 39
Opening and closing 34 Seite 247Everything from A to ZReference247
Online Edition for Part no. 01 40 2 960 440 - II/15