2015 AUDI TT ROADSTER brake light
[x] Cancel search: brake lightPage 22 of 244

20 Instruments and warning/indicator lights
If the Ill symbol comes on, add 1 quart (1 li
ter) of oil at the next opportunity
c:::> page 169.
'.!2" .... Engine oil sensor defective
If the. symbol illuminates, contact your au
thorized Audi dealer and have the oil sensor inspected.
Bil Fuel supply too low
When the D symbol illuminates, this means
there are about 1.9 gallons (7 liters) of fuel
left in the fuel tank. Time to refuel!
c:::> page 161.
If the symbol lights up, even when there is
ample fuel in the tank, and the text
Tank sys
tem malfunction! Please contact workshop
appears in the display, there is a fault in the
system. Contact a qualified workshop to have
the fault rectified.
co Windshield washer fluid level too
low
If the B symbol illuminates, add windshield
washer fluid to the washer system
c:::> page 179.
® Defective light bulb warning
If a defective bulb has been detected by the
system or a light bulb burns out, the
&:J sym
bol with a message appears in the display to
tell you which bulb is burnt out and where it is
located. For example:
Rear left turn signal
After 5 seconds, the message disappears . If
you want to recall the message into the dis
play, press the CH ECK button
c:::> page 10,
fig. 3(i) .
There are three reasons why the defective
bulb message would appear in the display:
- The light bulb has burnt out
r:> page 215.
-The fuse is "blown" r:> page 212, Replacing
fuses .
-The wire connection to the light bulb is de-
fective.
Have the bulb replaced or the connection re
paired by your authorized Audi Service depart
ment.
A WARNING
- Light bulbs are pressurized and could ex
plode while they are being changed caus
ing serious personal injury.
- Work with due care when handling the
high-voltage section of gas discharge
(xenon) lamps. Failing to do so could re
sult in death or serious injury!
BRAKE LIGHT!<®> Brake light defective
In case of a malfunction or component fail
ure, the symbol. (USA models)/Kf' ~» (Canada
models) can appear. The following electrical
components should be checked, repaired or
replaced, as necessary:
- Brake light bulbs
- All wiring connections
- Brake light switch
Contact your authorized Audi dealer for assis
tance if necessary.
(D Tips
The brake light switch is only inspected as
part of the functional check after the en
gine is started.
~CD Headlight range control defective
Applies to vehicles: wit h dynamic headlight range adjust·
ment
If the II illuminates, the dynamic headlight
range control is no longer working properly.
Have the system checked and repaired at your
authorized Audi dealer.
~O Adaptive light defective
Applies to vehicles: with Adapt ive Lig ht
m;J Adaptive light defective
Page 44 of 244
42 Convertible top
Opening the Convertible Top Manually
Applies to vehicles: with manua l convertible top
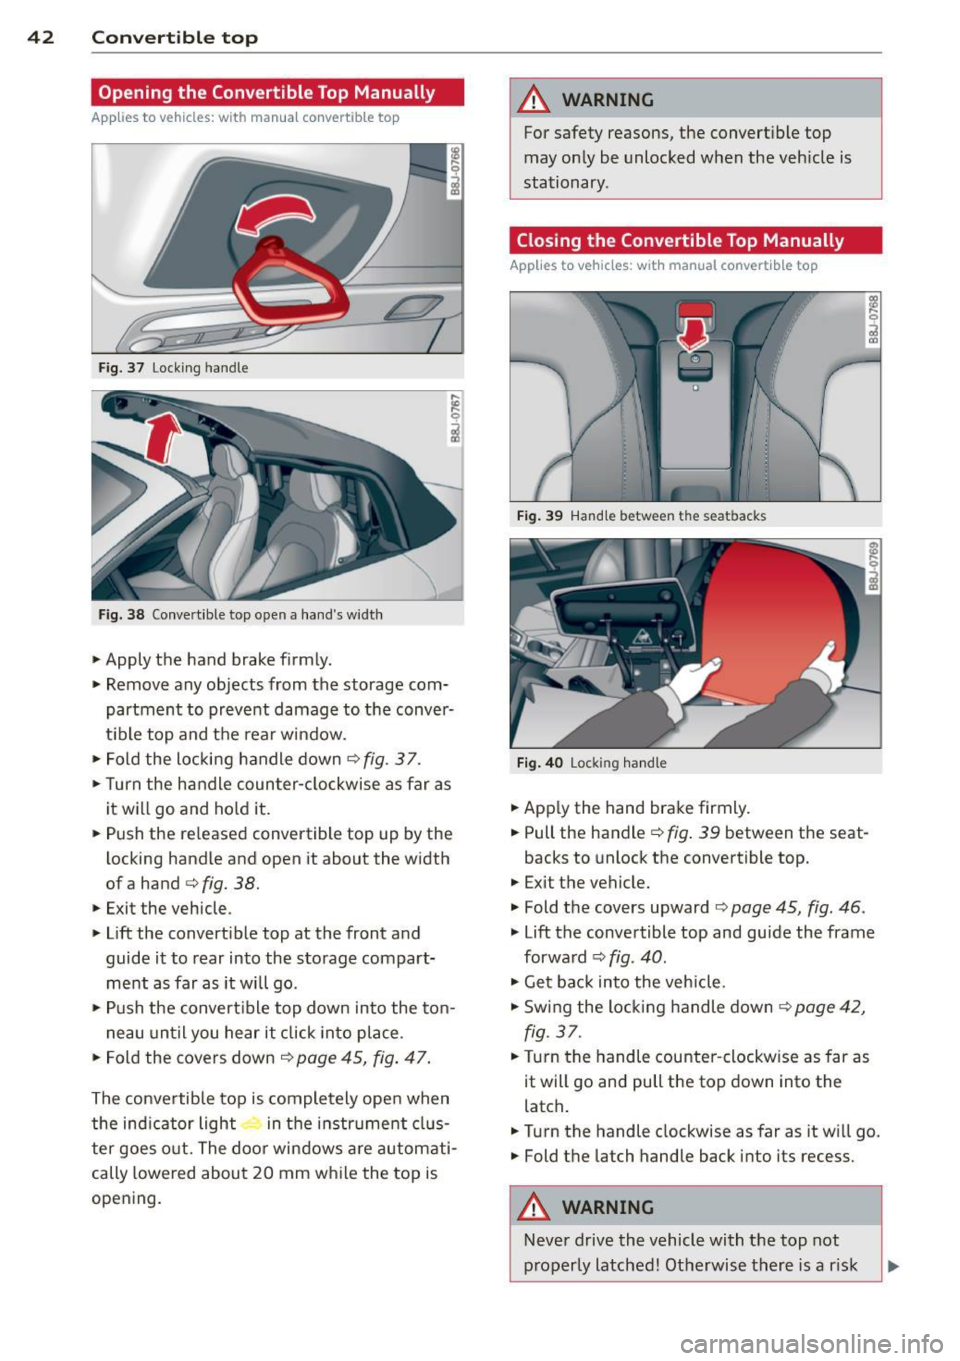
Fig. 37 Lock ing handle
Fig. 38 Convert ible top open a hand 's widt h
• Apply the hand brake f irmly.
• Remove any objects from the storage com
partment to prevent damage to the conver
t ib le top and the rear window.
• Fold the locking handle down
¢ fig . 3 7.
• Turn the handle coun ter-clockwise as far as
it w ill go and hold it.
• Push the released convertible top up by the
locking handle and open it about the width
ofa hand
¢ fig. 38.
• Exit the vehicle .
• Lift the convert ible top at the front and
guide it to rear into the storage compart
ment as far as it will go .
• Push the convert ible top down into the ton -
n eau until you hear it click into place .
• Fo ld the covers down ¢
page 45, fig. 47.
The conve rtib le top is comple tely ope n when
the ind icator light in t he i nstr ument clus
ter goes o ut. The door windows a re automati
cally lowered about 20 mm w hile the top is
opening .
A WARNING
-~
For safety reasons, the convert ible top
may on ly be unlocked when the veh icle is
stationary .
Closing the Convertible Top Manually
Applies to vehicles: with manual convertib le top
F ig . 39 Hand le betwee n the sea tbacks
Fig. 4 0 Locking hand le
• App ly the hand brake firmly.
• Pull the handle¢
fig. 39 between the seat-
backs to unlock the convertible top.
• Exit the vehicle.
• Fold the covers upward ¢
page 45, fig. 46 .
• Lift the convertible top and guide the frame
forwa rd ¢
fig. 40.
• Get bac k into the vehicle.
• Swing the locking handle down <=?
page 42,
fig. 37.
• Turn the handle counter -clockw ise as far as
it will go and pull the top down into the
latch .
• Turn the handle clockwise as far as it wi ll go.
• Fold the la tch handle back into its recess.
A WARNING
-
-
Neve r drive the vehicle with the top not
p roperly latched! Otherwise there is a r isk
Page 75 of 244
you leave your vehicle. This makes a vehicle
theft even more difficult ¢ .&. .
Ign ition key safety lock
Afte r switch ing off the ignition, the ig nit ion
key ca n only be removed from the ig nition
l ock when the se lector lever is in the "P"
(Park) position . After you have removed the
key, the selector lever is locked and cannot be
moved.
Ign ition on (D
If it is diffic ult to turn the key afte r you have
inse rted it into the ignition lock, turn the
steering whee l back and forth. This will take
the load
off the steering lock mechanism and
you will be able to turn the key freely and start the engine.
Starting th e engine @
In this position the engine starts . While the
engine is starting, the power supply to the headlights and other e lectrica l consumers is
temporari ly interrupted to conserve battery
power. After the engine has started, release
the key and it will return to posit io n
(D .
Before the starter can be operated again the
key must be turned back to position @. The
non-repeat lock prevents you from damaging
the starter when the engine is runn ing .
A WARNING
-Never remove the key from the ign ition
lock whi le the vehicle is mov ing . The
steering wheel will lock causing loss of
co ntrol.
- If you have to leave your veh icle - even
for just a m inute - a lways remove t he ig
ni tion key and take it with you. This is es
pecially important if you are going to
leave ch ildren behind in the vehicle. The
children co uld start the engine or use
other vehicle controls. Unsupervised use
of vehicle controls (for example, power
windows) can cause serious personal in
jur ies .
-
On th e ro ad 73
(D Tips
If the vehicle battery has been disconnect
ed and then reconnected, then yo u must
l eave the key in posit ion
(D for about 5
seconds before you can start the engine.
Starting and stopping
the engine
' Starting the engine
The engine can only be started with an origi
nal Audi key .
.,. Se t the par king brake.
.,. Move the selector lever in P or
N q .&_ .
.,. Turn the ignition key to position @
~ page 72, fig. Bl -do not depress the gas
peda l when starting the engine!
.,. Let go of the key as soon as the engine
starts .
A cold engine may at first be loud after it has
been started. This is due to the hydraulic
valves bu ild ing up the oil pressure. Th is nor
mal and no need for concern .
If the engine does not start immediately, stop
trying after 10 seconds and then try to restart
the engine about 30 seconds later.
A WARNING
-Never start or let the eng ine run in a con-
fined o r enclosed area . Exhaust fumes
from the engine co ntain carbon monoxide,
a colorless and odo rless gas. Ca rbon mon
oxide can be f atal if inhaled.
- Never leave the engine id ling unattend
ed. An una ttended veh icle w ith a runn ing
engine poses a danger o f personal injury
or theft .
(D Note
-Avo id high engine speeds, fast accelera
tion or heavy engine loads while the en
gine is still cold. This could damage the
engine.
- The e ngine cannot be started by pushing
or towing the vehicle . .,..
Page 76 of 244
7 4 On the road
@ For the sake of the environment
To avoid unnecessary engine wear and to reduce exhaust emissions, do not let your
veh icle stand and warm up. Be ready to
drive off immediately after start ing your
veh icle. Maintain moderate speed until the
engine is comp letely warm. Remember,
the engine performs best at operating
temperature.
Stopping the engine
• Turn the ign ition key to position@
~ page 72, fig. 81.
&_ WARNING
-Never turn off the engine before the ve
hicle has come to a complete stop. The
full function of the brake booster and the
power steering is not guaranteed. You
must use more force to turn or brake if
necessary. Because you cannot steer and
brake as you usually would, this could
lead to crashes and serious injuries.
- The radiator fan can continue to run for
up to 10 minutes even after you have
turned off the engine and removed the
ignition key . The radiator fan can also
turn on again if the engine coolant heats up because of intense sunlight or heat
build-up in the engine compartment.
(D Note
Do not stop the engine immediate ly after
hard or extended driving. Keep the engine
running for approximately two minutes to
prevent excessive heat build-up.
Parking brake
Parking brake
When the parking brake is set, it prevents the
vehicle from rolling away unintentionally.
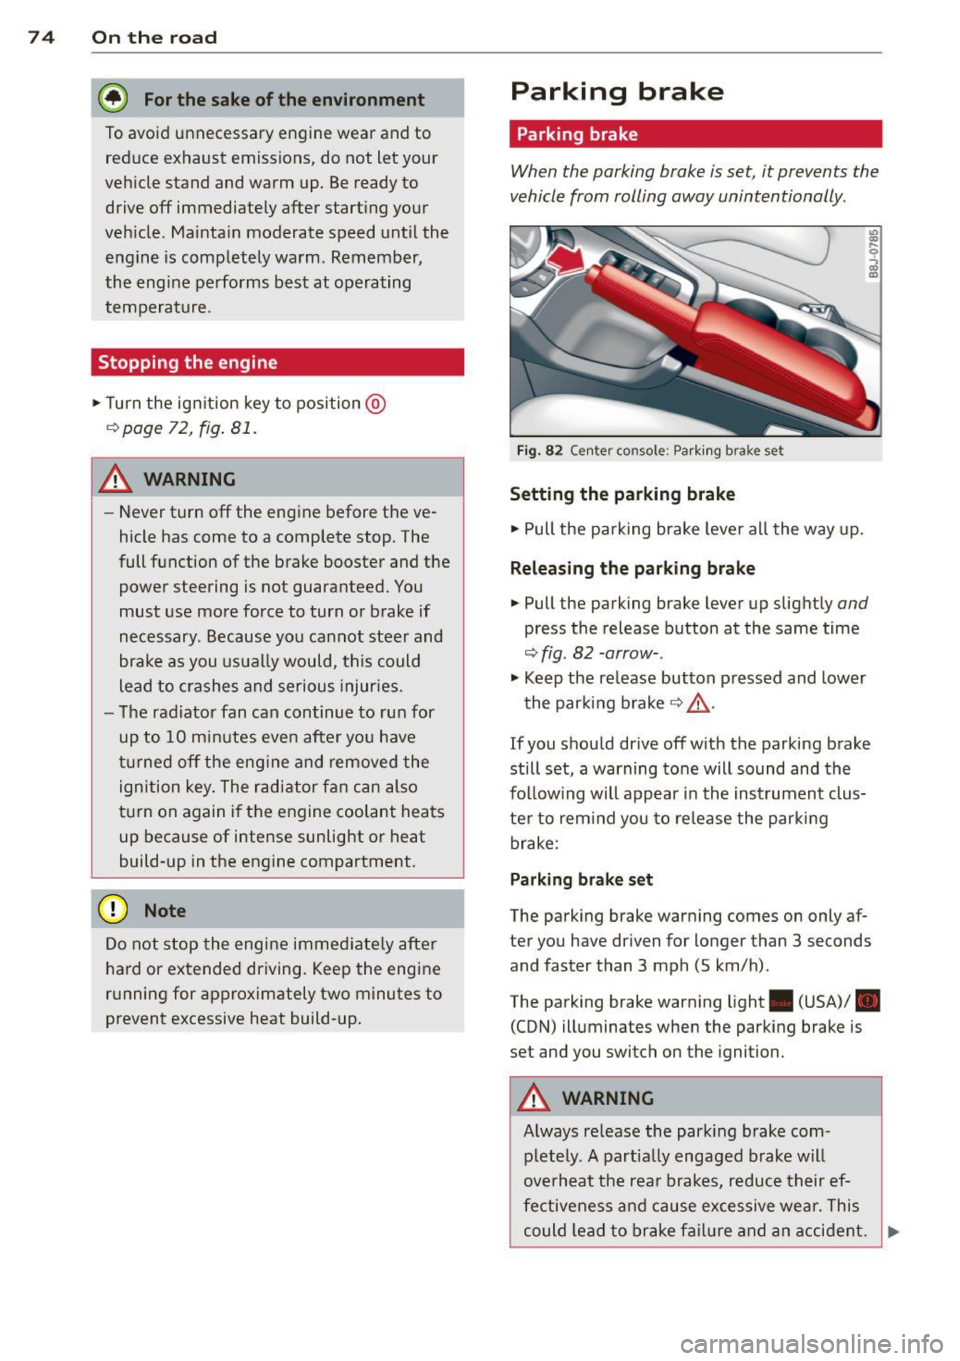
Fi g. 82 Center console: Park ing brake set
Setting the parking brake
• Pull the pa rking brake lever all the way up.
Releasing the parking brake
• Pull the parking brake lever up slightly and
press the release button at the same time
~fig. 82 -arrow-.
• Keep the release button pressed and lower
the parking brake~.&,.
If you should drive off with the parking brake
still set, a warning tone will sound and the
fol low ing will appear in the instrument clus
ter to remind you to release the parking
brake:
Parking brake set
The parking brake warning comes on only af
ter you have driven for longer than 3 seconds
and faster than 3 mph (5 km/h).
The parking brake warning light . (USA)/ .
(CON) illuminates when the parking brake is
set and you switch on the ignition.
&_ WARNING
Always release the park ing brake com-
pletely. A partially engaged brake will
overheat the rear brakes, reduce their ef
fectiveness and cause excessive wear. This
could lead to brake failure and an accident. .,..
Page 83 of 244
Transmission S tronic transmission
Introduction
Your vehicle is equipped with a S tronic trans miss ion, also called a double-clutch system/
transmission.
Power is transferred between the engine and
the transmission by means of two i ndepend
ent clutches. They replace the to rque convert
e r of conventional automat ic transm iss ions
and a llow the vehicle to acce lerate without a
noticeable break in the power flow .
W ith the aid
of tiptr oni c, the gea rs can op
tionally be sh ifted
manually¢ page 84.
Selector lever positions
All the selector lever positions are explained
in this section.
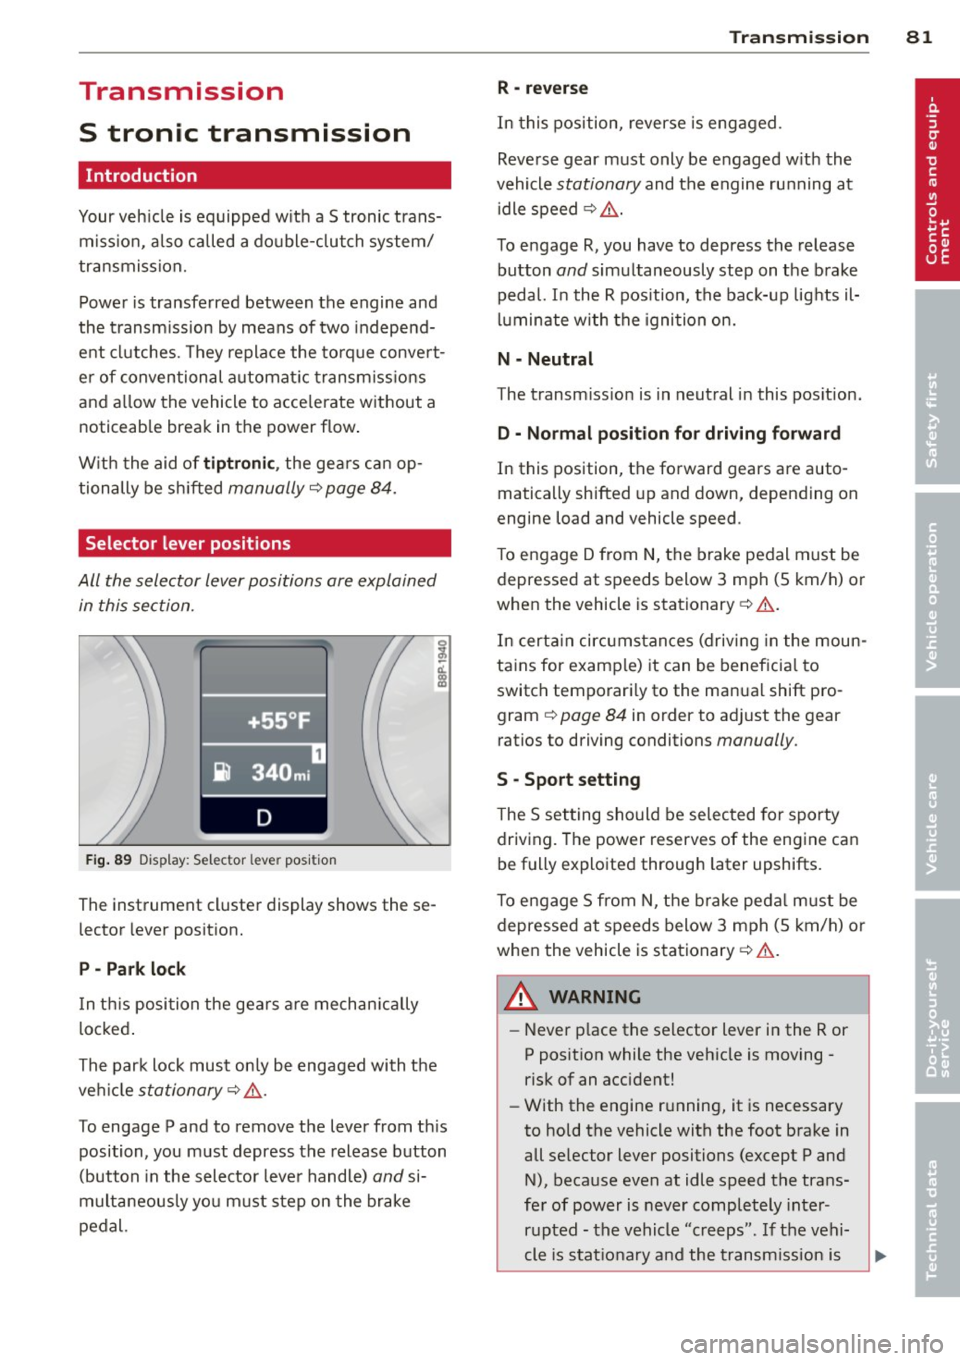
F ig . 89 Display: Selector lever position
The instrument cluster display shows these
l ector lever position.
P -Park loc k
In th is position the gea rs are mechan ically
l ocked .
The park lock must on ly be engaged with the
ve hicle
stationary¢ /1. .
To engage P and to remove the lever from th is
position, you must depress the release button
(button in the selector lever handle)
and si
multaneously you must step on the brake
pedal.
Tran sm iss ion 8 1
R -re ver se
In this position, reverse is engaged.
Reverse gear must only be engaged w ith the
vehicle
stationary and the engine ru nning at
idle speed ¢
/1..
To engage R, you have to depress the release
button
and simultaneously step on the brake
pedal. I n the R pos ition, the bac k-up lights il
luminate w ith the ignition on.
N -Neutral
The transm iss ion is in neutral in this pos ition.
D -Normal po sition fo r dri ving fo rward
In this position, the forward gears are auto
matically shifted up and down, depending on
engine load and vehicle speed.
T o engage D from
N, the brake pedal must be
depressed at speeds below 3 mph (5 km/h) or
when the vehicle is stationary¢&. .
In certa in circ umstances (driving in the moun
tains for examp le) it can be beneficia l to
switch temporari ly to the man ual shift pro
gram ¢
page 84 in order to adjust the gear
ratios to driving conditions
manually .
S -Sport setting
The S set ting should be se lected for sporty
driving. The power reserves of the engine can
be fully exploited through later upshifts.
T o e ngage 5 from N, the b rake peda l must be
depressed at speeds below 3 mph (5 km/h) or
when the vehicle is stationary¢&. .
A WARNING
-Never p lace the selector lever i n the R or
P posit ion while the veh icle is moving -
risk of an accident!
- With the engine r unning, it is necessary
to hold the vehicle with the foot brake in
all se lector lever positions (except P and
N), because even at idle speed the trans
fe r of power is never completely inter
r u pted -the vehicle "creeps". If t he vehi
cle is stat io nary and the transm ission is
Page 84 of 244
82 Transmi ssion
engag ed, the engine shou ld neve r be
spe eded up unintentionally (e.g. manual
ly from under the hood). Otherwise the
vehicle will immediately start to move -
sometimes even if the parking brake is
firmly applied -risk of an accident!
- Before you or other persons open the
hood and work on a running eng ine, the
selector lever must be move d to P and
t h e parking bra ke applied fi rm ly -ris k of
an a ccident! Fo ll ow the warning stickers .
a) Tips
If you have inadvertently s hifted into N
while the veh icle is moving, you should r e
move your foo t from the accelerato r and
wait until the eng ine speed h as droppe d to
id le before shifting back to Dor S.
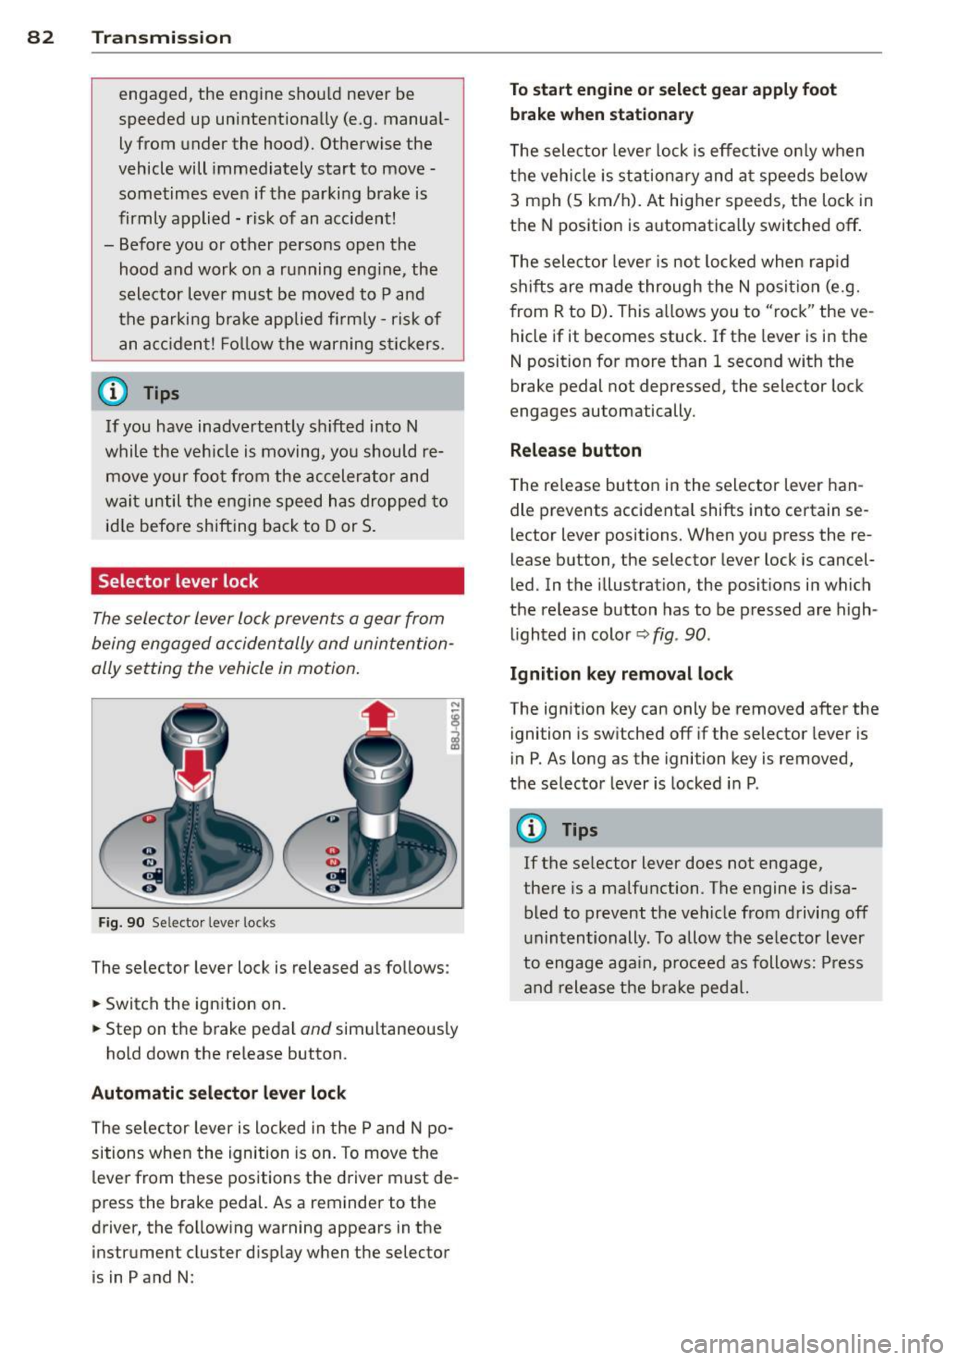
Selector lever lock
The selec tor Lever Lo ck prevents a gear from
being engaged occidentally and unintention
ally setting the vehicle in motion .
Fig. 90 Selecto r lever lo cks
The selector lever lock is released as follows:
.. Switch the ign ition on .
.. Step on the brake pedal
and simultaneous ly
hold down the release button .
Automatic selector lever lock
The selector lever is locked in the P and N po
sitions when the ignition is on. To move the
leve r from t hese positions the d river m ust de
press the brake pedal. As a reminder to the
driver, the fo llowing warning appears in the
inst rument cluster d isp lay when the selector
is in P and N :
To start engine or select gear apply foot
brake when stationar y
The selec tor leve r lock is effec tive on ly w hen
t h e veh icle is stationary and a t speeds below
3 m ph (5 km/h). At higher speeds, the lock in
t h e N position is automatica lly switched off .
T he selec tor leve r is not locked whe n rap id
shifts are made through the N posi tion (e.g.
from R to D). This a llows you to "rock" the ve
hicle if it becomes stuck. If the lever is in the
N position for more than 1 second with the
brake pedal not depre ssed, the selector lock
engages au tomatically.
Release button
T he re lease bu tton in the selector lever han
dle prevents accidenta l shifts into certain se
lector leve r positions. When you press the re
lease button, the selector lever lock is cancel
led. In the illustration, the posit ions i n which
the re lease button has to be p res sed are high
lighted in color ~
fig. 90 .
Ignition key remo val lock
The ign it ion key can only be removed after the
ignition is sw itched off if the selector lever is
in P . As long as the igni tion key is removed ,
the selector lever is locked in P.
(D Tips
If the se lector lever does not engage,
the re is a malfunction. The engine is disa
bled to prevent t he veh icle from drivi ng off
unintentionally . To allow the selector lever
to engage aga in, p roceed as follows: Press
an d release the bra ke peda l.
Page 87 of 244
If you have selected a lower gear than the cur
rent one, the transmission will only shift down
when the engine cannot be overspeeded .
If kick-down is actuated, the transmission
shifts into a lower gear independent ly of
speed and engine rpm .
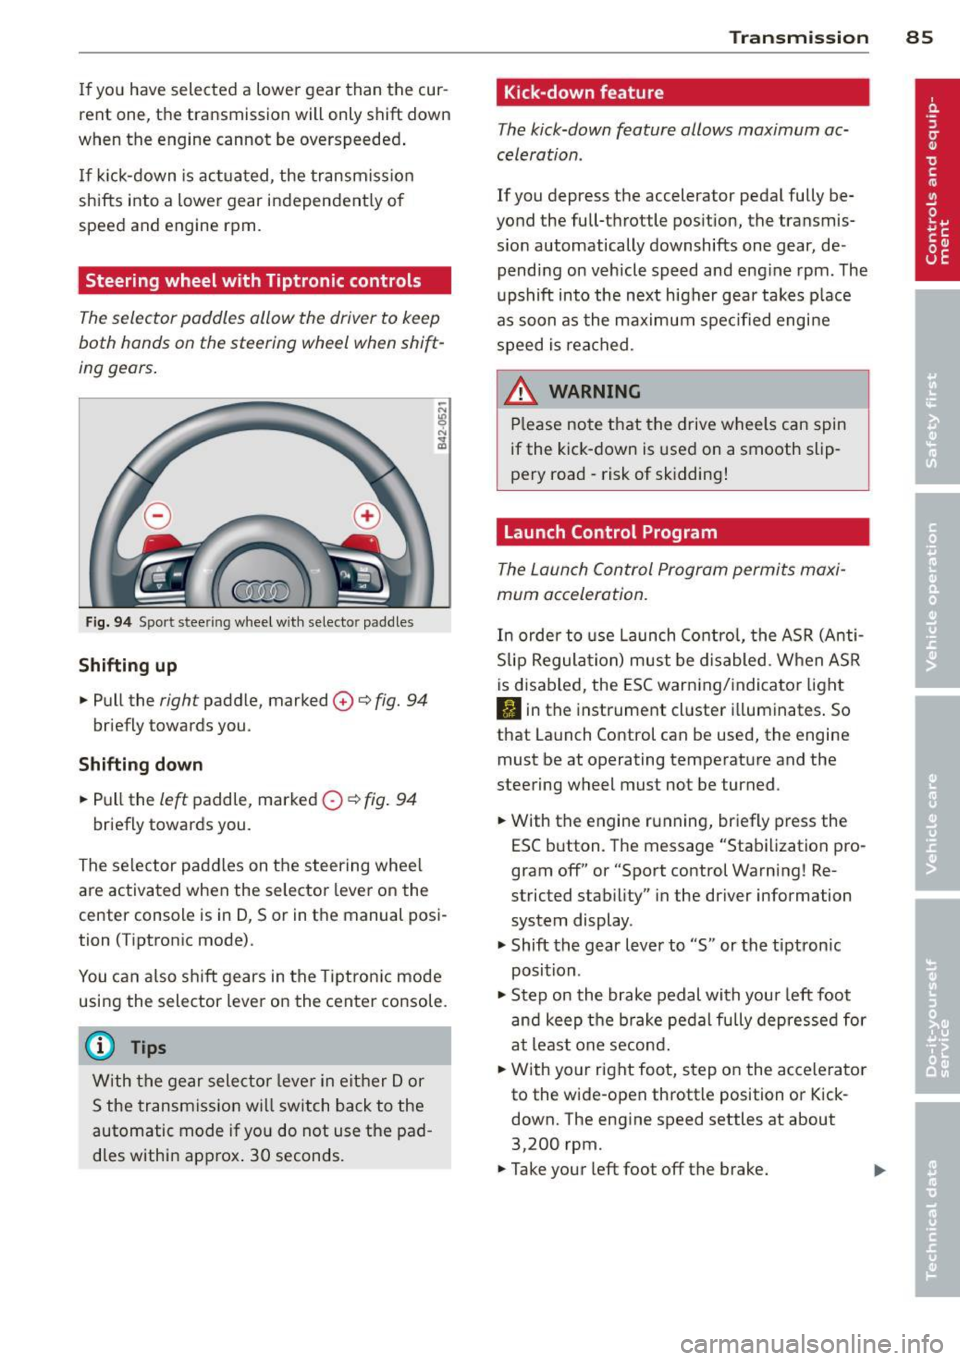
Steering wheel with Tiptronic controls
The selector paddles allow the driver to keep
both hands on the steering wheel when shift
ing gears.
Fig. 94 Sport stee ring wheel with selecto r paddles
Shifting up
.,. Pull the right paddle, marked 0 ¢ fig. 94
briefly towards you .
Shifting down
.. Pull the left paddle, marked 0 ¢ fig. 94
briefly towards you.
The selector paddles on the steering wheel
are activated when the selector lever on the
center console is in D, Sor in the manual posi
tion (Tiptronic mode).
You can also shift gears in the Tiptronic mode
using the selector lever on the center console.
@ Tips
With the gear selector lever in either Dor
S the transmission will switch back to the
automatic mode if you do not use the pad
dles within approx . 30 seconds.
Transmission 85
Kick -down feature
The kick-down feature allows maximum ac
celeration .
If you depress the accelerator pedal fully be
yond the full-throttle position, the transmis
sion automatically downshifts one gear, de
pending on vehicle speed and engine rpm. The
upshift into the next higher gear takes place
as soon as the maximum specified engine
speed is reached.
_&. WARNING
Please note that the drive wheels can spin
if the kick-down is used on a smooth slip
pery road -risk of sk idding!
Launch Control Program
The Launch Control Program permits maxi
mum acceleration.
In order to use Launch Control, the ASR (Anti
Slip Regulation) must be disabled. When ASR
is disabled, the ESC warning/indicator light
I) in the instrument cluster illuminates. So
that Launch Control can be used, the engine must be at operating temperature and the
steering wheel must not be turned .
.. With the engine running, briefly press the
ESC button . The message "Stabilization pro
gram off" or "Sport control Warning! Re
stricted stability" in the driver information
system display.
.. Shift the gear lever to "S" or the tiptron ic
position .
.. Step on the brake pedal with your left foot
and keep the brake pedal fully depressed for
at least one second .
.. With your right foot, step on the accelerator
to the wide-open throttle position or Kick
down. The engine speed settles at about
3,200 rpm.
.. Take your left foot off the brake.
Page 88 of 244
86 Transmis sion
& WARNING ,-
- Always adapt your driving to the traffic
flow.
- Only use Launch Control when road and
traffic conditions allow it and other driv
ers will not be endangered or annoyed by
your driving and the acceleration of the
vehicle .
- Make sure that ESC remains enabled.
With the ESC disabled, the vehicle could
brake away, particularly on a slick and
slippery road - risk of skidding!
- Once acce lerat ion is finished, switch ASR
on again by briefly pushing the ESC but
ton.
(j) Tips
- The transmission temperature may in
crease significantly after using the Launch Control Program. If that hap
pens, the program may not be available
for a few minutes.
It will be available
again after a cool-down period.
- When accelerating using the Launch
Control program, all vehicle parts are
subject to heavy loads . This can result in
increased wear.
Back-up program
In the event of a system malfunction, there is
a back-up program.
In the event of system malfunction, the auto
matic transmission switches to the fail-safe
mode. Al l of the selector lever position dis
plays for the automatic transmission are high
lighted with a light background in the instru
ment cluster display . In some cases you can
not use reverse gear any more.
If the transmission switches to fail-safe mode, you should take the vehicle to an au
thorized Audi dealership as soon as possible
to have the condition corrected .
Clutch is overheating
• Clutch is overheating! Please stop vehi
cle!
If the symbols are illum inated, the clutch is
overheating and could be damaged if you con
t inu e to drive. Stop the vehicle and allow the
transmission to cool with the se lector lever in
the P position while the engine runs at idle. If
the warning does not turn off, do not continue driving. See your authorized Audi dealer or
qualified repair facility for assistance. Other
wise serious transmission damage could re
sult . Once the indicator light has turned off,
drive to your authorized Audi dealer or quali
fied repa ir facility immed iately to have the
malfunction corrected .
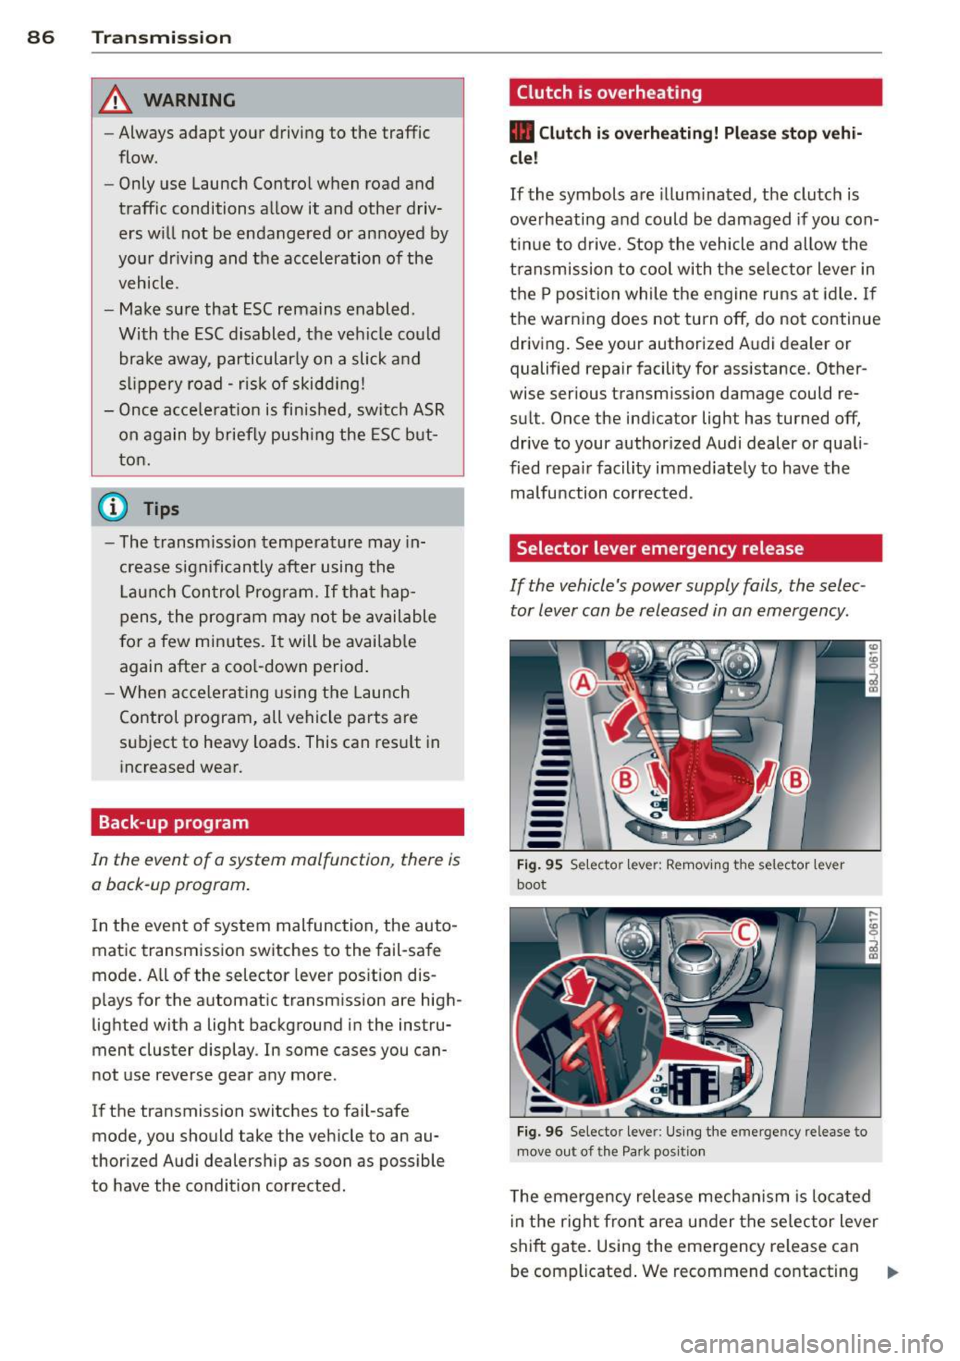
Selector lever emergency release
If the vehicle's power supply fails, the selec
tor lever can be released in an emergency.
--
-
-
-
-
---Fig. 95 Selecto r lev er: Remov ing the selector le ver
boot
Fig. 96 Selecto r lever : Using the emerge ncy release to
move out of the Park positio n
The emergency release mechanism is located
i n the right front area under the selector lever
shift gate. Using the emergency release can
be complicated. We recommend contacting ..,_