2015 AUDI A3 CABRIOLET parking brake
[x] Cancel search: parking brakePage 263 of 302

....,
N
r--. > co
rl I.O
"' rl
"' rl
What do I do now? Luggage compartment
lid emergency release
In case of an emergency, the rear lid can be
opened from the inside using the trunk es
cape handle .
Fig. 178 Rear lid: emergency release lock cylinder
.,. Insert the key into the lock cylinder near the
hand le .
.,. Turn the key counterclockwise .
General information
.,. Park the vehicle as far as possib le from mov
ing traff ic in the event of a flat tire. In the
event of a flat tire, park the vehicle on a lev
el surface. It you are on a steep incline, be
especially careful.
.,. Set the parking brake .
.,. Switch the emergency flashers on .
.,. Put on a reflective vest, if avai lable .
.,. Set up the warn ing t riang le, if available .
.,. Have the passengers exit the vehicle. They
shou ld move to a safe place, for example
behind a guard rail.
.&_ WARNING
Pay attention to the steps above . They are
for your protection and the for the safety
of other drivers.
.&_ WARNING
Improper use of the vehicle jack can cause
ser ious personal inju ries .
- Never use the screw driver hex head to
tighten wheel bolts, since the bolts can-
What do I d o now ? 261
not attain the necessary tightening tor
que if you use the hex head, potentially
causing an accident.
- The factory-supplied jack is intended on
ly for your vehicle model. Under no c ir
cumstances should it be used to lift
heavy veh icles o r other loads; you risk i n
juring yourself .
- Never start the engine when the vehicle
is raised, wh ich could cause an acc ident.
- Support the vehicle securely with appro
priate stands if work is to be performed
underneath the vehicle; otherwise , there
is a pote ntia l risk for injury .
- Never use the jack supplied with your Aud i on another vehicle , part icularly on a
heav ier one. The jack is only su itable for
use on the veh icle it came with .
a) Tips
- Some of the onboard items listed above
are provided on certai n models only or
are opt ional ext ras.
- Before stor ing the jack*, ma ke sure it is
wound back down as far as it w ill go.
Equipment
Vehicle tool kit
Applies to vehicles: with vehicle tool kit
Fig. 179 Luggag e compar tment: cargo floor cover
folde d upward
The vehicle tool kit is located in the luggage
compartment under the cargo floor cover
¢fig . 179 .
Hook the plast ic hook CD into the luggage
compartment seal.
Page 265 of 302

the tire chain before mounting the wheel
and tire is recommended.
- Loose items in the passenger compart
ment can cause serious personal injury
during hard braking or in an accident.
Never store the inf latab le spare tire or
jack and tools in the passenger compart
ment.
- Normal summer or winter tires must not
be mounted on the compact spare wheel
rim.
Removing the subwoofer
A pp lies to vehicles: with s ubwoofer
The subwoofer must be removed before the
spare wheel* can be removed.
Fig. 182 Spare wheel well: subwoofer
Removing the subwoofer
• Lift the cargo floor c:, page 262, fig. 180.
• Pull the latch (D c:> fig. 182 toward the ca
ble.
• Press the locking tab @down .
• Remove the connector @ and set the re-
moved cable aside.
• Remove the bolt@.
• Carefully remove the subwoofer.
Installing the subwoofer
• Carefully place the subwoofer n the rim
well. The word "FRONT" on the subwoofer
must face forward .
• Insert the connector that was removed .
• Secure the subwoofer with the bolt.
~ • Fold the cargo floor cover back into place.
r--. > co
rl I.O
"' rl
"' rl
What do I do now? 263
Changing a wheel
Before changing a wheel
Observe the following precautions for your
own and your passenger's safety when chang
ing a wheel.
• After you experience a tire failure, pull the
car well away from moving traffic and try to
reach
level ground before you stop c:> _&..
• All passengers should leave the car and
move to a safe location (for instance, behind
the guardrail)
c:> _&..
• Engage the parking brake to prevent your
vehicle from rolling unintentionally
c:> _&. .
• Move selector lever to position P c:> ,&..
• If you are towing a trailer, unhitch the trailer
from your vehicle.
• Take the
jack c:, page 261 and the spare tire
r:> page 262 out of the luggage compart
ment .
A WARNING
You or your passengers could be injured
while changing a wheel if you do not fol
low these safety precautions:
-If you have a flat tire, move a safe dis
tance off the road. Turn off the engine,
turn the eme rgency flashers on and use
other warning devices to alert other mo
torists.
- Make sure that passengers wait in a safe
place away from the vehicle and well
away from the road and traffic.
- To help prevent the vehicle from moving
suddenly and possibly slipping off the
jack, always fully set the parking brake
and block the wheel diagonally opposite
the wheel being changed. When one
front wheel is lifted off the ground, plac ing the Automatic Transmission in P
(Park) will
not prevent the vehicle from
mov ing .
- Before you change a wheel, be sure the
ground is level and firm. If necessary,
use a sturdy board under the jack.
-
Page 272 of 302

2 70 Fuses and bulbs
Interior fuse assignment
No. Equipment Ampere
Fl 3 Adaptive dampers contro
l
20
module
Fl4 Climate
control system
30
blower
Fl S E
lectronic steering column
10
lock
Fl6 MM I area 7.5
Fl7 Instrument cluster 5
Fl8 Rearview camera
7.5
F l9 Convince key
system control
7.5
module, tank system
F20 Tank system
7.5
F23 E
xterior lighti ng, heated
40
washe r fl ui d nozzles
Panorama sunroof/ power
F24 top control module, power 20/30
Fig. 192 Vehicle inter ior : fuse assignment top latch (Cabriolet)
No. Equipment Ampere
F25 Door/dr
iver's side doors (for
30
example power windows)
Fl Engine components 30 F26 Seat heat
ing 30
F2 Seat adjustment 10 F27
Sound-amplif
ier
30
F3 Hydraulic pump
cover (Cab-
40
riolet) F28
Power top control module,
5
elect ro ni cs (Cabr io let)
F4 M
M co ntrols, M MI-compo-
7.5
nents F29
Inte
rior lights
7.5
F3 1 E xterior lighting
40
F5 Gateway
5
F32 Driver ass istance systems 7.5
F 6 Anti-theft a
larm system
s F33 Airbag 5
Climate/heating control, se-
Button illumination, coils
lector lever (automatic
for upper cab in heating relay
F7 transmission), park ing heat- 10
er, rear window heater re lay F34 (Cabriolet) and socket relay,
7.5
in ter ior sound, back-up light
coil switch, temperature sensor,
Diagnosis, electrical parking oil level sensor
F 8 brake
switch, light switch,
10
rain/ light sensor, interior
light ing Diagnosis, headlight range
F35 co
ntrol system, a ir quality
10
sensor, a utomat ic dimming
F9 Steering column
switch
1
module
Fl0 D isp lay 5 rearview mir
ror
F36 Right
corner ing light/ right
15
LED-headlight
Fll Reversible driver's
side safe-
25
ty belt tensioners F37
Left corner
ing light/ left
15
L E D- headlight
Fl 2 M MI area 15/20
Page 276 of 302
2 7 4 Emergency situations
@ Tips
The discharged battery must be properly
connected to the vehicle's electrical sys
tem. When jump starting or charging the
battery, never connect the negative
ground cable to the battery negative post
because the batte ry manager system must
be able to detect the battery 's state of
charge. Always connect the negative
ground cab le to the negative ground post
of the battery manager control unit.
Using jump start cables
Connect the jump start cables in the exact or
der described below.
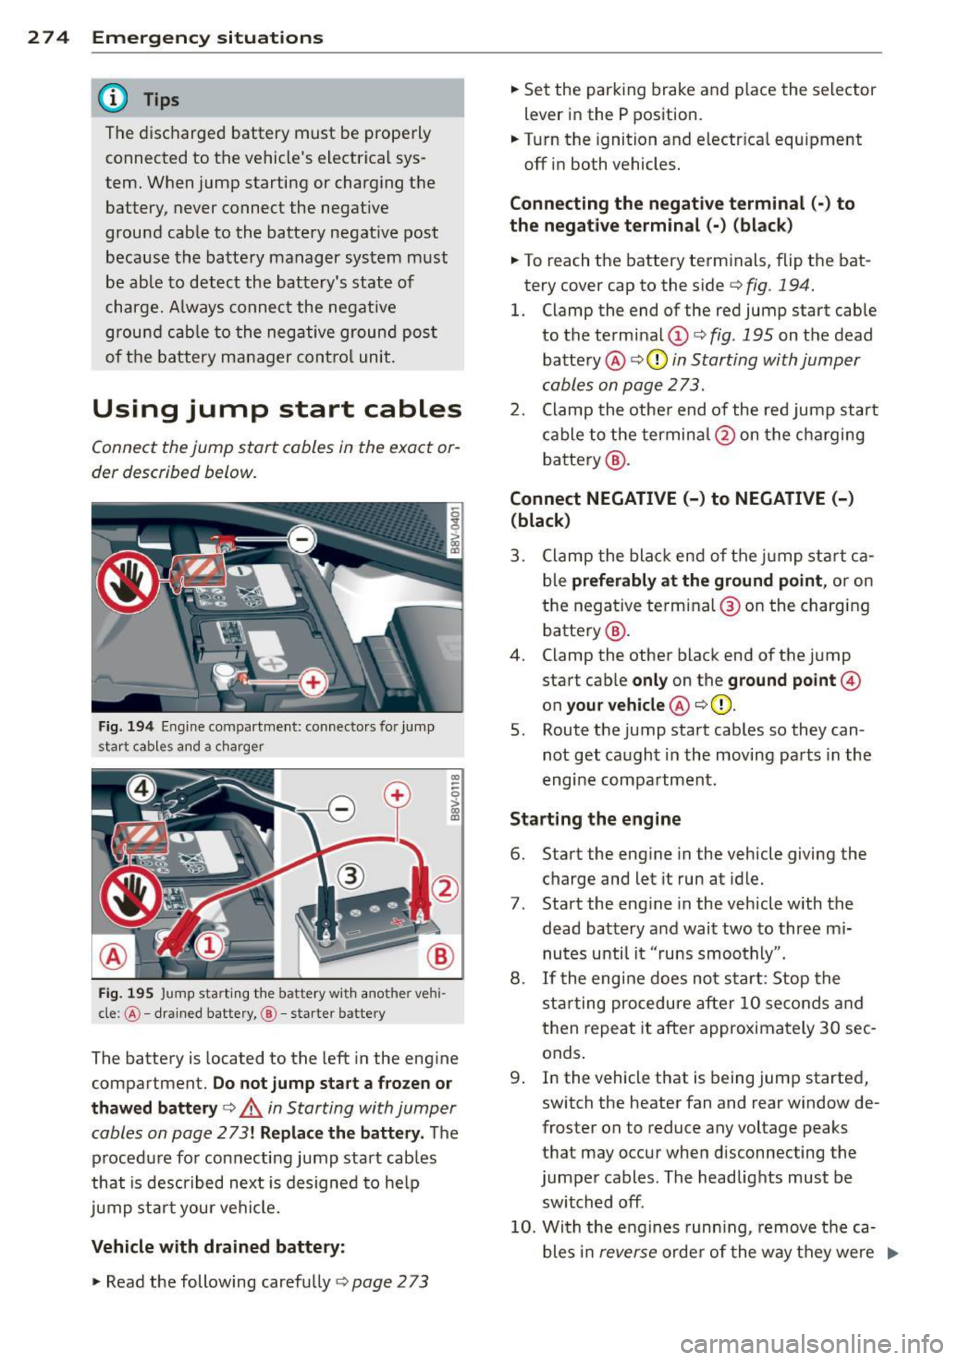
Fig. 194 Engine compartment: connecto rs fo r jump
start cab les and a charger
Fig. 195 Jump sta rting the battery with another ve hi
cle :@ -drained battery, @-starte r battery
CD
--0 > ~
The battery is located to the left in the engine
compartment.
Do not jump start a frozen or
thawed battery¢
,A in Starting with Jumper
cables on page
273! Replace the battery. The
procedure for connecting jump start cables
that is described next is designed to help
jump start your vehicle.
Vehicle with drained battery:
.. Read the following carefully ¢ page 2 73
.. Set the parking brake and place the selector
lever in the P position.
.. Turn the ignition and electr ical equipment
off in both vehicles.
Connecting the negative terminal(·) to
the negative terminal (-) (black)
.. To reach the battery terminals, flip the bat
tery cover cap to the side¢
fig. 194.
l. Clamp the end of the red jump start cable
to the terminal (!)¢
fig. 195 on the dead
battery @¢0
in Starting with Jumper
cables on page 273.
2. Clamp the other end of the red jump start
cable to the terminal @on the charging
battery @.
Connect NEGATIVE (-) to NEGATIVE (-)
(black)
3. Clamp the black end of the jump start ca
ble
preferably at the ground point, or on
the negative terminal@on the charging
battery @.
4. Clamp the other black end of the jump
start cab le
only on the ground point@
on your vehicle @¢(D.
5. Route the jump start cables so they can
not get caught in the moving parts in the
engine compartment .
Starting the engine
6. Start the engine in the vehicle giving the
charge and let it run at idle.
7 . Start the engine in the vehicle with the
dead battery and wait two to three mi nutes until it "runs smoothly" .
8.
If the engine does not start: Stop the
starting procedure after
10 seconds and
then repeat it after approximately
30 sec
onds .
9 . In the vehicle that is being jump started,
switch the heater fan and rear window de
froster on to reduce any voltage peaks
that may occur when disconnecting the
jumper cables. The headlights must be
switched off .
10. With the engines running, remove the ca
bles in
reverse order of the way they were ..,.
Page 292 of 302

290 Index
E
ECO mode (automatic climate control sys -
tem) . ..... .. ................ ..... ..
72
Efficiency program . . . . . . . . . . . . . . . . . . . 28
Description .............. .... .. .. .. 28
Fu el economy messages . . . . . . . . . . . . . 29
Other equipment . . . . . . . . . . . . . . . . . . . 29
Electrical accessor ies
refer to Socket . . . . . . . . . . . . . . . . . . . . . 64
Electromechanical parking brake
refer to Parking brake ......... .... .. 82
Electromechanical steering ....... ... . 192
Indicator lights ................... 192
Electronic diffe rent ial loc k ... .. .. .. .. . 188
Indicator light . . . . . . . . . . . . . . . . . . . . . 21
Electronic immobilizer ...... .... .... .. 36
also refer to Immobilizer . . . . . . . . . . . . 31
Electronic speed limiter . . . . . . . . . . . . . . . 30
Electronic stabilization control (ESC)
I ndicator light . . . . . . . . . . . . . . . . . . . . .
21
Sport mode ................ ..... . 189
Electronic Stabilization Control (ESC) . . . 188
Emergency assistance ....... ... .... . 261
Emergency flasher . . . . . . . . . . . . . . . . . . . 50
Emergency flashers
Indicator light . . . . . . . . . . . . . . . . . . . . .
25
Emergency operation
Emergency braking function .... .... ..
84
Front passenger's door ...... .. .. .. . . 37
Luggage compartment lid .. .... .... . 261
Power top . . . . . . . . . . . . . . . . . . . . . . . . . 45
·th ' k
w1 convenience ey . . . . . . . . . . . . . . . . 80
Emergency release
Fuel filler door ........... .........
213
Selector lever . . . . . . . . . . . . . . . . . . . . . 117
Emergency starting ......... ... .... . 273
Emergency towing ... .. .... .. .. .. .. . 275
Energy management ....... .. .. .. .. . 193
Indicator light . . . . . . . . . . . . . . . . . . . . . 20
Engine
Coolant
.. .. ................ ..... . 220
Starting with jumper cables . ..... .. . 273
starting (button) ............. .... .. 78
Starting (driver messages with conven-
ience key) .. ........ ..... .. ........
81
start ing (key) . .. ...... .... ... .. .. .. 76
stopping (button) ............. ..... 79
stopping (key) ... ................ .. 78
Engine compartment
Closing the hood .............. .. ..
216
Open ing the hood ................. 215
Overview . ..... .. ................ . 216
Safety precautions ............. .... 214
Engine control (indicator light) ...... .. . 22
Engine coolant .. .. ............. .... 220
Radiator fan ... .. ... .......... .... 221
Engine oil . ..... .. ................ . 217
adding ....... .. ................ . 218
Changing ........................ 219
Checking the oil level ............... 218
Dipstick. .. .. .. .. ............ 216, 218
Indicator light . .. ... ......... ... .. . 20
Oil consumption .. ..... ..... ... .. .. 217
Specification and viscosity ... .. .. .. .. 217
Use ...... .... ................... 218
Engine speed limitation (indicator light) . 23
Environment
Break-in period . . . . . . . . . . . . . . . . . . . .
196
Catalytic converter ............. .. .. 197
Disposing of your vehicle battery . .. .. 226
Driving at high speeds ............ .. 198
Driving to minimize pollution and noise 198
Fuel economy . ... ....... ...... .. .. 198
Letting the vehicle stand and warm up. 199
Proper disposal of drained brake fluid . 222
Proper disposal of drained eng ine oil .. 219
Unleaded fuel .... ................ . 210
What should I do with an o ld battery? . 226
EPC (engine contro l) . . . . . . . . . . . . . . . . . . 22
ESC
Automatic post-collision braking sys-
tem .. ... ... .. .. .. ...... ....... ..
189
Electronic stabilizat ion control . .. .. .. 188
Sport mode . .. .. ... ....... ... .. .. 189
Event Data Recorder (EDR) . . . . . . . . . . . . 194
Exterior lighting . .. ... .......... ..... 49
Exterior m irrors
Adjusting . . . . . . . . . . . . . . . . . . . . . . . . .
55
D. . 1mming .. .. ...... .. ... ... ... ..... 56
folding ... ................... ..... 55
Heating . .. ................... .... . 55
Page 296 of 302
29 4 Index
Parking brake .......... ... .. .. .... .. 82
Emergency braking function . ..... .. .. 84
Indicator light ............ ... .... .. 19
Parking .. ............... ........ .. 83
Power supply failure .............. .. 82
Setting/releasing . . . . . . . . . . . . . . . . . . . 82
Starting from a stop ...... .. .. .. .. . . 83
also refer to Parking brake ........... 82
Parking light ... ............ ... .... .. 49
Park ing system
Adjusting the disp lay/warning tone ... 125
C leaning the rearview camera ..... .. . 122
Malfunction .............. ... .... . 125
Parking system plus ................ 120
Peripheral display . . . . . . . . . . . . . . . . . 120
Rear parking system ........... .... 120
Rearview camera .......... .... ... . 121
also refer to Park ing systems . . . 120, 121
Parking systems ............ ... .... . 119
Park ing (automatic transmission) . 112, 113
Parts replacement ............. .. ... 284
PASSENGER AIR BAG OFF light ....... . 159
Pedals .. .. ... ............ .. .. .. .. . 131
Peripheral display . . . . . . . . . . . . . . . . . . . 120
Physica l principles of a frontal collis ion . 139
Polishing .. .. ... .... ...... ...... .. . 206
Pollen filter
refer to Pollutant filter . . . . . . . . . . . . . . 70
Poll utant filter ...................... 70
Power seat adjustment ............... ..... 61
W indows .. .......... ......... .. .. 38
Power top ..... ............ ... .... .. 41
Cleaning . ... ... .......... ... .. ... 206
Closing .. .. ................ ... .... 41
Conven ience closing ............ ..... 42
Conven ience opening ................ 42
E mergency operation . . . . . . . . . . . . . . . . 45
General informat ion ................ 41
Malfunction .............. ... .... .. 43
Messages .. ................ ..... .. 43
Opening ... ................ ..... .. 41
Power top storage compartment .. .... 43
Wind deflector ............ ... .... .. 44
Power windows . . . . . . . . . . . . . . . . . . . . . . 38
Convenience opening/closing . . . . . . . . . 39
Malfunction .............. ... .... .. 40 Pregnant
women
Special considerations when wearing a
safety belt . . . . . . . . . . . . . . . . . . . . . . . 143
Pre sense ........................... 95
Bas ic (description) ............. .... . 95
Driver messages . . . . . . . . . . . . . . . . 93, 97
Front (description) ................ .. 95
General information ............ ... . 95
General Information ........... .. .. . 87
Settings .......................... 97
Warnings ....... ................. . 96
Pressure (tires) .... ................ . 259
Proper occupant seating positions ..... 127
Proper safety belt position . . . . . . . . . . . . 142
Proper seating position Front passenger .. ................ . 128
Occupants ..... .. .. .............. . 127
Rear passengers . . . . . . . . . . . . . . . . . . . 129
Protecting .. .. .. .. ............. .... 206
Protection mat
refer to Revers ible mat ............ .. 69
Q
Question
What happens to unbelted occupants? 139
R
Radiator fan
221
Radio clock
refer to Clock . . . . . . . . . . . . . . . . . . . . . . 10
Rain/light sensor Headlights ...... ............. ..... 49
Indicator light ... ............. .... . 24
Intermittent (w indshield w ipers) ...... 53
Switching on and off ................ 53
Range (tank contents) .............. .. 27
Rear lid
refer to Luggage compartment lid .. .. . 38
Rea r light
Indicator light ... ................ .. 24
Rearv iew camera
refer to Park ing systems 120,121
Rearview mirror
refer to Mirror ... ... .... ........ .. . 56
Rearview mirror dimming ........ ... .. 56
Rear window defogger ................ 74