2015 Alfa Romeo Giulietta boot
[x] Cancel search: bootPage 85 of 288

Opening
Press flap A fig. 94 to release it and
access fuel tank cap B. Then press cap
B and turn it anticlockwise.
61)
The cap is provided with a loss
prevention device C which attaches it
to the flap and prevents it from being
lost. Attach the cap to device D during
refuelling.
Emergency flap opening
In case of emergency, pull the cord A
fig. 95 on the right-hand side of the
boot to open the fuel flap.
Pulling the cord will unlock the flap: it
will then be necessary to press on
the flap to open it.Closure
Release cap B from device D and insert
it in its housing. Then tighten the cap
clockwise until one or more clicks
are heard. Finally, close flap A checking
that it is correctly locked.
The sealing may cause a slight pressure
increase in the tank. A little breathing
off, while slackening the cap is
absolutely normal.
WARNING
61) Keep naked flames or lit
cigarettes away from the fuel tank
filler: fire risk. Avoid bringing
your face close to the filler, in
order not to breathe in harmful
vapours.
PROTECTING THE
ENVIRONMENT
The following devices are used for
reducing petrol fuel engine emissions:
catalytic converter, oxygen sensors and
evaporation control system
The following devices are used for
reducing diesel fuel engine emissions:
oxidising catalytic converter, exhaust
gas recirculation system (EGR) and
particulate filter (DPF).
62)
DIESEL PARTICULATE
FILTER (DPF)
(Diesel Particulate Filter)
(for versions/markets, where provided)
The Diesel Particulate Filter is a
mechanical filter, integral to the exhaust
system, that physically traps carbon
particles present in the exhaust gases
of diesel engines.
The diesel particulate filter is needed to
eliminate almost all carbon particle
emissions in compliance with
current/future regulations and
standards.94A0K0598
95A0K0599
81
Page 97 of 288

❒interruption after locking using the
remote control
❒interruption after a lock or other
action using the remote control
Proceed as follows to activate or
deactivate this function:
❒press the SET/
button briefly to
make the display flash "On" or "Off"
according to what was previously set;
❒press
orto make your
choice;
❒briefly press the SET/
button to
go back to the menu screen or hold
the button down to go back to the
standard screen without saving.Menu exit
This is the last function that closes the
cycle of settings listed in the menu
screen.
Pressing the SET/
button briefly will
return the display to the standard
screen without saving.
Press the
button to return to the
first menu option.
93
Courtesy lights
(Activation/deactivation
of “Greeting lights”)
(for versions/markets, where provided)
With this function it is possible to turn
on the side lights, the number plate
lights and the ceiling lights for
approximately 25 seconds when the
doors or boot are opened using the
remote control, with the following
exceptions:
❒interruption after 5 seconds from
when the door closes
Page 162 of 288

WARNING
106) Using the levers incorrectly
(levers pushed towards the
dashboard, see fig. 137) could
break them.
107) Never leave children
unattended in the car. Always
remove the ignition key when
leaving the car and take the key
with you.
108) The Launch control function is
only available in Dynamic mode.
Regardless of what is explicitly
indicated in the description of
these modes, the ESC and ASR
systems are deactivated during
operation of the Launch Control
function. This means that vehicle
dynamic control is the sole
responsibility of the driver.
Therefore pay the utmost
attention when using the Launch
Control. Take into account traffic
and road surface conditions and
during manoeuvres make sure
there is enough room in the area
concerned.
SAVING FUEL
Here are some suggestions which can
help you to save fuel and lower harmful
emissions.
GENERAL
CONSIDERATIONS
Car maintenance
Checks and adjustments should be
carried out in accordance with the
“Scheduled Servicing Plan” (see
chapter “Maintenance and care”).
Tyres
Check the tyre pressures at least once
every four weeks: if the pressure is
too low, consumption levels increase as
resistance to rolling is higher.
Unnecessary loads
Do not travel with an overloaded boot.
The weight of the car and its
arrangement greatly affect fuel
consumption and stability.Roof rack/ski rack
Remove the roof rack or the ski rack
from the roof after use. These
accessories lower aerodynamic
penetration and adversely affect
consumption levels. When transporting
particularly large objects, use a trailer
if possible.
Electrical devices
Use the electrical devices only for the
necessary amount of time. The heated
rear window, additional headlights,
screen wipers and heater fan require a
considerable amount of energy;
increasing the current uptake increases
fuel consumption (by up to +25% in
an urban cycle).
Climate control system
Using the climate control system will
increase consumption: use the air vents
when the temperature outside permits.
Devices for
aerodynamic control
The use of non-certified devices for
aerodynamic control may adversely
affect air drag and fuel consumption.
158
STARTING AND DRIVING
Page 182 of 288

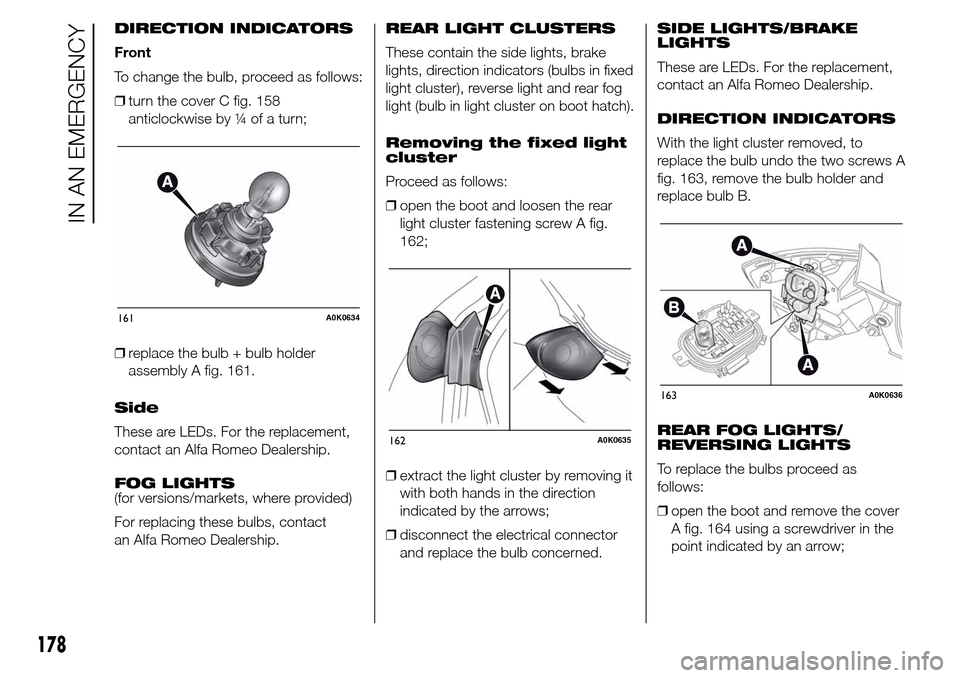
DIRECTION INDICATORS
Front
To change the bulb, proceed as follows:
❒turn the cover C fig. 158
anticlockwise by ¼ of a turn;
❒replace the bulb + bulb holder
assembly A fig. 161.
Side
These are LEDs. For the replacement,
contact an Alfa Romeo Dealership.
FOG LIGHTS
(for versions/markets, where provided)
For replacing these bulbs, contact
an Alfa Romeo Dealership.REAR LIGHT CLUSTERS
These contain the side lights, brake
lights, direction indicators (bulbs in fixed
light cluster), reverse light and rear fog
light (bulb in light cluster on boot hatch).
Removing the fixed light
cluster
Proceed as follows:
❒open the boot and loosen the rear
light cluster fastening screw A fig.
162;
❒extract the light cluster by removing it
with both hands in the direction
indicated by the arrows;
❒disconnect the electrical connector
and replace the bulb concerned.SIDE LIGHTS/BRAKE
LIGHTS
These are LEDs. For the replacement,
contact an Alfa Romeo Dealership.
DIRECTION INDICATORS
With the light cluster removed, to
replace the bulb undo the two screws A
fig. 163, remove the bulb holder and
replace bulb B.
REAR FOG LIGHTS/
REVERSING LIGHTS
To replace the bulbs proceed as
follows:
❒open the boot and remove the cover
A fig. 164 using a screwdriver in the
point indicated by an arrow;
161A0K0634
162A0K0635
163A0K0636
178
IN AN EMERGENCY
Page 190 of 288

ENGINE COMPARTMENT FUSE BOX
fig. 178
DEVICE PROTECTED FUSE AMPS
Headlamp washer pump power supply F09 30
HornF10 15
AC compressorF19 7,5
Heated rear window F20 30
Fuel pumpF21 15
Cigar lighter/power socket F85 20
12 V boot power socket F86 2 0
IBS Battery charge status sensor for Start&Stop system F87 5
External mirror defrosters F88 7,5
186
IN AN EMERGENCY
Page 196 of 288

RAISING THE CAR
If the car needs to be jacked up, go to
an Alfa Romeo Dealership which is
equipped with shop jacks and jack
arms.
IMPORTANT Be careful when
positioning the arm of the lift for
versions with side skirts.
TOWING THE CAR
The tow ring provided with the car is
housed in the tool box in the boot.
ATTACHING THE TOW
HOOK
Release plug A by pressing the lower
part, take tow hook B from its housing
in the tool support and tighten it
securely on the front threaded pin (fig.
183) or on the rear threaded pin (fig.
184).
135) 136) 137)
WARNING
135) Before towing, turn the ignition
key to MAR-ON and then to STOP
without removing it. The steering
column will automatically lock
when the key is removed and the
wheels cannot be steered. Also
check that the gearbox is in
neutral (on versions equipped with
Alfa TCT automatic transmission,
check that the gear lever is inN
position)
183A0K0623
184A0K0704
192
IN AN EMERGENCY
Page 201 of 288

SCHEDULED SERVICING PLAN
PETROL VERSIONS
Thousands of miles 9 18 27 36 45 54 63 72 81 90
Thousands of kilometres 15 30 45 60 75 90 105 120 135 150
Years12345678910
Check tyre condition/wear and adjust pressure, if
necessary; check “Fix&Go Automatic” kit recharge expiry
date (for versions/markets, where provided)●●●●●●●●●●
Check operation of lighting system (headlights, direction
indicators, hazard warning lights, luggage compartment,
passenger compartment, glove compartment, instrument
panel warning lights, etc.)●●●●●●●●●●
Check and, if necessary, top up fluid levels (engine
coolant, hydraulic clutch/brakes, windscreen washer,
battery, etc.)●●●●●●●●●●
Check exhaust emissions/smokiness●●●●●●●●●●
Use the diagnosis socket to check supply/engine
management system operation, emissions and, for
versions/markets, where provided, engine oil degradation●●●●●●●●●●
Visually inspect condition of: exterior bodywork,
underbody protection, pipes and hoses (exhaust, fuel
system, brakes), rubber elements (boots, sleeves, bushes,
etc.)●●●●●
Check windscreen/rear window wiper blade position/wear●●●●●
197
The checks listed in the Scheduled Servicing Plan, after reaching 120,000 km/8 years, must be cyclically repeated starting from
the first interval, thus following the same intervals as before.
Page 205 of 288

DIESEL VERSIONS
Thousands of miles 12 24 36 48 60 72 84 96 108 120
Thousands of kilometres 20 40 60 80 100 120 140 160 180 200
Years12345678910
Check tyre condition/wear and adjust pressure, if
necessary; check “Fix&Go Automatic” kit recharge expiry
date (for versions/markets, where provided)●●●●●●●●●●
Check operation of lighting system (headlights, direction
indicators, hazard warning lights, luggage compartment,
passenger compartment, glove compartment, instrument
panel warning lights, etc.)●●●●●●●●●●
Check and, if necessary, top up fluid levels (engine
coolant, hydraulic clutch/brakes, windscreen washer,
battery, etc.)●●●●●●●●●●
Check exhaust emissions/smokiness●●●●●●●●●●
Use the diagnosis socket to check supply/engine
management system operation, emissions and, for
versions/markets, where provided, engine oil degradation●●●●●●●●●●
Visually inspect condition of: exterior bodywork,
underbody protection, pipes and hoses (exhaust, fuel
system, brakes), rubber elements (boots, sleeves, bushes,
etc.)●●●●●
Check windscreen/rear window wiper blade position/wear●●●●●
Check operation of windscreen wiper/washer system and
adjust jets, if necessary●●●●●
201
The checks listed in the Scheduled Servicing Plan, after reaching 120,000 km/6 years, must be cyclically repeated starting from
the first interval, thus following the same intervals as before.