Page 158 of 288

In both cases, if the described
conditions and times are not respected,
the ignition key will be automatically
locked.
To remove the key, turn it to MAR-ON
and then to STOP.
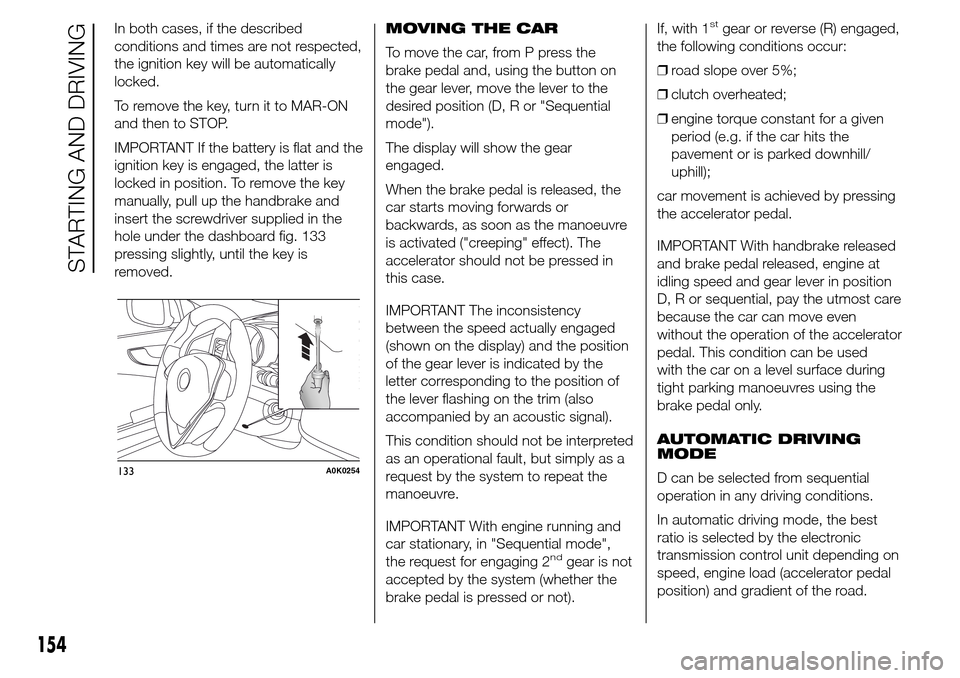
IMPORTANT If the battery is flat and the
ignition key is engaged, the latter is
locked in position. To remove the key
manually, pull up the handbrake and
insert the screwdriver supplied in the
hole under the dashboard fig. 133
pressing slightly, until the key is
removed.MOVING THE CAR
To move the car, from P press the
brake pedal and, using the button on
the gear lever, move the lever to the
desired position (D, R or "Sequential
mode").
The display will show the gear
engaged.
When the brake pedal is released, the
car starts moving forwards or
backwards, as soon as the manoeuvre
is activated ("creeping" effect). The
accelerator should not be pressed in
this case.
IMPORTANT The inconsistency
between the speed actually engaged
(shown on the display) and the position
of the gear lever is indicated by the
letter corresponding to the position of
the lever flashing on the trim (also
accompanied by an acoustic signal).
This condition should not be interpreted
as an operational fault, but simply as a
request by the system to repeat the
manoeuvre.
IMPORTANT With engine running and
car stationary, in "Sequential mode",
the request for engaging 2
ndgear is not
accepted by the system (whether the
brake pedal is pressed or not).If, with 1
stgear or reverse (R) engaged,
the following conditions occur:
❒road slope over 5%;
❒clutch overheated;
❒engine torque constant for a given
period (e.g. if the car hits the
pavement or is parked downhill/
uphill);
car movement is achieved by pressing
the accelerator pedal.
IMPORTANT With handbrake released
and brake pedal released, engine at
idling speed and gear lever in position
D, R or sequential, pay the utmost care
because the car can move even
without the operation of the accelerator
pedal. This condition can be used
with the car on a level surface during
tight parking manoeuvres using the
brake pedal only.
AUTOMATIC DRIVING
MODE
D can be selected from sequential
operation in any driving conditions.
In automatic driving mode, the best
ratio is selected by the electronic
transmission control unit depending on
speed, engine load (accelerator pedal
position) and gradient of the road.
133A0K0254
154
STARTING AND DRIVING
Page 166 of 288

STORING THE CAR
If the car is to be left inactive for longer
than a month, the following precautions
should be noted:
❒park the car in covered, dry and if
possible well-ventilated premises and
slightly open the windows;
❒check that the handbrake is not
engaged;
❒disconnect the negative battery
terminal and check the battery
charge. Repeat this check once
every three months during storage;
❒if the battery is not disconnected
from the electrical system, checks its
state of charge every thirty days;
❒clean and protect the painted parts
using protective wax;
❒clean and protect the shiny metal
parts using special compounds
available commercially;
❒sprinkle talcum powder on the
windscreen and rear window wiper
rubber blades and lift them off the
glasses;
❒slightly open the windows;❒cover the car with a cloth or
perforated plastic sheet. Do not use
compact plastic sheets which do
not allow humidity to evaporate from
the surface of the car.
❒inflate tyres to +0.5 bar above the
standard prescribed pressure and
check it periodically;
❒do not drain the engine cooling
system;
❒Any time the car is left inactive for
two weeks or more, operate the
air conditioning system with engine
idling for at least 5 minutes, setting
external air and with fan at maximum
speed. This operation will ensure a
suitable lubrication to minimise
possibility of damage to the
compressor when the system is
operated again.
IMPORTANT After turning the ignition
key to STOP, wait at least 1 minute
before disconnecting the electrical
supply to the battery.
162
STARTING AND DRIVING
Page 167 of 288
IN AN EMERGENCY
A punctured tyre or a burnt-out bulb?
At times, a problem may interfere
with our journey.
The pages on emergencies can help
you to deal with critical situations
independently and with calm.
In an emergency we recommend that
you call the freephone number found in
the Warranty Booklet.
It is also possible to call the 00 800
2532 4200 freephone number to
search the nearest Alfa Romeo
Authorised Network.STARTING THE ENGINE .................164
REPLACING A WHEEL ...................165
"FIX&GO AUTOMATIC" KIT .............170
CHANGING A BULB .......................173
REPLACING EXTERIOR BULBS......177
INTERIOR BULB REPLACEMENT ...180
REPLACING FUSES........................181
BATTERY RECHARGING ................191
RAISING THE CAR..........................192
TOWING THE CAR .........................192
163
Page 168 of 288

STARTING THE
ENGINE
Contact the Alfa Romeo Dealership
immediately if the warning light
stays on constantly on the
instrument panel.
JUMP STARTING
If the battery is flat, start the engine
using an auxiliary battery with the same
capacity or a little higher than the flat
one.
24) 25)112)
Proceed as follows to start the car:
❒connect the positive terminal (+) fig.
138 of the auxiliary battery only to
the point indicated on the car battery
(writing OK) and nowhere else;
❒with a second lead, connect the
negative terminal(−)oftheauxiliary
battery to an earthing point
on
the engine or the gearbox/
transmission of the car to be started;
❒start the engine; when the engine has
been started, remove the leads
reversing the order above.
For versions with Start&Stop system, in
case of starting by auxiliary battery,
refer to the paragraph “Start&Stop
system” in the chapter “Getting to know
your car”.If after a few attempts the engine does
not start, contact the Alfa Romeo
Dealership.
BUMP STARTING
Never jump start the engine by pushing,
towing or coasting downhill.
IMPORTANT
24) Do not connect the negative
terminals of the two batteries
directly! If the auxiliary battery is
installed on another car, prevent
accidental contact between
metallic parts of the two cars.
25) Never use a fast battery charger
to start the engine as this could
damage the electronic systems
and the ignition and engine fuel
supply control units.
WARNING
112) This procedure must be
performed by qualified personnel
as incorrect actions may cause
high-intensity electrical discharge.
Furthermore, battery fluid is
poisonous and corrosive: avoid
contact with skin and eyes. Keep
naked flames away from the
battery. No smoking. Do not cause
sparks.
138A0K0247
164
IN AN EMERGENCY
Page 187 of 288
FUSE LOCATION
Fuses are grouped together in three
fuse boxes located in the engine
compartment, dashboard and luggage
compartment.
Engine compartment fuse box
This is located next to the battery fig.
178: to access the fuses, undo screws
A fig. 177 and remove cover B.
The number identifying the electrical
component corresponding to each fuse
is on the back of the cover.
After replacing the fuse, make sure you
close cover B on the junction unit.
177A0K0525
F10
F87F85
F86
F19
F09
F21 F88
F20
178A0K0231
183
Page 190 of 288
ENGINE COMPARTMENT FUSE BOX
fig. 178
DEVICE PROTECTED FUSE AMPS
Headlamp washer pump power supply F09 30
HornF10 15
AC compressorF19 7,5
Heated rear window F20 30
Fuel pumpF21 15
Cigar lighter/power socket F85 20
12 V boot power socket F86 2 0
IBS Battery charge status sensor for Start&Stop system F87 5
External mirror defrosters F88 7,5
186
IN AN EMERGENCY
Page 195 of 288

BATTERY
RECHARGING
IMPORTANT The battery recharging
procedure is given as information only.
To carry out this operation contact
an Alfa Romeo Dealership.
IMPORTANT After turning the ignition
key to STOP and having closed the
driver's side door, wait at least one
minute before disconnecting and then
reconnecting the battery electrical
supply.
Charging should be slow at a low
ampere rating for approximately 24
hours. Charging for a longer time may
damage the battery.
VERSIONS WITHOUT
Start&Stop SYSTEM
(for versions/markets, where provided)
To recharge, proceed as follows:
❒disconnect the negative battery
terminal;
❒connect the charger cables to the
battery terminals, observing the
polarity;
❒turn on the charger;
❒when it is recharged, turn the charger
off before disconnecting it from the
battery;
❒reconnect the negative battery
terminal.VERSIONS WITH
Start&Stop SYSTEM
(for versions/markets, where provided)
To recharge, proceed as follows:
❒disconnect the connector A fig. 182
(pressing the button B) from the
sensor C monitoring the battery
conditions, on the negative pole (–) D
of the battery;❒connect the positive cable (+) of the
battery charger to the positive battery
terminal E and the negative cable (–)
to sensor terminal D as shown;
❒turn on the battery charger. At the
end of the charging process, switch
the battery charger off;
❒after having disconnected the
charging device, reconnect
connector A to the sensor C as
shown.
182A0K0530
191
Page 199 of 288
SERVICING AND MAINTENANCE
Correct maintenance permits the
performance of the car to be
maintained over time, as well as limited
running costs and safeguarding the
efficiency of the safety systems.
This chapter explains how.SCHEDULED SERVICING ...............196
SCHEDULED SERVICING PLAN .....197
PERIODIC CHECKS ........................204
HEAVY-DUTY USE OF THE CAR .....204
CHECKING LEVELS........................205
AIR CLEANER/POLLEN
FILTER/DIESEL FILTER....................210
BATTERY ........................................211
WHEELS AND TYRES.....................212
WINDSCREEN/REAR WINDOW
WIPERS ..........................................213
BODYWORK ...................................216
INTERIORS .....................................218
195