2015 Alfa Romeo Giulietta ECU
[x] Cancel search: ECUPage 139 of 288

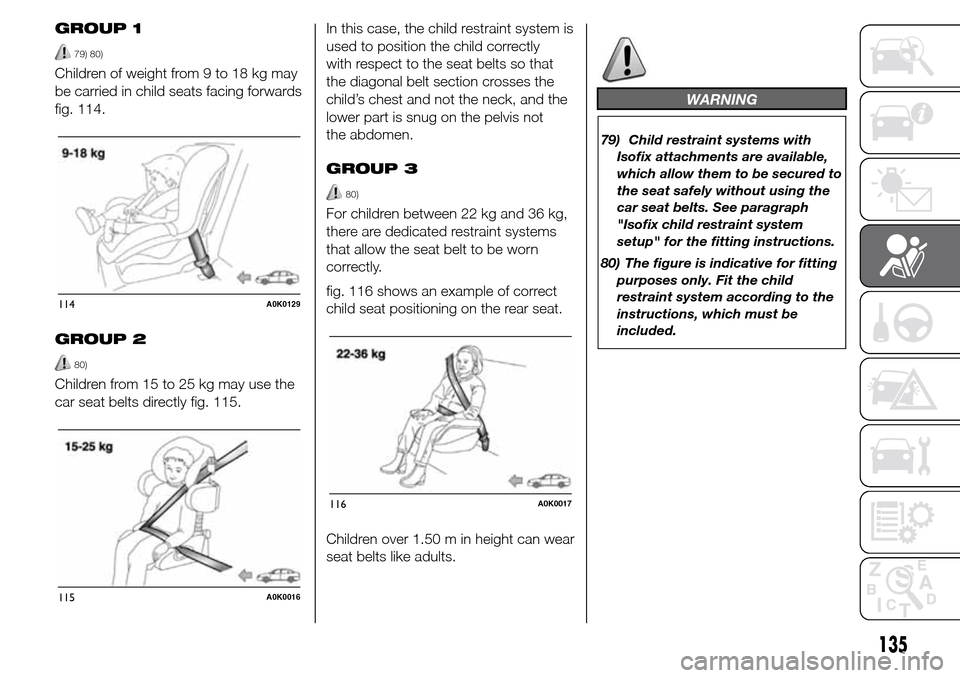
GROUP 1
79) 80)
Children of weight from 9 to 18 kg may
be carried in child seats facing forwards
fig. 114.
GROUP 2
80)
Children from 15 to 25 kg may use the
car seat belts directly fig. 115.In this case, the child restraint system is
used to position the child correctly
with respect to the seat belts so that
the diagonal belt section crosses the
child’s chest and not the neck, and the
lower part is snug on the pelvis not
the abdomen.
GROUP 3
80)
For children between 22 kg and 36 kg,
there are dedicated restraint systems
that allow the seat belt to be worn
correctly.
fig. 116 shows an example of correct
child seat positioning on the rear seat.
Children over 1.50 m in height can wear
seat belts like adults.
WARNING
79) Child restraint systems with
Isofix attachments are available,
which allow them to be secured to
the seat safely without using the
car seat belts. See paragraph
"Isofix child restraint system
setup" for the fitting instructions.
80) The figure is indicative for fitting
purposes only. Fit the child
restraint system according to the
instructions, which must be
included.
114A0K0129
115A0K0016
116A0K0017
135
Page 141 of 288

PREPARATION FOR
“ISOFIX” CHILD
SEAT
The car is equipped with ISOFIX
anchorages, a new standard which
makes fitting a child seat quick, simple
and safe.
Isofix systems can be fitted alongside
conventional child seats on different
seats in the same car.
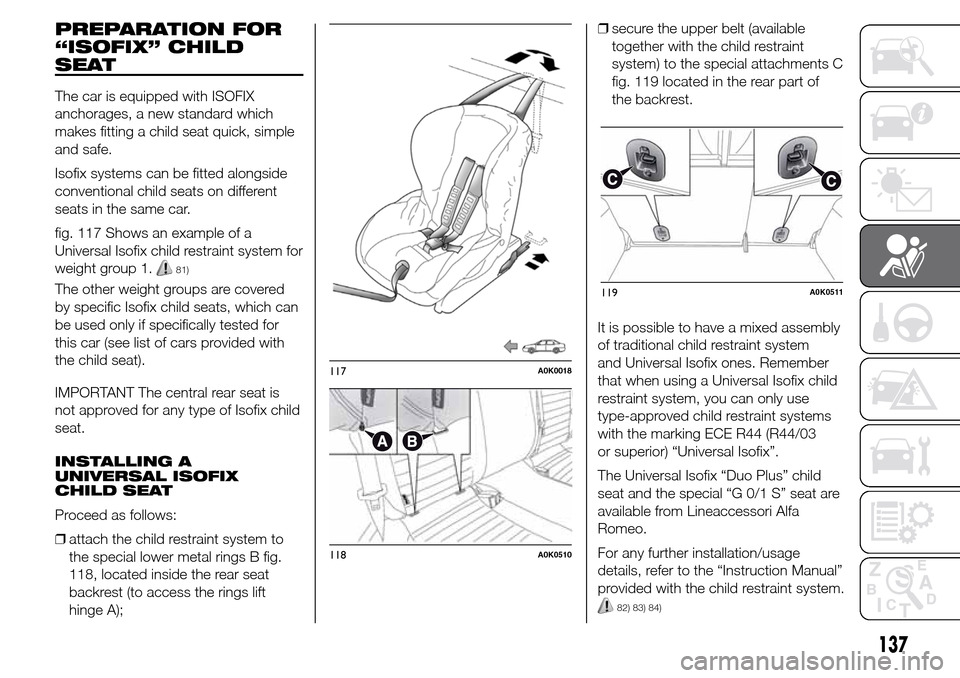
fig. 117 Shows an example of a
Universal Isofix child restraint system for
weight group 1.
81)
The other weight groups are covered
by specific Isofix child seats, which can
be used only if specifically tested for
this car (see list of cars provided with
the child seat).
IMPORTANT The central rear seat is
not approved for any type of Isofix child
seat.
INSTALLING A
UNIVERSAL ISOFIX
CHILD SEAT
Proceed as follows:
❒attach the child restraint system to
the special lower metal rings B fig.
118, located inside the rear seat
backrest (to access the rings lift
hinge A);❒secure the upper belt (available
together with the child restraint
system) to the special attachments C
fig. 119 located in the rear part of
the backrest.
It is possible to have a mixed assembly
of traditional child restraint system
and Universal Isofix ones. Remember
that when using a Universal Isofix child
restraint system, you can only use
type-approved child restraint systems
with the marking ECE R44 (R44/03
or superior) “Universal Isofix”.
The Universal Isofix “Duo Plus” child
seat and the special “G 0/1 S” seat are
available from Lineaccessori Alfa
Romeo.
For any further installation/usage
details, refer to the “Instruction Manual”
provided with the child restraint system.
82) 83) 84)
117A0K0018
118A0K0510
119A0K0511
137
Page 143 of 288

Main recommendations
to carry children safely
❒Install the child restraint systems
on the rear seat, which is the most
protected position in the event of an
accident.
❒Keep children in rear facing child
restraint systems for as long as
possible, until 2 years old.
❒Should a rear facing child restraint
system be installed on the rear seats,
it is advisable to position it as far
forward as the position of the front
seat allows.
❒If the front passenger airbag is
deactivated always check the
permanent switching on of the
warning light in the trim above the
internal rearview mirror to make
sure that it has actually been
deactivated.
❒Carefully follow the instructions
supplied with the child restraint
system itself. Keep the instructions in
the car along with the other
documents and this handbook. Do
not use second-hand child restraint
systems without instructions.
❒Only one child is to be strapped into
each restraint system; never carry
two children simultaneously.❒Always check that the seat belts do
not interfere with the child's throat.
❒Always check that the seat belt
is well fastened by pulling on it.
❒While travelling, do not let the child sit
incorrectly or unfasten the belts.
❒Never allow a child to put the belt's
diagonal section under an arm or
behind their back.
❒Never carry children on your lap,
even newborns. No-one can restrain
a child in the event of an accident.
❒In the event of an accident, replace
the child restraint system with a
new one.
WARNING
81) The figure is indicative for fitting
purposes only. Fit the child
restraint system according to the
instructions, which must be
included.
82) If a Universal Isofix child
restraint system is not fixed to all
three anchorages, it will not be
able to protect the child correctly.
In a crash, the child could be
seriously or fatally injured.83) Fit the child restraint system only
when the car is stationary. The
child restraint system is correctly
secured to the brackets when
you hear the click. Follow the
instructions for assembly,
disassembly and positioning that
the manufacturer must supply
with the child restraint system.
84) Fit the child restraint system
according to the instructions,
which must be included.
139
Page 153 of 288

IMPORTANT
16) In the first period of use, we
recommend not to demand
maximum performance from the
car (for instance excessive
accelerations, extended travel at
maximum speed, sudden braking,
etc.).
17) With the engine off, do not leave
the key in the ignition switch on
MAR-ON to prevent draining
the battery.
18) A quick burst on the accelerator
before turning off the engine
serves absolutely no practical
purpose; it wastes fuel and is
especially damaging to
turbocharged engines.
19) If the
warning light flashes
for about 1 minute after starting
or during prolonged cranking, this
indicates a fault in the glow plug
preheating system. If the engine
starts, you may use the car
normally, but should contact an
Alfa Romeo Dealership as soon as
possible.
PARKING
Always remove the ignition key when
leaving the car.
When parking and leaving the car,
proceed as follows:
❒engage a gear (1st gear if parked
uphill or reverse if facing downhill)
and leave the wheels turned;
❒stop the engine and engage the
handbrake.
Block the wheels with a wedge or a
stone if the car is parked on a steep
slope.
On versions equipped with Alfa TCT
transmission, before releasing the brake
pedal, wait for letter P to be displayed.
IMPORTANTNEVERleave the car
with the gearbox in neutral (or, on
versions equipped with Alfa TCT
transmission, before placing the gear
lever at P).
HANDBRAKE
To engage it, pull lever A fig. 126
upwards until the car is secured.
When the handbrake is engaged and
the ignition key is at MAR-ON, the
warning light will switch on in the
instrument panel.To release it, raise lever A slightly, hold
down button B and lower the lever:
the
warning light on the instrument
panel switches off.
103) 104)
IMPORTANT Carry out these
manoeuvres with the brake pedal
pressed.
IMPORTANT For cars equipped with a
front armrest, lift it up to ensure that
it does not interfere with the action of
the handbrake.
126A0K0615
149
Page 177 of 288

123) Always indicate that the tyre
was repaired using the quick
tyre repair kit. Give the booklet to
the technicians who will be
handling the tyre that was treated
using the kit.
124) Repair is not possible if the
wheel rim is damaged (groove
is deformed, causing air to
escape). Do not remove foreign
bodies (screws or nails) from the
tyre.
125) Do not operate the compressor
for longer than 20 minutes
consecutively. Risk of
overheating. The kit is not suitable
for definitive repairs, so the
repaired tyres may only be used
temporarily.126) The bottle contains ethylene
glycol and latex: it may cause
an allergic reaction. It is harmful if
swallowed. It is irritant for the
eyes. It may cause sensitisation if
inhaled or on contact. Avoid
contact with eyes, skin and
clothes. In the event of contact,
rinse immediately with plenty
of water. If ingested, do not
induce vomiting. Rinse out your
mouth, drink large quantities
of water and seek immediate
medical attention. Keep out of the
reach of children. The product
must not be used by asthmatics.
Do not inhale the vapours during
insertion and suction. Call a
doctor immediately if allergic
reactions are noted. Store the
bottle in its proper compartment,
away from sources of heat. The
sealant fluid has an expiry date.
Replace the bottle containing
out-of-date sealant fluid.CHANGING A BULB
28)
127) 128) 129)
GENERAL
INSTRUCTIONS
❒Before changing a bulb check the
contacts for oxidation;
❒replace blown bulbs with others of
the same type and power;
❒after replacing a headlight bulb,
always check its alignment;
❒when a light is not working, check
that the corresponding fuse is intact
before changing the bulb. For the
location of fuses, refer to the
paragraph “If a fuse blows” in this
chapter.
173
Page 181 of 288

REPLACING
EXTERIOR BULBS
FRONT LIGHT CLUSTERS
These contain the bulbs for the side
lights/daytime running lights (DRL),
dipped beams, main beams and
direction indicators. The bulbs are
arranged as follows fig. 158:
ASide lights/daytime running lights and
main beam headlights
BDipped beam headlights
CDirection indicators
SIDE LIGHTS/DAYTIME
RUNNING LIGHTS (DRL)
These are LEDs. For the replacement,
contact an Alfa Romeo Dealership.MAIN BEAM HEADLIGHTS
To change the bulb, proceed as
follows:
❒remove cover A fig. 158;
❒remove the connector A fig. 159 and
then open the tabs B pulling
outwards;
❒remove the bulb C and replace it;
❒refit the new lamp, making sure that it
is locked correctly, secure the tabs B
again and reconnect the connector
A;
❒then refit the cover A fig. 158.DIPPED BEAM
HEADLIGHTS
To change the bulb, proceed as follows:
❒remove cover B fig. 158;
❒remove the connector A fig. 160,
press the tab B forward and then
release by pushing it towards inside
the car;
❒remove the bulb C and replace it;
❒refit the new lamp, making sure that it
is locked correctly, secure the tab B
again and reconnect the connector
A;
❒then refit the cover B fig. 158.
158A0K0631159A0K0632160A0K0633
177
Page 184 of 288

INTERIOR BULB
REPLACEMENT
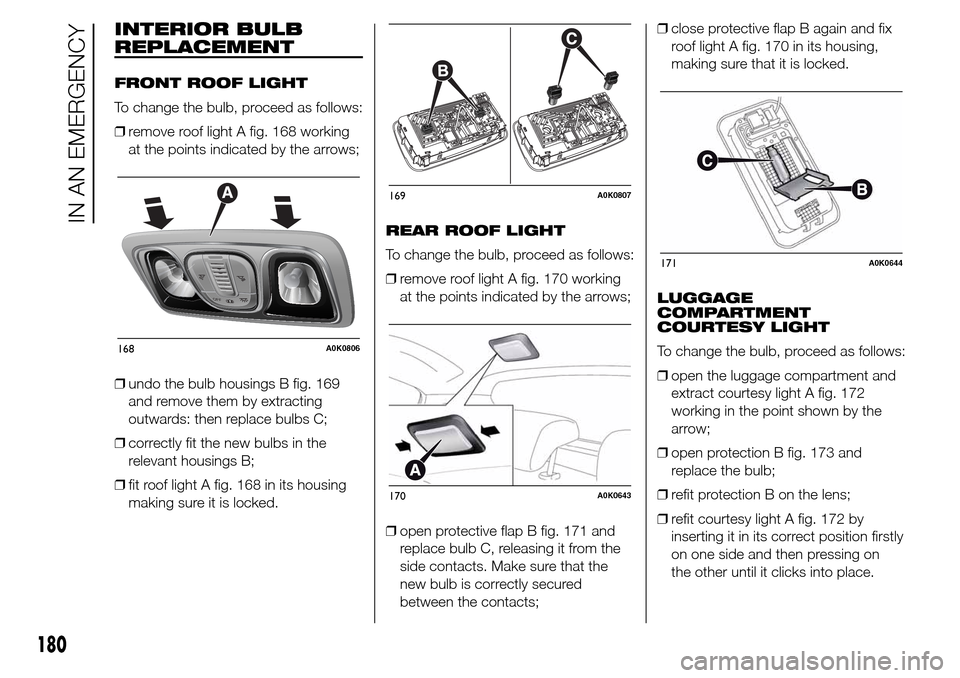
FRONT ROOF LIGHT
To change the bulb, proceed as follows:
❒remove roof light A fig. 168 working
at the points indicated by the arrows;
❒undo the bulb housings B fig. 169
and remove them by extracting
outwards: then replace bulbs C;
❒correctly fit the new bulbs in the
relevant housings B;
❒fit roof light A fig. 168 in its housing
making sure it is locked.REAR ROOF LIGHT
To change the bulb, proceed as follows:
❒remove roof light A fig. 170 working
at the points indicated by the arrows;
❒open protective flap B fig. 171 and
replace bulb C, releasing it from the
side contacts. Make sure that the
new bulb is correctly secured
between the contacts;❒close protective flap B again and fix
roof light A fig. 170 in its housing,
making sure that it is locked.
LUGGAGE
COMPARTMENT
COURTESY LIGHT
To change the bulb, proceed as follows:
❒open the luggage compartment and
extract courtesy light A fig. 172
working in the point shown by the
arrow;
❒open protection B fig. 173 and
replace the bulb;
❒refit protection B on the lens;
❒refit courtesy light A fig. 172 by
inserting it in its correct position firstly
on one side and then pressing on
the other until it clicks into place.
168A0K0806
169A0K0807
170A0K0643
171A0K0644
180
IN AN EMERGENCY
Page 196 of 288

RAISING THE CAR
If the car needs to be jacked up, go to
an Alfa Romeo Dealership which is
equipped with shop jacks and jack
arms.
IMPORTANT Be careful when
positioning the arm of the lift for
versions with side skirts.
TOWING THE CAR
The tow ring provided with the car is
housed in the tool box in the boot.
ATTACHING THE TOW
HOOK
Release plug A by pressing the lower
part, take tow hook B from its housing
in the tool support and tighten it
securely on the front threaded pin (fig.
183) or on the rear threaded pin (fig.
184).
135) 136) 137)
WARNING
135) Before towing, turn the ignition
key to MAR-ON and then to STOP
without removing it. The steering
column will automatically lock
when the key is removed and the
wheels cannot be steered. Also
check that the gearbox is in
neutral (on versions equipped with
Alfa TCT automatic transmission,
check that the gear lever is inN
position)
183A0K0623
184A0K0704
192
IN AN EMERGENCY