2015 Acura TLX charging
[x] Cancel search: chargingPage 12 of 545

11Quick Reference Guide
Instrument Panel
(P 69)
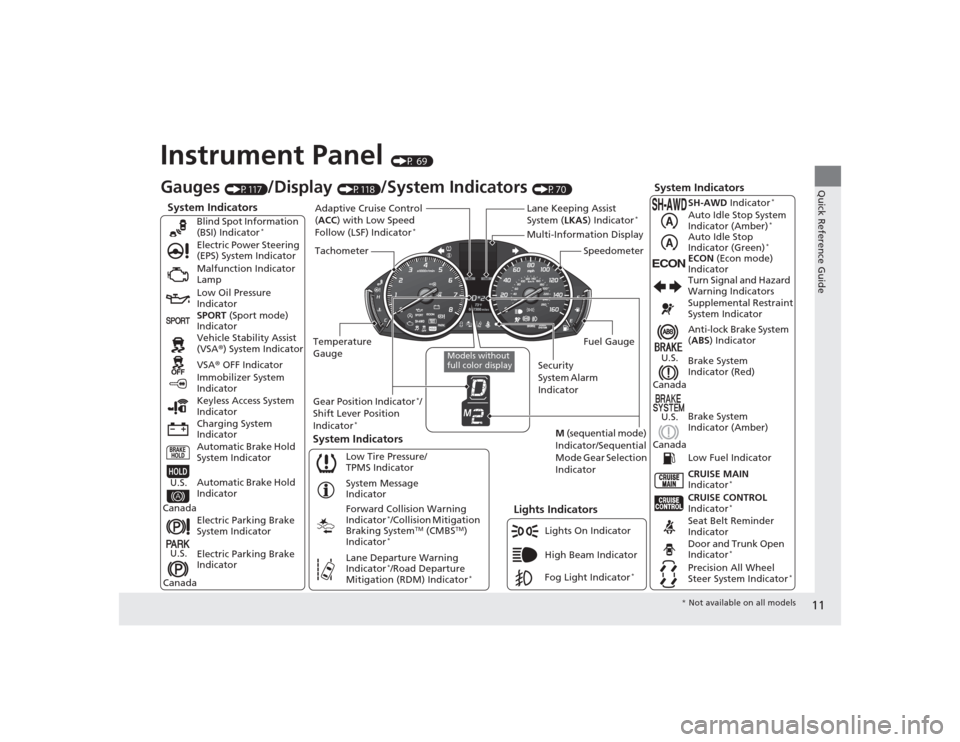
System Indicators
Malfunction Indicator
Lamp
Low Oil Pressure
Indicator
Charging System
Indicator Vehicle Stability Assist
(VSA®) System Indicator
VSA ® OFF Indicator
Electric Power Steering
(EPS) System Indicator
Lights Indicators
Lights On Indicator
High Beam Indicator
Immobilizer System
Indicator
System Indicators
System Message
Indicator
Gauges
(P117)
/Display
(P118)
/System Indicators
(P70)
Low Tire Pressure/
TPMS Indicator
Keyless Access System
Indicator
Electric Parking Brake
System Indicator
Electric Parking Brake
Indicator Automatic Brake Hold
System Indicator SPORT
(Sport mode)
Indicator Blind Spot Information
(BSI) Indicator
*
Forward Collision Warning
Indicator
*/Collision Mitigation
Braking System
TM (CMBS
TM)
Indicator
*
Lane Departure Warning
Indicator
*/Road Departure
Mitigation (RDM) Indicator
*
Automatic Brake Hold
Indicator
U.S.
CanadaU.S.
Canada
Fog Light Indicator
*
Temperature
Gauge Security
System Alarm
IndicatorFuel Gauge
Tachometer
Multi-Information Display
Speedometer
Gear Position Indicator
*/
Shift Lever Position
Indicator
*
M (sequential mode)
Indicator/Sequential
Mode Gear Selection
Indicator
System Indicators
Lane Keeping Assist
System ( LKAS) Indicator
*
Adaptive Cruise Control
(ACC ) with Low Speed
Follow (LSF) Indicator
*
Models without
full color display
Anti-lock Brake System
( ABS ) Indicator
Seat Belt Reminder
Indicator CRUISE CONTROL
Indicator
*
Brake System
Indicator (Red) Supplemental Restraint
System Indicator
CRUISE MAIN
Indicator
*
Low Fuel Indicator Turn Signal and Hazard
Warning Indicators
Brake System
Indicator (Amber)
U.S.
Canada
U.S.
Canada
Door and Trunk Open
Indicator
*
Precision All Wheel
Steer System Indicator
*
ECON
ECON (Econ mode)
Indicator SH-AWD Indicator
*
Auto Idle Stop System
Indicator (Amber)
*
Auto Idle Stop
Indicator (Green)
*
* Not available on all models
Page 75 of 545

74
uuIndicators u
Instrument Panel
*1:On the left: Models with full color display
On the right: Models without full color displayIndicator
Name
On/Blinking
Explanation
Message
*1
Malfunction
Indicator Lamp
●Comes on when you set the
power mode to ON, and goes
off either when the engine
starts or after several seconds
if the engine is not started. If
“readiness codes” have not
been set, it blinks five times
before it goes off.●Comes on if there is a
problem with the emissions
control system.●Blinks when a misfire in the
engine’s cylinders is detected.
●Readiness codes are part of the on board
diagnostics for the emissions control
systems.
2Testing of Readiness Codes P. 527
●Comes on while driving - Have your
vehicle checked by a dealer.●Blinks while driving - Stop in a safe place
where there are no flammable objects. Stop
the engine for 10 minutes or more, and
wait for it to cool down. Then, take the
vehicle to a dealer.
2 If the Malfunction Indicator Lamp
Comes On or Blinks P. 506
Charging
System
Indicator
●Comes on when you set the
power mode to ON, and goes
off when the engine starts.●Comes on when the battery is
not charging.
●Comes on while driving - Turn off the
climate control system and rear defogger in
order to reduce electricity consumption.
2 If the Charging System Indicator
Comes On P. 505
Page 97 of 545

96
uuIndicators uMulti-Information Display Warn ing and Information Messages
Instrument Panel
*1:On the left: Models with full color display
On the right: Models without full color display
Message
*1
Condition
Explanation
●Appears when the transmission system temperature
is too high. The vehicle no longer moves.
●Immediately stop in a safe place in
(P
.
●Let the engine idle until the message disappears.
●Appears when the engine coolant temperature gets
abnormally high.
2Overheating P. 503
●Appears when there is a problem with the sensor on
the battery.●Appears along with the battery charging system
indicator when the battery is not charging.
●Have your vehicle checked by a dealer.
2Checking the Battery P. 465
●Turn off the climate control system and rear
defogger to reduce electricity consumption.
2If the Charging System Indicator Comes On
P. 505
Page 116 of 545

115
uuIndicators uMulti-Information Display Warning and Information Messages
Continued
Instrument Panel
Message
Condition
Explanation
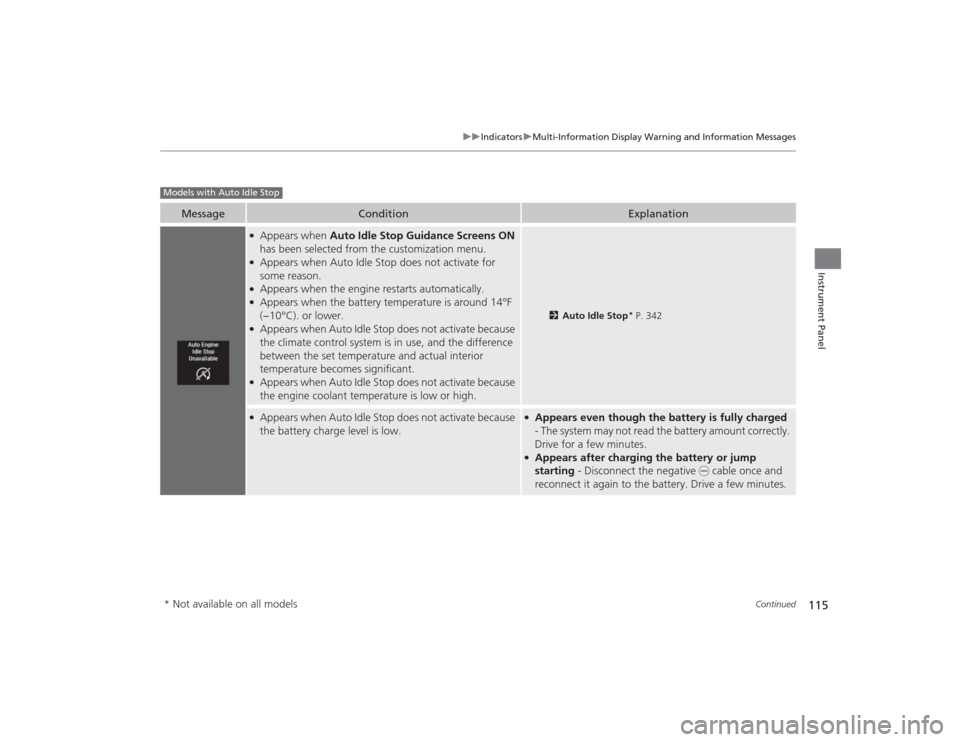
●Appears when Auto Idle Stop Guidance Screens ON
has been selected from the customization menu.●Appears when Auto Idle Stop does not activate for
some reason.●Appears when the engine restarts automatically.●Appears when the battery temperature is around 14°F
(−10°C). or lower.●Appears when Auto Idle Stop does not activate because
the climate control system is in use, and the difference
between the set temperature and actual interior
temperature becomes significant.●Appears when Auto Idle Stop does not activate because
the engine coolant temperature is low or high.
2 Auto Idle Stop
* P. 342
●Appears when Auto Idle Stop does not activate because
the battery charge level is low.
●Appears even though the battery is fully charged
- The system may not read the battery amount correctly.
Drive for a few minutes.●Appears after charging the battery or jump
starting - Disconnect the negative - cable once and
reconnect it again to the battery. Drive a few minutes.
Models with Auto Idle Stop* Not available on all models
Page 466 of 545

465Maintenance
BatteryChecking the BatteryThe battery condition is being monitored by the sensor on the negative terminal. If
there is a problem with the sensor, the warning message on multi-information
display will let you know. Have your vehicle checked by a dealer.
If your vehicle’s battery is disconnected or goes dead:
• The audio system is disabled.
2 Reactivating the audio system P. 213
•The clock resets.
2 Clock P. 138
•The navigation system
* is disabled.
2 Refer to the Navigation System Manual
Charging the Battery
*
Disconnect both battery cables to prevent damaging your vehicle’s electrical system.
Always disconnect the negative (–) cable first, and reconnect it last.
1 BatteryWARNING: Battery post, terminals,
and related accessori es contain lead
and lead compounds.
Wash your hands after handling.When you find corrosion, clean the battery terminals
by applying a baking powder and water solution.
Clean terminals with a damp towel. Cloth/towel dry
the battery. Coat the termina ls with grease to help
prevent future corrosion.
When replacing the battery, the replacement must be
of the same specifications.
Please consult a dealer for more information.
3
WARNING
The battery gives off explosive hydrogen
gas during normal operation.
A spark or flame can cause the battery to
explode with enough force to kill or
seriously hurt you.
When conducting any battery
maintenance, wear protective clothing and
a face shield, or have a skilled technician do
it.
* Not available on all models
Page 467 of 545

466
uuBattery uCharging the AGM Battery
*
Maintenance
Charging the AGM Battery
*
AGM labeled batteries like those installed in your vehicle require a compatible
charger to be properly ch arged. Damage to the battery can result if the battery is
charged improperly or with the wrong equipment. For more information on how to
charge your vehicle’s AGM battery, consult a dealer.
1 Battery
The 12-volt ba ttery installed in this vehicle is
specifically designed for a model with Auto Idle Stop.
Using a 12-volt battery other than this specified type
may shorten the battery life, and prevent Auto Idle
Stop from activating. If you need to replace the
battery, make sure to select the specified type. Ask a
dealer for more details.Models with Auto Idle Stop
* Not available on all models
Page 476 of 545

475
Handling the Unexpected
This chapter explains how to handle unexpected troubles.
Tools
Types of Tools .................................. 476
If a Tire Goes Flat Temporarily Repairing a Flat Tire....... 477
Changing a Flat Tire ......................... 489
Engine Does Not Start Checking the Engine ........................ 495
If the Keyless Access Remote Battery is Weak ............................................. 496
Emergency Engine Stop ................... 497
Jump Starting .................................... 498
Shift Lever Does Not Move .............. 502Overheating
How to Handle Overheating............. 503
Indicator, Coming On/Blinking
If the Low Oil Pressure Indicator Comes On .. 505If the Charging System Indicator Comes On ................................................. 505
If the Malfunction Indicator Lamp Comes On or Blinks ................................... 506If the Brake System Indicator (Red) Comes On .. 506If the Electric Power Steering (EPS) System Indicator Comes On ........................... 507
If the Electric Parking Brake System Indicator Comes On ....................... 507 If the Low Tire Pressure/TPMS Indicator
Comes On or Blinks ....................... 508
If the Transmission Indicator Blinks along with the Warning Message.............. 509
Fuses Fuse Locations ................................. 510
Inspecting and Changing Fuses ........ 514
Emergency Towing ........................... 515
When You Cannot Unlock the Fuel Fill Door ................................................. 516
When You Cannot Open the Trunk ..... 517RefuelingRefueling From a Portable Fuel Container ... 518
Page 500 of 545

499
uuJump Starting u
Continued
Handling the Unexpected
3.Connect the first jumper cable to your
vehicle’s battery + terminal.
4. Connect the other end of the first jumper
cable to the booster battery + terminal.
u Use a 12-volt booster battery only.
u When using an automotive battery
charger to boost your 12-volt battery,
select a lower charging voltage than 15-
volt. Check the charger manual for the
proper setting.
5. Connect the second jumper cable to the
booster battery - terminal.
Booster Battery4-cylinder models
All models
6-cylinder modelsBooster Battery