2015 Acura RDX steering wheel
[x] Cancel search: steering wheelPage 27 of 71
46 || 47
AUDIO AND CONNECTIVITY
AUDIO AND CONNECTIVITY
TABLE OF
CONTENTS
VISUAL INDEX
SAFETY
INFORMATION
INSTRUMENT PANEL
VEHICLE
CONTROLS
AUDIO AND
CONNECTIVITY
BLUETOOTH®
HANDSFREELINK®
ACURALINK®
INDEX
VOICE COMMAND INDEX
CLIENT
INFORMATION
SPECIFICATIONS
MAINTENANCE
HANDLING THE UNEXPECTED
DRIVING
NAVIGATION
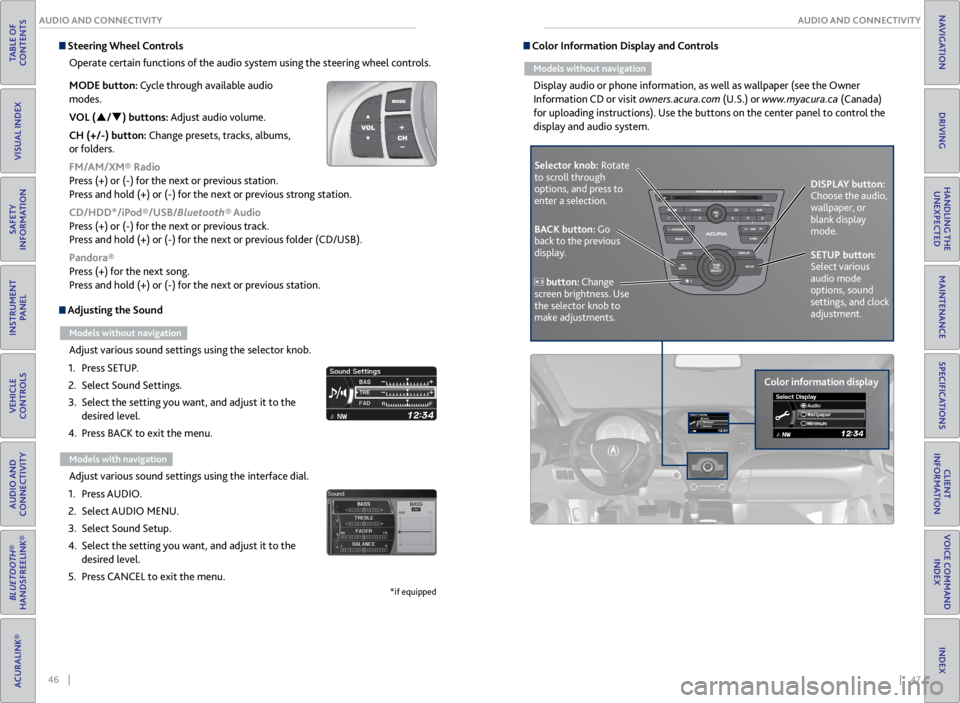
Adjusting the Sound
Models without navigation
Adjust various sound settings using the selector knob.
1. Press SETUP.
2. Select Sound Settings.
3. Select the setting you want, and adjust it to the
desired level.
4. Press BACK to exit the menu.
Models with navigation
Adjust various sound settings using the interface dial.
1. Press AUDIO.
2. Select AUDIO MENU.
3. Select Sound Setup.
4. Select the setting you want, and adjust it to the
desired level.
5. Press CANCEL to exit the menu.
*if equipped
Steering Wheel Controls
Operate certain functions of the audio system using the steering wheel controls.
MODE button: Cycle through available audio
modes.
VOL (p/q) buttons: Adjust audio volume.
CH (+/-) button: Change presets, tracks, albums,
or folders.
FM/AM/XM® Radio
Press (+) or (-) for the next or previous station.
Press and hold (+) or (-) for the next or previous strong station.
CD/HDD*/iPod®/USB/Bluetooth® Audio
Press (+) or (-) for the next or previous track.
Press and hold (+) or (-) for the next or previous folder (CD/USB).
Pandora®
Press (+) for the next song.
Press and hold (+) or (-) for the next or previous station. Color Information Display and Controls
Models without navigation
Display audio or phone information, as well as wallpaper (see the Owner
Information CD or visit owners.acura.com (U.S.) or www.myacura.ca (Canada)
for uploading instructions). Use the buttons on the center panel to control the
display and audio system.
Selector knob: Rotate
to scroll through
options, and press to
enter a selection.
Color information displayDISPLAY button:
Choose the audio,
wallpaper, or
blank display
mode.
SETUP button:
Select various
audio mode
options, sound
settings, and clock
adjustment.
BACK button: Go
back to the previous
display.
button: Change
screen brightness. Use
the selector knob to
make adjustments.
Page 40 of 71
72 || 73
NAVIGATION
NAVIGATION
TABLE OF
CONTENTS
VISUAL INDEX
SAFETY
INFORMATION
INSTRUMENT PANEL
VEHICLE
CONTROLS
AUDIO AND
CONNECTIVITY
BLUETOOTH®
HANDSFREELINK®
ACURALINK®
INDEX
VOICE COMMAND INDEX
CLIENT
INFORMATION
SPECIFICATIONS
MAINTENANCE
HANDLING THE UNEXPECTED
DRIVING
NAVIGATION
Learn how to enter a destination and operate the navigation system.
Basic Navigation Operation
A real-time navigation system uses GPS and a map database to show your current
location and help guide you to a desired destination. You can operate the system
using voice commands or the system controls.
To reduce the potential for driver distraction, certain manual functions may
be inoperable or grayed out while the vehicle is moving. Voice commands are
always available.
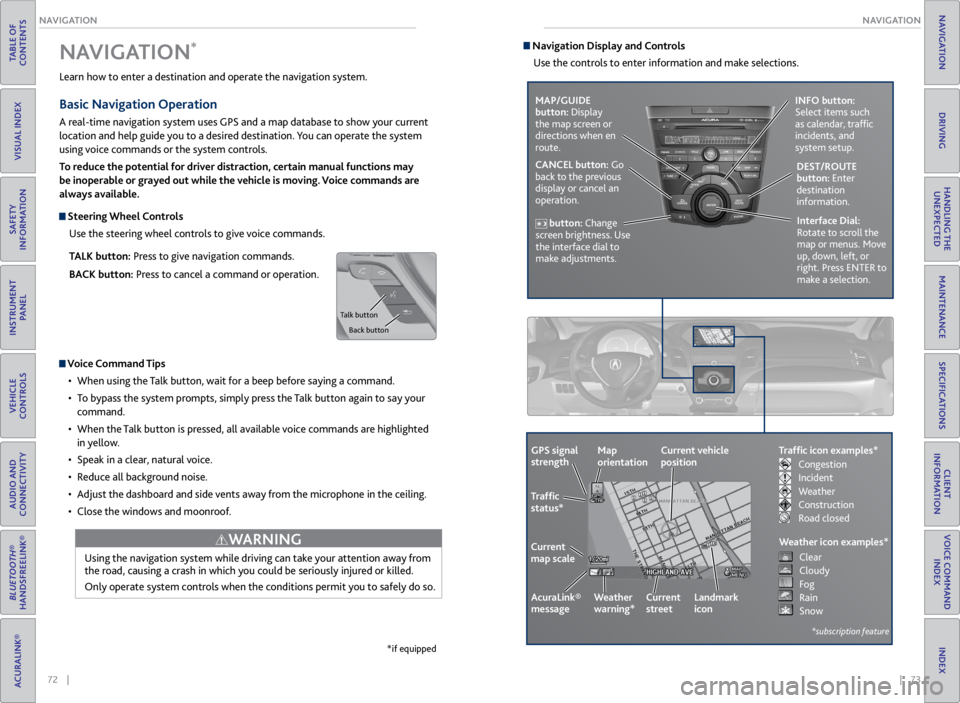
Steering Wheel Controls
Use the steering wheel controls to give voice commands.
TALK button: Press to give navigation commands.
BACK button: Press to cancel a command or operation.
Voice Command Tips
• When using the Talk button, wait for a beep before saying a command.
• To bypass the system prompts, simply press the Talk button again to say your
command.
• When the Talk button is pressed, all available voice commands are highlighted
in yellow.
• Speak in a clear, natural voice.
• Reduce all background noise.
• Adjust the dashboard and side vents away from the microphone in the ceiling.
• Close the windows and moonroof.
Using the navigation system while driving can take your attention away from
the road, causing a crash in which you could be seriously injured or killed.
Only operate system controls when the conditions permit you to safely do so.
WARNING
NAVIGATION*
*if equipped
Talk button
Back button
Navigation Display and ControlsUse the controls to enter information and make selections.
MAP/GUIDE
button: Display
the map screen or
directions when en
route. INFO button:
Select items such
as calendar, traffic
incidents, and
system setup.
CANCEL button: Go
back to the previous
display or cancel an
operation. DEST/ROUTE
button: Enter
destination
information.
button: Change
screen brightness. Use
the interface dial to
make adjustments. Interface Dial:
Rotate to scroll the
map or menus. Move
up, down, left, or
right. Press ENTER to
make a selection.
GPS signal
strength
Traffic
status*
Current
map scale Current vehicle
position
AcuraLink®
message Weather
warning*Map
orientation
Current
streetLandmark
icon
*subscription feature
Traffic icon examples*
Weather icon examples*
Congestion
Incident
Weather
Construction
Road closed Clear
Cloudy
Fog
Rain
Snow
Page 43 of 71
78 || 79
DRIVING
DRIVING
TABLE OF
CONTENTS
VISUAL INDEX
SAFETY
INFORMATION
INSTRUMENT PANEL
VEHICLE
CONTROLS
AUDIO AND
CONNECTIVITY
BLUETOOTH®
HANDSFREELINK®
ACURALINK®
INDEX
VOICE COMMAND INDEX
CLIENT
INFORMATION
SPECIFICATIONS
MAINTENANCE
HANDLING THE UNEXPECTED
DRIVING
NAVIGATION
Learn about preparation for driving and other features.
Before Driving
Check the following items before you begin driving.
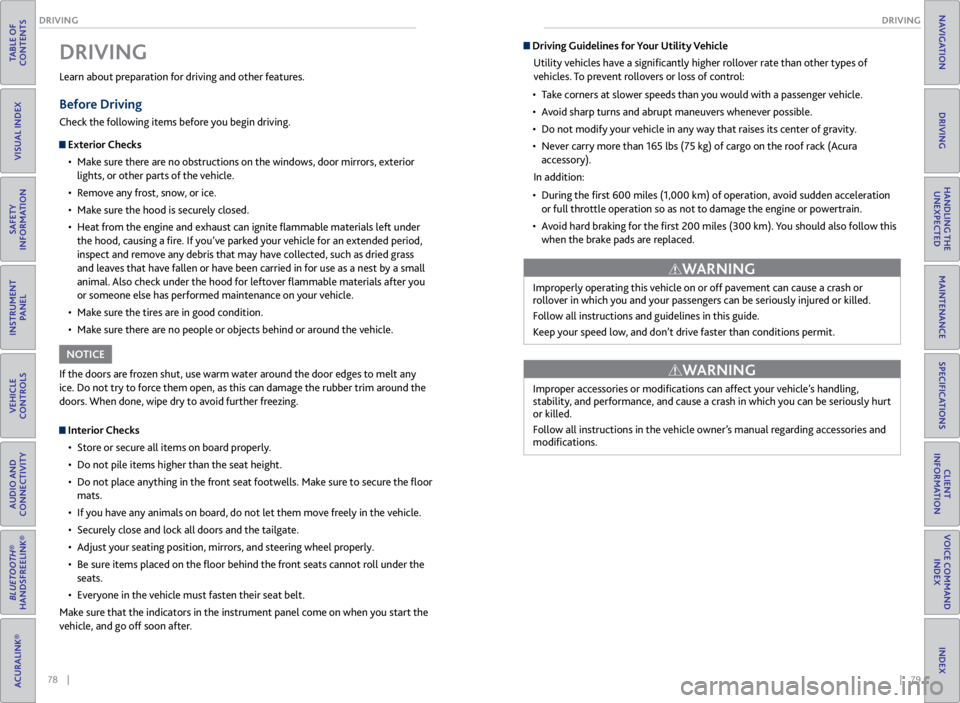
Exterior Checks
• Make sure there are no obstructions on the windows, door mirrors, exterior
lights, or other parts of the vehicle.
• Remove any frost, snow, or ice.
• Make sure the hood is securely closed.
• Heat from the engine and exhaust can ignite flammable materials left under
the hood, causing a fire. If you’ve parked your vehicle for an extended period,
inspect and remove any debris that may have collected, such as dried grass
and leaves that have fallen or have been carried in for use as a nest by a small
animal. Also check under the hood for leftover flammable materials after you
or someone else has performed maintenance on your vehicle.
• Make sure the tires are in good condition.
• Make sure there are no people or objects behind or around the vehicle.
DRIVING
If the doors are frozen shut, use warm water around the door edges to melt any
ice. Do not try to force them open, as this can damage the rubber trim around the
doors. When done, wipe dry to avoid further freezing.
NOTICE
Interior Checks
• Store or secure all items on board properly.
• Do not pile items higher than the seat height.
• Do not place anything in the front seat footwells. Make sure to secure the floor
mats.
• If you have any animals on board, do not let them move freely in the vehicle.
• Securely close and lock all doors and the tailgate.
• Adjust your seating position, mirrors, and steering wheel properly.
• Be sure items placed on the floor behind the front seats cannot roll under the
seats.
• Everyone in the vehicle must fasten their seat belt.
Make sure that the indicators in the instrument panel come on when you start the
vehicle, and go off soon after.
Driving Guidelines for Your Utility Vehicle
Utility vehicles have a significantly higher rollover rate than other types of
vehicles. To prevent rollovers or loss of control:
• Take corners at slower speeds than you would with a passenger vehicle.
• Avoid sharp turns and abrupt maneuvers whenever possible.
• Do not modify your vehicle in any way that raises its center of gravity.
• Never carry more than 165 lbs (75 kg) of cargo on the roof rack (Acura
accessory).
In addition:
• During the first 600 miles (1,000 km) of operation, avoid sudden acceleration
or full throttle operation so as not to damage the engine or powertrain.
• Avoid hard braking for the first 200 miles (300 km). You should also follow this
when the brake pads are replaced.
Improperly operating this vehicle on or off pavement can cause a crash or
rollover in which you and your passengers can be seriously injured or killed.
Follow all instructions and guidelines in this guide.
Keep your speed low, and don’t drive faster than conditions permit.
WARNING
Improper accessories or modifications can affect your vehicle’s handling,
stability, and performance, and cause a crash in which you can be seriously hurt
or killed.
Follow all instructions in the vehicle owner’s manual regarding accessories and
modifications.
WARNING
Page 46 of 71
84 || 85
DRIVING
DRIVING
TABLE OF
CONTENTS
VISUAL INDEX
SAFETY
INFORMATION
INSTRUMENT PANEL
VEHICLE
CONTROLS
AUDIO AND
CONNECTIVITY
BLUETOOTH®
HANDSFREELINK®
ACURALINK®
INDEX
VOICE COMMAND INDEX
CLIENT
INFORMATION
SPECIFICATIONS
MAINTENANCE
HANDLING THE UNEXPECTED
DRIVING
NAVIGATION
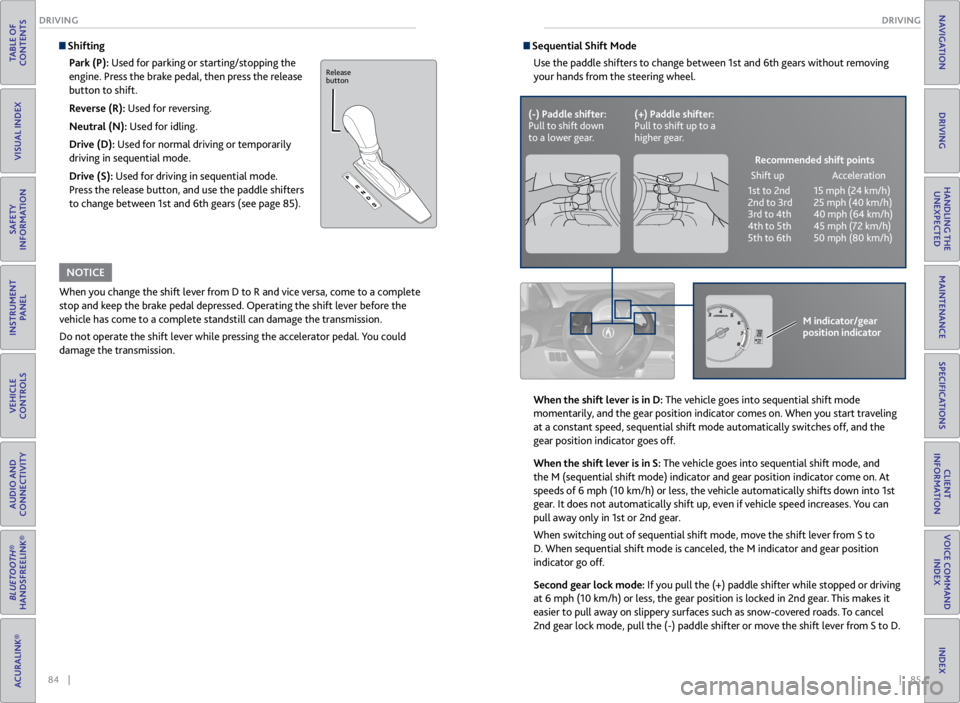
Shifting
Park (P): Used for parking or starting/stopping the
engine. Press the brake pedal, then press the release
button to shift.
Reverse (R): Used for reversing.
Neutral (N): Used for idling.
Drive (D): Used for normal driving or temporarily
driving in sequential mode.
Drive (S): Used for driving in sequential mode.
Press the release button, and use the paddle shifters
to change between 1st and 6th gears (see page 85).
When you change the shift lever from D to R and vice versa, come to a complete
stop and keep the brake pedal depressed. Operating the shift lever before the
vehicle has come to a complete standstill can damage the transmission.
Do not operate the shift lever while pressing the accelerator pedal. You could
damage the transmission.
NOTICE
Release
button
Sequential Shift Mode
Use the paddle shifters to change between 1st and 6th gears without removing
your hands from the steering wheel.
When the shift lever is in D: The vehicle goes into sequential shift mode
momentarily, and the gear position indicator comes on. When you start traveling
at a constant speed, sequential shift mode automatically switches off, and the
gear position indicator goes off.
When the shift lever is in S: The vehicle goes into sequential shift mode, and
the M (sequential shift mode) indicator and gear position indicator co\
me on. At
speeds of 6 mph (10 km/h) or less, the vehicle automatically shifts down into 1st
gear. It does not automatically shift up, even if vehicle speed increases. You can
pull away only in 1st or 2nd gear.
When switching out of sequential shift mode, move the shift lever from S to
D. When sequential shift mode is canceled, the M indicator and gear position
indicator go off.
Second gear lock mode: If you pull the (+) paddle shifter while stopped or driving
at 6 mph (10 km/h) or less, the gear position is locked in 2nd gear. This makes it
easier to pull away on slippery surfaces such as snow-covered roads. To cancel
2nd gear lock mode, pull the (-) paddle shifter or move the shift lever from S to D.
(-) Paddle shifter:
Pull to shift down
to a lower gear. (+) Paddle shifter:
Pull to shift up to a
higher gear.
Recommended shift points
Shift up Acceleration
1st to 2nd 15 mph (24 km/h)
2nd to 3rd 25 mph (40 km/h)
3rd to 4th 40 mph (64 km/h)
4th to 5th 45 mph (72 km/h)
5th to 6th 50 mph (80 km/h)
M indicator/gear
position indicator
Page 47 of 71
86 || 87
DRIVING
DRIVING
TABLE OF
CONTENTS
VISUAL INDEX
SAFETY
INFORMATION
INSTRUMENT PANEL
VEHICLE
CONTROLS
AUDIO AND
CONNECTIVITY
BLUETOOTH®
HANDSFREELINK®
ACURALINK®
INDEX
VOICE COMMAND INDEX
CLIENT
INFORMATION
SPECIFICATIONS
MAINTENANCE
HANDLING THE UNEXPECTED
DRIVING
NAVIGATION
Braking
Slow down or stop your vehicle, and keep it from moving when parked.
Foot Brake
Press the brake pedal to slow down or stop
your vehicle from moving.
Parking BrakeKeep the vehicle from moving when it is parked.
To apply: Press the parking brake with your
foot.
To release: Press the brake pedal, then press
the parking brake until it releases. Brake Assist System
During hard or emergency braking, the system increases braking force. The brake
pedal may move slightly or make a noise; this is normal. Continue to hold the
brake pedal firmly down.
Anti-Lock Brake System (ABS)
During hard or emergency braking, the system rapidly pumps the brakes to
prevent wheel lockup and help you maintain steering control. The brake pedal
may pulsate slightly during ABS operation; this is normal. Do not pump the brake
pedal, and continue to hold it firmly down.
The ABS may not function correctly if you use an incorrect tire type and size.
Release the parking brake fully before driving. The rear brakes and axle can be
damaged if you drive with the parking brake applied.
NOTICE
NOTICE
Parking brake
Foot brake
Vehicle Stability Assist (VSA®), aka Electronic Stability Control
(ESC) System
Helps to stabilize the vehicle during cornering if the vehicle turns more or less
than what was intended. It assists in maintaining traction on slippery surfaces by
regulating engine output and selectively applying the brakes.
Turning VSA On or Off VSA is turned on every time you turn on the vehicle, even if you previously turned
it off. If you turn VSA off, your vehicle has normal braking and cornering ability,
but not VSA traction and stability enhancement.
Press and hold the VSA OFF button until you
hear a beep to turn VSA on or off. The VSA OFF
indicator appears when the system is off.
Traction control stops functioning, which may
make it easier when trying to free your vehicle
if it is stuck in mud or snow.
VSA OFF indicator
VSA OFF
button
Page 51 of 71

94 || 95
HANDLING THE UNEXPECTED
HANDLING THE UNEXPECTED
TABLE OF
CONTENTS
VISUAL INDEX
SAFETY
INFORMATION
INSTRUMENT PANEL
VEHICLE
CONTROLS
AUDIO AND
CONNECTIVITY
BLUETOOTH®
HANDSFREELINK®
ACURALINK®
INDEX
VOICE COMMAND INDEX
CLIENT
INFORMATION
SPECIFICATIONS
MAINTENANCE
HANDLING THE UNEXPECTED
DRIVING
NAVIGATION
Emergency Engine Stop
The ENGINE START/STOP button may be used to stop the engine due to an
emergency situation even while driving. If you must stop the engine, choose one of
the following operations:
• Press and hold the ENGINE START/STOP
button for three seconds, OR
• Firmly press the ENGINE START/STOP button
three times.
The steering wheel will not lock. The power mode changes to ACCESSORY, unless
the shift lever is in Park (P), in which case the power mode changes to VEHICLE OFF.
Because turning off the engine also disables the power assist the engine provides to
the steering and braking systems, it will require significantly more physical effort
and time to steer and slow the vehicle. Downshift gears and use both feet on the
brake pedal, if necessary, to slow the vehicle and stop immediately in a safe place.
Trying to lift or tow your vehicle by the bumpers will cause serious damage. The
bumpers are not designed to support the vehicle’s weight.
Improper towing such as towing behind a motorhome or other motor vehicle can
damage the transmission.
NOTICE
NOTICE
Emergency Towing
Call a professional towing service if you need to tow your vehicle.
All models
Flat bed equipment: The operator loads your vehicle on the back of a truck. This is
the best way to transport your vehicle.
2WD models
Wheel lift equipment: The tow truck uses two pivoting arms that go under the front
tires and lift them off the ground. The rear tires remain on the ground. This is an
acceptable way to tow your vehicle. Do not press the button while driving unless it is absolutely necessary for the
engine to be switched off.
Tire Pressure Monitoring System (TPMS)
Monitors the tire pressure while you are driving.
If your vehicle’s tire pressure becomes significantly low, the low tire pressure
indicator comes on and a message appears on the multi-information display.
What to Do
Stop your vehicle in a safe place. Adjust the tire pressure to the specified level on
a label on the driver’s doorjamb.
Driving on an extremely underinflated tire can cause it to overheat. An overheated
tire can fail. Always inflate your tires to the specified pressure.
NOTICE
Press the INFO button to
scroll to the tire pressure
monitor to see which
tire(s) have low pressure.
Tire
pressure
monitor
The
specific
tire is
displayed.
Page 52 of 71

96 || 97
HANDLING THE UNEXPECTED
HANDLING THE UNEXPECTED
TABLE OF
CONTENTS
VISUAL INDEX
SAFETY
INFORMATION
INSTRUMENT PANEL
VEHICLE
CONTROLS
AUDIO AND
CONNECTIVITY
BLUETOOTH®
HANDSFREELINK®
ACURALINK®
INDEX
VOICE COMMAND INDEX
CLIENT
INFORMATION
SPECIFICATIONS
MAINTENANCE
HANDLING THE UNEXPECTED
DRIVING
NAVIGATION
Changing a Flat Tire
If a tire goes flat while driving, grasp the steering wheel firmly, and brake gradually
to reduce speed. Stop in a safe place. Replace the flat tire with the compact spare
tire. Go to a dealer as soon as possible to have the full-size tire repaired or replaced.
Getting Ready to Change the Tire
Park the vehicle on a firm, level, non-slippery surface. Move the shift lever to Park
(P), and apply the parking brake. Turn the hazard warning lights on and turn the
vehicle off.
1. Open the tailgate. Turn on the cargo lights on
the inside of the tailgate, if necessary (see page
34). Open the cargo area floor lid.
2. Take the wheel nut wrench and jack handle bar
out of the cargo area.
3. Unscrew the wing bolt, and remove the spacer
cone. Then, remove the spare tire.
4. Take the jack out of the spare tire area.
5. Loosen each wheel nut about one turn using the
wheel nut wrench.
Spare Tire
Tool Case
Wheel
Blocks
The tire to be replaced.Spare tire
Setting Up the Jack
1. Place the jack under the jacking point closest to
the tire to be changed.
2. Turn the end bracket (as shown in the image)
clockwise until the top of the jack contacts the
jacking point. Make sure that the jacking point
tab is resting in the jack notch.
3. Raise the vehicle, using the jack handle bar and
the jack handle, until the tire is off the ground.
The following instructions must be followed to use the jack safely:
• Do not use the jack with people or luggage in the vehicle.
• Use the jack provided in your vehicle. Other jacks may not support the weight
(“load”) or fit the jacking point.
• Do not use while the engine is running.
• Use only where the ground is firm and level.
• Use only at the jacking points.
• Do not get in the vehicle while using the jack.
• Do not put anything on top of or underneath the jack.
The vehicle can easily roll off the jack, seriously injuring anyone underneath.
Follow the directions for changing a tire exactly, and never get under the
vehicle when it is supported only by the jack.
WARNING
Jack
handle bar
Wheel nut wrench as
jack handle
Page 69 of 71

130 || 131
INDEX
VOICE COMMAND INDEX
TABLE OF
CONTENTS
VISUAL INDEX
SAFETY
INFORMATION
INSTRUMENT PANEL
VEHICLE
CONTROLS
AUDIO AND
CONNECTIVITY
BLUETOOTH®
HANDSFREELINK®
ACURALINK®
INDEX
VOICE COMMAND INDEX
CLIENT
INFORMATION
SPECIFICATIONS
MAINTENANCE
HANDLING THE UNEXPECTED
DRIVING
NAVIGATION
Main Setup Screen Commands
The system accepts these commands on the Main Setup screen.
On-screen CommandsThe system accepts these commands on any screen where applicable. All
available on-screen voice commands are highlighted in blue when you press the
Talk button.
• Next (or Down)
• Previous (or Up)
• Return
• OK (excluding Startup Confirmation screen)
• Delete
•
Brightness up
• Brightness down
• Brightness minimum/min.
• Brightness maximum/max.
• Contrast up
• Contrast down
• Contrast minimum/min.
• Contrast maximum/max.
• Black level up
• Black level down •
Black level minimum/min.
• Black level maximum/max.
• Volume up
• Volume down
• Volume minimum/min.
• Volume maximum/max.
• Volume off
• Interface dial feedback off
• Interface dial feedback auto
• Interface dial feedback on
INDEX
ABS indicator ................................................... 24
AC button ........................................................ 43
AcuraLink® ....................................................... 71
AcuraLink Real-Time Traffic™ ....................... 77
Acura Total Luxury Care Roadside Assistance ... 123
Advanced Airbags ............................................. 9
Airbags .............................................................. 9
Advanced Airbags ........................................ 9
Airbag Care ................................................. 14
Airbag System Components ....................13
Airbag System Indicators .......................... 11
Front Airbags (SRS) ..................................... 9
Important Facts About Your Airbags ...... 11
Passenger Airbag Off Indicator ............... 12
Side Airbags ................................................ 10
Side Airbag Off indicator ......................... 25
Side Curtain Airbags ................................. 10
All-Wheel Drive (AWD) indicator ................ 24
Anti-lock Brake System (ABS) ..................... 86
Anti-lock Brake System (ABS) indicator ..... 24
Audio Operation ............................................ 45
Adjusting the Sound ................................ 46
Audio Commands .................................... 127
Auxiliary Input Jack .................................. 45
Bluetooth® Audio ..................................... 58
Compact Disc (CD) ................................... 52
FM/AM Radio ............................................ 48
Hard Disc Drive (HDD) Audio ................. 62
iPod® .......................................................... 54
Pandora® ................................................... 60
Song By Voice™ Commands ................. 129
Steering Wheel Controls ......................... 46
USB Adapter Cable ................................... 45
USB Flash Drive ......................................... 56
XM® Radio ................................................. 50
Automatic Dimming Rearview Mirror ........40
Auxiliary Input Jack ........................................ 45
AWD indicator ................................................. 24
Battery .......................................................... 110
Bluetooth® Audio .......................................... 58
Bluetooth® Audio Commands .................... 128
Bluetooth® HandsFreeLink® ........................ 63
Cellular Phone Commands .................... 129
Making a Call ....................................... 65, 69
Pairing a Phone .................................. 64, 68
Phonebook .......................................... 65, 69
SMS Text Messaging .......................... 66, 70
Speed Dial .............................. 65, 66, 69, 70
Voice Command Tips ................................ 67
Brake Assist System ....................................... 86
Brake system indicator ........................... 23, 24
Braking ........................................................... 86Anti-Lock Brake System (ABS) ...............
86
Brake Assist System ................................. 86
Foot Brake .................................................. 86
Parking Brake ............................................ 86
Carbon Monoxide Gas ..................................... 4
Cargo Lights .................................................... 34
Cellular Phone Commands ......................... 129
Changing a Flat Tire ....................................... 96
Changing Fuses ............................................. 101
Changing Wiper Blades ................................. 111
Charging system indicator ............................ 23
Checking the Battery ................................... 110
Childproof Door Locks .................................. 30
Child Safety ..................................................... 15
Childproof Door Locks ............................ 30
Protecting Child Passengers .................... 15
Protecting Infants ..................................... 16
Protecting Larger Children ..................... 20
Protecting Smaller Children .................... 17
Child Seat ......................................................... 17
Adding Security with a Tether ................ 20
Installing with a Lap/Shoulder Seat Belt .. 19
Installing a LATCH-Compatible Child Seat .. 18
Selecting a Child Seat ............................... 17
Client Information ........................................ 121
Contact Us ................................................ 122
Frequently Asked Questions ................. 121
Roadside Assistance ................................ 123
Warranty Coverages ............................... 123
Climate Control ............................................. 43
Climate Control Commands ....................... 126
Clock ........................................................... 44
Color Information Display ............................ 47
Compact Disc (CD) ......................................... 52
Compact Disc (CD) Commands ................. 127
Contact Us ..................................................... 122
Cruise Control ................................................ 88
Cruise Control indicators .............................. 25
Customized Settings ...................................... 27
Detour ............................................................ 77
Door Operation .............................................. 30
Door/tailgate open indicator ........................ 25
DOT Tire Quality Grading ........................... 116
Driving ............................................................ 78
Before Starting the Engine ..................... 83
Braking ....................................................... 86
Changing the Power Mode ..................... 83
Exterior Checks .......................................... 78
Guidelines for Your Utility Vehicle ......... 79
Interior Checks ........................................... 78
Sequential Shift Mode ............................. 85
Shifting ....................................................... 84