2015 Acura RDX brake
[x] Cancel search: brakePage 2 of 71

TABLE OF
CONTENTS
VISUAL INDEX
SAFETY
INFORMATION
INSTRUMENT PANEL
VEHICLE
CONTROLS
AUDIO AND
CONNECTIVITY
BLUETOOTH®
HANDSFREELINK®
ACURALINK®
INDEX
VOICE COMMAND INDEX
CLIENT
INFORMATION
SPECIFICATIONS
MAINTENANCE
HANDLING THE UNEXPECTED
DRIVING
NAVIGATION
Devices That Emit Radio Waves
The following products and systems on your vehicle emit radio waves when in
operation:
• Audio system
• Bluetooth® Audio
• Bluetooth® HandsFreeLink®
• HomeLink Universal Transceiver •
Immobilizer system
• Remote transmitter
• Keyless Access System
• Tire Pressure Monitoring System
DISCLOSURES
Event Data Recorders
This vehicle is equipped with an event data recorder (EDR). The main purpose
of an EDR is to record, in certain crash or near crash-like situations, such as an air
bag deployment or hitting a road obstacle, data that will assist in understanding
how a vehicle’s systems performed. The EDR is designed to record data related
to vehicle dynamics and safety systems for a short period of time, typically
30 seconds or less. The EDR in this vehicle is designed to record such data as:
• How various systems in your vehicle were operating;
• Whether or not the driver and passenger safety belts were buckled/
fastened;
• How far (if at all) the driver was depressing the accelerator and/or brake
pedal; and,
• How fast the vehicle was traveling.
These data can help provide a better understanding of the circumstances in which
crashes and injuries occur. NOTE: EDR data are recorded by your vehicle only if a
non-trivial crash situation occurs; no data are recorded by the EDR under normal
driving conditions and no personal data (e.g., name, gender, age, and crash
location) are recorded. However, other parties, such as law enforcement, could
combine the EDR data with the type of personally identifying data routinely
acquired during a crash investigation.
To read data recorded by an EDR, special equipment is required, and access to
the vehicle or the EDR is needed. In addition to the vehicle manufacturer, other
parties such as law enforcement that have the special equipment can read the
information if they have access to the vehicle or the EDR.
The data belong to the vehicle owner and may not be accessed by anyone else
except as legally required or with the permission of the vehicle owner.
Service Diagnostic Recorders This vehicle is equipped with service-related devices that record information
about powertrain performance. The data can be used to verify emissions law
requirements and/or help technicians diagnose and solve service problems. It
may also be combined with data from other sources for research purposes, but it
remains confidential.
Each of the above complies with the appropriate requirements or the required
standards of FCC (Federal Communications Commission) and Industry Canada,
described below:
As required by
the FCC:
This device complies with Part 15 of the FCC rules. Operation is subject to the
following two conditions: (1) This device may not cause harmful interference, and
(2) this device must accept any interference received, including interference that
may cause undesired operation.
Changes or modifications not expressly approved by the party responsible for
compliance could void the user’s authority to operate the equipment.
As required by Industry Canada:
This device complies with Industry Canada Standard RSS-Gen/210/310. Operation is
subject to the following two conditions: (1) this device may not cause interference,
and (2) this device must accept any interference, including interference that may
cause undesired operation of the device.
California Perchlorate Contamination Prevention Act
The airbags, seat belt tensioners, and CR-type batteries in this vehicle may
contain perchlorate materials—special handling may apply. See www.dtsc.ca.gov/
hazardouswaste/perchlorate/ for more information.
California Proposition 65 WarningWARNING: This product contains or emits chemicals known to the state of
California to cause cancer and birth defects or other reproductive harm.
Page 15 of 71

22 || 23
INSTRUMENT P
ANEL
SAFETY
TABLE OF
CONTENTS
VISUAL INDEX
SAFETY
INFORMATION
INSTRUMENT PANEL
VEHICLE
CONTROLS
AUDIO AND
CONNECTIVITY
BLUETOOTH®
HANDSFREELINK®
ACURALINK®
INDEX
VOICE COMMAND INDEX
CLIENT
INFORMATION
SPECIFICATIONS
MAINTENANCE
HANDLING THE UNEXPECTED
DRIVING
NAVIGATION
Reporting Safety Defects
In the U.S.
If you believe that your vehicle has a defect which could cause a crash or could
cause injury or death, you should immediately inform the National Highway Traffic
Safety Administration (NHTSA) in addition to notifying American Honda Motor
Co., Inc.
If NHTSA receives similar complaints, it may open an investigation, and if it finds
that a safety defect exists in a group of vehicles, it may order a recall and remedy
campaign. However, NHTSA cannot become involved in individual problems
between you, your dealer, or American Honda Motor Co., Inc.
To contact NHTSA, you may call the Vehicle Safety Hotline toll-free at (888)
327-4236 (TTY: 1-800-424-9153); go to http://www.safercar.gov; or write to:
Administrator, NHTSA, 1200 New Jersey Avenue, SE., Washington, DC 20590. You
can also obtain other information about motor vehicle safety from http://www.
safercar.gov.
In Canada
If you believe that your vehicle has a defect which could cause a crash or could
cause injury or death, you should immediately inform Honda Canada, Inc., and you
may also inform Transport Canada.
If Transport Canada receives similar complaints, it may open an investigation, and
if it finds that a safety defect exists in a group of vehicles, it may lead to a recall
and remedy campaign. However, Transport Canada cannot become involved in
individual problems between you, your dealer, or Honda Canada, Inc.
To contact Transport Canada’s Defect Investigations and Recalls Division, you may
call (800) 333-0510. For more information on reporting safety defects or about
motor vehicle safety, go to http://www.tc.gc.ca/roadsafety. Learn about the indicators, gauges, and displays related to driving the vehicle.
Indicators briefly appear
with each engine start and then go out. Red and amber
indicators are most critical. Blue and green indicators are used for general
information.
Malfunction Indicators
These are the most critical indicators. If they come on and stay lit while driving or
at any other time, there may be a problem. See your dealer if necessary.
Brake system
• Brake fluid is low.
• There is a malfunction in the brake system.
Press the brake pedal lightly to check pedal pressure. If normal, check
the brake fluid level when you stop. If abnormal, take immediate action.
If necessary, downshift the transmission to slow the vehicle using engine
braking. Have your vehicle repaired immediately.
Low oil pressure
Engine oil pressure is low. Stop in a safe place. Open the hood and check
the oil level, and add oil if necessary. If the indicator does not turn off, have
your vehicle repaired immediately.
Malfunction indicator lamp (check engine light)
• The emissions control system may have a problem, or the fuel cap is
missing or loose.
• (Blinks) A misfire in the engine’s cylinders is detected. Stop in a safe place,
and wait for the engine to cool down.
Charging system
The battery is not charging. Turn off all electrical items, but do not turn off
the vehicle to prevent further battery discharge. Have your vehicle repaired
immediately.
Canada U.S.
INSTRUMENT P
ANEL
Page 16 of 71

24 || 25
INSTRUMENT P
ANEL
INSTRUMENT P ANEL
TABLE OF
CONTENTS
VISUAL INDEX
SAFETY
INFORMATION
INSTRUMENT PANEL
VEHICLE
CONTROLS
AUDIO AND
CONNECTIVITY
BLUETOOTH®
HANDSFREELINK®
ACURALINK®
INDEX
VOICE COMMAND INDEX
CLIENT
INFORMATION
SPECIFICATIONS
MAINTENANCE
HANDLING THE UNEXPECTED
DRIVING
NAVIGATION
Anti-Lock Brake Sysytem (ABS)
There is a problem with the anti-lock brake system. Your vehicle still has
normal braking ability, but no anti-lock function.
Supplemental Restraint System (SRS)
There is a problem with one of the airbag systems or seat belt tensioners.
Electric Power Steering (EPS)
There is a problem with the electric power steering system.
Tire Pressure Monitoring System (TPMS)
(Blinks and stays on) There is a problem with the tire pressure monitoring
system, or the vehicle is fitted with the spare tire.
Keyless Access system
There is a problem with the keyless access system.
All-Wheel Drive (AWD) system*
• There is a problem with the AWD system. Only the front wheels are
powered.
• (Blinks) The AWD system has overheated and is inactive. Stop in a safe
place, shift to Park (P), and idle the engine until the indicator goes off.
Vehicle Stability Assist® (VSA®) system
• There is a problem with the VSA system or the hill start assist system.
• (Blinks) VSA is active.
Brake system
There is a problem with the hydraulic brake boost system.
Condition Indicators
These indicators may require you to perform an action.
Parking brake
Release the parking brake before driving. You will hear a beep if you drive
with it not fully released.
Seat belt reminder
Make sure seat belts are fastened for you and all passengers. The indicator
blinks and beeps sound continuously if you or your front passenger has not
fastened your seat belts when you begin driving. If the indicator remains on
after seat belts are fastened, see your dealer.
Low fuel
Refuel as soon as possible. If the indicator blinks, there is a problem with
the fuel gauge. See your dealer.
CanadaU.S.
*if equipped
Door/tailgate open
Close any open doors or the tailgate. A beep sounds if any doors or the
tailgate is opened while driving.
Low tire pressure
Stop in a safe place, check
tire pressures, and inflate tire(s) if necessary.
System message
When a condition or malfunction indicator comes on, a message also
appears on the multi-information display. Check the display for more
information.
Immobilizer
Your remote transmitter cannot be recognized by the vehicle. If the
indicator blinks, you may not be able to start the engine. Turn the vehicle
off and then on again. If it continues to blink, there may be a problem with
the system. See your dealer.
On/Off Indicators
These indicators remind you when an item is on or off.
VSA off
CRUISE MAIN on
CRUISE CONTROL on
Turn signals/hazards on Exterior lights on
Fog lights on*
High beams on
Side airbag off
Canada
U.S.
*if equipped
Page 43 of 71
78 || 79
DRIVING
DRIVING
TABLE OF
CONTENTS
VISUAL INDEX
SAFETY
INFORMATION
INSTRUMENT PANEL
VEHICLE
CONTROLS
AUDIO AND
CONNECTIVITY
BLUETOOTH®
HANDSFREELINK®
ACURALINK®
INDEX
VOICE COMMAND INDEX
CLIENT
INFORMATION
SPECIFICATIONS
MAINTENANCE
HANDLING THE UNEXPECTED
DRIVING
NAVIGATION
Learn about preparation for driving and other features.
Before Driving
Check the following items before you begin driving.
Exterior Checks
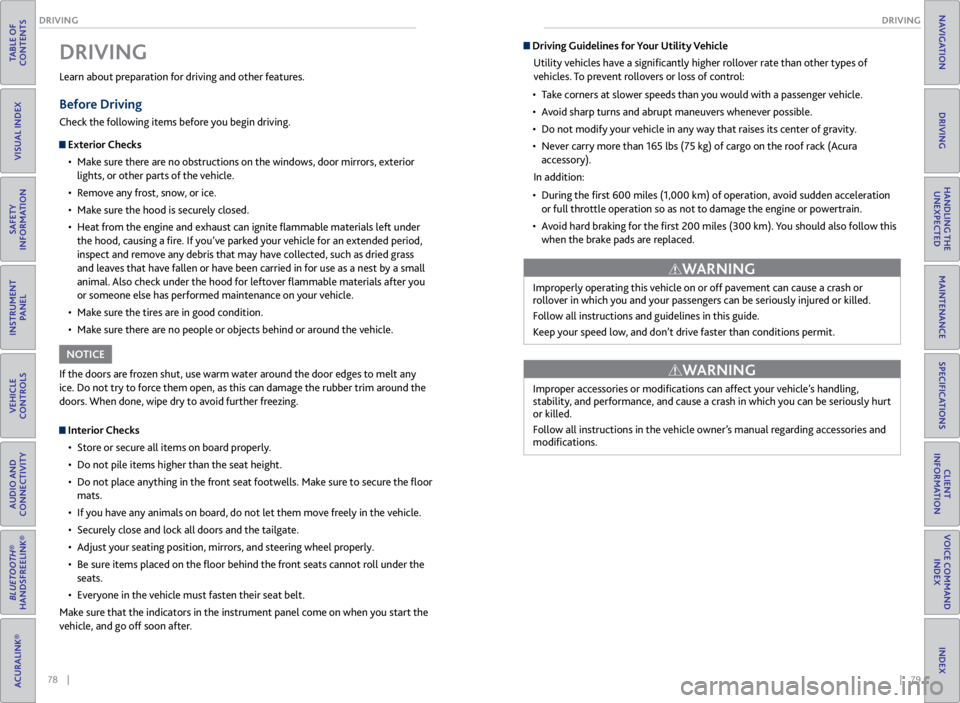
• Make sure there are no obstructions on the windows, door mirrors, exterior
lights, or other parts of the vehicle.
• Remove any frost, snow, or ice.
• Make sure the hood is securely closed.
• Heat from the engine and exhaust can ignite flammable materials left under
the hood, causing a fire. If you’ve parked your vehicle for an extended period,
inspect and remove any debris that may have collected, such as dried grass
and leaves that have fallen or have been carried in for use as a nest by a small
animal. Also check under the hood for leftover flammable materials after you
or someone else has performed maintenance on your vehicle.
• Make sure the tires are in good condition.
• Make sure there are no people or objects behind or around the vehicle.
DRIVING
If the doors are frozen shut, use warm water around the door edges to melt any
ice. Do not try to force them open, as this can damage the rubber trim around the
doors. When done, wipe dry to avoid further freezing.
NOTICE
Interior Checks
• Store or secure all items on board properly.
• Do not pile items higher than the seat height.
• Do not place anything in the front seat footwells. Make sure to secure the floor
mats.
• If you have any animals on board, do not let them move freely in the vehicle.
• Securely close and lock all doors and the tailgate.
• Adjust your seating position, mirrors, and steering wheel properly.
• Be sure items placed on the floor behind the front seats cannot roll under the
seats.
• Everyone in the vehicle must fasten their seat belt.
Make sure that the indicators in the instrument panel come on when you start the
vehicle, and go off soon after.
Driving Guidelines for Your Utility Vehicle
Utility vehicles have a significantly higher rollover rate than other types of
vehicles. To prevent rollovers or loss of control:
• Take corners at slower speeds than you would with a passenger vehicle.
• Avoid sharp turns and abrupt maneuvers whenever possible.
• Do not modify your vehicle in any way that raises its center of gravity.
• Never carry more than 165 lbs (75 kg) of cargo on the roof rack (Acura
accessory).
In addition:
• During the first 600 miles (1,000 km) of operation, avoid sudden acceleration
or full throttle operation so as not to damage the engine or powertrain.
• Avoid hard braking for the first 200 miles (300 km). You should also follow this
when the brake pads are replaced.
Improperly operating this vehicle on or off pavement can cause a crash or
rollover in which you and your passengers can be seriously injured or killed.
Follow all instructions and guidelines in this guide.
Keep your speed low, and don’t drive faster than conditions permit.
WARNING
Improper accessories or modifications can affect your vehicle’s handling,
stability, and performance, and cause a crash in which you can be seriously hurt
or killed.
Follow all instructions in the vehicle owner’s manual regarding accessories and
modifications.
WARNING
Page 45 of 71
82 || 83
DRIVING
DRIVING
TABLE OF
CONTENTS
VISUAL INDEX
SAFETY
INFORMATION
INSTRUMENT PANEL
VEHICLE
CONTROLS
AUDIO AND
CONNECTIVITY
BLUETOOTH®
HANDSFREELINK®
ACURALINK®
INDEX
VOICE COMMAND INDEX
CLIENT
INFORMATION
SPECIFICATIONS
MAINTENANCE
HANDLING THE UNEXPECTED
DRIVING
NAVIGATION
Pre-tow checklist
When preparing to tow, and before driving away, be sure to check the following:
• Avoid towing a trailer during your vehicle’s first 600 miles (1,000 km).
• The vehicle has been properly serviced, and the suspension and the cooling
system are in good operating condition.
• The trailer has been properly serviced and is in good condition.
• All weights and loads are within limits. Never exceed the gross weight ratings.
• Check if all loads are within limits at a public scale. If a public scale is not
available, add the estimated weight of your cargo load to the weight of your
trailer (as quoted by the manufacturer) and the tongue load.
• The hitch, safety chains, and any other attachments are secure.
• All items in or on the trailer are properly secured and cannot shift while you
drive.
Towing a Trailer
Your vehicle can tow a trailer if you carefully observe the load limits, use the
proper equipment, and follow the towing guidelines. See the Owner’s Manual on
the Owner Information CD or visit owners.acura.com (U.S.) or www.myacura.com
(Canada) for more information.
Towing Load Limits
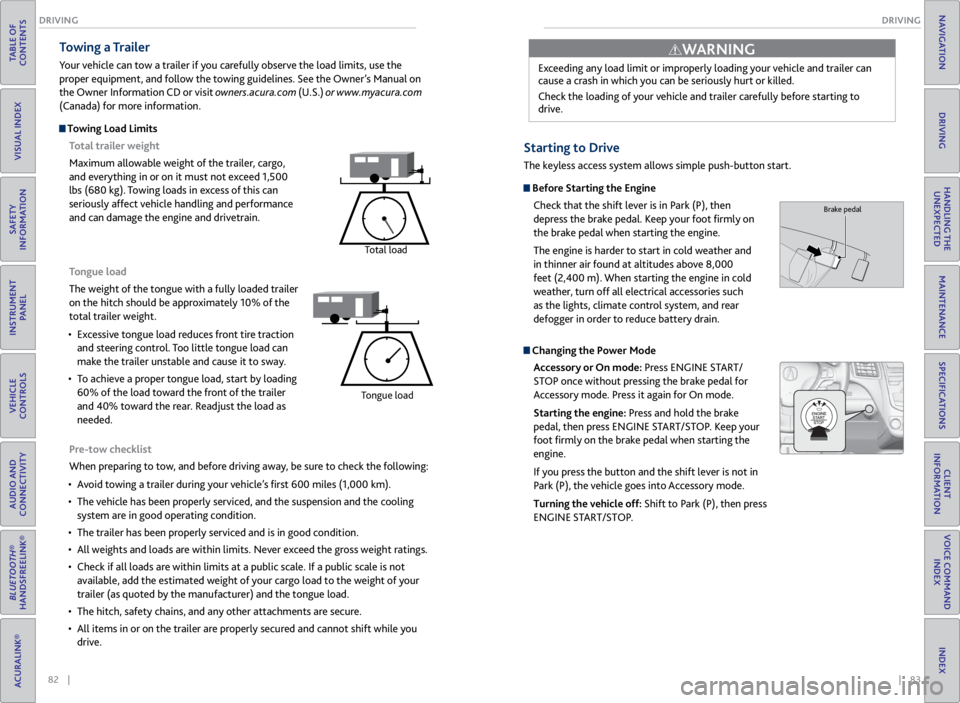
Total trailer weight
Maximum allowable weight of the trailer, cargo,
and everything in or on it must not exceed 1,500
lbs (680 kg). Towing loads in excess of this can
seriously affect vehicle handling and performance
and can damage the engine and drivetrain.
Total load
Tongue load
The weight of the tongue with a fully loaded trailer
on the hitch should be approximately 10% of the
total trailer weight.
• Excessive tongue load reduces front tire traction
and steering control. Too little tongue load can
make the trailer unstable and cause it to sway.
• To achieve a proper tongue load, start by loading
60% of the load toward the front of the trailer
and 40% toward the rear. Readjust the load as
needed.
Tongue load
Exceeding any load limit or improperly loading your vehicle and trailer can
cause a crash in which you can be seriously hurt or killed.
Check the loading of your vehicle and trailer carefully before starting to
drive.
WARNING
Starting to Drive
The keyless access system allows simple push-button start.
Before Starting the Engine
Check that the shift lever is in Park (P), then
depress the brake pedal. Keep your foot firmly on
the brake pedal when starting the engine.
The engine is harder to start in cold weather and
in thinner air found at altitudes above 8,000
feet (2,400 m). When starting the engine in cold
weather, turn off all electrical accessories such
as the lights, climate control system, and rear
defogger in order to reduce battery drain.
Changing the Power Mode
Accessory or On mode: Press ENGINE START/
STOP once without pressing the brake pedal for
Accessory mode. Press it again for On mode.
Starting the engine: Press and hold the brake
pedal, then press ENGINE START/STOP. Keep your
foot firmly on the brake pedal when starting the
engine.
If you press the button and the shift lever is not in
Park (P), the vehicle goes into Accessory mode.
Turning the vehicle off: Shift to Park (P), then press
ENGINE START/STOP.
Brake pedal
Page 46 of 71
84 || 85
DRIVING
DRIVING
TABLE OF
CONTENTS
VISUAL INDEX
SAFETY
INFORMATION
INSTRUMENT PANEL
VEHICLE
CONTROLS
AUDIO AND
CONNECTIVITY
BLUETOOTH®
HANDSFREELINK®
ACURALINK®
INDEX
VOICE COMMAND INDEX
CLIENT
INFORMATION
SPECIFICATIONS
MAINTENANCE
HANDLING THE UNEXPECTED
DRIVING
NAVIGATION
Shifting
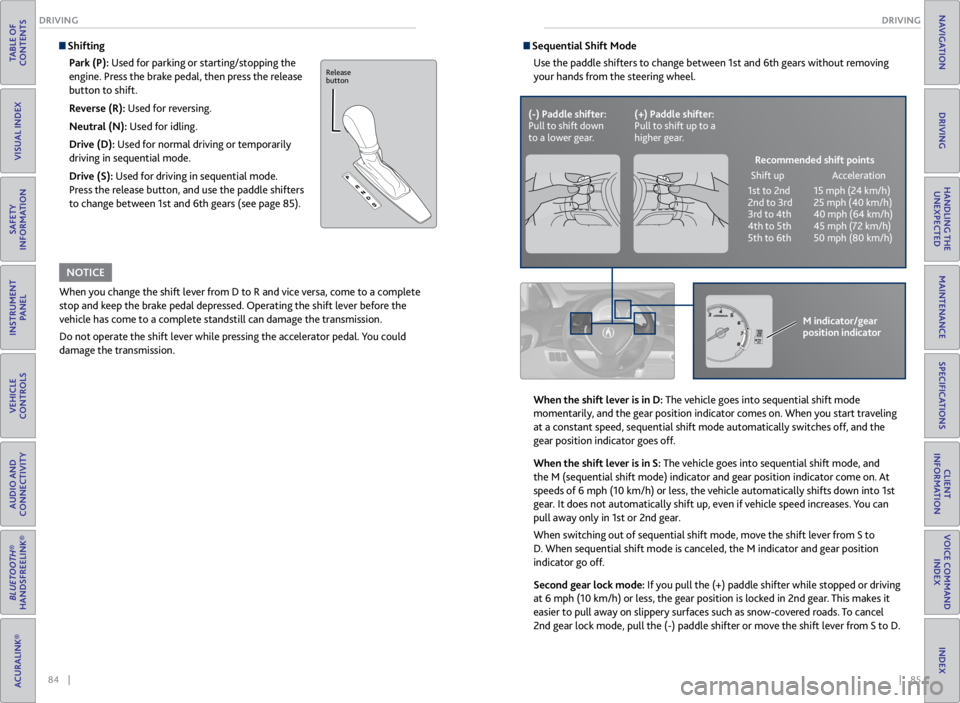
Park (P): Used for parking or starting/stopping the
engine. Press the brake pedal, then press the release
button to shift.
Reverse (R): Used for reversing.
Neutral (N): Used for idling.
Drive (D): Used for normal driving or temporarily
driving in sequential mode.
Drive (S): Used for driving in sequential mode.
Press the release button, and use the paddle shifters
to change between 1st and 6th gears (see page 85).
When you change the shift lever from D to R and vice versa, come to a complete
stop and keep the brake pedal depressed. Operating the shift lever before the
vehicle has come to a complete standstill can damage the transmission.
Do not operate the shift lever while pressing the accelerator pedal. You could
damage the transmission.
NOTICE
Release
button
Sequential Shift Mode
Use the paddle shifters to change between 1st and 6th gears without removing
your hands from the steering wheel.
When the shift lever is in D: The vehicle goes into sequential shift mode
momentarily, and the gear position indicator comes on. When you start traveling
at a constant speed, sequential shift mode automatically switches off, and the
gear position indicator goes off.
When the shift lever is in S: The vehicle goes into sequential shift mode, and
the M (sequential shift mode) indicator and gear position indicator co\
me on. At
speeds of 6 mph (10 km/h) or less, the vehicle automatically shifts down into 1st
gear. It does not automatically shift up, even if vehicle speed increases. You can
pull away only in 1st or 2nd gear.
When switching out of sequential shift mode, move the shift lever from S to
D. When sequential shift mode is canceled, the M indicator and gear position
indicator go off.
Second gear lock mode: If you pull the (+) paddle shifter while stopped or driving
at 6 mph (10 km/h) or less, the gear position is locked in 2nd gear. This makes it
easier to pull away on slippery surfaces such as snow-covered roads. To cancel
2nd gear lock mode, pull the (-) paddle shifter or move the shift lever from S to D.
(-) Paddle shifter:
Pull to shift down
to a lower gear. (+) Paddle shifter:
Pull to shift up to a
higher gear.
Recommended shift points
Shift up Acceleration
1st to 2nd 15 mph (24 km/h)
2nd to 3rd 25 mph (40 km/h)
3rd to 4th 40 mph (64 km/h)
4th to 5th 45 mph (72 km/h)
5th to 6th 50 mph (80 km/h)
M indicator/gear
position indicator
Page 47 of 71
86 || 87
DRIVING
DRIVING
TABLE OF
CONTENTS
VISUAL INDEX
SAFETY
INFORMATION
INSTRUMENT PANEL
VEHICLE
CONTROLS
AUDIO AND
CONNECTIVITY
BLUETOOTH®
HANDSFREELINK®
ACURALINK®
INDEX
VOICE COMMAND INDEX
CLIENT
INFORMATION
SPECIFICATIONS
MAINTENANCE
HANDLING THE UNEXPECTED
DRIVING
NAVIGATION
Braking
Slow down or stop your vehicle, and keep it from moving when parked.
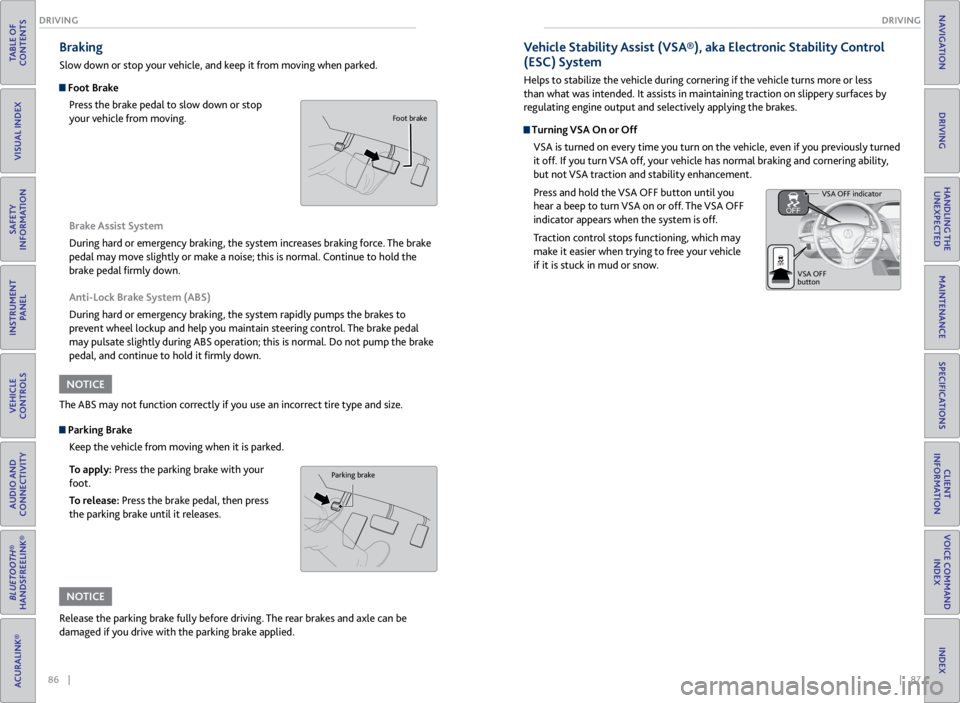
Foot Brake
Press the brake pedal to slow down or stop
your vehicle from moving.
Parking BrakeKeep the vehicle from moving when it is parked.
To apply: Press the parking brake with your
foot.
To release: Press the brake pedal, then press
the parking brake until it releases. Brake Assist System
During hard or emergency braking, the system increases braking force. The brake
pedal may move slightly or make a noise; this is normal. Continue to hold the
brake pedal firmly down.
Anti-Lock Brake System (ABS)
During hard or emergency braking, the system rapidly pumps the brakes to
prevent wheel lockup and help you maintain steering control. The brake pedal
may pulsate slightly during ABS operation; this is normal. Do not pump the brake
pedal, and continue to hold it firmly down.
The ABS may not function correctly if you use an incorrect tire type and size.
Release the parking brake fully before driving. The rear brakes and axle can be
damaged if you drive with the parking brake applied.
NOTICE
NOTICE
Parking brake
Foot brake
Vehicle Stability Assist (VSA®), aka Electronic Stability Control
(ESC) System
Helps to stabilize the vehicle during cornering if the vehicle turns more or less
than what was intended. It assists in maintaining traction on slippery surfaces by
regulating engine output and selectively applying the brakes.
Turning VSA On or Off VSA is turned on every time you turn on the vehicle, even if you previously turned
it off. If you turn VSA off, your vehicle has normal braking and cornering ability,
but not VSA traction and stability enhancement.
Press and hold the VSA OFF button until you
hear a beep to turn VSA on or off. The VSA OFF
indicator appears when the system is off.
Traction control stops functioning, which may
make it easier when trying to free your vehicle
if it is stuck in mud or snow.
VSA OFF indicator
VSA OFF
button
Page 48 of 71
88 || 89
DRIVING
DRIVING
TABLE OF
CONTENTS
VISUAL INDEX
SAFETY
INFORMATION
INSTRUMENT PANEL
VEHICLE
CONTROLS
AUDIO AND
CONNECTIVITY
BLUETOOTH®
HANDSFREELINK®
ACURALINK®
INDEX
VOICE COMMAND INDEX
CLIENT
INFORMATION
SPECIFICATIONS
MAINTENANCE
HANDLING THE UNEXPECTED
DRIVING
NAVIGATION
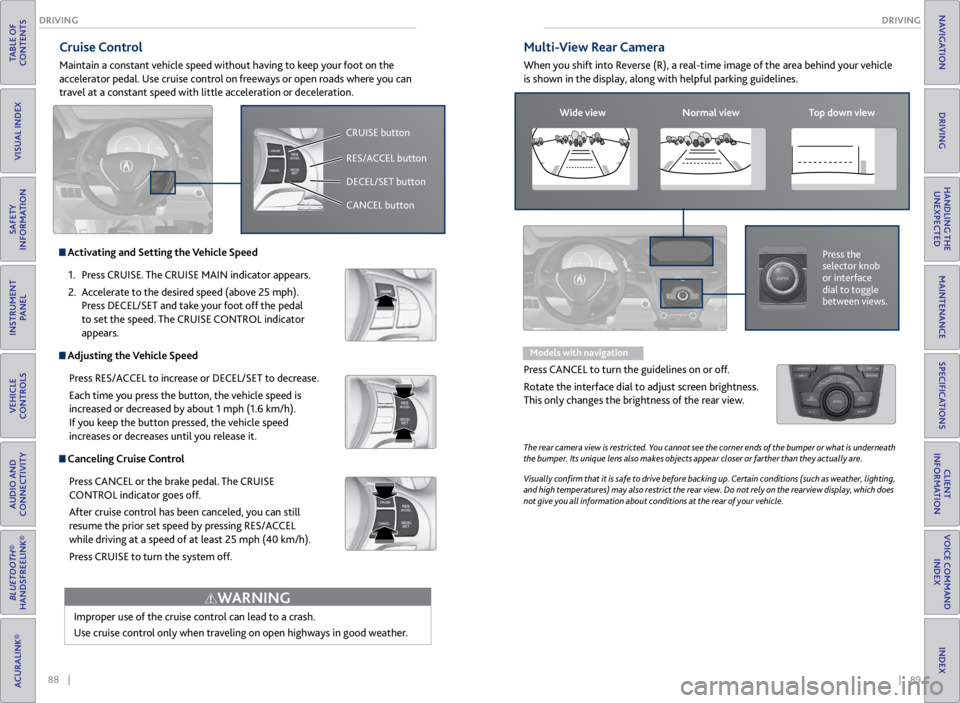
Cruise Control
Maintain a constant vehicle speed without having to keep your foot on the
accelerator pedal. Use cruise control on freeways or open roads where you can
travel at a constant speed with little acceleration or deceleration.
Improper use of the cruise control can lead to a crash.
Use cruise control only when traveling on open highways in good weather.
WARNING
Activating and Setting the Vehicle Speed1. Press CRUISE. The CRUISE MAIN indicator appears.
2. Accelerate to the desired speed (above 25 mph).
Press DECEL/SET and take your foot off the pedal
to set the speed. The CRUISE CONTROL indicator
appears.
Adjusting the Vehicle Speed
Press RES/ACCEL to increase or DECEL/SET to decrease.
Each time you press the button, the vehicle speed is
increased or decreased by about 1 mph (1.6 km/h).
If you keep the button pressed, the vehicle speed
increases or decreases until you release it.
Canceling Cruise ControlPress CANCEL or the brake pedal. The CRUISE
CONTROL indicator goes off.
After cruise control has been canceled, you can still
resume the prior set speed by pressing RES/ACCEL
while driving at a speed of at least 25 mph (40 km/h).
Press CRUISE to turn the system off.
CRUISE button
RES/ACCEL button
DECEL/SET button
CANCEL button
Multi-View Rear Camera
When you shift into Reverse (R), a real-time image of the area behind your vehicle
is shown in the display, along with helpful parking guidelines.
The rear camera view is restricted. You cannot see the corner ends of the bumper or what is underneath
the bumper. Its unique lens also makes objects appear closer or farther than they actually are.
Visually confirm that it is safe to drive before backing up. Certain conditions (such as weather, lighting,
and high temperatures) may also restrict the rear view. Do not rely on the rearview display, which does
not give you all information about conditions at the rear of your vehicle.
Wide view Normal view Top down view
Press the
selector knob
or interface
dial to toggle
between views.
Models with navigation
Press CANCEL to turn the guidelines on or off.
Rotate the interface dial to adjust screen brightness.
This only changes the brightness of the rear view.