2015 Acura RDX AUX
[x] Cancel search: AUXPage 5 of 258

4
Quick Reference GuideSystem Controls
9VOL 9 (Volume/Power)
Knob
(P6)
Display
la
8 (Sound) Button
(P174)
lcHDD/AUX Button (P149)
3FM/AM Button (P136)
1E (Eject) Button
4 Preset Buttons
(P6)
6TUNE Bar (P6)
ldAUDIO Button (P7)7SiriusXM® Button (P140)
lbDISC Button (P145)
lgMAP/GUIDE Button
(P102)
lhCANCEL Button
mcInterface Dial/ENTER
Button
(P8)
2Disc Slot (P6) Navigation Screen
Audio
Navigation
Voice Control
Bluetooth® HandsFreeLink®
8 TITLE Button (P6)
5CATEGORY Bar (P6)
lfSCAN/A.SEL Bar (P6)
ljINFO Button
ma DEST/ROUTE Button
(P68)lia (Display Mode)
Button
(P29)
mb PHONE Button (P178)
leSKIP Bar (P6)
Page 134 of 258
133
Audio
This section describes how to operate the audio system. You can play
music from a wide array of media s ources, and control the audio system
using the audio buttons, the Interface Dial, or voice control.
Audio System .................................................. 134
About Your Audio System .............................. 134
Auxiliary Input Jack ......... .......................... ..... 134
System Theft Protection ................................. 135
Playing FM/AM Radio ..................................... 136
Selecting FM/AM Mode.................................. 136
Audio Screen Control ..................................... 136
Audio Menu .................................................. 137
Radio Data System (RDS) ................................ 138
Playing SiriusXM® Radio ................................ 140
Selecting SiriusXM® Mode............................. 140
Audio Screen Control ..................................... 140
Audio Menu .................................................. 141
Note Function ................................................ 142
SiriusXM® Radio Service ................................ 144
Playing a Disc ................................................... 145
Selecting Disc Mode ....................................... 145
Audio Screen Control ..................................... 145
Audio Menu .................................................. 146 Playing MP3/WMA/AAC Discs ........................ 147
Recommended Discs ...................................... 148
Playing Hard Disc Drive (HDD) Audio ............ 149
Selecting HDD Mode ...................................... 149
Audio Screen Control ..................................... 150
Audio Menu ................................................... 150
Recording a Music CD to HDD........................ 152
Searching for Music........................................ 154
Editing a Playlist or Album .............................. 155
Editing Track Information ............................... 156
Displaying Music Information ......................... 157
Updating Gracenote® Album Info .................. 158
Playing an iPod® ............................................. 159
Selecting iPod® Mode .................................... 160
Audio Screen Control ..................................... 160
Audio Menu ................................................... 161
Searching for Music........................................ 162
Searching for Music Using Song By Voice™ (SBV) ............................................................... 163 Playing Pandora®
........................................... 164
Selecting Pandora® Mode ............................. 164
Audio Screen Control..................................... 165
Audio Menu .................................................. 166
QuickMix ....................................................... 167
Playing a USB Flash Drive ............................... 168
Selecting USB Mode....................................... 169
Audio Screen Control..................................... 169
Audio Menu .................................................. 170
Playing Tracks in Folders................................. 171
Playing Bluetooth ® Audio............................. 172
Selecting Bluetooth ® Audio Mode ................ 172
Switching to HFL Mode .................................. 173
Audio Screen Control..................................... 173
Adjusting the Sound ....................................... 174
Audio Remote Controls .................................. 175
Steering Wheel Controls ................................ 175
Page 135 of 258
134
Audio
Audio System
About Your Audio System
The audio system features FM/AM radio and SiriusXM® Radio. It can also play audio
discs, WMA/MP3/AAC tracks, iP od®, USB flash drives, and Bluetooth® devices.
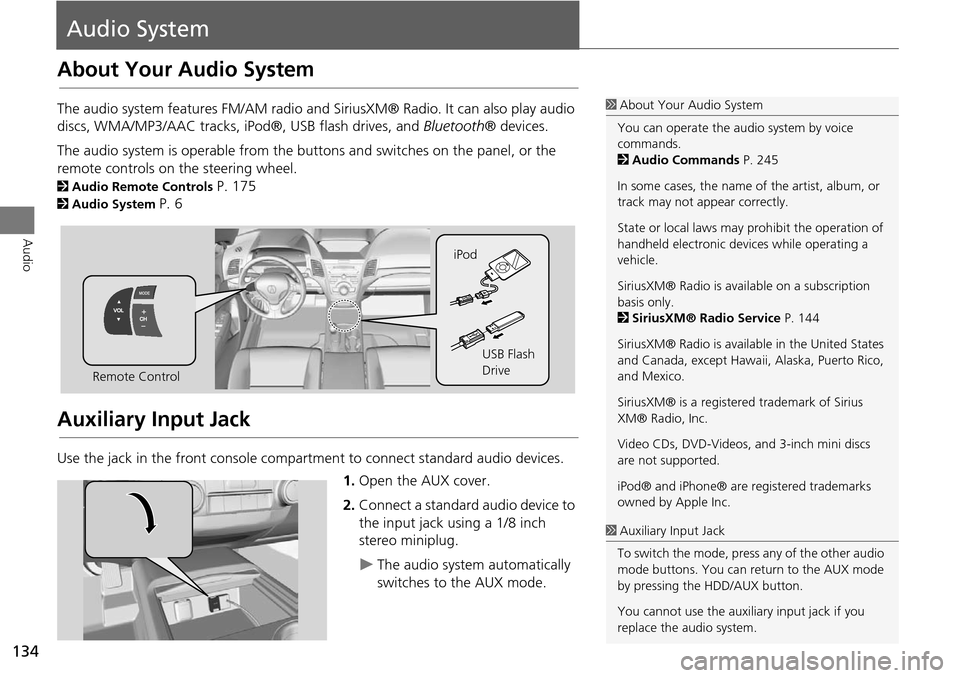
The audio system is operable from the butto ns and switches on the panel, or the
remote controls on the steering wheel.
2 Audio Remote Controls P. 175
2Audio System P. 6
Auxiliary Input Jack
Use the jack in the front console compartment to connect standard audio devices.
1.Open the AUX cover.
2. Connect a standard audio device to
the input jack using a 1/8 inch
stereo miniplug.
The audio system automatically
switches to the AUX mode.
1About Your Audio System
You can operate the audio system by voice
commands.
2 Audio Commands P. 245
In some cases, the name of the artist, album, or
track may not appear correctly.
State or local laws may pr ohibit the operation of
handheld electronic devices while operating a
vehicle.
SiriusXM® Radio is avai lable on a subscription
basis only.
2 SiriusXM® Radio Service P. 144
SiriusXM® Radio is available in the United States
and Canada, except Hawaii , Alaska, Puerto Rico,
and Mexico.
SiriusXM® is a registered trademark of Sirius
XM® Radio, Inc.
Video CDs, DVD-Videos, and 3-inch mini discs
are not supported.
iPod® and iPhone® are registered trademarks
owned by Apple Inc.
Remote Control iPod
USB Flash
Drive
1Auxiliary Input Jack
To switch the mode, press any of the other audio
mode buttons. You can return to the AUX mode
by pressing the HDD/AUX button.
You cannot use the auxili ary input jack if you
replace the audio system.
Page 150 of 258
149
Audio
Playing Hard Disc Drive (HDD) Audio
The Hard Disc Drive (HDD) Audio function plays tracks from music CDs that have
been recorded onto the built-in HDD. You ca n arrange the tracks in playlists or play
the tracks using various search methods.
Selecting HDD Mode
1. Press the HDD/AUX button to play tracks stored on the HDD.
2. Select a track by genre, artist, album, recording date, playlist, or track list.
The track number and elapsed time ar e displayed on the display. Title
information is displayed if found in the Gracenote® Album Info (Gracenote®
Media Database) stored on the HDD.
The HDD has two types of playlists: original playlists and user playlists. An
original playlist is automatically creat ed for each album when a music CD is
recorded. You can customize up to six us er playlists provided on the HDD by
adding tracks from your original playlists.
1 Playing Hard Disc Drive (HDD) Audio
d “Display audio screen”
You can control the HDD audio using voice
commands.
2 HDD Commands P. 246
A visual guide helps you operate the audio
system.
2 System Controls P. 4
2 Basic Operation P. 6
Music tracks recorded on HDD cannot be
recorded onto CDs or other devices.
Tracks are recorded at four times the playback
speed using ultra-eff icient compression
technology; therefore, sound quality may vary
slightly from the original.
If the HDD is ever replaced, all music data is lost
and cannot be recovered.
If there is a problem, you may see an error
message on the display.
2 Error Messages P. 223
Page 161 of 258

160
Playing an iPod®Selecting iPod® Mode
Audio
Selecting iPod® Mode
1.Connect the iPod® to the USB adapter cable in the console compartment.
2. Press the HDD/AUX button until you get to iPod® mode.
3. Select a track using the iPod® menu on the screen.
The current track number and total number of tracks are displayed.
Audio Screen Control
HAUDIO button (in iPod® mode)
Control the audio screen through the navigation system. Rotate i to select a track. Press u.
Move e to select MUSIC SEARCH
to change songs in the track list.
2Searching for Music P. 162
Move r to select AUDIO MENU .
2Audio Menu P. 161
1Playing an iPod®
d “Display audio screen”
You can control the iPod® using voice
commands.
2 iPod® Commands P. 247
A visual guide helps you operate the audio
system.
2 System Controls P. 4
2 Basic Operation P. 6
Available operating functi ons vary on models or
versions. Some functions may not be available on
the vehicle’s audio system.
If there is a problem, you may see an error
message on the display.
2 Error Messages P. 223
iPod® mode
Track list
Page 165 of 258
164
Audio
Playing Pandora®
Pandora® is a personalized Internet radio service that selects music based on an
artist, song, or genre a user enters, and streams what is likely to be of interest.
Selecting Pandora® Mode
1. Activate Pandora® on your iPhone®.
2. Connect the iPhone® to the USB adapter cable in the console compartment.
2 Connecting an iPod® P. 159
3. Press the HDD/AUX button until you get to Pandora® mode.
4. Select a station using the CATEGORY bar.
The current station name, artist name, album name, track name, and rating are
displayed.
1 Playing Pandora®
d “Display audio screen” (when in Pandora®
mode)
You can control Pandora® using voice
commands.
2 Pandora® Commands P. 247
A visual guide helps you operate the audio
system.
2 System Controls P. 4
2 Basic Operation P. 6
To use this service in your vehicle, the Pandora®
app must first be installed on your iPhone®. Visit
www.pandora.com for more information.
Pandora® mode and Audi o Screen Control is
only available for iPhone ®. For other phones,
Pandora® can be played through Bluetooth®
Audio.
2 Playing Bluetooth® Audio P. 172
If there is a problem, you may see an error
message on the display.
2 Error Messages P. 223
If Pandora® is not sele cted from your phone,
iPod® music is played.
Page 170 of 258
169
Playing a USB Flash DriveSelecting USB Mode
Audio
Selecting USB Mode
1.Connect the USB flash drive to the USB adapter cable in the console
compartment.
2. Press the HDD/AUX button until you get to USB mode.
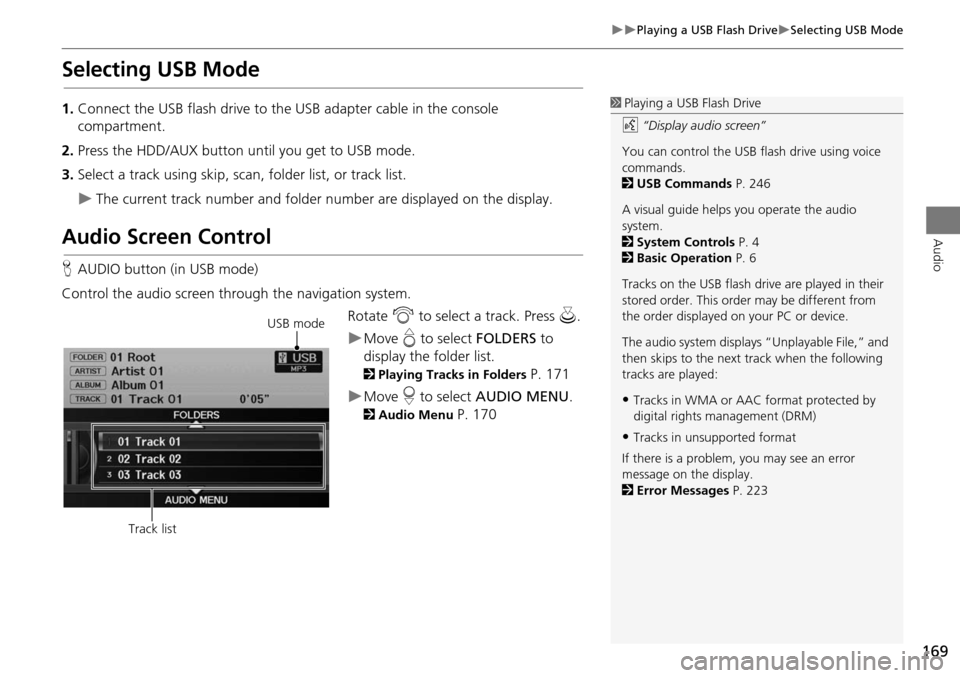
3. Select a track using skip, scan, folder list, or track list.
The current track number and folder number are displayed on the display.
Audio Screen Control
HAUDIO button (in USB mode)
Control the audio screen through the navigation system. Rotate i to select a track. Press u .
Move e to select FOLDERS to
display the folder list.
2 Playing Tracks in Folders P. 171
Move r to select AUDIO MENU .
2Audio Menu P. 170
1Playing a USB Flash Drive
d “Display audio screen”
You can control the USB flash drive using voice
commands.
2 USB Commands P. 246
A visual guide helps you operate the audio
system.
2 System Controls P. 4
2 Basic Operation P. 6
Tracks on the USB flash drive are played in their
stored order. This orde r may be different from
the order displayed on your PC or device.
The audio system displays “Unplayable File,” and
then skips to the next track when the following
tracks are played:
•Tracks in WMA or AAC format protected by
digital rights management (DRM)
•Tracks in unsupported format
If there is a problem, you may see an error
message on the display.
2 Error Messages P. 223
USB mode
Track list
Page 173 of 258
172
Audio
Playing Bluetooth ® Audio
Your audio system allows you to listen to music tracks stored on your Bluetooth-
compatible phone.
This function is available when the phone is linked to the vehicle’s Bluetooth®
HandsFreeLink® (HFL) system.
2 Bluetooth® HandsFreeLink® P. 177
Selecting Bluetooth ® Audio Mode
1.Make sure that your phone is on, paired, and linked to HFL.
2Pairing a Phone P. 180
2. Press the HDD/AUX button to select Bluetooth® Audio mode.
A Bluetooth ® message and icon are displaye d on the display and screen.
3. If necessary, follow the cell phone operating instructions for playing audio tracks.
Check the following if the phone is not recognized:
• Another HFL-compatible phone, which is not compatible for Bluetooth® Audio, is
already connected.
1 Playing Bluetooth ® Audio
d “Display audio screen”
You can control the Bluetooth® Audio using
voice commands.
2 Bluetooth ® Audio Commands P. 247
Not all Bluetooth -enabled phones with
streaming audio capabilities are compatible. To
check if your phone is compatible:
•U.S.: Visit www.acura.com/handsfreelink .
•Canada: Visit www.handsfreelink.ca .
•Call HandsFreeLink customer support at
(888) 528-7876.
In some states, it may be illegal to perform some
data device functions while driving.
Only one phone can be used with HFL at a time.
When there are more than two paired phones in
the vehicle, the first paired phone the system
finds will be automatically linked.
Pressing the TITLE button switches the center
display between the Bluetooth® Audio message
and the device name.