2015.5 VAUXHALL MOVANO_B steering
[x] Cancel search: steeringPage 112 of 215

110Driving and operatingIgnition switch positionsSt=Ignition offA=Steering wheel lock released,ignition offM=Ignition on, for diesel engine:
preheatingD=StartingStarting the engine
Manual transmission: operate clutch.
Manual transmission automated:
operate brake; transmission
automatically shifts to N.
Do not accelerate.
Turn the key to position M for
preheating, and hold until control
indicator N extinguishes from the
Driver Information Centre.
Turn key to position D and release.
The increased engine speed
automatically returns to normal idling
speed as the engine temperature
rises.
Start attempts should not last longer
than 15 seconds. If engine does not
start, wait 15 seconds before
repeating starting procedure. If
necessary, depress accelerator
before repeating starting procedure.
Before restarting or to switch off the
engine, turn key back to St.
During an Autostop, the engine can be started by depressing the clutch
pedal. Stop-start system 3 111.
Turbo engine warm-up Upon start-up, engine available
torque may be limited for a short time, especially when the engine
temperature is cold. The limitation is
to allow the lubrication system to fully
protect the engine.
Page 114 of 215

112Driving and operating
AutostopIf the vehicle is at low speed or
standstill, activate an Autostop as
follows:
■ depress the clutch pedal
■ shift the selector lever to neutral (manual transmission) or N
(manual transmission automated)
■ release the clutch pedal
The engine will be switched off while the ignition stays on if the required
conditions are met.
An Autostop is indicated when Ï
illuminates green in the instrument
cluster.
During an Autostop, the heating
performance, power steering and brake performance will be
maintained. Brake assist, however, is
not available 3 123.
Conditions for an Autostop
The stop-start system checks if each
of the following conditions is fulfilled,
otherwise an Autostop will be
inhibited and control indicator \ will
illuminate in the instrument cluster.
■ The stop-start system is not manually deactivated
■ the bonnet is fully closed
■ the driver's door is closed or the driver's seat belt is fastened
■ the vehicle battery is sufficiently charged and in good condition
■ the engine is warmed up
■ the engine coolant temperature is not too high
■ the ambient temperature is not too low
■ the defrosting function is not activated■the climate control system does not
inhibit an Autostop
■ the brake vacuum is sufficient
■ the self-cleaning function of the diesel particle filter is not active
■ the vehicle has moved since the last Autostop
Otherwise an Autostop will be
inhibited.
An Autostop may become
unavailable as the ambient
temperature approaches freezing
point.
Certain settings of the climate control
system may also inhibit an Autostop.
See Climate control chapter for
further information 3 96.
Immediately after motorway driving
an Autostop may be inhibited.
Autostop may also be inhibited
temporarily if the vehicle battery has
been recharged by an external
source.
New vehicle running-in 3 109.
Page 137 of 215

Driving and operating135
If the trailer starts snaking, drive moreslowly, do not attempt to correct the
steering and brake sharply if
necessary.
When driving downhill, drive in the
same gear as if driving uphill and
drive at a similar speed.
Adjust tyre pressure to the value
specified for full load 3 201.
Trailer towing Trailer loads
The permissible trailer loads are
vehicle-dependent and engine-
dependent maximum values which
must not be exceeded. The actual
trailer load is the difference between
the actual gross weight of the trailer
and the actual coupling socket load
with the trailer coupled.
The permissible trailer loads are
specified in the vehicle documents. In general, they are valid for gradients
up to max. 12 %.
The permitted trailer load applies up to the specified incline and up to an
altitude of 1000 metres above sealevel. Since engine power decreases as altitude increases due to the airbecoming thinner, therefore reducing
climbing ability, the permissible gross
train weight also decreases by 10 % for every 1000 metres of additional
altitude. The gross train weight does
not have to be reduced when driving on roads with slight inclines (less than 8 %, e.g. motorways).
The permissible gross train weight
must not be exceeded. This weight is
specified on the identification plate
3 182.
Vertical coupling load
The vertical coupling load is the load
exerted by the trailer on the coupling
ball. It can be varied by changing the
weight distribution when loading the
trailer.
The maximum permissible vertical
coupling load is specified on the
towing equipment identification plate
and in the vehicle documents. Always aim for the maximum load, especially
in the case of heavy trailers. The
vertical coupling load should never
fall below 25 kg.In the case of trailer loads of
1200 kg or more, the vertical coupling load should not be less than 50 kg.
Rear axle load When the trailer is coupled and the
towing vehicle fully loaded (including
all occupants), the permissible rear
axle load (see identification plate or
vehicle documents) must not be
exceeded.
Towing equipmentCaution
When operating without a trailer,
remove the coupling ball bar.
Towing equipment audible
warning For vehicles fitted with towing
equipment, when connected to a
trailer the pitch of the audible warning
changes upon operation of the turn
signals.
Page 138 of 215

136Driving and operating
The pitch of the audible warning will
change if a turn signal light on the
trailer or the towing vehicle fails.
Trailer stability assist
If the system detects snaking
movements, engine power is reduced
and the vehicle/trailer combination is
selectively braked until the snaking ceases. While the system is working,keep steering wheel as still as
possible.
Trailer stability assist (TSA) is a
function of the Electronic stability
program (ESP) 3 125.Auxiliary features
Power take-off
Activation
To activate the power take-off, with
the vehicle stationary and the engine
idling:
■ Set the gearshift lever to neutral (vehicles with manual transmissionautomated: selector lever in
position N).
■ Depress the clutch pedal.
■ Press switch on the instrument panel; LED in switch illuminatesafter approx. 2 seconds.
■ Release the clutch pedal.
The engine idle speed increases to
1,200 rpm.Caution
During operation of the power
take-off, never move the selector
lever out of neutral (vehicles with
manual transmission automated:
selector lever in position N), to
avoid damage to the transmission.
If a gear change becomes
necessary, i.e. to adjust the driving
speed, the power take-off must always be deactivated first.
Deactivation
To deactivate the power take-off:
■ Depress the clutch pedal.
■ Press switch on the instrument panel; LED in switch extinguishes
after approx. 2 seconds.
■ Release the clutch pedal.
Page 144 of 215

142Vehicle careEngine coolantThe coolant provides freeze
protection down to approx. -28 °C.Caution
Only use approved antifreeze.
Coolant level
Caution
Too low a coolant level can cause engine damage.
If the cooling system is cold, the
coolant level should be just above the
MINI mark.Top up if the level is low.9Warning
Allow the engine to cool before
opening the cap. Carefully open
the cap, relieving the pressure
slowly.
Top up with antifreeze.If no antifreeze
is available, use clean tap water or
distilled water.Install the cap
tightly.Have the antifreeze
concentration checked and have the
cause of the coolant loss remedied by a workshop.
If a substantial amount of coolant is
required, it will be necessary to bleed
any trapped air from the cooling
system.Seek the assistance of a
workshop.
Power steering fluidCaution
Extremely small amounts of
contamination can cause steering
system damage and cause it to not work properly. Do not allow
contaminates to contact the fluid
side of the reservoir cap or from
entering the reservoir.
The fluid level normally does not need
to be checked. If an unusual noise is
heard during steering or if the power
steering reacts conspicuously, seek
the assistance of a workshop.
Depending on vehicle, the power
steering fluid reservoir may be
located in the engine compartment
(Type A) or below the front wheel
arch, behind a trim panel (Type B).
Page 166 of 215

164Vehicle care
Wheel covers on steel wheels maycome into contact with parts of the
chains. In such cases, remove the
wheel covers.
Tyre chains may only be used at
speeds up to 30 mph and, when
travelling on roads that are free of
snow, they may only be used for brief
periods since they are subject to rapid wear on a hard road and may snap.
The use of tyre chains is not permitted on the temporary spare wheel.
Tyre repair kit
Minor damage to the tyre tread can be
repaired with the tyre repair kit.
Do not remove foreign bodies from
the tyres.
Tyre damage exceeding 4 mm or that
is at the tyre's sidewall near the rim
cannot be repaired with the tyre repair kit.9 Warning
Do not drive faster than 50 mph.
Do not use for a lengthy period.
Steering and handling may be
affected.
If the vehicle has a flat tyre:
Apply the parking brake and engage
neutral (manual transmission) or N
(manual transmission automated).
The tyre repair kit is located under the
front seat. Slide seat forwards fully
and fold backrest down to access kit.
1. Take the tyre repair kit out from under the front seat.
2. Remove the compressor.
3. Remove the power supply lead(s)
and air hose from the stowage
compartments on the underside
of the compressor.
4. Screw the compressor air hose to
the connection on the sealant
bottle.
5. Fit the sealant bottle into the retainer on the compressor.
Set the compressor near the tyre
in such a way that the sealant
bottle is upright.
6. Unscrew valve cap from defective
tyre.
Page 176 of 215
174Vehicle careTowing
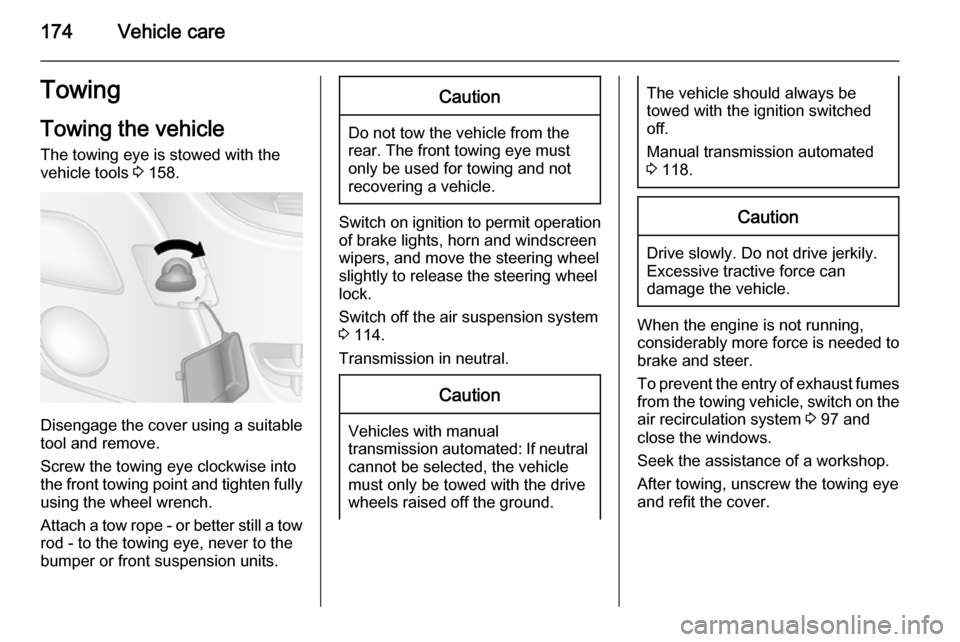
Towing the vehicle The towing eye is stowed with the
vehicle tools 3 158.
Disengage the cover using a suitable
tool and remove.
Screw the towing eye clockwise into
the front towing point and tighten fully using the wheel wrench.
Attach a tow rope - or better still a tow
rod - to the towing eye, never to the
bumper or front suspension units.
Caution
Do not tow the vehicle from the
rear. The front towing eye must
only be used for towing and not
recovering a vehicle.
Switch on ignition to permit operation
of brake lights, horn and windscreen
wipers, and move the steering wheel
slightly to release the steering wheel
lock.
Switch off the air suspension system 3 114.
Transmission in neutral.
Caution
Vehicles with manual
transmission automated: If neutral cannot be selected, the vehiclemust only be towed with the drive
wheels raised off the ground.
The vehicle should always be
towed with the ignition switched
off.
Manual transmission automated
3 118.Caution
Drive slowly. Do not drive jerkily.
Excessive tractive force can
damage the vehicle.
When the engine is not running,
considerably more force is needed to
brake and steer.
To prevent the entry of exhaust fumes
from the towing vehicle, switch on the air recirculation system 3 97 and
close the windows.
Seek the assistance of a workshop.
After towing, unscrew the towing eye
and refit the cover.
Page 211 of 215

209
Oil............................................... 140
Oil, engine .......................... 179, 184
Oil level ......................................... 76
Oil pressure .................................. 82
Outside temperature ....................71
Overcab storage ..........................64
Overhead console .......................63
Overrun cut-off ........................... 111
P Parking ................................ 17, 114
Parking assist ............................ 130
Parking brake ............................ 122
Parking ticket holder .....................35
Particulate filter ........................... 116
Performing work ........................139
Pollen filter ................................. 107
Power door locks ..........................23
Power outlets ............................... 72
Power side step ............................ 24
Power sliding door ........................24
Power steering fluid ....................142
Power take-off ............................ 136
Power windows ............................ 33
Preheating ........................... 82, 110
Puncture ............................. 164, 167R
Radio Frequency Identification (RFID) ..................................... 204
Radio remote control ...................18
Rain sensor .................................. 70
Reading lights .............................. 94
Rear air conditioning system .....101
Rear bench seat storage ..............63
Rear doors ................................... 27
Rear fog light ............................... 84
Rear fog lights ........................ 89, 92
Rear heating system .................. 100
Rear seats .................................... 42
Rear view camera ...................... 131
Rear windows .............................. 33
Recommended fluids and lubricants ........................ 179, 184
Refuelling ................................... 133 Remote control ............................. 18
Retractable parking brake ..........122
Reversing lights ........................... 92
Ride control systems ..................124
Ride height ................................. 114
Roof .............................................. 35
Roof load ...................................... 68
Roof rack ..................................... 67S
Safety belts ................................... 44
Safety net .................................... 66
Seat adjustment ....................... 7, 38
Seat belt ........................................ 8
Seat belt reminder .......................79
Seat belts ..................................... 44
Seat heating ................................. 41
Seat position ................................ 37
Selector lever ............................. 118
Service ............................... 107, 178
Service display ......................76, 80
Service information ....................178
Service vehicle soon .................... 80
Side airbag system ......................50
Sidelights ...................................... 89
Side turn signal lights ................152
Sliding door .................................. 24
Spare wheel ............................... 169
Speed limiter......................... 74, 129
Speedometer ............................... 74
Starting and operating ................109
Starting off ................................... 16
Starting the engine .......16, 110, 118
Steering ...................................... 109
Steering column controls ..............70
Steering wheel adjustment ......9, 69
Steering wheel controls ...............69
Stop engine .................................. 80