Page 235 of 331
Vehicle care233
1. Rotate the cap anticlockwise andremove it.
2. Rotate the bulb holderanticlockwise to disengage.
Withdraw the bulb holder from the
reflector.
3. Disengage the bulb holder from the plug connector by slightly
bending apart the retaining lug.
4. Replace the bulb and connect with the plug.
5. Insert the bulb holder, engaging the two lugs into the reflector androtate clockwise to secure.
6. Fit the cap and rotate clockwise.
Sidelight/Daytime running light
(2)
1. Rotate cap anticlockwise and withdraw from the reflector.
Page 237 of 331
Vehicle care235Xenon headlights9Danger
Adaptive forward lighting system
uses Xenon headlights.
Xenon headlights work under
extremely high electrical voltage.
Do not touch. Have bulbs replaced by a workshop.
Bulbs for front turn signal and
corner lighting can be changed.
Sidelight/Daytime running lights are
designed as Light Emitting Diodes
(LEDs) and cannot be replaced.
Corner lighting
1. Rotate the cap anticlockwise and remove it.
2. Rotate the bulb holderanticlockwise to disengage.
Withdraw the bulb holder from the
reflector.
3. Disengage the bulb from the plug connector by unlatching and
pulling.
4. Replace the bulb and connect bulb holder with the plug
connector.
5. Insert the bulb holder, engaging the two lugs into the reflector and
rotate clockwise to secure.
6. Fit the cap and rotate clockwise.
Page 238 of 331
236Vehicle care
Front turn signal
1. Rotate the cap anticlockwise andremove it.
2. Rotate the bulb holderanticlockwise to disengage.
Withdraw the bulb holder from the
reflector.
3. Disengage the bulb holder from the plug connector by unlatching
and pulling.
4. Replace the bulb and connect bulb holder with the plug.
5. Insert the bulb holder, engaging the two lugs into the reflector androtate clockwise to secure.
Sidelight/Daytime running light
Sidelight and daytime running lights
are designed as LEDs. In case of
failure, have LEDs replaced by a
workshop.
Fog lights
The bulbs are accessible from the
underside of the vehicle.
1. Turn the bulb holder anticlockwise
and remove it from the reflector.
Page 239 of 331
Vehicle care237
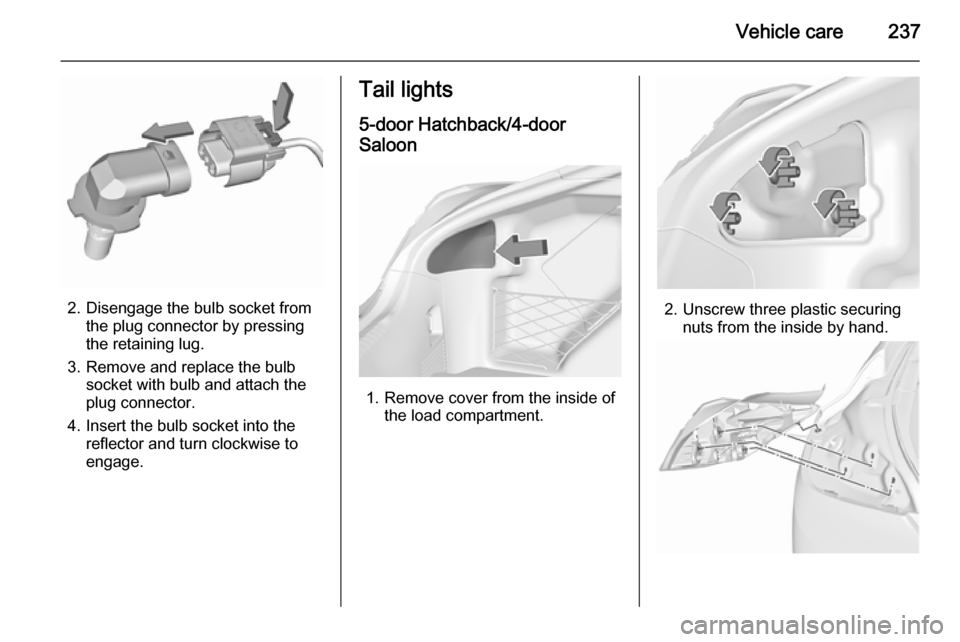
2. Disengage the bulb socket fromthe plug connector by pressing
the retaining lug.
3. Remove and replace the bulb socket with bulb and attach the
plug connector.
4. Insert the bulb socket into the reflector and turn clockwise to
engage.
Tail lights
5-door Hatchback/4-door
Saloon
1. Remove cover from the inside of the load compartment.
2. Unscrew three plastic securingnuts from the inside by hand.
Page 240 of 331
238Vehicle care
3. Carefully withdraw the lightassembly from the recesses and
remove.
4. Turn bulb holder anticlockwise and remove. Replace bulb by
withdrawing or turning:
Turn signal light 1
Rear fog light 2, only on driver side
Reverse light 3
Tail light and brake light are
designed as LEDs. In case of
failure, have LEDs replaced by a
workshop.
5. Insert bulb holder into the tail light
assembly and turn clockwise. Fit
light assembly with the retaining
pins into the recesses of the
vehicle body and tighten the
plastic securing nuts from the
inside of the load compartment.
Close cover.
Sports Tourer/Country Tourer
1. Release and open the cover in the
tailgate.
2. Unscrew three plastic securing nuts by hand.
Page 241 of 331
Vehicle care239
3. Carefully withdraw the lightassembly from the recesses and
remove.
4. Turn bulb holder anticlockwise and remove. Replace bulb by
withdrawing:
Reverse light 1
Turn signal light 2
Tail light, brake light and rear fog
light are designed as LEDs. In
case of failure, have LEDs
replaced by a workshop.
5. Insert bulb holder into the tail light
assembly and turn clockwise. Fit
light assembly with the retaining
pins into the recesses of the
tailgate and tighten the plastic
securing nuts from the inside of
the tailgate. Close cover.
Additional tail lights in the tailgate
frame
1. Open tailgate.
2. Release cover in side trim panel and remove.
3. Press out lamp housing from theinside of the side trim panel.
4. Rotate plastic nut anticlockwiseand remove from the bulb holder.
Page 251 of 331

Vehicle care249
Vehicles with spare wheel
The jack with wheel wrench, the tools,
an extension bolt for securing a
damaged wheel and the towing eye
are placed in the tool box below the
spare wheel in the load compartment. Spare wheel 3 260.
Wheels and tyres
Tyre condition, wheel condition
Drive over edges slowly and at right
angles if possible. Driving over sharp
edges can cause tyre and wheel
damage. Do not trap tyres on the kerb when parking.
Regularly check the wheels for
damage. Seek the assistance of a
workshop in the event of damage or
unusual wear.
Winter tyres Winter tyres improve driving safety at
temperatures below 7 °C and should
therefore be fitted on all wheels.
In accordance with country-specific
regulations, affix the speed sticker in
the driver's field of view.
All tyre sizes are permitted as winter
tyres 3 293.
5-door Hatchback, 4-door Saloon,
Sports TourerTyre sizes 205/60 R 16 and
235/45 R 18 are only suitable as
winter tyres.
Tyre designations E.g. 215/60 R 16 95 H215=tyre width, mm60=cross-section ratio (tyre height
to tyre width), %R=belt type: RadialRF=type: RunFlat16=wheel diameter, inches95=load index e.g. 95 is equivalent
to 690 kgH=speed code letter
Speed code letter:
Q=up to 100 mphS=up to 112 mphT=up to 118 mphH=up to 130 mphV=up to 150 mphW=up to 168 mph
Page 260 of 331
258Vehicle care
■ Never crawl under a jacked-upvehicle.
■ Do not start the vehicle when it is raised on the jack.
■ Clean wheel nuts and thread with a
clean cloth before mounting the
wheel.9 Warning
Do not grease wheel bolt, wheel
nut and wheel nut cone.
1. Disengage wheel nut caps with a screwdriver and remove.
Steel wheels with cover: Pull off
the wheel cover.
Alloy wheels: Disengage wheel
nut caps with a screwdriver and
remove. To protect the wheel,
place a soft cloth between the
screwdriver and the alloy wheel.
2. Fold out the wheel wrench and install ensuring that it locates
securely and loosen each wheel
nut by half a turn.
The wheels might be protected by
locking wheel nuts. To loosen
these specific nuts, first attach the adapter for the locking wheel nuts
onto the head of the nut before
installing the wheel wrench. The
adapter is located in the glovebox.3. Some versions may have covered
the vehicle jacking point. Pull out
the cover sideways.