Page 164 of 276

162
- If a pressure of at least 3 bar is not
reached within 5 minutes, disconnect
the compressor from the valve and the
power socket, then move the vehicle
forward by approximately 10 metres to
distribute the sealant fluid inside the
tyre.
-
t
hen repeat the inflation operation:
●
if a pressure of at least 3 bar
is not
reached within 10 minutes, switch off
your vehicle: the tyre has suffered
too much damage and repair has not
been possible. Contact a P
eugeOt
dealer or a qualified workshop.
●
if the tyre has been inflated to a
pressure of
5 bar, set off again
immediately.
After driving for approximately 10 minutes,
stop and check the pressure of the tyre
again.
Adjust the pressure to the value given on the
label on the driver's door pillar, and contact
a P
eugeOt dealer or a qualified workshop
as soon as possible.
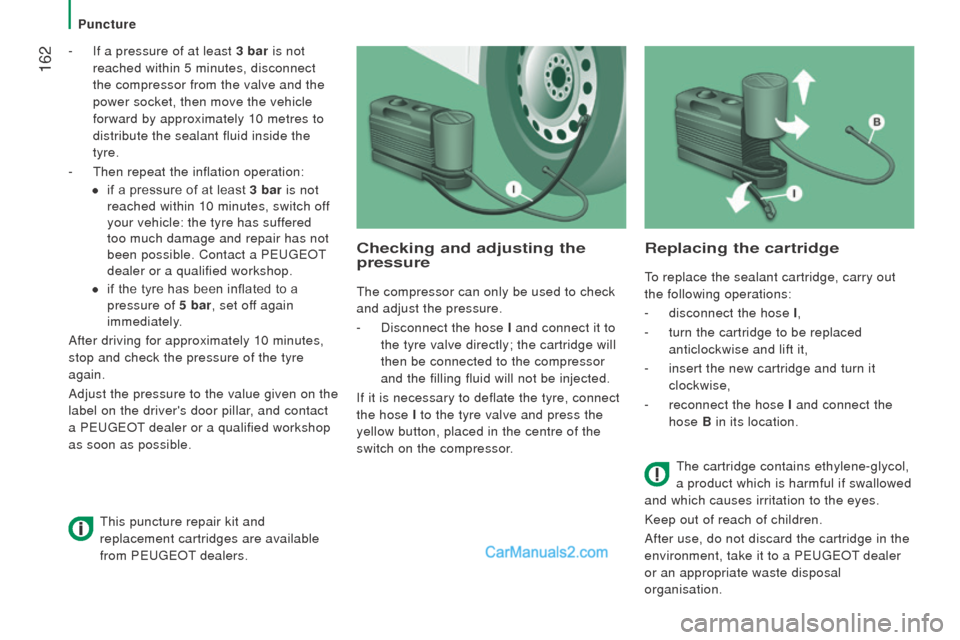
checking and adjusting the
pressure
the compressor can only be used to check
and adjust the pressure.
-
Disconnect the hose I and connect it to
the tyre valve directly; the cartridge will
then be connected to the compressor
and the filling fluid will not be injected.
If it is necessary to deflate the tyre, connect
the hose I to the tyre valve and press the
yellow button, placed in the centre of the
switch on the compressor.
replacing the cartridge
to replace the sealant cartridge, carry out
the following operations:
-
disconnect the hose I ,
-
turn the cartridge to be replaced
anticlockwise and lift it,
-
insert the new cartridge and turn it
clockwise,
-
reconnect the hose I and connect the
hose B in its location.
the cartridge contains ethylene-glycol,
a product which is harmful if swallowed
and which causes irritation to the eyes.
Keep out of reach of children.
After use, do not discard the cartridge in the
environment, take it to a P
eugeOt
dealer
or an appropriate waste disposal
organisation.
this puncture repair kit and
replacement cartridges are available
from P
eugeOt dealers.
Puncture
Page 184 of 276
182
IdEntIFIcAtIon MArKInGS
A. Manufacturer's plate
this plate is located on the front bumper
crossmember, under the bonnet.
1 -
european whole vehicle type approval number.
2 - VF... type and serial number.
3 -
gross vehicle weight (gVW).
4 -
gross train weight (gtW).
5.1 -
Maximum weight on front axle.
5.2 - Maximum weight on rear axle.
B. Serial number on the
bodywork E.
Serial number on the
bodywork
this number is located under the plastic
cover, at the sill on the right-hand side.
c. tyres
the label (image given as an indication only)
affixed to the vehicle's door pillar , on the
driver's side, indicates:
-
the tyre sizes,
-
the tyre pressures when laden.
d. Paint code
the paint code is located on the front
bumper crossmember, under the bonnet.
the tyre pressures must be checked cold,
at least monthly.
Vehicle identification
Page 261 of 276
259
● Ensure that there is no person or obstacle nearby (below or
above) when unloading.
●
Never leave the tipper body raised when not in use,
●
Always discharge the load with the top part of the rear body side
secured.
●
Observe the maximum payload on the weights plate on the
vehicle.
●
Check regularly that the suspension is in good condition and
that the tyres are inflated to the recommended pressures.
●
Distribute the load uniformly in the tipper body.
●
Transport similar products that discharge easily
.
SAFEtY AdVIcE
Discharge onto a flat and hard surface: a sloping
or loose surface may cause a change in the centre
of gravity, with an adverse affect on the stability of
the vehicle.
●
Never drive, even slowly, with the tipper body raised.
SPeCIAL FeAtuReS
tipper body