Page 73 of 396

71
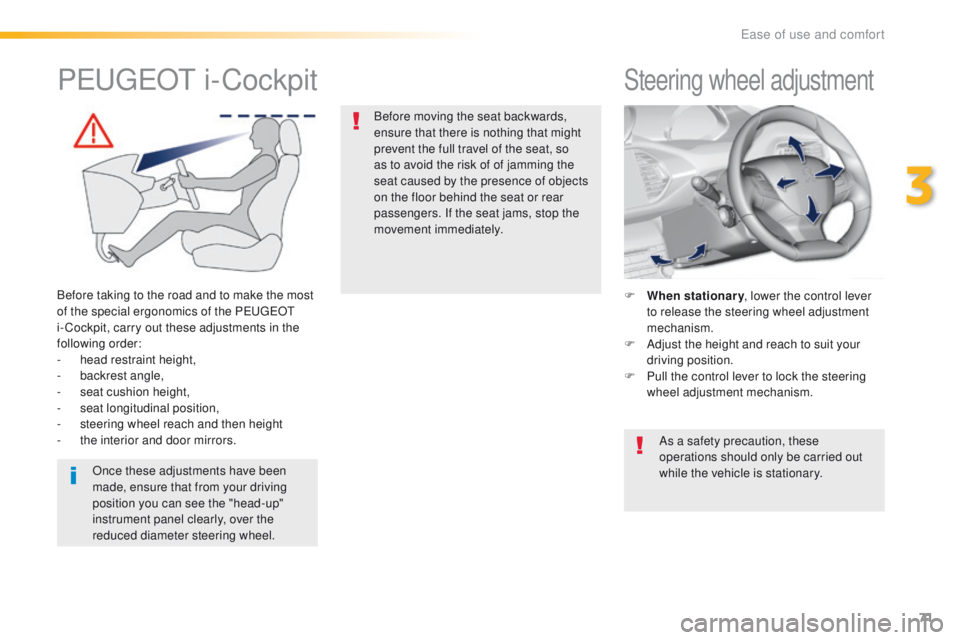
Steering wheel adjustment
F When stationary, lower the control lever
to release the steering wheel adjustment
mechanism.
F
A
djust the height and reach to suit your
driving position.
F
P
ull the control lever to lock the steering
wheel adjustment mechanism.
As a safety precaution, these
operations should only be carried out
while the vehicle is stationary.
PeugeOt i -Cockpit
Before taking to the road and to make the most
of the special ergonomics of the Pe
ugeOt
i- Cockpit, carry out these adjustments in the
following order:
-
hea
d restraint height,
-
b
ackrest angle,
-
sea
t cushion height,
-
s
eat longitudinal position,
-
s
teering wheel reach and then height
-
t
he interior and door mirrors.Once these adjustments have been
made, ensure that from your driving
position you can see the "head-up"
instrument panel clearly, over the
reduced diameter steering wheel. Before moving the seat backwards,
ensure that there is nothing that might
prevent the full travel of the seat, so
as to avoid the risk of of jamming the
seat caused by the presence of objects
on the floor behind the seat or rear
passengers. If the seat jams, stop the
movement immediately.
3
ease of use and comfort
Page 74 of 396
72
Front seats with manual adjustments
F Raise the control and slide the seat forwards or backwards. F
P ull the control upwards to raise or push
it downwards to lower, as many times as
required, to obtain the position required. F
tu rn the knob to adjust the backrest.
Forwards-backwards
HeightSeat backrest angle
As a safety measure, seat adjustments should only be carried out when stationary.
F t
u
rn the knob manually to obtain the
desired level of lumbar support.
LumbarBefore moving the seat backwards, ensure that there is nothing that might prevent the full
travel of the seat, so as to avoid the risk of of jamming the seat caused by the presence of
objects on the floor behind the seat or rear passengers. If the seat jams, stop the movement
immediately.
ease of use and comfort
Page 88 of 396
86
Boot fittings (hatchback)
1. Rear parcel shelf
2. Boot floor
R
aise the floor for access to the storage.
3.
St
orage wells
i
n which are stowed:
-
t
he towing eye,
-
t
he temporary puncture repair kit,
-
t
he spare wheel, depending on trim
level, an option or standard.
4.
S
towing rings
5.
S
trap (depending on version)
Ease of use and comfort
Page 90 of 396
88
Load space cover, roller blind (SW)
To reel inTo removeStorage
F Remove the roller guide from the rails in
the boot pillars.
F
R
elease the roller blind, it reels in
automatically. F
P lace a hand on the left under
the luggage
c ove r.
F
t
u
rn the end of the reel towards the front
(clockwise) to release it.
F
R
epeat the operation on the right (anti-
clockwise). A recess in the floor well, under the boot
carpet, allows the luggage cover to be stowed
diagonally.
th
is recess is not available with the
bass woofer unit.
ease of use and comfort
Page 133 of 396
131
Child seat at the rear
Rearward facing
When a rear ward facing child seat is installed
on a rear passenger seat, move the vehicle's
front seat for ward and straighten the backrest
so that the rear ward facing child seat does not
touch the vehicle's front seat.
Forward facing
When a for ward facing child seat is installed
on a rear passenger seat , move the vehicle's
front seat for ward and straighten the backrest
so that the legs of the child in the for ward
facing child seat do not touch the vehicle's front
seat.
Centre rear seat
A child seat with a support leg must never be
installed on the centre rear passenger seat .
en
sure that the seat belt is correctly
tensioned.
For child seats with a support leg,
ensure that this is in firm contact with
the floor. If necessary, adjust the front
seat of the vehicle.
5
Safety
Page 134 of 396
132
Passenger seat in the fully back and
highest position.
Rearward facing
Child seat in the front*
Forward facing
ensure that the seat belt is correctly
tensioned.
For child seats with a support leg, ensure
that the support leg is in firm and stable
contact with the floor. If necessary, adjust
the the passenger seat.
When a rear ward facing child seat is installed
on the front passenger seat
, adjust the seat
to the fully back and highest position, with the
backrest straightened.
the
passenger airbag must be deactivated.
Otherwise, the child would risk being
seriously injured or killed if the airbag were
to inflate . When a for ward facing child seat is installed on
the front passenger seat
, adjust the vehicle's
seat to the fully back and highest position
with seat backrest straightened and leave the
passenger's airbag activated.
*
R
efer to the legislation in force in your country
before carrying your child in this seating
position.
Safety
Page 141 of 396
139
Your vehicle has been approved in accordance with the latest ISOFIX regulations.th
e seats shown below (hatchback version) are fitted with regulation ISOFIX mountings.
"ISOFIX" mountings
there are three rings for each seat.tw o rings A , located between the vehicle seat
back and cushion, indicated by an ISOFIX
marking. A ring B located in the boot (indicated by a
marking), referred to as the TOP TETHER for
fixing the upper strap.
th
e t
O
P tet
HeR i
s used to secure the upper
strap of child seats that have them.
t
h
is limits
the for ward tipping of the child seat in the event
of a frontal impact.
th
e t
O
P tet
HeR i
s located on the boot floor
behind the seat backrest.
Do not use the luggage net rings
(hatchback) or lashing rings (SW),
located at the edges of the boot floor.
th
ese rings are located behind covers
(hatchback).
F
F
or access to them, pull for wards
to unclip the cover and pivot it
upwards.
5
Safety
Page 142 of 396

140
the incorrect installation of a child seat
in a vehicle compromises the child's
protection in the event of an accident.
Observe strictly the fitting instructions
provided with the child seat.
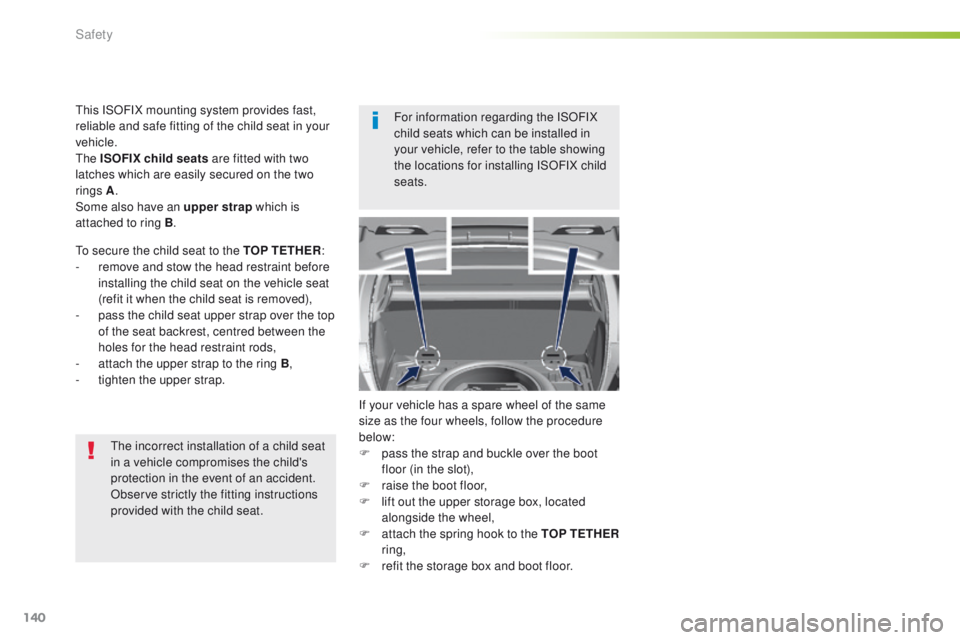
to s
ecure the child seat to the TOP TETHER
:
-
r
emove and stow the head restraint before
installing the child seat on the vehicle seat
(refit it when the child seat is removed),
-
p
ass the child seat upper strap over the top
of the seat backrest, centred between the
holes for the head restraint rods,
-
a
ttach the upper strap to the ring B,
-
t
ighten the upper strap.
If your vehicle has a spare wheel of the same
size as the four wheels, follow the procedure
below:
F p ass the strap and buckle over the boot
floor (in the slot),
F
r
aise the boot floor,
F
l
ift out the upper storage box, located
alongside the wheel,
F
a
ttach the spring hook to the TOP TETHER
ring,
F
r
efit the storage box and boot floor.
th
is ISOFIX mounting system provides fast,
reliable and safe fitting of the child seat in your
vehicle.
th
e ISOFIX child seats are fitted with two
latches which are easily secured on the two
rings A .
Some also have an upper strap which is
attached to ring B . For information regarding the ISOFIX
child seats which can be installed in
your vehicle, refer to the table showing
the locations for installing ISOFIX child
seats.
Safety