Page 201 of 344
199
Never store bottles of AdBlue® in your
vehicle.
Recommendations on storage
AdBlue® freezes at about -11°C and
deteriorates above 25°C. It is recommended
that bottles be stored in a cool area and
protected from direct sunlight.
Under these conditions, the additive can be
kept for at least a year.
If the additive has frozen, it can be used once it
has completely thawed out.
Procedure
Before topping-up, ensure that the vehicle is
parked on a flat and level sur face.
In wintry conditions, ensure that the
temperature of the vehicle is above -11°C.
Otherwise the AdBlue
® may be frozen and
so cannot be poured into its tank. Park your
vehicle in a warmer area for a few hours to
allow the top-up to be carried out.
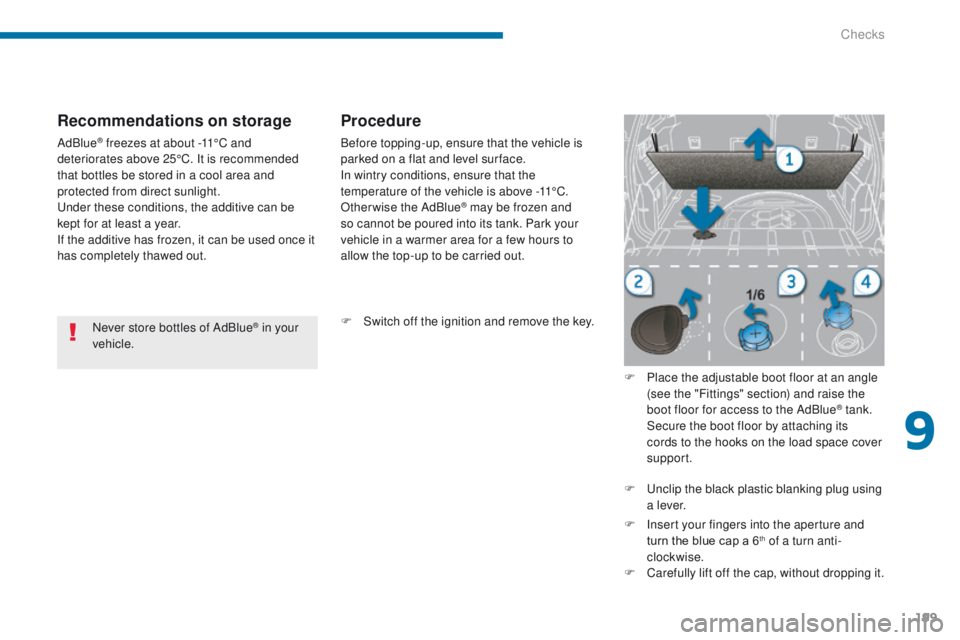
F
S
witch off the ignition and remove the key. F
P
lace the adjustable boot floor at an angle
(see the "Fittings" section) and raise the
boot floor for access to the AdBlue
® tank. S
ecure the boot floor by attaching its
cords to the hooks on the load space cover
support.
F
U
nclip the black plastic blanking plug using
a l eve r.
F
I
nsert your fingers into the aperture and
turn the blue cap a 6
th of a turn anti-
clockwise.
F
C
arefully lift off the cap, without dropping it.
9
Checks
Page 203 of 344
201
Tool kit
This is a set of tools provided with the vehicle. The content depends on your vehicle's equipment (temporary puncture repair kit or spare wheel).
Access to the tools
The main tools are stowed in the boot under
t h e f l o o r.
For access to them:
F
o
pen the boot,
F
p
lace the adjustable boot floor at an angle
(refer to the "Fittings" section),
F
r
aise the floor,
F
s
ecure it by hooking its cords on the hooks
on the load space cover support,
For versions with a standard or
"space-saver" spare wheel
F remove the polystyrene storage box,
F u nclip by pulling at the top then remove the
carrier containing the tools.
For BlueHDi versions with
"space-saver" spare wheel
F remove the spare wheel,
F r emove the polystyrene storage box,
F
p
ush the jack for wards then lift it at the
r e a r.
10
Practical information
Page 204 of 344
202
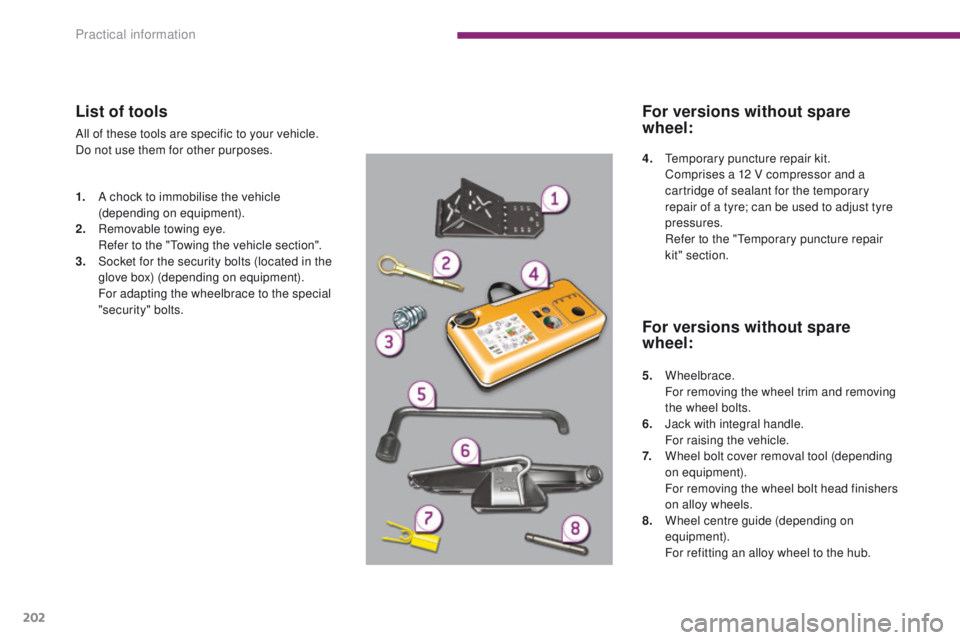
List of tools
All of these tools are specific to your vehicle.
Do not use them for other purposes.
1.
A c
hock to immobilise the vehicle
(depending on equipment).
2.
R
emovable towing eye.
R
efer to the "Towing the vehicle section".
3.
S
ocket for the security bolts (located in the
glove box) (depending on equipment).
F
or adapting the wheelbrace to the special
"security" bolts. 4.
T
emporary puncture repair kit.
C
omprises a 12 V compressor and a
cartridge of sealant for the temporary
repair of a tyre; can be used to adjust tyre
pressures.
R
efer to the "Temporary puncture repair
kit" section.
5.
Wheelbrace.
F
or removing the wheel trim and removing
the wheel bolts.
6.
J
ack with integral handle.
F
or raising the vehicle.
7.
W
heel bolt cover removal tool (depending
on equipment).
F
or removing the wheel bolt head finishers
on alloy wheels.
8.
W
heel centre guide (depending on
equipment).
F
or refitting an alloy wheel to the hub.
For versions without spare
wheel:
For versions without spare
wheel:
Practical information
Page 211 of 344
209
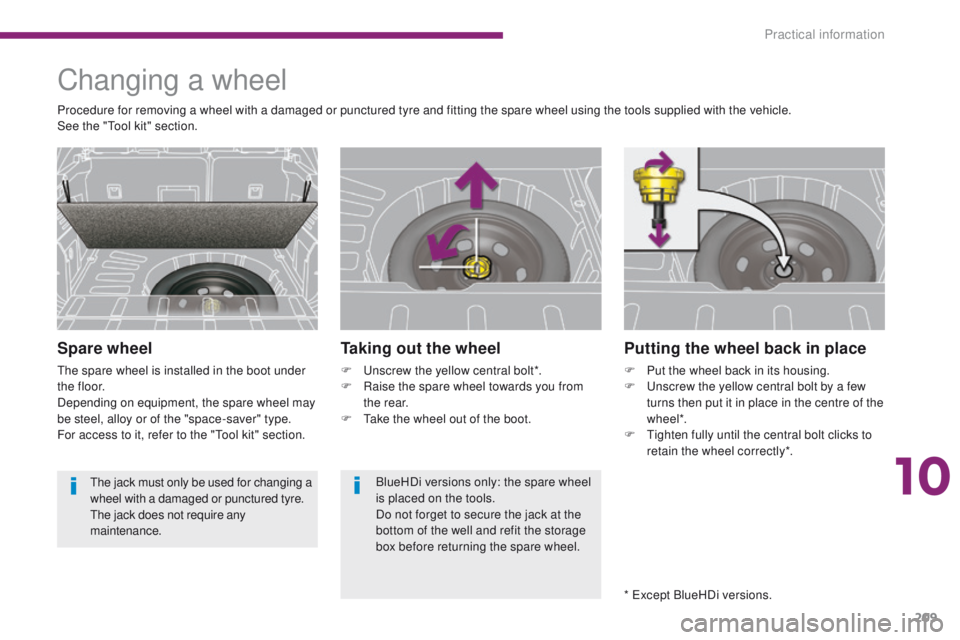
Putting the wheel back in place
F Put the wheel back in its housing.
F U nscrew the yellow central bolt by a few
turns then put it in place in the centre of the
w h e e l*.
F
T
ighten fully until the central bolt clicks to
retain the wheel correctly*.
Changing a wheel
Spare wheel
The spare wheel is installed in the boot under
t h e f l o o r.
Depending on equipment, the spare wheel may
be steel, alloy or of the "space-saver" type.
For access to it, refer to the "Tool kit" section.
Taking out the wheel
F Unscrew the yellow central bolt*.
F R aise the spare wheel towards you from
the rear.
F
T
ake the wheel out of the boot.
Procedure for removing a wheel with a damaged or punctured tyre and fitting the spare wheel using the tools supplied with the vehicle.
See the "Tool kit" section.
* Except BlueHDi versions.
BlueHDi versions only: the spare wheel
is placed on the tools.
Do not forget to secure the jack at the
bottom of the well and refit the storage
box before returning the spare wheel.
The jack must only be used for changing a
wheel with a damaged or punctured tyre.
The jack does not require any
maintenance.
10
Practical information
Page 212 of 344
210
Tyre under-inflation detection
The space-saver type or steel spare
wheel does not have a sensor.
The punctured wheel must be repaired
by a PEUGEOT dealer or a qualified
workshop.
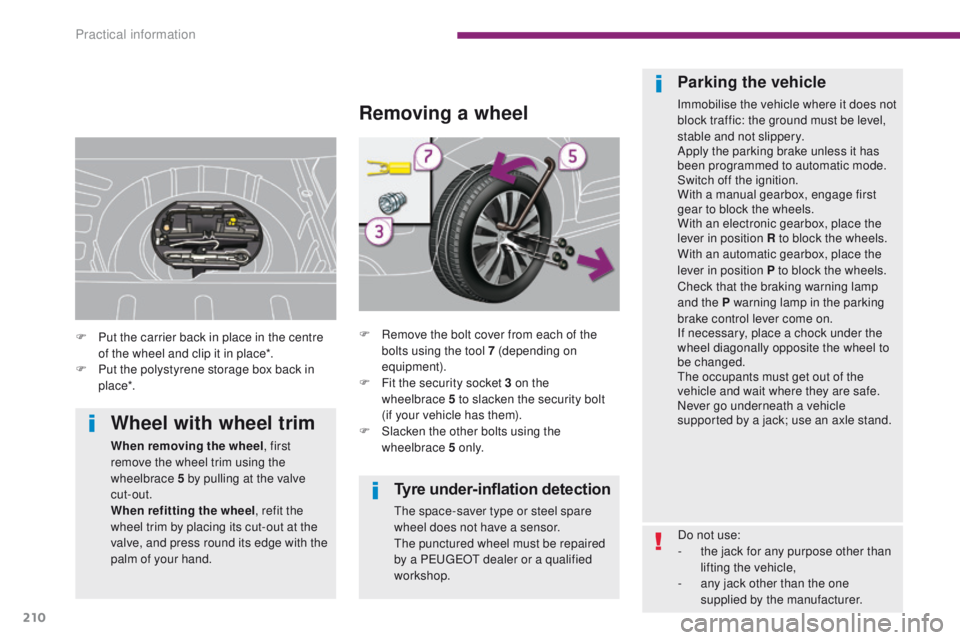
Removing a wheel
F Remove the bolt cover from each of the bolts using the tool 7 (depending on
equipment).
F
F
it the security socket 3 on the
wheelbrace
5 to slacken the security bolt
(if
your vehicle has them).
F
S
lacken the other bolts using the
wheelbrace 5 o n l y.
Parking the vehicle
Immobilise the vehicle where it does not
block traffic: the ground must be level,
stable and not slippery.
Apply the parking brake unless it has
been programmed to automatic mode.
Switch off the ignition.
With a manual gearbox, engage first
gear to block the wheels.
With an electronic gearbox, place the
lever in position R to block the wheels.
With an automatic gearbox, place the
lever in position P to block the wheels.
Check that the braking warning lamp
and the P warning lamp in the parking
brake control lever come on.
If necessary, place a chock under the
wheel diagonally opposite the wheel to
be changed.
The occupants must get out of the
vehicle and wait where they are safe.
Never go underneath a vehicle
supported by a jack; use an axle stand.
F
P
ut the carrier back in place in the centre
of the wheel and clip it in place*.
F
P
ut the polystyrene storage box back in
p lac e*.
Wheel with wheel trim
When removing the wheel , first
remove the wheel trim using the
wheelbrace 5 by pulling at the valve
cut-out.
When refitting the wheel , refit the
wheel trim by placing its cut-out at the
valve, and press round its edge with the
palm of your hand. Do not use:
-
t
he jack for any purpose other than
lifting the vehicle,
-
a
ny jack other than the one
supplied by the manufacturer.
Practical information
Page 214 of 344
212
F Remove the bolts and store them in a clean place.
F
R
emove the wheel.
Fitting a wheel
Fitting the "space-saver"
spare wheel
If your vehicle is fitted with alloy wheels,
when tightening the bolts on fitting, it
is normal to notice that the washers do
not come into contact with the "space-
saver" spare wheel. The wheel is
secured by the conical contact sur face
of each bolt. F
P
ut the wheel in place on the hub using the
centre guide 8 .
F S crew in the bolts fully by hand.
F U sing the wheelbrace 5 fitted with the
security socket 3 , pre-tighten the security
bolt (if your vehicle has them).
F
P
re-tighten the other bolts using the
wheelbrace 5 o n l y.
Practical information
Page 215 of 344
213
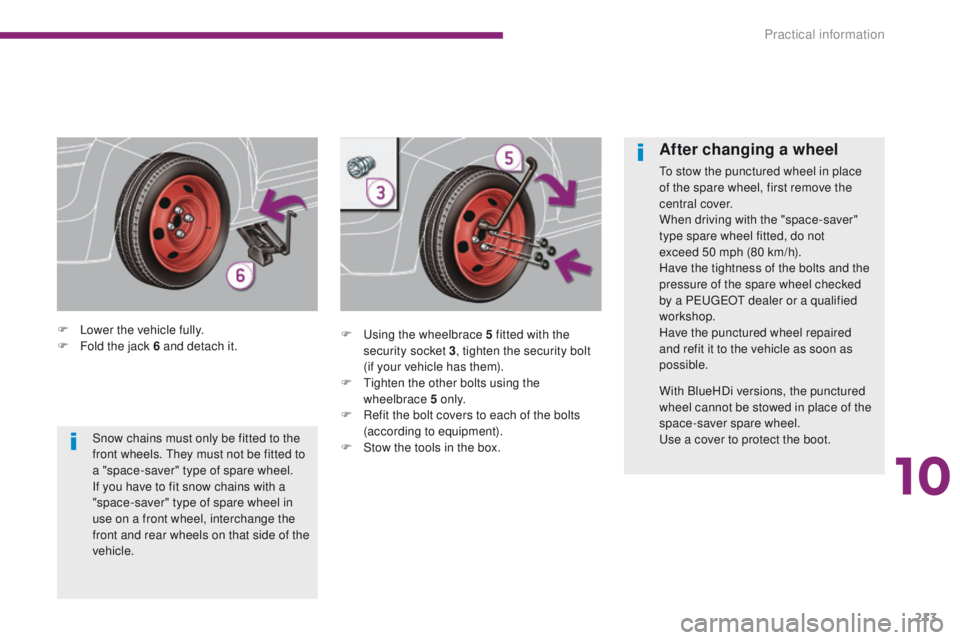
F Lower the vehicle fully.
F F old the jack 6 and detach it. F
U sing the wheelbrace 5 fitted with the
security socket 3 , tighten the security bolt
(if your vehicle has them).
F
T
ighten the other bolts using the
wheelbrace 5 o n l y.
F
R
efit the bolt covers to each of the bolts
(according to equipment).
F
S
tow the tools in the box.
After changing a wheel
To stow the punctured wheel in place
of the spare wheel, first remove the
central cover.
When driving with the "space-saver"
type spare wheel fitted, do not
exceed 50 mph (80 km/h).
Have the tightness of the bolts and the
pressure of the spare wheel checked
by a PEUGEOT dealer or a qualified
workshop.
Have the punctured wheel repaired
and refit it to the vehicle as soon as
possible.
With BlueHDi versions, the punctured
wheel cannot be stowed in place of the
space-saver spare wheel.
Use a cover to protect the boot.
Snow chains must only be fitted to the
front wheels. They must not be fitted to
a "space-saver" type of spare wheel.
If you have to fit snow chains with a
"space-saver" type of spare wheel in
use on a front wheel, interchange the
front and rear wheels on that side of the
vehicle.
10
Practical information
Page 230 of 344
228
12 V battery
Access to the battery
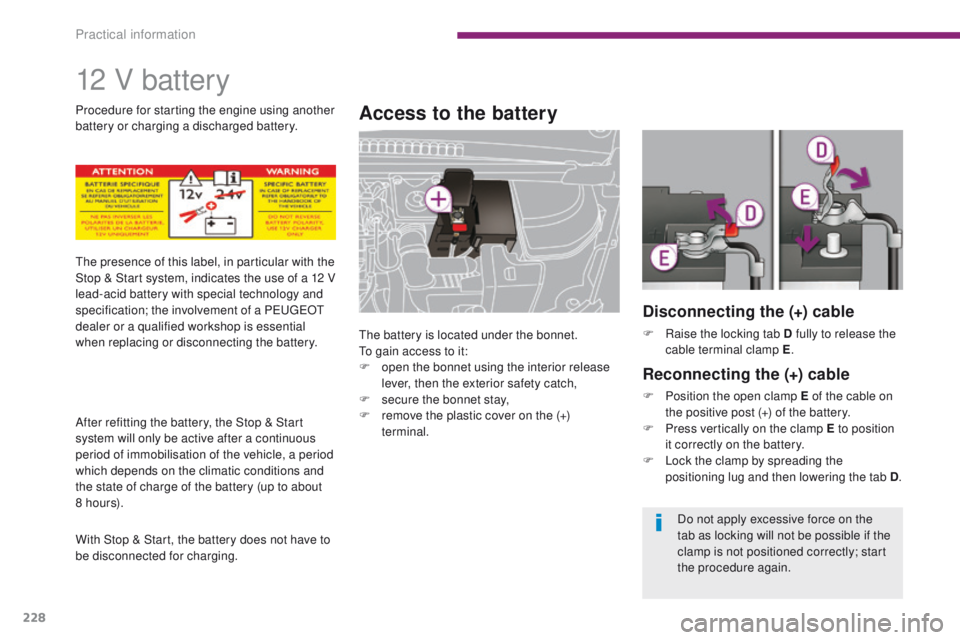
The battery is located under the bonnet.
To gain access to it:
F
o
pen the bonnet using the interior release
lever, then the exterior safety catch,
F
s
ecure the bonnet stay,
F
r
emove the plastic cover on the (+)
terminal.
The presence of this label, in particular with the
Stop & Start system, indicates the use of a 12
V
lead-acid battery with special technology and
specification; the involvement of a PEUGEOT
dealer or a qualified workshop is essential
when replacing or disconnecting the battery.
After refitting the battery, the Stop & Start
system will only be active after a continuous
period of immobilisation of the vehicle, a period
which depends on the climatic conditions and
the state of charge of the battery (up to about
8 h o u r s).
With Stop & Start, the battery does not have to
be disconnected for charging. Procedure for starting the engine using another
battery or charging a discharged battery.
Disconnecting the (+) cable
F Raise the locking tab D fully to release the cable terminal clamp E .
Reconnecting the (+) cable
F Position the open clamp E of the cable on
the positive post (+) of the battery.
F
P
ress vertically on the clamp E to position
it correctly on the battery.
F
L
ock the clamp by spreading the
positioning lug and then lowering the tab D .
Do not apply excessive force on the
tab as locking will not be possible if the
clamp is not positioned correctly; start
the procedure again.
Practical information