Page 157 of 344

155
Cruise control
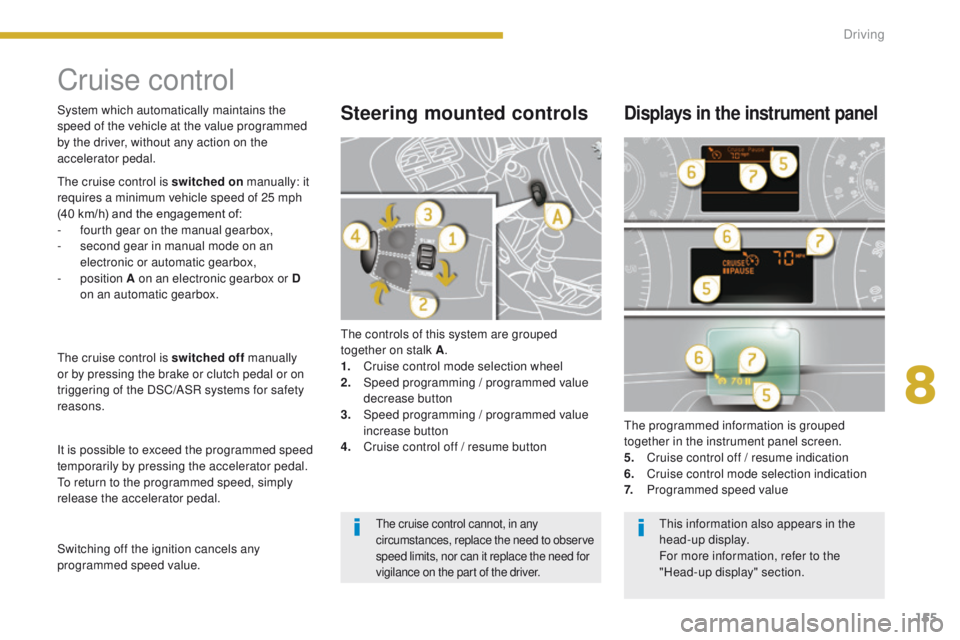
The controls of this system are grouped
together on stalk A.
1.
C
ruise control mode selection wheel
2.
S
peed programming
/ programmed value
decrease button
3.
S
peed programming
/ programmed value
increase button
4.
C
ruise control off / resume button The programmed information is grouped
together in the instrument panel screen.
5.
C
ruise control off / resume indication
6.
C
ruise control mode selection indication
7.
P
rogrammed speed value
Steering mounted controlsDisplays in the instrument panel
The cruise control is switched on manually: it
requires a minimum vehicle speed of 25 mph
(40 km/h) and the engagement of:
-
f
ourth gear on the manual gearbox,
-
s
econd gear in manual mode on an
electronic or automatic gearbox,
-
position A on an electronic gearbox or D
on an automatic gearbox.
The cruise control is switched off manually
or by pressing the brake or clutch pedal or on
triggering of the DSC/ASR systems for safety
reasons.
It is possible to exceed the programmed speed
temporarily by pressing the accelerator pedal.
To return to the programmed speed, simply
release the accelerator pedal. System which automatically maintains the
speed of the vehicle at the value programmed
by the driver, without any action on the
accelerator pedal.
Switching off the ignition cancels any
programmed speed value.
The cruise control cannot, in any
circumstances, replace the need to observe
speed limits, nor can it replace the need for
vigilance on the part of the driver.This information also appears in the
head-up display.
For more information, refer to the
"Head-up display" section.
8
Driving
Page 162 of 344

160
Steering mounted controls
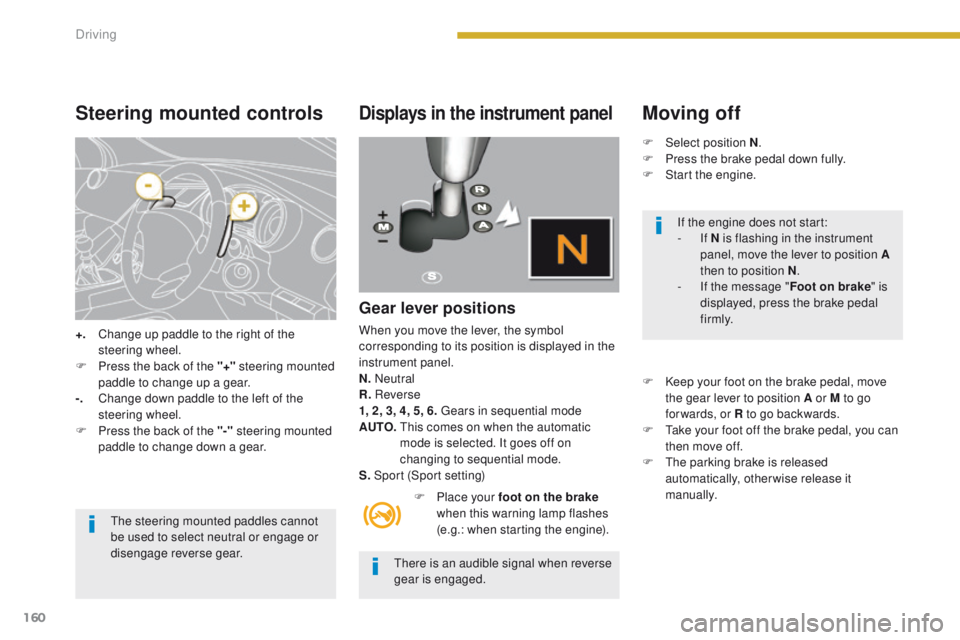
+. Change up paddle to the right of the steering wheel.
F
P
ress the back of the "+" steering mounted
paddle to change up a gear.
-.
C
hange down paddle to the left of the
steering wheel.
F
P
ress the back of the "-" steering mounted
paddle to change down a gear.
The steering mounted paddles cannot
be used to select neutral or engage or
disengage reverse gear.
Displays in the instrument panel
Gear lever positions
When you move the lever, the symbol
corresponding to its position is displayed in the
instrument panel.
N. Neutral
R. Reverse
1, 2, 3, 4, 5, 6. Gears in sequential mode
AUTO.
T
his comes on when the automatic
mode is selected. It goes off on
changing to sequential mode.
S. Sport (Sport setting)
F
P
lace your foot on the brake
when this warning lamp flashes
(e.g.: when starting the engine).
There is an audible signal when reverse
gear is engaged.
Moving off
F Select position N .
F P ress the brake pedal down fully.
F
S
tart the engine.
F
K
eep your foot on the brake pedal, move
the gear lever to position A or M to go
for wards, or R to go backwards.
F
T
ake your foot off the brake pedal, you can
then move off.
F
T
he parking brake is released
automatically, otherwise release it
manually. If the engine does not start:
-
If N is flashing in the instrument
panel, move the lever to position A
then to position N .
-
I
f the message " Foot on brake" is
displayed, press the brake pedal
f i r m l y.
Driving
Page 175 of 344

173
The flashing and then fixed
illumination of the under-inflation
warning lamp accompanied by
the illumination of the service warning lamp
indicates a fault with the system.
In this case, monitoring of the tyre pressures is
not assured.
This alert is also displayed when one or
more wheels is not fitted with a sensor
(for example, a space-saver or steel
spare wheel).
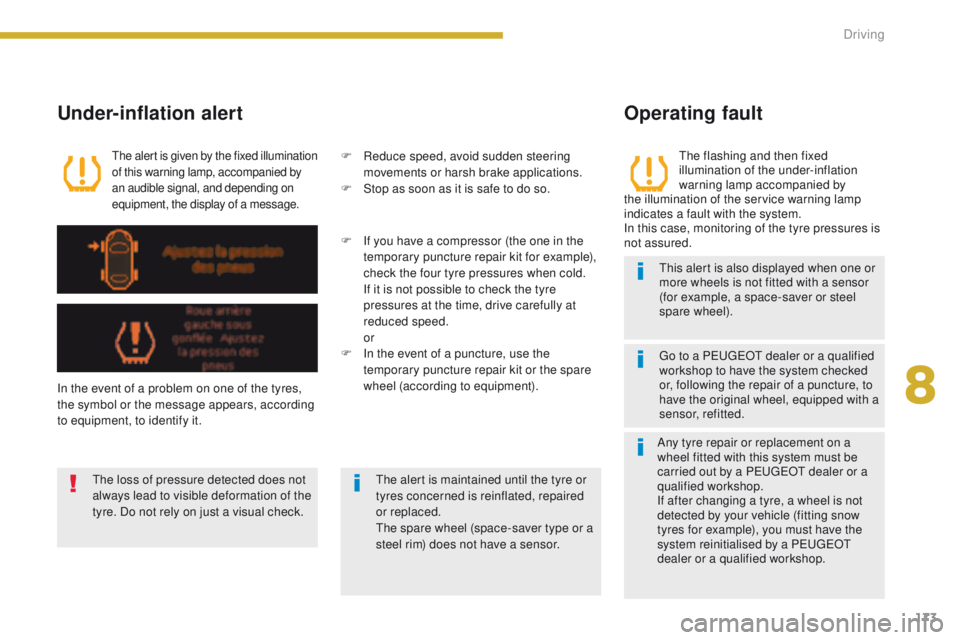
Under-inflation alert
The alert is given by the fixed illumination
of this warning lamp, accompanied by
an audible signal, and depending on
equipment, the display of a message.
In the event of a problem on one of the tyres,
the symbol or the message appears, according
to equipment, to identify it. F
R
educe speed, avoid sudden steering
movements or harsh brake applications.
F
S
top as soon as it is safe to do so.
The loss of pressure detected does not
always lead to visible deformation of the
tyre. Do not rely on just a visual check. The alert is maintained until the tyre or
tyres concerned is reinflated, repaired
or replaced.
The spare wheel (space-saver type or a
steel rim) does not have a sensor.
Operating fault
Go to a PEUGEOT dealer or a qualified
workshop
to have the system checked
or, following the repair of a puncture, to
have the original wheel, equipped with a
sensor, refitted.
F
I
f you have a compressor (the one in the
temporary puncture repair kit for example),
check the four tyre pressures when cold.
I
f it is not possible to check the tyre
pressures at the time, drive carefully at
reduced speed.
or
F
I
n the event of a puncture, use the
temporary puncture repair kit or the spare
wheel (according to equipment).
Any tyre repair or replacement on a
wheel fitted with this system must be
carried out by a PEUGEOT dealer or a
qualified workshop.
If after changing a tyre, a wheel is not
detected by your vehicle (fitting snow
tyres for example), you must have the
system reinitialised by a PEUGEOT
dealer or a qualified workshop.
8
Driving
Page 206 of 344
204
Description of the kit
A. "Sealant" or "Air" position selector.
B. On "I"
/ off "O" switch.
C.
D
eflation button.
D.
P
ressure gauge (in bar and psi).
E.
C
ompartment housing:
-
a c
able with adaptor for 12 V socket,
-
v
arious inflation adaptors for
accessories, such as balls, bicycle
tyres... F. S
ealant cartridge.
G. W hite pipe with cap for repair.
H.
B
lack pipe for inflation.
I.
Spe
ed limit sticker.The speed limit sticker I must be affixed
to the vehicle's steering wheel to remind
you that a wheel is in temporary use.
Do not exceed a speed of 50 mph
(80
km/h) when driving with a tyre
repaired using this type of kit.
Practical information
Page 235 of 344

233
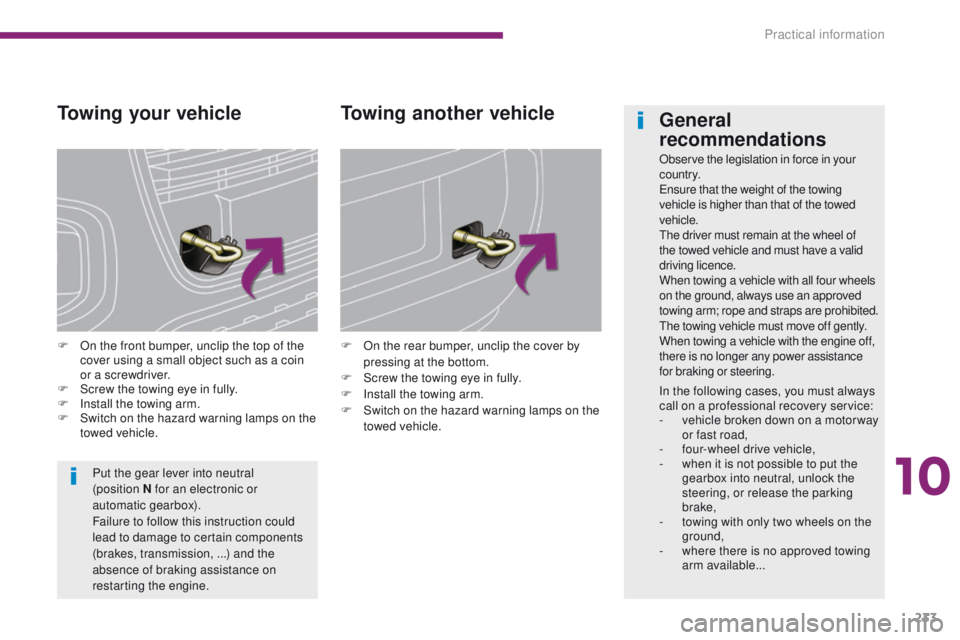
Towing your vehicle
F On the front bumper, unclip the top of the cover using a small object such as a coin
or a screwdriver.
F
S
crew the towing eye in fully.
F
I
nstall the towing arm.
F
S
witch on the hazard warning lamps on the
towed vehicle. F
O n the rear bumper, unclip the cover by
pressing at the bottom.
F
S
crew the towing eye in fully.
F
I
nstall the towing arm.
F
S
witch on the hazard warning lamps on the
towed vehicle.
Towing another vehicle
Put the gear lever into neutral
(position N for an electronic or
automatic gearbox).
Failure to follow this instruction could
lead to damage to certain components
(brakes, transmission, ...) and the
absence of braking assistance on
restarting the engine.
General
recommendations
Observe the legislation in force in your
c o unt r y.
Ensure that the weight of the towing
vehicle is higher than that of the towed
vehicle.
The driver must remain at the wheel of
the towed vehicle and must have a valid
driving licence.
When towing a vehicle with all four wheels
on the ground, always use an approved
towing arm; rope and straps are prohibited.
The towing vehicle must move off gently.
When towing a vehicle with the engine off,
there is no longer any power assistance
for braking or steering.
In the following cases, you must always
call on a professional recovery service:
-
v
ehicle broken down on a motor way
or fast road,
-
f
our-wheel drive vehicle,
-
w
hen it is not possible to put the
gearbox into neutral, unlock the
steering, or release the parking
brake,
-
t
owing with only two wheels on the
ground,
-
w
here there is no approved towing
arm available...
10
Practical information
Page 290 of 344
07
288By alphabetical list
Press RADIO, select the station of your
choice and confirm.
By automatic frequency search
Press 7 or 8 for the automatic search
for a lower or higher radio frequency.
Or turn the thumb wheel at the steering
mounted controls.
By manual frequency search
Press 5 or 6 to adjust the radio
frequency step by step.
Selecting a station
The external environment (hill, building, tunnel, underground car park.\
..) may interfere with the reception, including in RDS station tracking mode.
This
phenomenon is a normal result of the way in which radio waves are transm\
itted and does not in any way indicate a fault with the audio system.
The quality of reception is represented by the number of
active waves in this symbol.
Press RADIO or OK to display the
contextual menu.
Changing waveband
Select "Change waveband".
Select "FM / DAB / AM" and confirm.
RADIO
Page 291 of 344
07
289
Press the button on the numerical keypad to recall a
preset station.
Or press then turn the thumb wheel at the steering
mounted controls.
Presetting a station
After selecting a station, press one of the buttons on the
numerical keypad for 2 seconds to preset the current
station.
An audible signal confirms that the station has been preset.
Press RADIO.
Activate / Deactivate RDS
RDS, if activated, allows you to continue listening to the same
station by automatic retuning to alternative frequencies. However,
in certain conditions, coverage of an RDS station may not be
assured throughout the entire country as radio stations do not
cover 100 % of the territory. This explains the loss of reception of
the station during a journey.
Select "Guidance options " then
confirm.
Activate or deactivate "RDS" then
confirm.
RADIO
Page 324 of 344
06
322An incoming call is announced by a ring and a superimposed
display in the screen.
Select the YES tab on the display
using the buttons.
Confirm by pressing OK.
Press this button at the steering mounted controls
to accept the call. Select "Manage the telephone call
".
Select "Call". From the "Bluetooth: Telephone - Audio " menu.
Or
Select "Calls list".
Or
Select "Directory ".
BLUETOOTH
Receiving a call
Making a call
Press this button for more than two seconds for
access to your directory, then navigate using the
thumb wheel.
Or
To dial a number, use your telephone's keypad,
with the vehicle stationary.