2015.5. PEUGEOT 3008 ECO mode
[x] Cancel search: ECO modePage 39 of 344
37
Display configuration
Once this menu has been selected, you have
access to the following settings:
-
b
rightness-video setting,
-
d
ate and time setting,
-
s
election of the units.
Adjusting the date and time
F
P
ress the " 7" or " 8" button to select the
"Display configuration" menu, then the
"OK" button.
F
P
ress the " 5" or " 6" button, to select the
"Adjust date and time" line, then on the
"OK" button.
F
P
ress the " 7" or " 8" button to select the
setting to modify. Confirm by pressing the
"OK"
button then adjust the setting and
confirm again to save the modification.
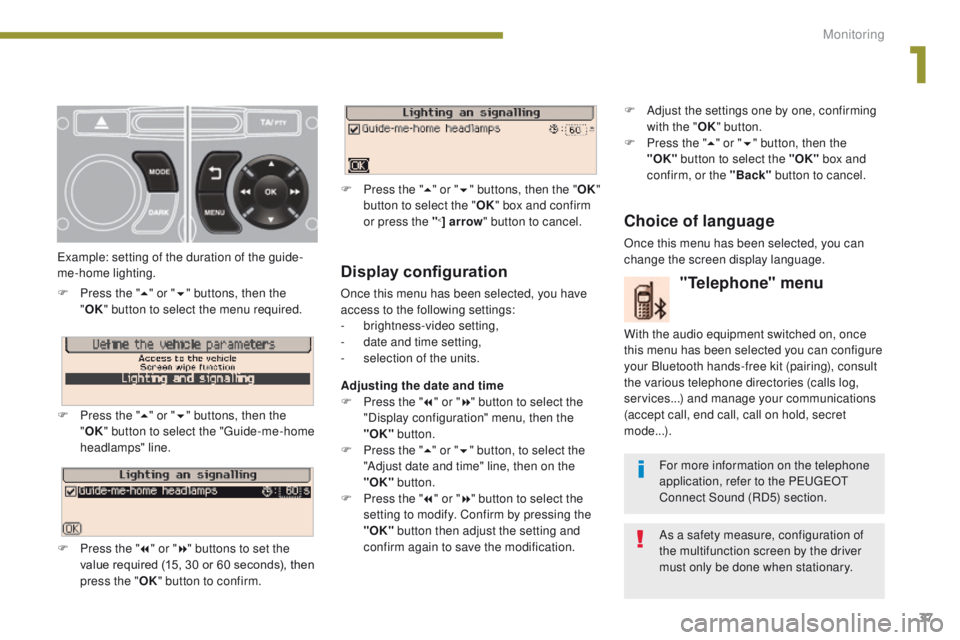
Example: setting of the duration of the guide-
me-home lighting.
F
P
ress the "
5" or " 6" buttons, then the
" OK "
button to select the menu required.
F
P
ress the " 5" or " 6" buttons, then the
" OK " button to select the "Guide-me-home
headlamps" line.
F
P
ress the " 7" or " 8" buttons to set the
value required (15, 30 or 60 seconds), then
press the " OK" button to confirm. F
P
ress the "
5" or " 6" buttons, then the " OK"
button to select the " OK" box and confirm
or press the "
<] arrow " button to cancel.
"Telephone" menu
With the audio equipment switched on, once
this menu has been selected you can configure
your Bluetooth hands-free kit (pairing), consult
the various telephone directories (calls log,
services...) and manage your communications
(accept call, end call, call on hold, secret
mode...).
For more information on the telephone
application, refer to the PEUGEOT
Connect Sound (RD5) section.
As a safety measure, configuration of
the multifunction screen by the driver
must only be done when stationary.
Choice of language
Once this menu has been selected, you can
change the screen display language. F
A
djust the settings one by one, confirming
with the " OK" button.
F
P
ress the "
5" or " 6" button, then the
"OK"
button to select the "OK"
box and
confirm, or the "Back" button to cancel.
1
Monitoring
Page 43 of 344

41
Tr i p c o m p u t e r
When the range falls below 20 miles (30 km),
dashes are displayed. After filling with at least
5 litres of fuel, the range is recalculated and is
displayed when it exceeds 60 miles (100 km).
Range
(miles or km)
The distance which can still be
travelled with the fuel remaining in the tank
(related to the average fuel consumption over
the last few miles (kilometres) travelled).
Current fuel consumption
(mpg or l/100 km or km/l)
Calculated over the last few seconds.
Average fuel
consumption
(mpg or l/100 km or km/l)
Calculated since the last trip
reset.
Distance travelled
(miles or km)
Calculated since the last trip
reset.
Average speed
(mph or km/h)
Calculated since the last trip reset.
Stop & Start time counter
(minutes / seconds or hours /
m inutes)
If your vehicle is fitted with Stop &
Start, a time counter calculates the time spent
in STOP mode during a journey.
It resets to zero every time the ignition is
switched on with the key.
If dashes are displayed continuously
while driving in place of the digits,
contact a PEUGEOT dealer or a
qualified workshop. This value may vary following a change
in the style of driving or the relief,
resulting in a significant change in the
current fuel consumption. This function is only displayed from
20 mph (30 km/h).
A few definitions
1
Monitoring
Page 54 of 344
52
Electric windows
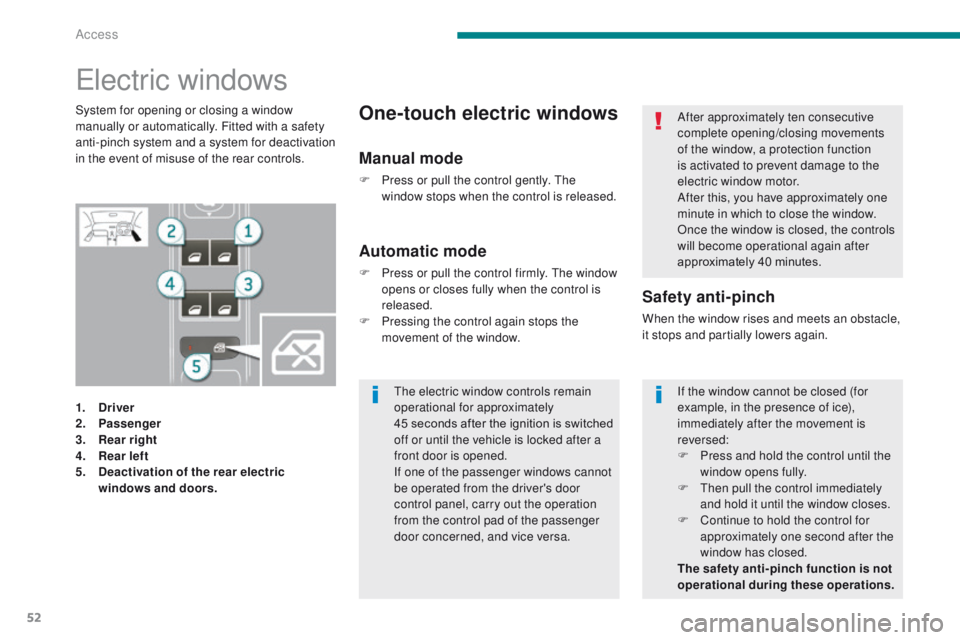
1. Driver
2. Passenger
3.
R
ear right
4.
R
ear left
5.
D
eactivation of the rear electric
windows and doors.
Safety anti-pinch
When the window rises and meets an obstacle,
it stops and partially lowers again.
Automatic mode
F Press or pull the control firmly. The window opens or closes fully when the control is
released.
F
P
ressing the control again stops the
movement of the window.
One-touch electric windowsSystem for opening or closing a window
manually or automatically. Fitted with a safety
anti-pinch system and a system for deactivation
in the event of misuse of the rear controls.
Manual mode
F Press or pull the control gently. The window stops when the control is released. After approximately ten consecutive
complete opening/closing movements
of the window, a protection function
is activated to prevent damage to the
electric window motor.
After this, you have approximately one
minute in which to close the window.
Once the window is closed, the controls
will become operational again after
approximately 40 minutes.
The electric window controls remain
operational for approximately
45
seconds after the ignition is switched
off or until the vehicle is locked after a
front door is opened.
If one of the passenger windows cannot
be operated from the driver's door
control panel, carry out the operation
from the control pad of the passenger
door concerned, and vice versa. If the window cannot be closed (for
example, in the presence of ice),
immediately after the movement is
reversed:
F
P
ress and hold the control until the
window opens fully.
F
T
hen pull the control immediately
and hold it until the window closes.
F
C
ontinue to hold the control for
approximately one second after the
window has closed.
The safety anti-pinch function is not
operational during these operations.
Access
Page 66 of 344
64
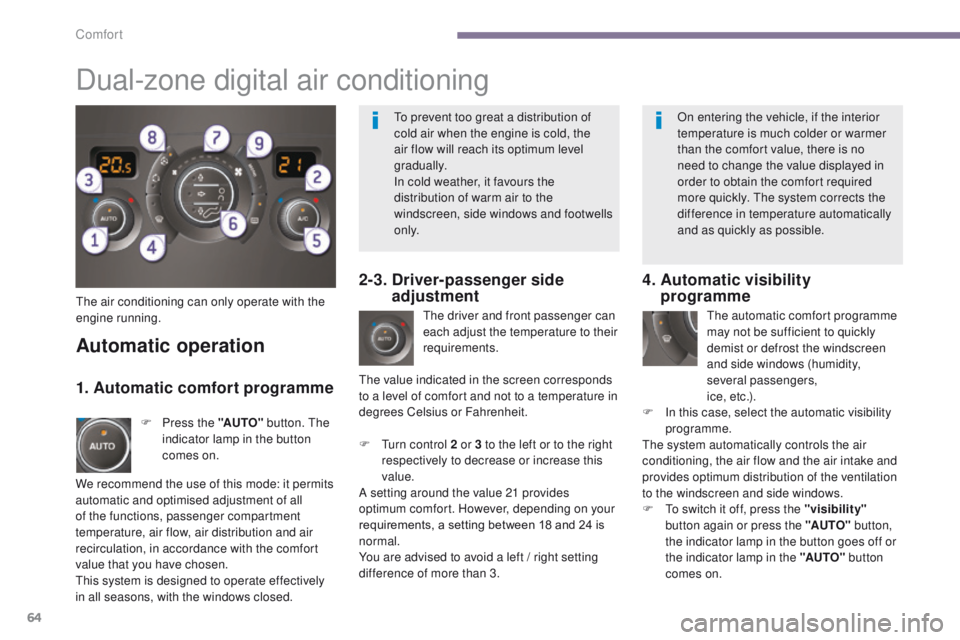
The air conditioning can only operate with the
engine running.The driver and front passenger can
each adjust the temperature to their
requirements.
F
T
urn control 2 or 3 to the left or to the right
respectively to decrease or increase this
value.
A setting around the value 21 provides
optimum comfort. However, depending on your
requirements, a setting between 18 and 24 is
normal.
You are advised to avoid a left
/ right setting
difference of more than 3.
4. Automatic visibility programme
The automatic comfort programme
may not be sufficient to quickly
demist or defrost the windscreen
and side windows (humidity,
several passengers,
i c e , e t c .) .
F
I
n this case, select the automatic visibility
programme.
The system automatically controls the air
conditioning, the air flow and the air intake and
provides optimum distribution of the ventilation
to the windscreen and side windows.
F
T
o switch it off, press the "visibility"
button again or press the "AUTO" button,
the indicator lamp in the button goes off or
the indicator lamp in the "AUTO" button
comes on.
Automatic operation
F Press the "AUTO" button. The
indicator lamp in the button
comes on.
2-3. Driver-passenger side adjustment
Dual-zone digital air conditioning
We recommend the use of this mode: it permits
automatic and optimised adjustment of all
of the functions, passenger compartment
temperature, air flow, air distribution and air
recirculation, in accordance with the comfort
value that you have chosen.
This system is designed to operate effectively
in all seasons, with the windows closed. The value indicated in the screen corresponds
to a level of comfort and not to a temperature in
degrees Celsius or Fahrenheit.
1. Automatic comfort programme
To prevent too great a distribution of
cold air when the engine is cold, the
air flow will reach its optimum level
gradually.
In cold weather, it favours the
distribution of warm air to the
windscreen, side windows and footwells
o n l y.
On entering the vehicle, if the interior
temperature is much colder or warmer
than the comfort value, there is no
need to change the value displayed in
order to obtain the comfort required
more quickly. The system corrects the
difference in temperature automatically
and as quickly as possible.
Comfort
Page 67 of 344
65
Manual operation
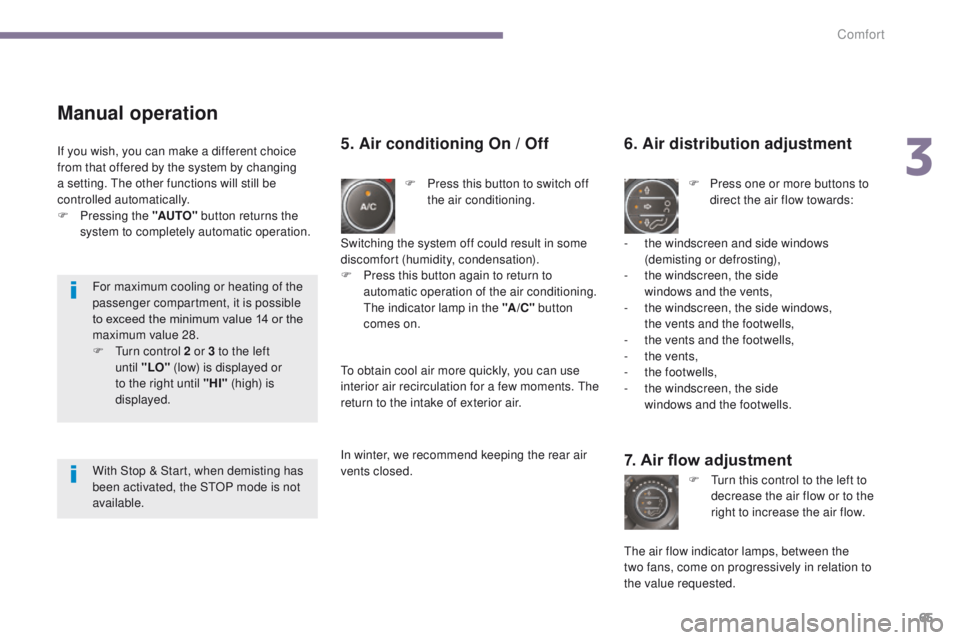
F Press this button to switch off the air conditioning.
6. Air distribution adjustment
F Press one or more buttons to direct the air flow towards:
7. Air flow adjustment
F Turn this control to the left to decrease the air flow or to the
right to increase the air flow.
5. Air conditioning On / Off
- the windscreen and side windows (demisting or defrosting),
-
t
he windscreen, the side
windows and the vents,
-
t
he windscreen, the side windows,
the vents and the footwells,
-
t
he vents and the footwells,
-
t
he vents,
-
t
he footwells,
-
t
he windscreen, the side
windows and the footwells.
The air flow indicator lamps, between the
two
fans, come on progressively in relation to
the value requested.
Switching the system off could result in some
discomfort (humidity, condensation).
F
P
ress this button again to return to
automatic operation of the air conditioning.
The indicator lamp in the "A /C " button
comes on.
If you wish, you can make a different choice
from that offered by the system by changing
a setting. The other functions will still be
controlled automatically.
F
P
ressing the "AUTO"
button returns the
system to completely automatic operation.
To obtain cool air more quickly, you can use
interior air recirculation for a few moments. The
return to the intake of exterior air.
In winter, we recommend keeping the rear air
vents closed.
For maximum cooling or heating of the
passenger compartment, it is possible
to exceed the minimum value 14 or the
maximum value 28.
F
T
urn control 2 or 3 to the left
until
"LO" (low) is displayed or
to the right until "HI" (high) is
displayed.
With Stop & Start, when demisting has
been activated, the STOP mode is not
available.
3
Comfort
Page 71 of 344
69
The electric functions of the driver's
seat are active for approximately
one minute after opening the front door.
They are deactivated approximately
one
minute after the ignition is switched
off and in economy mode.
To reactivate them, switch on the ignition.
Before moving the seat backwards,
ensure that there is nothing that might
prevent the full travel of the seat, so
as to avoid the risk of of jamming the
seat caused by the presence of objects
on the floor behind the seat or rear
passengers. If the seat jams, stop the
movement immediately.
Head restraint height and
angle adjustment
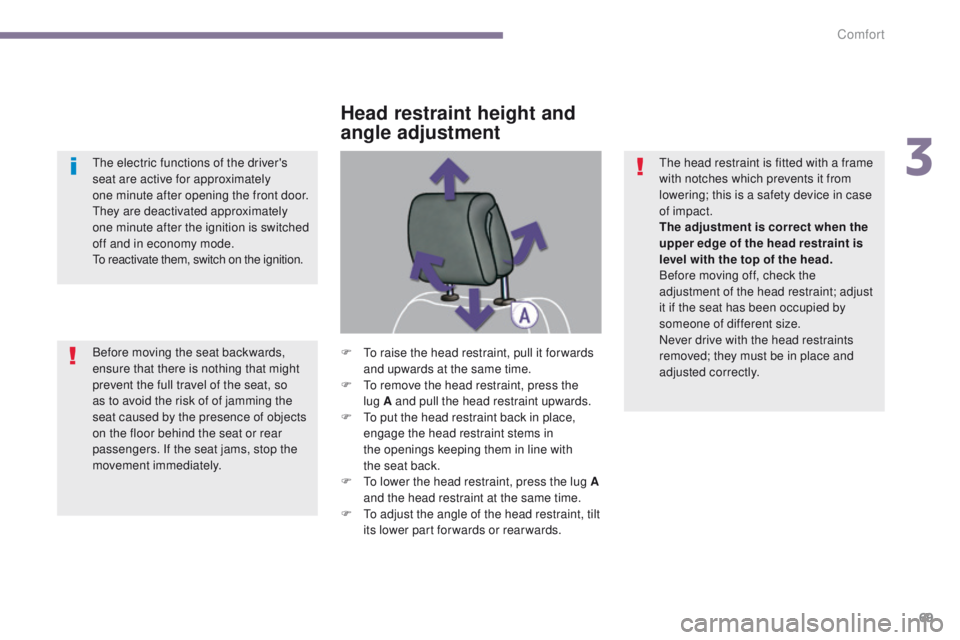
F To raise the head restraint, pull it for wards and upwards at the same time.
F
T
o remove the head restraint, press the
lug
A and pull the head restraint upwards.
F
T
o put the head restraint back in place,
engage the head restraint stems in
the
openings keeping them in line with
the
seat back.
F
T
o lower the head restraint, press the lug A
and the head restraint at the same time.
F
T
o adjust the angle of the head restraint, tilt
its lower part forwards or rearwards. The head restraint is fitted with a frame
with notches which prevents it from
lowering; this is a safety device in case
of impact.
The adjustment is correct when the
upper edge of the head restraint is
level with the top of the head.
Before moving off, check the
adjustment of the head restraint; adjust
it if the seat has been occupied by
someone of different size.
Never drive with the head restraints
removed; they must be in place and
adjusted correctly.
3
Comfort
Page 82 of 344
80
Switching off the lighting when
switching off the ignition
When the ignition is switched off, all of the
lamps switch off immediately, except for the
dipped beam headlamps if automatic guide-
me-home lighting is activated.
In good or rainy weather, by both day
and night, the front foglamps and the
rear foglamps are prohibited. In these
situations, the power of their beams
may dazzle other drivers. They should
only be used in fog or falling snow.
In these weather conditions, you should
switch on the foglamps and dipped
beam headlamps manually, as the
sunshine sensor may detect sufficient
light.
Do not forget to switch off the front and
rear foglamps when they are no longer
necessary.
Switching on the lighting when
switching on the ignition
To reactivate the lighting control stalk, turn the
ring A to position "0"
- lighting off, then to the
position of your choice.
When the driver's door is opened, a temporary
audible signal warns you that the vehicle's
lighting is on.
They switch off automatically after a period
which depends on the state of charge of the
battery (entry to energy economy mode).
Visibility
Page 93 of 344
91
Courtesy lamps
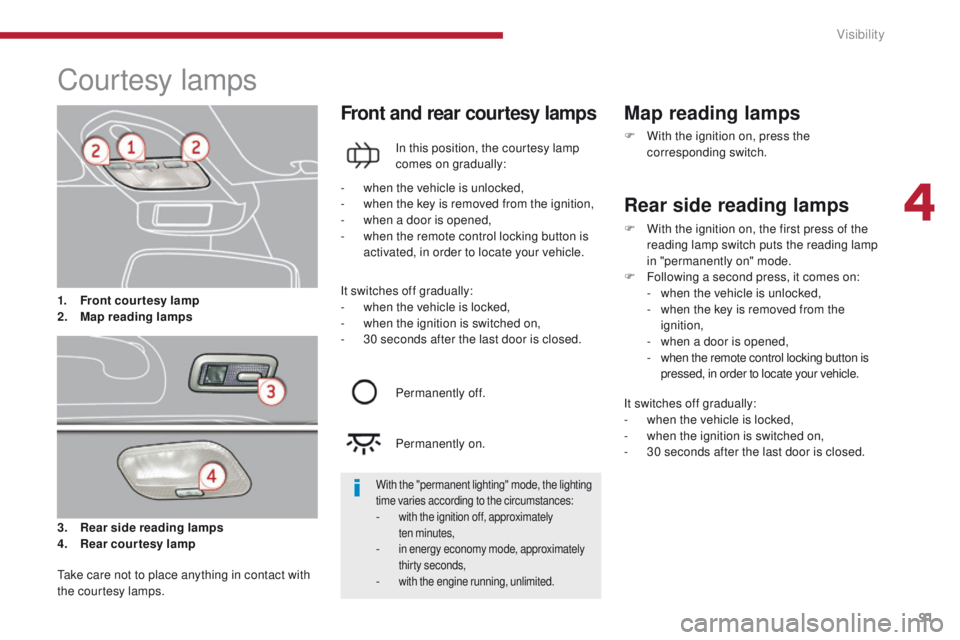
3. Rear side reading lamps
4. Rear courtesy lamp
Front and rear courtesy lamps
In this position, the courtesy lamp
comes on gradually:
Map reading lamps
F With the ignition on, press the corresponding switch.
-
w
hen the vehicle is unlocked,
-
w
hen the key is removed from the ignition,
-
w
hen a door is opened,
-
w
hen the remote control locking button is
activated, in order to locate your vehicle.
Permanently off.
Permanently on.
Rear side reading lamps
It switches off gradually:
- w hen the vehicle is locked,
-
w
hen the ignition is switched on,
-
3
0 seconds after the last door is closed.
Take care not to place anything in contact with
the courtesy lamps. 1. F
ront courtesy lamp
2.
M
ap reading lamps
With the "permanent lighting" mode, the lighting
time varies according to the circumstances:
- with the ignition off, approximately
ten minutes,
- in energy economy mode, approximately
thirty seconds,
- with the engine running, unlimited.
F With the ignition on, the first press of the reading lamp switch puts the reading lamp
in "permanently on" mode.
F
F
ollowing a second press, it comes on:
-
w
hen the vehicle is unlocked,
-
w
hen the key is removed from the
ignition,
-
w
hen a door is opened,
-
w
hen the remote control locking button is
pressed, in order to locate your vehicle.
It switches off gradually:
-
w
hen the vehicle is locked,
-
w
hen the ignition is switched on,
-
3
0 seconds after the last door is closed.
4
Visibility