Page 136 of 276

134
Low fuel level
rEF
u
ELLI
n
G
In low temperatures
In mountainous and/or cold areas, it is
advisable to use a "winter" type fuel suited
to low or minus temperatures. With Stop & Start, never refuel with
the system in STOP mode; you must
switch off the ignition with the key. When the fuel tank level E
(Empty) is reached, this warning
lamp comes on.
You then have around 10 to
12 litres in the reserve, depending on the
capacity of the tank, the engine type, the
driving conditions and the profile of the road.
Refuel without delay to avoid running out of
fuel.
The capacity of the fuel tank is
approximately 90 litres.
Fuel tanks of different capacities, 60 and
120 litres, may be fitted. The fuel tank must be filled with the engine
off.
-
Open the fuel filler flap.
-
Support the black cap with one hand.
-
With the other hand, insert the key
, then
turn it anticlockwise.
-
Remove the black cap and hook it onto
the clip located on the inside of the flap.
A label affixed to the inside of the flap
reminds you of the type of fuel to be used.
When filling the fuel tank, do not continue
after the 3rd cut-off of the nozzle. This could
cause malfunctions.
-
After filling the fuel tank, lock the black
cap and close the flap.
BlueH d i and AdBlue additive
The blue cap is only present on BlueHDi
Diesel versions.
For more information, refer to the "AdBlue
additive section". To understand the significance of the
precautions mentioned on the labels,
refer to the "Quick help - Label glossary"
section.
Fuel
Page 166 of 276

164
tOWBAr WItH QuIcKLY
d E t
A
c HABLE t
OWBALL
Presentation
This towball can be fitted and removed
quickly and easily without the use of tools. For information on the maximum
trailer weight and the recommended
nose weight, refer to the "Technical data -
Weights" section.
For information on safely towing a trailer,
refer to the "Accessories - Towing a trailer"
section.
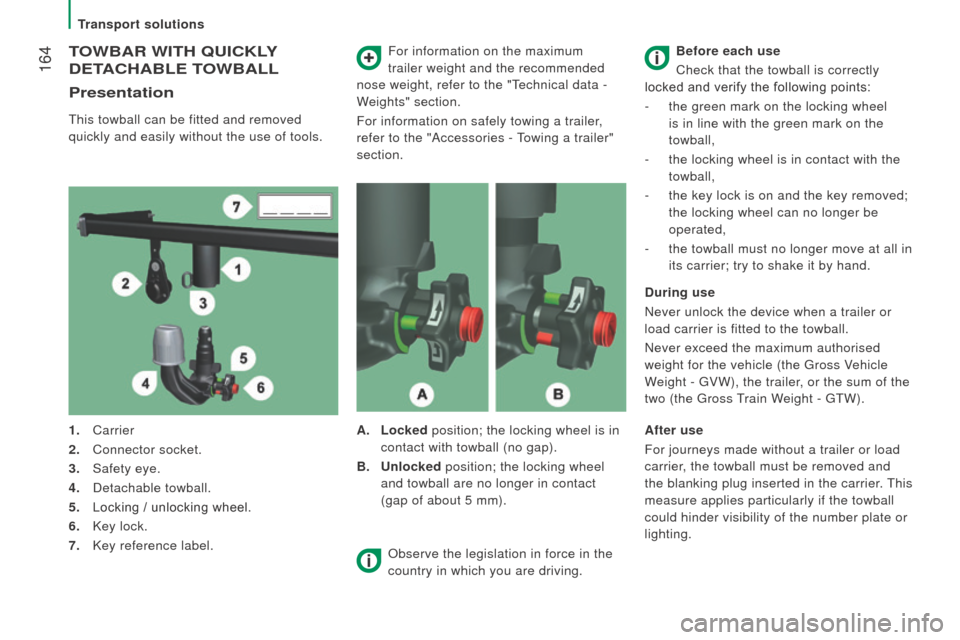
1.
Carrier
2.
Connector socket.
3.
Safety eye.
4.
Detachable towball.
5.
Locking / unlocking wheel.
6.
Key lock.
7.
Key reference label. A.
Locked
position; the locking wheel is in
contact with towball (no gap).
B.
u
nlocked position; the locking wheel
and towball are no longer in contact
(gap of about 5 mm). Before each use
Check that the towball is correctly
locked and verify the following points:
- the green mark on the locking wheel
is in line with the green mark on the
towball,
-
the locking wheel is in contact with the
towball,
-
the key lock is on and the key removed;
the locking wheel can no longer be
operated,
-
the towball must no longer move at all in
its carrier; try to shake it by hand.
d
uring use
Never unlock the device when a trailer or
load carrier is fitted to the towball.
Never exceed the maximum authorised
weight for the vehicle (the Gross Vehicle
Weight - GVW), the trailer, or the sum of the
two (the Gross Train Weight - GTW).
Observe the legislation in force in the
country in which you are driving. After use
For journeys made without a trailer or load
carrier, the towball must be removed and
the blanking plug inserted in the carrier. This
measure applies particularly if the towball
could hinder visibility of the number plate or
lighting.
Transport solutions
Page 167 of 276
165
Fitting the towball
Below the rear bumper, remove the
protective plug from the towball carrier.Insert the end of the towball 4
into the
carrier 1 and push upwards ; it locks in place
automatically. Check that the mechanism has correctly
locked in to place (position A
).
Close the lock 6 using the key.
The locking wheel 5 turns a quarter of a turn
anti-clockwise; take care to keep your hands
clear. Always remove the. The key cannot be
removed when the lock is open.
Clip the cap onto the lock.
Transport solutions
QUICK HELP
8
Page 168 of 276
166
removing the towball
Disconnect the trailer harness from the
socket 2 on the carrier.
Detach the cable on the trailer from the
safety ring 3 on the carrier.
Unhook the trailer from the towball.
Refit the protective cover to the towball.
Remove the protective cover from the
towball.
Attach the trailer to the towball.
Attach the cable on the trailer to the safety
ring
3 on the carrier.
Connect the trailer harness to the socket 2
on the carrier. Remove the cap from the lock and press it
onto the head of the key.
Insert the key into the lock 6
.
Open the lock using the key.
Transport solutions
Page 170 of 276
168
GLOSSArY OF LABELS
This section groups together all of the texts that appear on labels pres\
ent on the vehicle.under the bonnet
A
Original painting
Colour
Code
Refinishing code
B
AIR CONDITIONED VEHICLE - R134A -
"CFC" FREE
QTY R134A (kg)
c
ONL
Y FOR JUMP START
d
DANGER
AUT
OMATIC ENGINE RESTART. EXTRACT
THE KEY FROM DASHBOARD WHEN
HOOD IS OPENED
For the vehicle identification labels, refer to the "Technical data" section.
Precautions...
Page 171 of 276
169
E
1 - CAUTION
ORIGINAL LUBRICANTS AND FLUIDS
Engine oil Transmission
Radiater Brake system
Windscreen Washer Power steering
REFER TO OWNER HANDBOOK WEAR EYE PROTECTION
2 - SAFETY
The use of original parts, fluids and original lubrificants and respecti\
ng scheduled
maintenance guarantees your cars reliability and safety overtime.
3 - DANGER
KEEP OUT OF CHILDREN'S REACH KEEP AWAY FROM
FLAMES DO NOT TOUCH
DO NOT OPEN CAP WITH ENGINE WARM EXPLOSION
CORROSIVE LIQUID
MAY START AUTOMATICALLY EVEN WITH ENGINE OFF HIGH PRESSURE GAS DO
NOT OPEN
AUTOMATIC ENGINE RESTART. EXTRACT THE KEY
FROM DASHBOARD WHEN BONNET HOOD IS OPENED HIGH VOLTAGE
QUICK HELP
8
Precautions...
Page 191 of 276
189Level 1Level 2 Level 3co mment
rAd
IO Briefly press the buttons for an automatic search.
Press and hold the buttons for a quick search.
rAd
IO
Preset Make a long press on the button to present the
current radio station.
The current station is highlighted.
Press the "All" button to display all of the preset
radio stations in the waveband selected.
rAd
IO
n
avigate List of stations
Selection a station with a press.
Update the list according to reception.
Press these buttons to scroll through the radio
stations received.
Go directly to the desired letter in the list.
rAd
IO
AM/FM /
d
AB
ch
oose the waveband Choose the waveband
rAd
IO
Adjustment
dir
ect adjustment The screen virtual keypad can used to enter a
single number corresponding to a station.
The symbols allow precise adjustment of the
frequency.
rAd
IO
Info Information
Display information on the current radio station.
Touch Screen Audio - Telematic System
AUDIO and TELEMATICS
10
Page 209 of 276

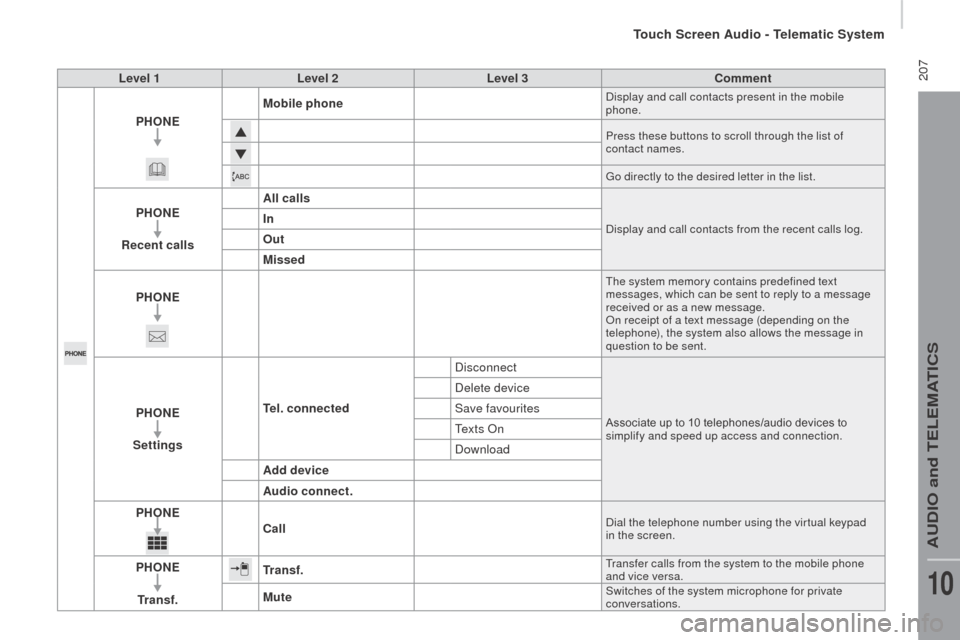
207Level 1Level 2 Level 3co mment
PHO
nE M
obile phone
Display and call contacts present in the mobile
phone.
Press these buttons to scroll through the list of
contact names.
Go directly to the desired letter in the list.
PHOnE
re
cent calls All callsDisplay and call contacts from the recent calls log.In
Out
Missed
PHO
nE
The system memory contains predefined text
messages, which can be sent to reply to a message
received or as a new message.
On receipt of a text message (depending on the
telephone), the system also allows the message in
question to be sent.
PHOnE
S ettingste l. connected DisconnectAssociate up to 10 telephones/audio devices to
simplify and speed up access and connection.
Delete device
Save favourites
Te x t s O n
Download
Add device
Audio connect.
PHO
nEc
all
Dial the telephone number using the vir tual keypad
in the screen.
PHOnE
tr
a n s f .tr a n s f .Transfer calls from the system to the mobile phone
and vice versa.
MuteSwitches of the system microphone for private
conversations.
Touch Screen Audio - Telematic System
AUDIO and TELEMATICS
10