2015.5 Citroen JUMPER RHD window
[x] Cancel search: windowPage 4 of 276

2
contents
3. EASE OF u SE and c
OMFO rt 44-86
Lighting control stalk 45
Wipers 48
Cruise control
49
Speed limiter
55
Demisting and
defrosting
59
Heating / Manual air conditioning
61
Digital air conditioning
63
Additional heating
systems
65
Rear Heating /
Air Conditioning
65
Programmable
additional heating
67
Front seats
71
Front bench seat
73
Rear seats
74
Front fittings
76
Rear fittings
81
Exterior fittings
84
Mirrors
85
Electric windows
86
Presentation
4
Exterior
6
Interior
7
Instruments and controls
9
T
echnical data - Maintenance
10
Environment
11
Eco-driving
12
1. OVErVIEW 4-15 4. t E c H n OLOGY on
BOA rd 87-97
Vehicle configuration 87
T rip computer 92
T
achograph
93
Rear parking sensors
94
Reversing camera
95
Pneumatic suspension
96
2. rEAdY tO GO 14-43
Remote control 14
Key 16
Alarm
19
Front / rear doors
20
Load space
22
Instrument panel
23
W
arning/indicator lamps
24
Fuel gauge
32
T
emperature indicator
32
Tyre under-inflation detection
33
Service indicator
35
Gearbox and steering
wheel
36
Gear shift indicator
36
Starting and
switching off
38
Hill start assist
39
Stop & Start
40
Driving
recommendations
43
This symbol informs you
of equipment which is
specific to the Combi /
Minibus model. Child lock.Rear heating / air
conditioning / Rear
seats / bench seats.
Reading lamps. Sliding
side windows.
Page 9 of 276

7
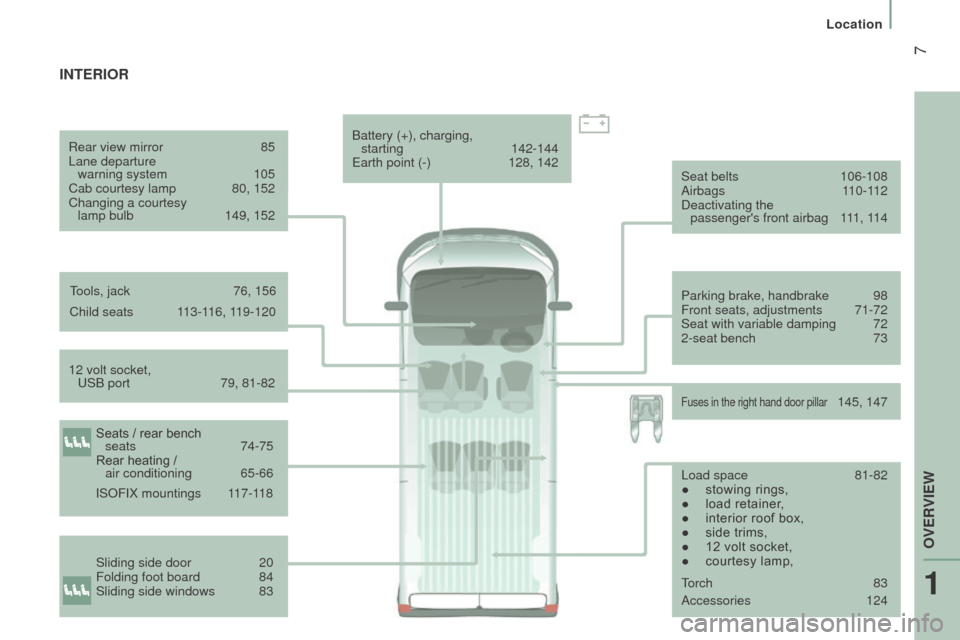
Seat belts 106-108
Airbags 110-112
Deactivating the passenger's front airbag
1
11, 114
Parking brake, handbrake
98
Front seats, adjustments
71-72
Seat with variable damping
72
2-seat bench
73
Child seats
1
13-116, 119-120
12 volt socket, USB port
79, 81-82 Battery (+), charging,
starting
142-144
Earth point (-)
128, 142
Fuses in the right hand door pillar 145, 147
IntErIOr
Seats / rear bench
seats 74-75
Rear heating /
air conditioning
65-66
Sliding side door
20
Folding foot board
84
Sliding side windows
83
Rear view mirror
85
Lane departure warning system
105
Cab courtesy lamp
80, 152
Changing a courtesy lamp bulb
149, 152
ISOFIX mountings
1
17-118
Tools, jack
76, 156
Accessories
124
Load space
81-82
●
stowing rings,
●
load retainer
,
●
interior roof box,
●
side trims,
●
12 volt socket,
●
courtesy lamp,
T
orch 83
1
OVERVIEW
Location
Page 11 of 276

9
Gearbox 36-37
Parking sensors 94-95
Instrument panels, screens,
speedometer
23
W
arning lamps,
indicator lamps
24-31
Gauges, indicators
32, 35
Gear shift indicator
36-37
Lighting controls
45-47
Automatic illumination of headlamps
46
Guide-me-home lighting
46
Parking lamps
47
V
ehicle configuration
87-89
Setting the time
88
Headlamp beam height adjustment
47
Front/rear fog lamps
45
Pneumatic suspension
96-97
Stop & Start
40-42
Front/rear wipers
48
Screenwash/headlamp wash
48
T
rip computer
92
Starter
, ignition switch
38
Hill start
39
Cruise control
49-51, 52-54
Speed limiter
55-57
Fixed speed limiter
58 Instruments and controls
4-5
Steering wheel, reach adjustment
37
Horn
99
Steering mounted radio controls
186, 233
Mirrors, electric windows
85-86
Locking the load space
22 Additional heating, rear air
conditioning
65-66
Programmable additional heating
67-70
1
OVERVIEW
Location
Page 14 of 276

12
EcO-drIVInG
Optimise the use of your gearbox
With a manual gearbox, move off gently and change up without
waiting. While accelerating changing up early. If your vehicle has
the system, the gear shift indicator invites you to engage the most
suitable gear; follow its instructions as soon as it is displayed in
the instrument panel.
drive smoothly
Maintain a safe distance between vehicles, use engine
braking rather than the brake pedal, and press the accelerator
progressively. These practices contribute towards a reduction in
fuel consumption and CO
2 emissions and also helps reduce the
background traffic noise.
If your vehicle has cruise control, make use of the system at
speeds above 20 mph (30 km/h) when the traffic is flowing well.
control the use of your electrical equipment
Before moving off, if the passenger compartment is too warm,
ventilate it by opening the windows and air vents before using the
air conditioning.
Above 30 mph (50 km/h), close the windows and leave the air
vents open.
Remember to make use of equipment that can help keep the
temperature in the passenger compartment down (window
blinds...).
Switch off the air conditioning, unless it has automatic digital
regulation, as soon as the desired temperature is attained.
Switch off the demisting and defrosting controls, if not automatic.
Switch off the heated seat as soon as possible.
Switch off the headlamps and front foglamps when the level of
light does not require their use.
Eco-driving is a range of everyday practices that allow the motorist to \
optimise their fuel consumption and CO
2 emissions.
Avoid running the engine before moving off, particularly in winter;
your vehicle will warm up much faster while driving.
As a passenger, if you avoid connecting your multimedia devices
(film, music, video game...), you will contribute towards limiting the\
consumption of electrical energy, and so of fuel.
Disconnect your portable devices before leaving the vehicle.
Motoring & the Environment
Page 61 of 276

59
dEMIStInG And dEF r OS t I n G
Manual mode
Direct the control to this air
distribution setting.
For faster and more effective
demisting and defrosting of
the windscreen:d efrosting the rear screen
and mirrors
Only operates when the engine
is running. Pressing this button
activates the rapid demisting-
defrosting of the rear screen and
door mirrors.
This function switches off automatically to
prevent excessive energy consumption. It
stops when the engine is switched off but
resumes when the engine is started again.
Pressing this button switches the function off.
-
increase the air flow setting, Returning to the exterior air
intake position permits renewal
of the air in the passenger
compartment.
Windscreen and side windows
The ventilation outlets located at the base
of the windscreen and the side vents for the
side windows increase the effectiveness
of the demisting and defrosting. Do not
obstruct these air outlets.
The pollen filter continuously and effectively
filters dust.
Air recirculation (which can be activated by
the driver or the passenger) isolates the
passenger compartment from the exterior
atmosphere. However, this position should
only be used temporarily, normal use is to
drive with the control positioned with the
exterior air intake open.
-
move the exterior air intake
control temporarily to air
recirculation.
With Stop & Start, when the heated
rear screen is switched on, the STOP
mode is not available.
3
EASE OF uSE and cOMFOrt
Ventilation
Page 62 of 276

60
cOrrEct uSE OF tHE AIr
c O nd I t IO n I n G
In order to be effective, the air conditioning
should only be used with the windows
closed. However, if the interior temperature
remains high after a prolonged period
parked in the sun, first ventilate the
passenger compartment for a few minutes. For even air distribution, ensure that the
exterior air intake grille located at the base
of the windscreen, the side and central
vents, the air outlets on the floor and the air
extractor at the rear are not obstructed.
The air conditioning is useful in all seasons
as it eliminates condensation and air
humidity.
Operate the air conditioning system for
5 to 10 minutes, once or twice a month,
to keep it in good working order.
Have the filter elements (air filter and
passenger compartment filter) replaced
regularly. If you drive in a dusty environment,
have them replaced twice as often.
It is normal that the condensation created by
the air conditioning system results in a flow
of water which may form a puddle under the
vehicle when parked.
If the system does not produce cold air,
do not use it and have it checked by a
CITROËN dealer or a qualified workshop.
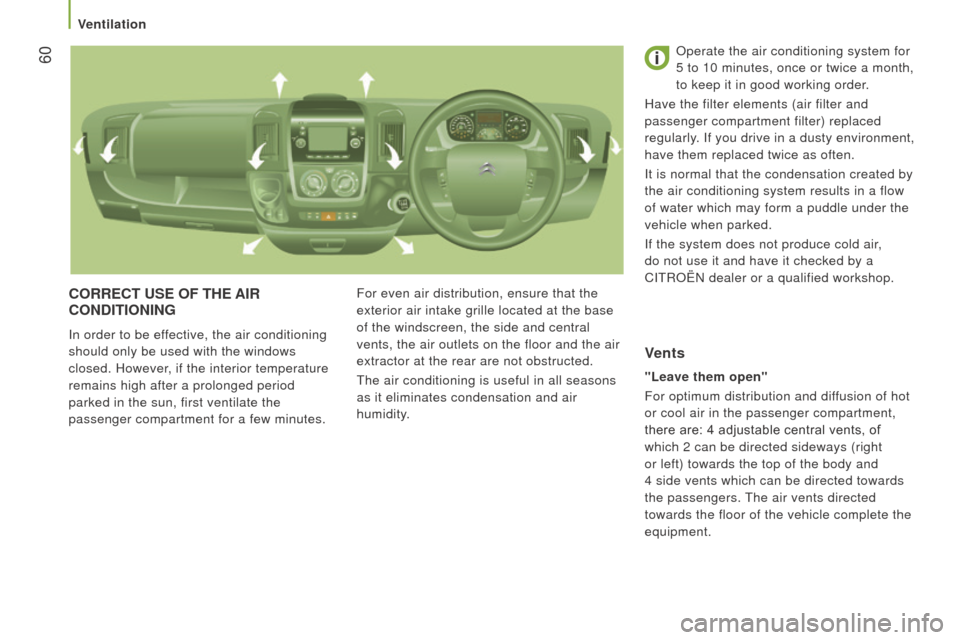
"Leave them open"
For optimum distribution and diffusion of hot
or cool air in the passenger compartment,
there are: 4 adjustable central vents, of
which 2 can be directed sideways (right
or left) towards the top of the body and
4
side vents which can be directed towards
the passengers. The air vents directed
towards the floor of the vehicle complete the
equipment.
Vents
Ventilation
Page 63 of 276

61
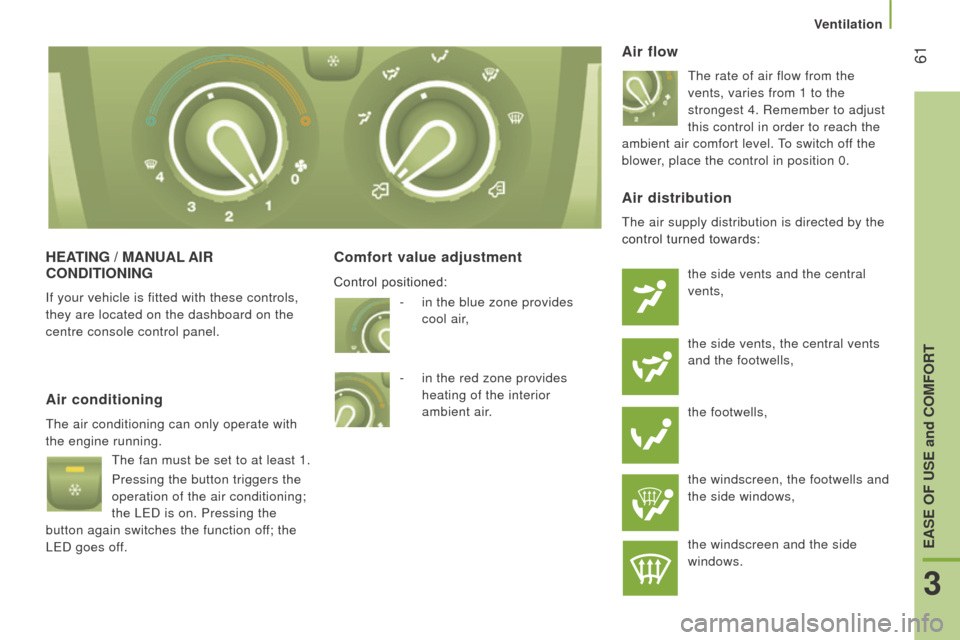
HEAtI n G / M A nu AL AI r
c O nd I t IO n I n G
If your vehicle is fitted with these controls,
they are located on the dashboard on the
centre console control panel.
comfort value adjustment Air flow
The rate of air flow from the
vents, varies from 1 to the
strongest 4. Remember to adjust
this control in order to reach the
ambient air comfort level. To switch off the
blower, place the control in position 0.
Air conditioning
The air conditioning can only operate with
the engine running.
The fan must be set to at least 1.
Pressing the button triggers the
operation of the air conditioning;
the LED is on. Pressing the
button again switches the function off; the
LED goes off.
Air distribution
The air supply distribution is directed by the
control turned towards:
the side vents and the central
vents,
the side vents, the central vents
and the footwells,
the footwells,
the windscreen, the footwells and
the side windows,
the windscreen and the side
windows.
-
in the blue zone provides
cool
air,
-
in the red zone provides
heating of the interior
ambient
air.
Control positioned:
3
EASE OF uSE and cOMFOrt
Ventilation
Page 66 of 276

64comfort value adjustment
ring
The settings range between:
-
increasing the interior ambient air
temperature HI (High) which goes up to
to a maximum setting of 32,
-
cooling the interior ambient air
temperature LO (Low) which goes down
to a setting of 16.
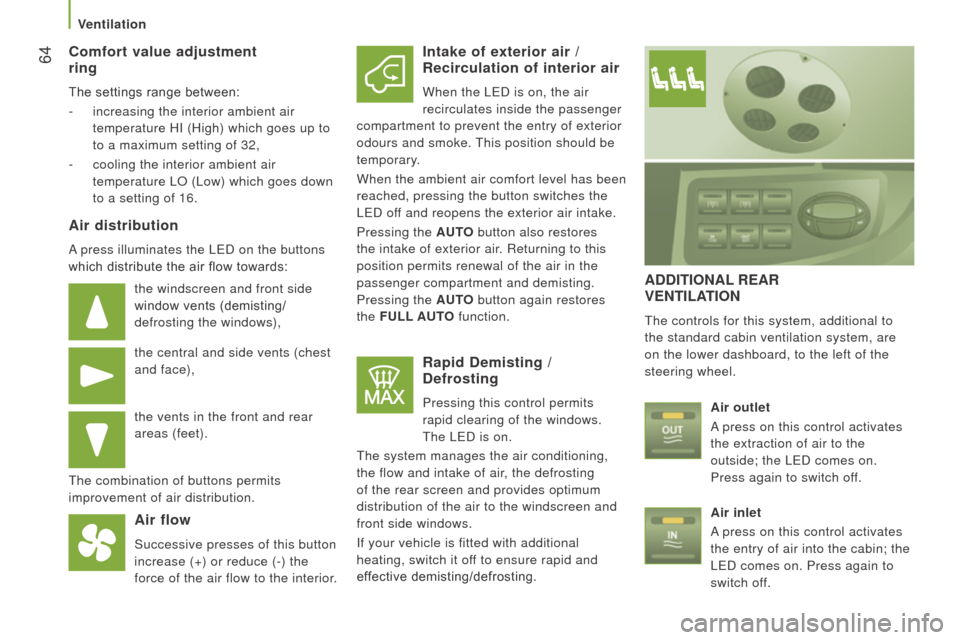
Air distribution
A press illuminates the LED on the buttons
which distribute the air flow towards:
the windscreen and front side
window vents (demisting/
defrosting the windows),
the central and side vents (chest
and face),
the vents in the front and rear
areas (feet).
The combination of buttons permits
improvement of air distribution.
Air flow
Successive presses of this button
increase (+) or reduce (-) the
force of the air flow to the interior.
Intake of exterior air / r ecirculation of interior air
When the LED is on, the air
recirculates inside the passenger
compartment to prevent the entry of exterior
odours and smoke. This position should be
temporary.
When the ambient air comfort level has been
reached, pressing the button switches the
LED off and reopens the exterior air intake.
Pressing the A
ut
O
button also restores
the intake of exterior air. Returning to this
position permits renewal of the air in the
passenger compartment and demisting.
Pressing the A
ut
O
button again restores
the F
u
LL A ut
O
function.
rapid demisting / defrosting
Pressing this control permits
rapid clearing of the windows.
The LED is on.
The system manages the air conditioning,
the flow and intake of air, the defrosting
of the rear screen and provides optimum
distribution of the air to the windscreen and
front side windows.
If your vehicle is fitted with additional
heating, switch it off to ensure rapid and
effective demisting/defrosting.
AddItIOnAL r EA r VE
nt ILAt IO n
The controls for this system, additional to
the standard cabin ventilation system, are
on the lower dashboard, to the left of the
steering wheel.
Air outlet
A press on this control activates
the extraction of air to the
outside; the LED comes on.
Press again to switch off.
Air inlet
A press on this control activates
the entry of air into the cabin; the
LED comes on. Press again to
switch off.
Ventilation