Page 5 of 400
002003004cOMFORT
A
ccE
SSdR IVIng
72 Front seats
77
R
ear seats
80
Mirrors
81
S
teering wheel adjustment
82
F
ront fittings
86
R
ear fittings
87
B
oot fittings
88
T
riangle (stowing)
89
H
eating and Ventilation
91
D
ual-zone digital air
conditioning
95
F
ront demist -
defrost
95
R
ear screen demist - defrost 98 D
riving recommendations
100
S
tarting / Switching off the
engine
103
E
lectric parking brake
109
H
ill start assist
110
M
anual gearbox
111
A
utomatic gearbox
115
G
ear ef ficiency indicator
116
T
yre under-inflation detection
118
St
op & Start
122
L
ane departure warning
system
123
B
lind spot sensors126 H
ead-up display
128
M
emorising speeds
130
Spe
ed limiter
133
C
ruise control
136
P
arking sensors
138
R
eversing camera
52 E
lectronic key - remote
control
54
K
eyless Entry and
Starting
61
C
entral locking
62
Boot
63
A
larm
66
E
lectric windows
68
C
ockpit glass roof
Page 6 of 400
005006007008SAFETY PR A cT IcA L
I
nF
ORMATIO
n
c
HILd S
AFETY
VISIBILITY
142 Lighting controls
14 5
D
aytime running lamps /
Sidelamps (LEDs)
14 6
A
utomatic illumination of
headlamps
147
A
utomatic headlamp dipping
14 9
S
ide spotlamps
15 0
H
eadlamp beam height
adjustment
151
D
irectional lighting
153
W
iper controls
155
A
utomatic rain sensitive
wipers
157
C
ourtesy lamps
15 8
I
nterior mood lighting 162 C
hild seats
164
D
eactivating the passenger's
front airbag
170
I
SOFIX mountings
176
C
hild lock180 D
irection indicators
181
E
mergency or assistance
call
181
H
orn
182
ES
C system
186
Se
at belts
189
A
irbags196 T
emporary puncture repair
kit
202
C
hanging a wheel
2 11
C
hanging a bulb
219
C
hanging a fuse
223
1
2 V battery
227
E
nergy economy mode
228
C
hanging a wiper blade
229
T
owing the vehicle
231
T
owing a trailer
232
F
itting roof bars
233
A
dvice on care and
maintenance
234
Accessories
Page 10 of 400

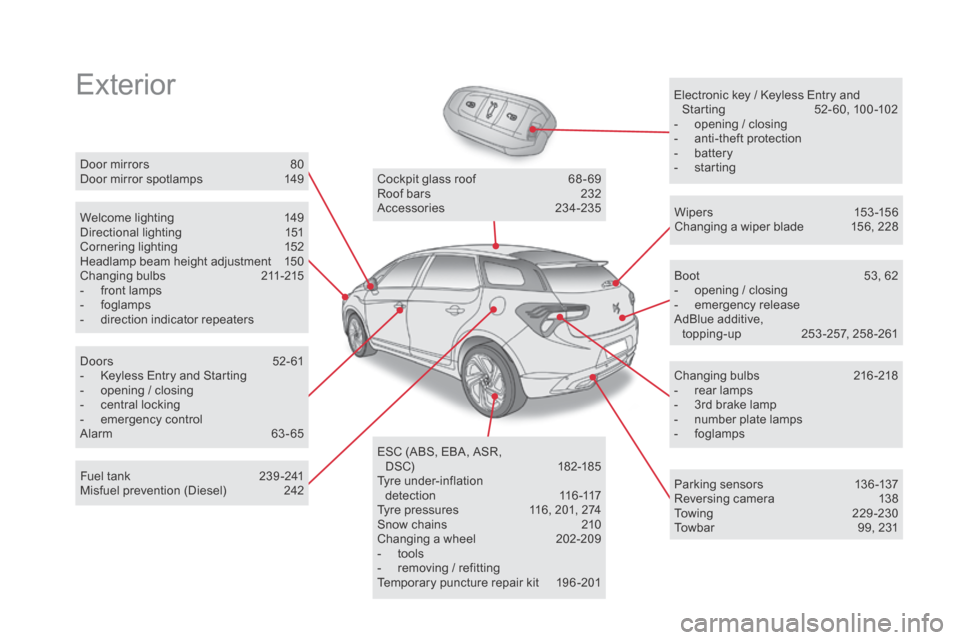
ExteriorElectronic key / Keyless Entry and Starting 5 2- 60, 100 -102
-
o
pening / closing
-
a
nti-theft protection
-
b
attery
-
s
tarting
Welcome lighting
1
49
Directional lighting
1
51
Cornering lighting
1
52
Headlamp beam height adjustment
1
50
Changing bulbs
2
11-215
-
f
ront lamps
-
fo
glamps
-
d
irection indicator repeaters Wipers
15
3 -15 6
Changing a wiper blade
1
56, 228
Doors
5
2- 61
-
K
eyless Entry and Starting
-
o
pening / closing
-
c
entral locking
-
em
ergency control
Alarm
6
3-65 Cockpit glass roof
6
8 - 69
Roof bars
2
32
Accessories
23
4-235
ESC (ABS, EBA, ASR, DSC)
18
2-185
Tyre under-inflation d e t e c t i o n
11
6 -117
Tyre pressures
1
16, 201, 274
Snow chains
2
10
Changing a wheel
2
02-209
-
t
ools
-
r
emoving / refitting
Temporary puncture repair kit
1
96 -201 Boot
5
3, 62
-
o
pening / closing
-
em
ergency release
AdBlue additive, topping-up
2
53 -257, 258 -261
Changing bulbs
2
16-218
-
r
ear lamps
-
3
rd brake lamp
-
n
umber plate lamps
-
fo
glamps
Door mirrors
8
0
Door mirror spotlamps
1
49
Fuel tank
2
39 -241
Misfuel prevention (Diesel)
2
42 Parking sensors
1
36 -137
Reversing camera
1
38
To w i n g
2
2 9 - 2 3 0
Towbar
9
9, 231
Page 13 of 400
11
Lighting controls 142-148
Direction indicators 1 80 Wiper controls
1 53 -156
Trip computer
4
6 - 48
Instruments and controls
Multifunction steering wheel
Horn 181
Speed limiter
1
30 -132
Cruise control
1
33 -135
Memorising speeds
1
28 -129
Audio and telephone controls
in the Audio system /
Bluetooth unit
2
83
Steering wheel adjustment
8
1
Over view
Page 17 of 400

15
Limit the causes of excess consumption
Spread loads throughout the vehicle; place the heaviest items in the
bottom of the boot, as close as possible to the rear seats.
Limit the loads carried in the vehicle and reduce wind resistance (roof
bars, roof rack, bicycle carrier, trailer...). Use a roof box in preference.
Remove roof bars and roof racks after use.
At the end of winter, remove snow tyres and refit your summer tyres.
Observe the recommendations on maintenance
Check the tyre pressures regularly, when cold, referring to the label in
the door aperture, driver's side.
Carry out this check in particular:
-
b
efore a long journey,
-
a
t each change of season,
-
a
fter a long period out of use.
Don't forget the spare wheel and the tyres on any trailer or caravan.
Have your vehicle serviced regularly (engine oil, oil filter, air filter,
passenger compartment filter...) and observe the schedule of
operations recommended in the manufacturer's service schedule.
With a BlueHDi Diesel engine, if the SCR system is faulty your vehicle
becomes polluting; go to a CITROËN dealer or a qualified workshop
without delay to have the emissions of nitrous oxides brought back to
the legal level.
When refuelling, do not continue after the third cut-off of the nozzle to
avoid any over flow.
At the wheel of your new vehicle, it is only after the first 1 800 miles
(3
000 kilometres) that you will see the fuel consumption settle down to
a consistent average.
Eco-driving
Page 30 of 400

Under-inflationfixed. The pressure in one or more wheels
is too low. Check the pressure of the tyres as soon as possible.
This check should preferably be carried out when the
tyres are cold.
+ flashing then fixed,
accompanied by the
Service warning lamp.The tyre pressure monitoring system
has a fault or no sensor is detected
on one of the wheels. Under-inflation detection is not assured.
Have the system checked by a CITROËN dealer or a
qualified workshop.
Warning / indicator lamp
State
cau
se
Action / Observations
Engine
autodiagnosis
system flashing.
The engine management system has
a fault. Risk of destruction of the catalytic converter.
Have it checked by a CITROËN dealer or a qualified
workshop.
fixed. The emission control system has
a fault.
The warning lamp should go off when the engine is started.If it does not go off, contact a CITROËN dealer or
qualified workshop without delay.
Low fuel level fixed with the two
last
bars flashing,
accompanied by a
message and an
audible signal. When it first comes on there remains
approximately 6 litres of fuel
in the
tank. You must refuel as soon as possible to avoid running
out of fuel.
This warning lamp will come on every time the ignition
is switched on, accompanied by a message and an
audible signal, until a sufficient addition of fuel is
made.
This audible signal and message are repeated with
increasing frequency as the fuel level drops and
approaches "0".
Fuel tank capacity: approximately 60 litres.
Never continue to drive until you run out of fuel as
this could damage the emission control and injection
systems.
Page 66 of 400

OFF
OFF
Locking the vehicle
with exterior perimeter
monitoring only
Deactivate the interior volumetric and anti-lift
monitoring to avoid unwanted triggering of the
alarm in certain cases such as:
-
l
eaving a window partially open,
-
l
eaving a pet in the vehicle,
-
w
ashing your vehicle,
-
c
hanging a wheel,
-
h
aving your vehicle towed,
-
t
ransportation by sea.deactivation of the interior
volumetric and anti-tilt monitoring
F Switch of the ignition and within ten seconds, press this button
until the indicator lamp is on
continuously.
F
G
et out of the vehicle.
F
P
ress the locking button on
the remote control immediately
or lock the vehicle using the
Keyless Entry and Starting
system.
The exterior perimeter monitoring alone is
activated: the indicator lamp in the button
flashes once per second.
Where the vehicle locks itself again
automatically (occurs 30 seconds after
unlocking, if a door or the boot is not
opened), the monitoring system is not
reactivated automatically.
To reactivate it, the vehicle must be
unlocked and locked again, using the
remote control or the "Keyless Entry
and Starting" system. To be effective, this deactivation must
be carried out each time the ignition is
switched off.
F
P
ress the unlocking button on
the remote control or unlock the
vehicle using the Keyless Entry
and Starting system.
deactivation
The alarm system is deactivated: the
indicator lamp in the button goes off.
Page 74 of 400
Front seats
Manual
1. Adjustments to the height and angle of
the head restraint
T
o raise it, pull upwards.
T
o lower it, press on the lug and the head
restraint at the same time.
2.
A
djustment of the backrest angle
T
urn the wheel to adjust the angle of the
backrest.
3.
A
djustment of the seat height
R
aise or lower the control lever the number
of times required to obtain the desired
position.
4.
F
orwards-backwards adjustment of
the seat position
L
ift the control bar and slide the seat
for wards or backwards.
5.
A
djustment of the driver's lumbar
support
T
urn the wheel to obtain the desired level
of lumbar support.
Before moving the seat backwards, ensure that there is nothing that might prevent the full
travel of the seat, so as to avoid the risk of of jamming the seat caused by the presence of
objects on the floor behind the seat or rear passengers. If the seat jams, stop the movement
immediately.