Page 6 of 436

SAFETYdRIVIngP R ACTICAL
I
nF
ORMATIO
n
182 Driving recommendations
184
S
tarting / Switching off the
engine with the key
187
S
tarting / Switching off the
engine with Keyless Entry
and Starting
190
E
lectric parking brake
196
M
anual parking brake
197
M
anual gearbox
198
A
utomatic gearbox
164 D
irection indicators
164
H
azard warning lamps
165
Horn
165
E
mergency or assistance
call
166
B
raking assistance systems
167
T
rajectory control systems
169
F
ront seat belts
173
A
irbags 226 T
emporary puncture repair
kit
231
C
hanging a wheel
239
S
now chains
240
C
hanging a bulb
249
C
hanging a fuse
255
1
2 V battery
259
E
nergy economy mode
260
C
hanging a wiper blade
260
V
ery cold climate screen
261
F
itting roof bars
262
T
owing the vehicle
264
T
owing a trailer
265
T
owbar with quickly
detachable towball
270
Accessories
008009
007
202 Hill start assist
203
G
ear ef ficiency indicator
204
T
yre under-inflation detection
206
St
op & Start
210
B
lind spot sensors
213
M
emorising speeds
215
Spe
ed limiter
218
C
ruise control
221
P
arking sensors
223
R
eversing camera
Page 10 of 436

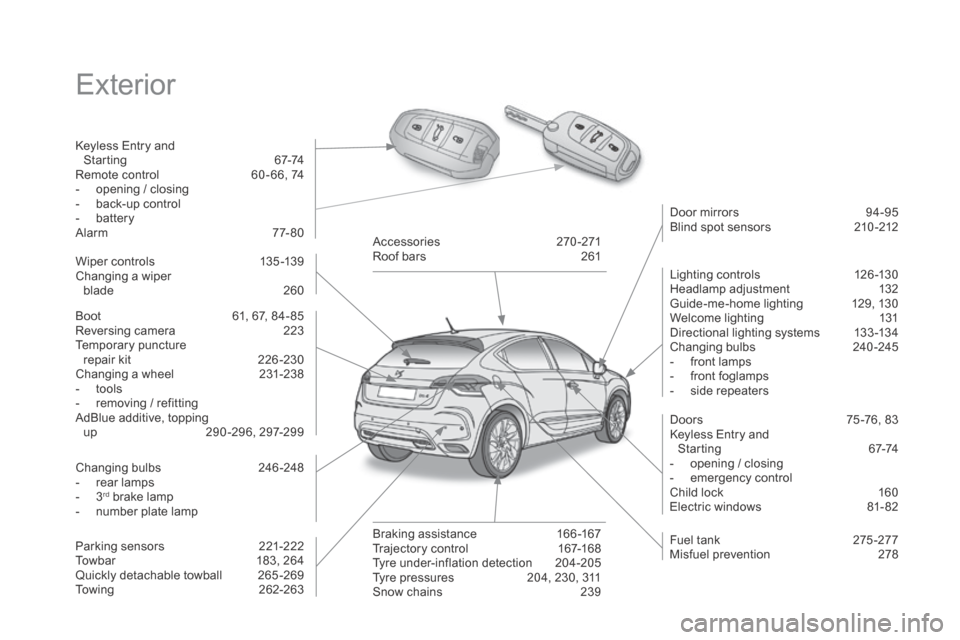
Exterior
Keyless Entry and Starting 6 7-74
Remote control
6
0 - 66, 74
-
o
pening / closing
-
b
ack-up control
-
b
attery
Alarm
7
7-80
Boot
6
1, 67, 84- 85
Reversing camera
2
23
Temporary puncture
repair kit
2
26 -230
Changing a wheel
2
31-238
-
t
ools
-
r
emoving / refitting
AdBlue additive, topping up
29
0-296, 297-299 Door mirrors
9
4-95
Blind spot sensors
2
10 -212
Wiper controls
1
35 -139
Changing a wiper blade
2
60
Changing bulbs
2
46-248
-
r
ear lamps
-
3rd brake lamp
-
n
umber plate lamp
Parking sensors
2
21-222
Towbar
1
83, 264
Quickly detachable towball
2
65 -269
Towing
2
62-263Accessories
2
70-271
Roof bars
2
61
Braking assistance
1
66 -167
Trajectory control
1
67-168
Tyre under-inflation detection
2
04-205
Tyre pressures
2
04, 230, 311
Snow chains
2
39Lighting controls
1
26 -130
Headlamp adjustment
1
32
Guide-me-home lighting
1
29, 130
Welcome lighting
1
31
Directional lighting systems
1
33 -134
Changing bulbs
2
40-245
-
f
ront lamps
-
f
ront foglamps
-
s
ide repeaters
Doors
7
5 -76, 83
Keyless Entry and Starting
6
7-74
-
o
pening / closing
-
em
ergency control
Child lock 1 60
Electric windows 8 1- 82
Fuel tank
2
75 -277
Misfuel prevention
2
78
Page 15 of 436
13
Technical data - Maintenance
Running out of Diesel fuel 279
Checking levels
2
83 -286
-
o
il
-
b
rake fluid
-
c
oolant
-
p
ower steering fluid
-
s
creenwash / headlamp wash fluid
-
a
dditive (Diesel with particle filter)
AdBlue additive
2
90 -299
Changing bulbs
2
40-248
-
f
ront
-
r
ear Petrol engines
3
02-305
Diesel engines
3
06 -309
Dimensions
3
10
Identification markings
3
11
Bonnet
2
80
Petrol underbonnet
2
81
Diesel underbonnet
2
82Checking components
2
87-289
-
b
attery
-
a
ir filter / passenger compartment filter
-
o
il filter
-
p
article filter (Diesel)
-
b
rake pads / discs
Battery 2
55 -258
Energy economy mode 2 59
Changing / Replacing a fuse
2
49 -250
Engine compartment fuses
2
53 -254
Over view
Page 125 of 436
123
Use
F Extract the torch from its location pulling it upwards.
F
P
ress the switch, located on the back, to
switch the torch on or off.
F
U
nfold the support, located on the back, to
set down and raise the torch; for example,
when changing a wheel.
Storing
F Put the torch back in place in its location starting with the lower part.
I
f you have forgotten to switch off the torch,
this switches it off automatically.
Storage box
F Raise the boot carpet for access to the storage box.
This has areas for the storage of a box of spare
bulbs, a first aid kit, two warning triangles...
It also contains the vehicle tools, the temporary
puncture repair kit...
If the torch is not engaged correctly, it
may not charge and may not come on
when the boot is opened.
Fittings
Page 134 of 436

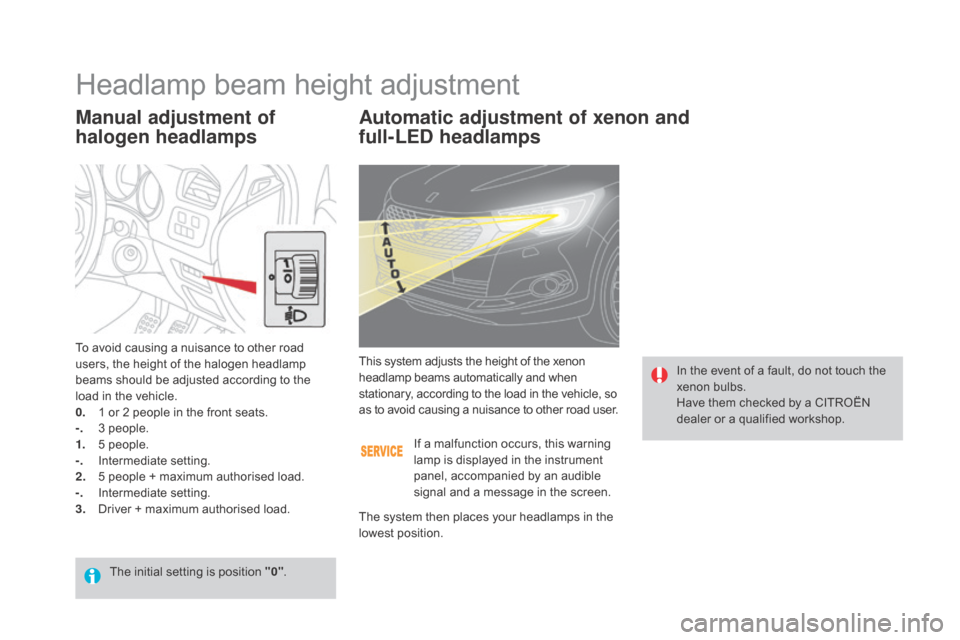
Automatic adjustment of xenon and
full-LEd headlamps
In the event of a fault, do not touch the
xenon bulbs.
Have them checked by a CITROËN
dealer or a qualified workshop.
This system adjusts the height of the xenon
headlamp beams automatically and when
stationary, according to the load in the vehicle, so
as to avoid causing a nuisance to other road user.
If a malfunction occurs, this warning
lamp is displayed in the instrument
panel, accompanied by an audible
signal and a message in the screen.
Headlamp beam height adjustment
To avoid causing a nuisance to other road
users, the height of the halogen headlamp
beams should be adjusted according to the
load in the vehicle.
0.
1 o
r 2 people in the front seats.
-.
3 p
eople.
1.
5 p
eople.
-.
I
ntermediate setting.
2.
5 p
eople + maximum authorised load.
-.
I
ntermediate setting.
3.
D
river + maximum authorised load. The system then places your headlamps in the
lowest position.
Manual adjustment of
halogen headlamps
The initial setting is position "0".
Page 242 of 436

Changing a bulb
The headlamps are fitted with
polycarbonate glass with a protective
coating:
F
d
o not clean them using a dr y
or abrasive cloth, nor with a
detergent or solvent product,
F
u
se a sponge and soapy water or a
pH neutral product,
F
w
hen using a high pressure
washer on persistent marks, do not
keep the lance directed towards
the lamps or their edges for too
long, so as not to damage their
protective coating and seals. Changing a bulb should only be done
after the headlamp has been switched
off for several minutes (risk of serious
burns).
F
D
o not touch the bulb directly with
your fingers, use a lint-free cloth.
It is imperative to use only anti-
ultraviolet (UV) type bulbs to avoid
damaging the headlamp.
Always replace a failed bulb with a
new bulb with the same type and
specification.Light-emitting diodes (LEd)
For the replacement of this type of
lamp, go to a CITROËN dealer or a
qualified workshop.
LED (light-emitting diode) replacement
kits are available from CITROËN
dealers.
Risk of electrocution
Xenon bulbs (D1S) must be replaced
by a CITROËN dealer or a qualified
workshop.
Page 243 of 436
241
Bulbs with lugs, type H1, H7... take care
to position them correctly to ensure the
best lighting.
Model with directional xenon and
full-LEd h eadlamps
1. daytime running lamps / sidelamps
(LEds ).
2.
di
rectional main beam / dipped beam
headlamps (
d1S
).
3.
di
rection indicators (LE
ds
).
4.
di
rectional foglamps (LE
ds
).
Model with halogen headlamps
(t y p e 1)
1. direction indicators (H21 clear).
2. di
pped beam headlamps (H7).
3.
M
ain beam headlamps (H1).
4.
da
ytime running lamps / sidelamps
(P21/5W XL).
5.
di
rectional front foglamps (H11).
Front lamps
Model with halogen headlamp
and LEd light signature (type 2)*
1. direction indicators (LEds ).
2. da
ytime running lamps / sidelamps
(LE
ds
).
3.
di
pped beam headlamps (H7).
4.
M
ain beam headlamps (H7).
5.
di
rectional front foglamps (H11).
Bulbs with lugs, type H1, H7... take care
to position them correctly to ensure the
best lighting.
*
LED: light emitting diodes.
Practical information
Page 244 of 436

Changing direction indicator
bulbs
Amber coloured bulbs, such as the
direction indicators, must be replaced
with bulbs of identical specifications
and colour.
Rapid flashing of the direction indicator
warning lamp (right or left) indicates the
failure of a bulb on that side.
Model with halogen (type 2) and xenon
headlamps
For the replacement of this type of LED lamp,
contact a CITROËN dealer or a qualified
workshop.
Model with halogen headlamps (t yp e 1)
F
T
urn the bulb holder a quarter of a turn and
extract it.
F
P
ull out the bulb and change it.
To reassemble, carry out these operations in
reverse order.
Access to bulbs
Depending on the engine and only on the left
hand side, you must first carry out the following
operations for access to the protective covers
on the bulbs.
F
R
emove the air deflector by unclipping
each of its three attachment points.
F
U
nclip the bonnet release cable at its
two
fixings.
F
M
ove the cable down.
After changing the failed bulb, remember to
put everything back in place (cable and air
deflector).