2014 YAMAHA YZ450F fuel
[x] Cancel search: fuelPage 7 of 360

EAS1SL1005
SAFETY INFORMATION
THIS MACHINE IS DESIGNED STRICTLY FOR COMPETITION USE, ONLY ON A CLOSED
COURSE. It is illegal for this machine to be operated on any public street, road, or highway. Off-road
use on public lands may also be illegal. Please check local regulations before riding.
• THIS MACHINE IS TO BE OPERATED BY AN EXPERIENCED RIDER ONLY.
Do not attempt to operate this machine at maximum power until you are totally familiar with its char-
acteristics.
• THIS MACHINE IS DESIGNED TO BE RIDDEN BY THE OPERATOR ONLY.
Do not carry passengers on this machine.
• ALWAYS WEAR PROTECTIVE APPAREL.
When operating this machine, always wear an approved helmet with goggles or a face shield. Also
wear heavy boots, gloves, and protective clothing. Always wear proper fitting clothing that will not
be caught in any of the moving parts or controls of the machine.
• ALWAYS MAINTAIN YOUR MACHINE IN PROPER WORKING ORDER.
For safety and reliability, the machine must be properly maintained. Always perform the pre-oper-
ation checks indicated in this manual.
Correcting a mechanical problem before you ride may prevent an accident.
• GASOLINE IS HIGHLY FLAMMABLE.
Always turn off the engine while refueling. Take care to not spill any gasoline on the engine or ex-
haust system. Never refuel in the vicinity of an open flame, or while smoking.
• GASOLINE CAN CAUSE INJURY.
If you should swallow some gasoline, inhale excess gasoline vapors, or allow any gasoline to get
into your eyes, contact a doctor immediately. If any gasoline spills onto your skin or clothing, imme
-
diately wash skin areas with soap and water, and change your clothes.
• ONLY OPERATE THE MACHINE IN AN AREA WITH ADEQUATE VENTILATION.
Never start the engine or let it run for any length of time in an enclosed area. Exhaust fumes are
poisonous. These fumes contain carbon monoxide, which by itself is odorless and colorless. Car
-
bon monoxide is a dangerous gas which can cause unconsciousness or can be lethal.
• PARK THE MACHINE CAREFULLY; TURN OFF THE ENGINE.
Always turn off the engine if you are going to leave the machine. Do not park the machine on a slope
or soft ground as it may fall over.
• THE ENGINE, EXHAUST PIPE, MUFFLER, AND OIL TANK WILL BE VERY HOT AFTER THE EN-
GINE HAS BEEN RUN.
Be careful not to touch them or to allow any clothing item to contact them during inspection or repair.
• PROPERLY SECURE THE MACHINE BEFORE TRANSPORTING IT.
For safety, drain the gasoline from the fuel tank before transporting the vehicle.
Page 11 of 360

1
2
3
4
5
6
7
8
9
10
TABLE OF CONTENTS
GENERAL INFORMATION
SPECIFICATIONS
PERIODIC CHECKS AND ADJUST-
MENTS
CHASSIS
ENGINE
COOLING SYSTEM
FUEL SYSTEM
ELECTRICAL SYSTEM
TROUBLE SHOOTING
TUNING
Page 13 of 360

1
GENERAL INFORMATION
LOCATION OF IMPORTANT LABELS............................................................ 1-1
DESCRIPTION .................................................................................................. 1-4
IDENTIFICATION ............................................................................................. 1-5
VEHICLE IDENTIFICATION NUMBER ...................................................... 1-5
ENGINE SERIAL NUMBER ....................................................................... 1-5
MODEL LABEL........................................................................................... 1-5
FEATURES ....................................................................................................... 1-6
OUTLINE OF THE FI SYST EM .................................................................. 1-6
FI SYSTEM....................................... .......................................................... 1-7
INCLUDED PARTS .......................................................................................... 1-8
SIDESTAND ............................................................................................... 1-8
SPARK PLUG WRENCH ........................................................................... 1-8
NIPPLE WRENCH...................................................................................... 1-8
HANDLEBAR PROTECTOR .. .................................................................... 1-8
FUEL HOSE JOINT COVER ...................................................................... 1-8
COUPLER FOR CONNECTING OPTIONAL PART................................... 1-8
IMPORTANT INFORMATION ........................................................................ 1-10
PREPARATION FOR REMOVAL A ND DISASSEMBLY.......................... 1-10
REPLACEMENT PARTS.......................................................................... 1-10
GASKETS, OIL SEALS AND O-RINGS ................................................... 1-11
LOCK WASHERS/PLATES AND COTTER PINS .................................... 1-11
BEARINGS AND OIL SEALS ................................................................... 1-11
CIRCLIPS ................................................................................................. 1-11
BASIC SERVICE INFORMATION .................................................................. 1-12
ELECTRICAL SYSTEM.......... .................................................................. 1-12
SPECIAL TOOLS ........................................................................................... 1-15
CONTROL FUNCTIONS ................................................................................ 1-20
ENGINE STOP SWITCH .......................................................................... 1-20
CLUTCH LEVER ................................................................................... ... 1-20
SHIFT PEDAL .......................................................................................... 1-20
KICKSTARTER LEVER.......... .................................................................. 1-20
THROTTLE GRIP ..................................................................................... 1-20
FRONT BRAKE LEVER ........................................................................... 1-20
REAR BRAKE PEDAL.............................................................................. 1-21
STARTER KNOB/IDLE SCREW .............................................................. 1-21
FUEL TANK CAP ..................................................................................... 1-21
Page 14 of 360

STARTING AND BREAK-IN.......................................................................... 1-22
FUEL ........................................................................................................ 1-22
STARTING A COLD ENGINE .................................................................. 1-22
STARTING A WARM ENGINE ................................................................. 1-23
BREAK-IN PROCEDURES ...................................................................... 1-23
MAINTENANCE AFTER BREAK-IN.............................................................. 1-24
MAJOR MAINTENANCE .......................................................................... 1-24
TORQUE-CHECK POINTS............................................................................ 1-25
CLEANING AND STORAGE.......................................................................... 1-27
CLEANING ............................................................................................... 1-27
STORAGE ................................................................................................ 1-27
Page 18 of 360

DESCRIPTION
1-4
EAS1SL1009
DESCRIPTION
TIP
Designs and specifications of the vehicle are subject to change without notice. Therefore, please
note that the descriptions in this manual may be different from those for the vehicle you have pur
-
chased.
1. Clutch lever10. Coolant drain bolt
2. Front brake lever11. Rear brake pedal
3. Throttle grip12. Air filter
4. Radiator cap13. Drive chain
5. Fuel tank cap14. Shift pedal
6. Engine stop switch15. Oil level check window
7. Fuel tank16. Starter knob/idle screw
8. Kickstarter lever17. Front fork
9. Radiator
2 1
6
78 954 3
11 10 17 16 15 14 1312
Page 20 of 360

FEATURES
1-6
EAS20170
FEATURES
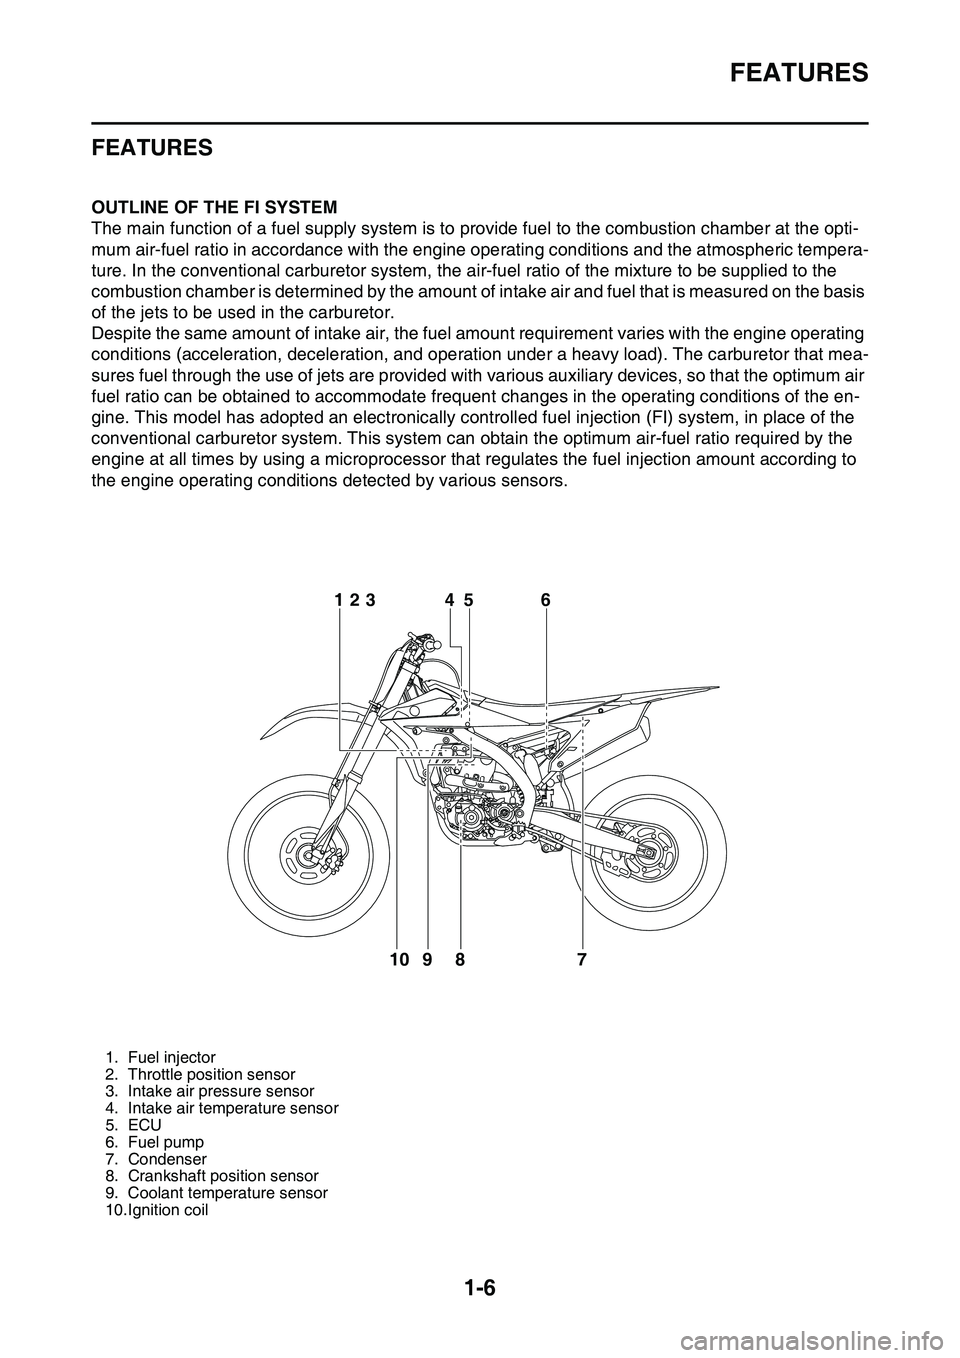
EAS1SL1014OUTLINE OF THE FI SYSTEM
The main function of a fuel supply system is to provide fuel to the combustion chamber at the opti-
mum air-fuel ratio in accordance with the engine operating conditions and the atmospheric tempera-
ture. In the conventional carburetor system, the air-fuel ratio of the mixture to be supplied to the
combustion chamber is determined by the amount of intake air and fuel that is measured on the basis
of the jets to be used in the carburetor.
Despite the same amount of intake air, the fuel amount requirement varies with the engine operating
conditions (acceleration, deceleration, and operation under a heavy load). The carburetor that mea
-
sures fuel through the use of jets are provided with various auxiliary devices, so that the optimum air
fuel ratio can be obtained to accommodate frequent changes in the operating conditions of the en
-
gine. This model has adopted an electronically controlled fuel injection (FI) system, in place of the
conventional carburetor system. This system can obtain the optimum air-fuel ratio required by the
engine at all times by using a microprocessor that regulates the fuel injection amount according to
the engine operating conditions detected by various sensors.
EAS1SL1015
1. Fuel injector
2. Throttle position sensor
3. Intake air pressure sensor
4. Intake air temperature sensor
5. ECU
6. Fuel pump
7. Condenser
8. Crankshaft position sensor
9. Coolant temperature sensor
10.Ignition coil
6
7 8 95 4 123
10
Page 21 of 360

FEATURES
1-7
FI SYSTEM
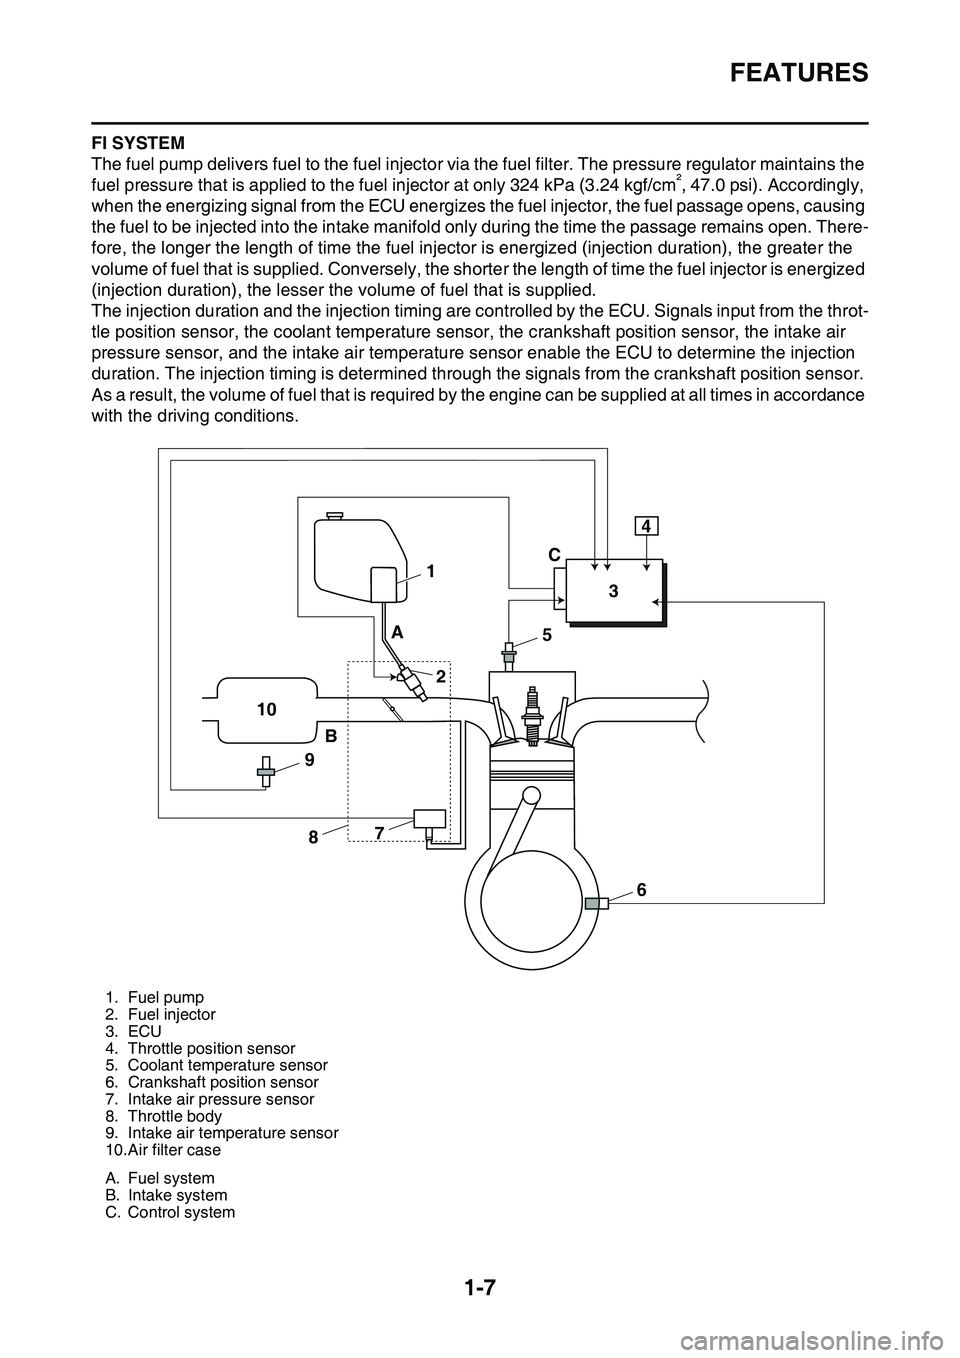
The fuel pump delivers fuel to the fuel injector via the fuel filter. The pressure regulator maintains the
fuel pressure that is applied to the fuel injector at only 324 kPa (3.24 kgf/cm², 47.0 psi). Accordingly,
when the energizing signal from the ECU energizes the fuel injector, the fuel passage opens, causing
the fuel to be injected into the intake manifold only during the time the passage remains open. There
-
fore, the longer the length of time the fuel injector is energized (injection duration), the greater the
volume of fuel that is supplied. Conversely, the shorter the length of time the fuel injector is energized
(injection duration), the lesser the volume of fuel that is supplied.
The injection duration and the injection timing are controlled by the ECU. Signals input from the throt-
tle position sensor, the coolant temperature sensor, the crankshaft position sensor, the intake air
pressure sensor, and the intake air temperature sensor enable the ECU to determine the injection
duration. The injection timing is determined through the signals from the crankshaft position sensor.
As a result, the volume of fuel that is required by the engine can be supplied at all times in accordance
with the driving conditions.
1. Fuel pump
2. Fuel injector
3. ECU
4. Throttle position sensor
5. Coolant temperature sensor
6. Crankshaft position sensor
7. Intake air pressure sensor
8. Throttle body
9. Intake air temperature sensor
10.Air filter case
A. Fuel system
B. Intake system
C. Control system
1
234
5
6 7
8 9 10A
BC
Page 22 of 360

INCLUDED PARTS
1-8
EAS1SL1016
INCLUDED PARTS
EAS1SL1017SIDESTAND
The sidestand “1” is used to support only the
machine when standing or transporting it.
EWA@
WARNING
• Never apply additional force to the sides-
tand.
• Remove this sidestand before starting out.
EAS1SL1018SPARK PLUG WRENCH
The spark plug wrench “1” is used to remove or
install the spark plug.
EAS1SL1019NIPPLE WRENCH
The nipple wrench “1” is used to tighten the
spoke.
EAS1SL1020
HANDLEBAR PROTECTOR
Install the handlebar protector “1” with the mark
“a” facing forward.
EAS1SL1021FUEL HOSE JOINT COVER
The fuel hose joint covers “1” are used to pre-
vent mud, dust, and other foreign materials
from entering the inside when the fuel hose is
disconnected.
EAS1SL1022COUPLER FOR CONNECTING OPTIONAL
PART
The coupler “1” is used for connecting the op-
tional Power Tuner and so on.ECA1DX1002
NOTICE
When no optional parts, etc. are connected,
connect the connection terminal to the orig
-
inal coupler.
Before disconnecting the coupler, thor-
oughly wipe off any mud or water stuck to it.
1
1
a
1
1
1