2014 YAMAHA AEROX50 warning light
[x] Cancel search: warning lightPage 32 of 78

OPERATION AND IMPORTANT RIDING POINTS
5-1
5
EAU15952
Read the Owner’s Manual carefully to
become familiar with all controls. If
there is a control or function you do not
understand, ask your Yamaha dealer.
WARNING
EWA10272
Failure to familiarize yourself with
the controls can lead to loss of con-
trol, which could cause an accident
or injury.
EAUM3150
TIPThis model is equipped with a lean an-
gle sensor to stop the engine in case of
a turnover. To start the engine after a
turnover, be sure to turn the main
switch to Ž and then to Ž. Failing
to do so will prevent the engine from
starting even though the engine will
crank when pushing the start switch.
EAUM3161
Starting a cold engineNOTICE
ECA10251
See page 5-4 for engine break-in in-
structions prior to operating the ve-
hicle for the first time.1. Turn the key to “ ”.NOTICE
ECAT1071
The engine trouble warning light and
coolant temperature warning light
should come on for a few seconds,
then go off. If these warning lights
do not go off, have a Yamaha dealer
check their electrical circuits.2. Close the throttle completely.ZAUM0944
U1GBE0E0.book Page 1 Wednesday, June 26, 2013 4:04 PM
Page 34 of 78

OPERATION AND IMPORTANT RIDING POINTS
5-3
5
EAU16794
Braking
WARNING
EWA10301
Avoid braking hard or suddenly
(especially when leaning over to
one side), otherwise the scooter
may skid or overturn.
Railroad crossings, streetcar
rails, iron plates on road con-
struction sites, and manhole
covers become extremely slip-
pery when wet. Therefore, slow
down when approaching such
areas and cross them with cau-
tion.
Keep in mind that braking on a
wet road is much more difficult.
Ride slowly down a hill, as brak-
ing downhill can be very diffi-
cult.1. Close the throttle completely.
2. Apply both front and rear brakes
simultaneously while gradually in-
creasing the pressure.Front
Rear
EAU16821
Tips for reducing fuel con-
sumptionFuel consumption depends largely on
your riding style. Consider the follow-
ing tips to reduce fuel consumption:
Avoid high engine speeds during
acceleration.
Avoid high engine speeds with no
load on the engine.
Turn the engine off instead of let-
ting it idle for an extended length
of time (e.g., in traffic jams, at traf-
fic lights or at railroad crossings).
ZAUM1081ZAUM1082
U1GBE0E0.book Page 3 Wednesday, June 26, 2013 4:04 PM
Page 47 of 78

PERIODIC MAINTENANCE AND ADJUSTMENT
6-12
6 7. Check the final transmission case
for oil leakage. If oil is leaking,
check for the cause.
EAU20071
CoolantThe coolant level should be checked
before each ride. In addition, the cool-
ant must be changed at the intervals
specified in the periodic maintenance
and lubrication chart.
EAUM3180
To check the coolant level
1. Place the vehicle on a level sur-
face and hold it in an upright posi-
tion.TIPThe coolant level must be
checked on a cold engine since
the level varies with engine tem-
perature.
Make sure that the vehicle is posi-
tioned straight up when checking
the coolant level. A slight tilt to the
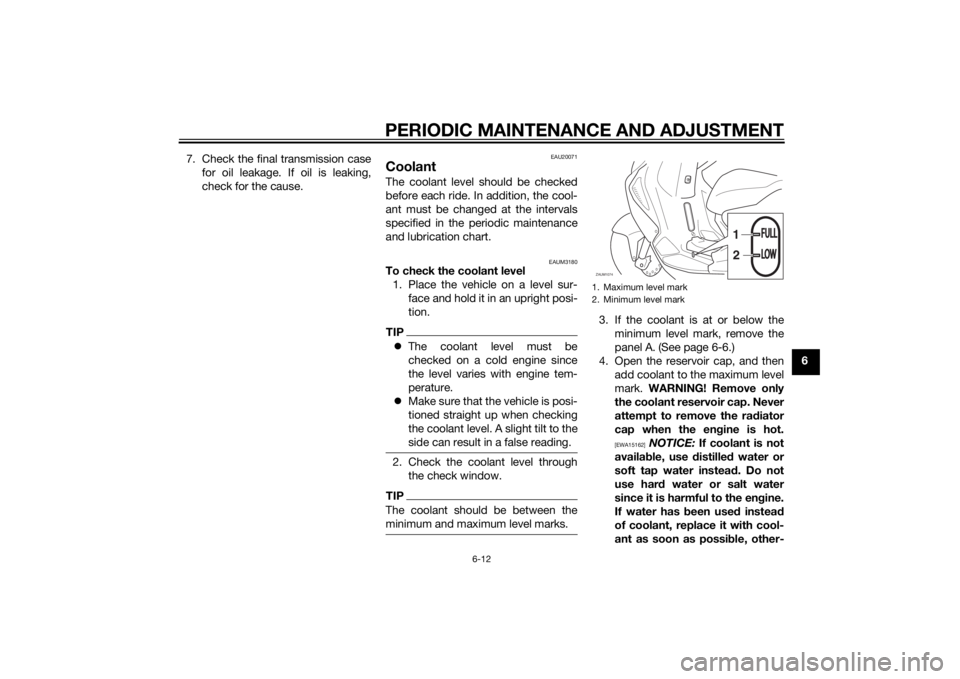
side can result in a false reading.2. Check the coolant level through
the check window.TIPThe coolant should be between the
minimum and maximum level marks.
3. If the coolant is at or below the
minimum level mark, remove the
panel A. (See page 6-6.)
4. Open the reservoir cap, and then
add coolant to the maximum level
mark. WARNING! Remove only
the coolant reservoir cap. Never
attempt to remove the radiator
cap when the engine is hot.
[EWA15162]
NOTICE: If coolant is not
available, use distilled water or
soft tap water instead. Do not
use hard water or salt water
since it is harmful to the engine.
If water has been used instead
of coolant, replace it with cool-
ant as soon as possible, other-
1. Maximum level mark
2. Minimum level markZAUM1074
1
2
FULLFULLLOWLOW
U1GBE0E0.book Page 12 Wednesday, June 26, 2013 4:04 PM
Page 64 of 78

PERIODIC MAINTENANCE AND ADJUSTMENT
6-29
65. Insert a new bulb into the socket.
6. Install the socket (together with
the bulb) by pushing it in.
7. Install the cowling.
EAU25882
TroubleshootingAlthough Yamaha scooters receive a
thorough inspection before shipment
from the factory, trouble may occur
during operation. Any problem in the
fuel, compression, or ignition systems,
for example, can cause poor starting
and loss of power.
The following troubleshooting charts
represent quick and easy procedures
for checking these vital systems your-
self. However, should your scooter re-
quire any repair, take it to a Yamaha
dealer, whose skilled technicians have
the necessary tools, experience, and
know-how to service the scooter prop-
erly.
Use only genuine Yamaha replace-
ment parts. Imitation parts may look
like Yamaha parts, but they are often
inferior, have a shorter service life and
can lead to expensive repair bills.
WARNING
EWA15142
When checking the fuel system, do
not smoke, and make sure there are
no open flames or sparks in the ar-
ea, including pilot lights from waterheaters or furnaces. Gasoline or
gasoline vapors can ignite or ex-
plode, causing severe injury or prop-
erty damage.
1. Auxiliary light bulbU1GBE0E0.book Page 29 Wednesday, June 26, 2013 4:04 PM
Page 69 of 78

SCOOTER CARE AND STORAGE
7-3
7 windshield which does not affect your
visibility and which cannot be easily
recognized.
After cleaning
1. Dry the scooter with a chamois or
an absorbing cloth.
2. Use a chrome polish to shine
chrome, aluminum and stainless-
steel parts, including the exhaust
system. (Even the thermally in-
duced discoloring of stainless-
steel exhaust systems can be re-
moved through polishing.)
3. To prevent corrosion, it is recom-
mended to apply a corrosion pro-
tection spray on all metal,
including chrome- and nickel-plat-
ed, surfaces.
4. Use spray oil as a universal clean-
er to remove any remaining dirt.
5. Touch up minor paint damage
caused by stones, etc.
6. Wax all painted surfaces.
7. Let the scooter dry completely be-
fore storing or covering it.
WARNING
EWA10943
Contaminants on the brakes or tires
can cause loss of control.
Make sure that there is no oil or
wax on the brakes or tires. If
necessary, clean the brake
discs and brake linings with a
regular brake disc cleaner or
acetone, and wash the tires with
warm water and a mild deter-
gent.
Before operating the scooter
test its braking performance
and cornering behavior.NOTICE
ECA10801
Apply spray oil and wax spar-
ingly and make sure to wipe off
any excess.
Never apply oil or wax to any
rubber and plastic parts, but
treat them with a suitable care
product.
Avoid using abrasive polishing
compounds as they will wear
away the paint.
TIPConsult a Yamaha dealer for ad-
vice on what products to use.
Washing, rainy weather or humid
climates can cause the headlight
lens to fog. Turning the headlight
on for a short period of time will
help remove the moisture from the
lens.
U1GBE0E0.book Page 3 Wednesday, June 26, 2013 4:04 PM
Page 73 of 78

SPECIFICATIONS
8-3
8
Bulb voltage, wattage × quantity:Headlight:
12 V, 35.0 W/35.0 W × 1
Tail/brake light:
12 V, 5.0 W/21.0 W × 1
Front turn signal light:
12 V, 10.0 W × 2
Rear turn signal light:
12 V, 10.0 W × 2
Auxiliary light:
12 V, 5.0 W × 1 (CHE)
License plate light:
12 V, 5.0 W × 1 (GBR, CYP, IRL, CHE)
Meter lighting:
LED
High beam indicator light:
LED
Turn signal indicator light:
LED
Fuel level warning light:
LED
Coolant temperature warning light:
LED
Engine trouble warning light:
LEDFuses:Main fuse:
15.0 A
U1GBE0E0.book Page 3 Wednesday, June 26, 2013 4:04 PM
Page 75 of 78

INDEX
AAcceleration and deceleration ................ 5-2
Air filter element and check hose,
replacing and cleaning ....................... 6-13
Auxiliary light bulb, replacing ............... 6-28BBattery .................................................. 6-23
Brake fluid, changing............................ 6-20
Brake fluid level, checking.................... 6-18
Brake lever, front .................................... 3-7
Brake lever, rear ..................................... 3-7
Brake levers, lubricating ....................... 6-21
Braking ................................................... 5-3CCables, checking and lubricating ......... 6-20
Care ........................................................ 7-1
Catalytic converter ............................... 3-10
Centerstand, checking and
lubricating........................................... 6-21
Coolant ................................................. 6-12
Coolant temperature warning light ......... 3-2
Cowling and panel, removing and
installing ............................................... 6-6DDimmer switch........................................ 3-7EEngine break-in ...................................... 5-4
Engine oil ................................................ 6-9
Engine trouble warning light ................... 3-3FFinal transmission oil ............................ 6-11
Front and rear brake lever free play,
checking ............................................. 6-17
Front and rear brake pads, checking ... 6-18Front fork, checking ............................. 6-22
Fuel ........................................................ 3-8
Fuel consumption, tips for reducing ...... 5-3
Fuel level warning light........................... 3-2
Fuel tank cap.......................................... 3-8
Fuse, replacing..................................... 6-25
HHandlebar switches ............................... 3-6
Headlight bulb, replacing ..................... 6-26
High beam indicator light ....................... 3-2
Horn switch ............................................ 3-7IIdentification numbers ........................... 9-1
Indicator lights and warning lights ......... 3-2KKickstarter ............................................ 3-10LLicense plate light ................................ 6-28MMain switch/steering lock ...................... 3-1
Maintenance and lubrication, periodic... 6-3
Maintenance, emission control
system ................................................. 6-2
Matte color, caution ............................... 7-1
Model label............................................. 9-1
Multi-function display............................. 3-3PParking ................................................... 5-4
Part locations ......................................... 2-1SSafe-riding points................................... 1-5
Safety information .................................. 1-1
Seats .................................................... 3-11
Spark plug, checking ............................. 6-7Specifications ......................................... 8-1
Starting a cold engine............................. 5-1
Starting off .............................................. 5-2
Start switch ............................................. 3-7
Steering, checking ................................ 6-23
Storage ................................................... 7-4
Storage compartment........................... 3-12
TTail/brake light bulb, replacing ............. 6-27
Throttle grip and cable, checking and
lubricating ........................................... 6-20
Throttle grip free play, checking ........... 6-14
Tires ...................................................... 6-15
Troubleshooting .................................... 6-29
Troubleshooting charts ......................... 6-30
Turn signal indicator light ....................... 3-2
Turn signal light bulb, replacing............ 6-27
Turn signal switch ................................... 3-7VValve clearance..................................... 6-14
Vehicle identification number ................. 9-1WWheel bearings, checking .................... 6-23
Wheels .................................................. 6-17
U1GBE0E0.book Page 1 Wednesday, June 26, 2013 4:04 PM