2014 YAMAHA AEROX50 battery
[x] Cancel search: batteryPage 59 of 78
PERIODIC MAINTENANCE AND ADJUSTMENT
6-24
6
TIPMake sure that the scooter is posi-
tioned straight up when checking the
electrolyte level.2. Remove panel A. (See page 6-6.)
3. Check the electrolyte level in the
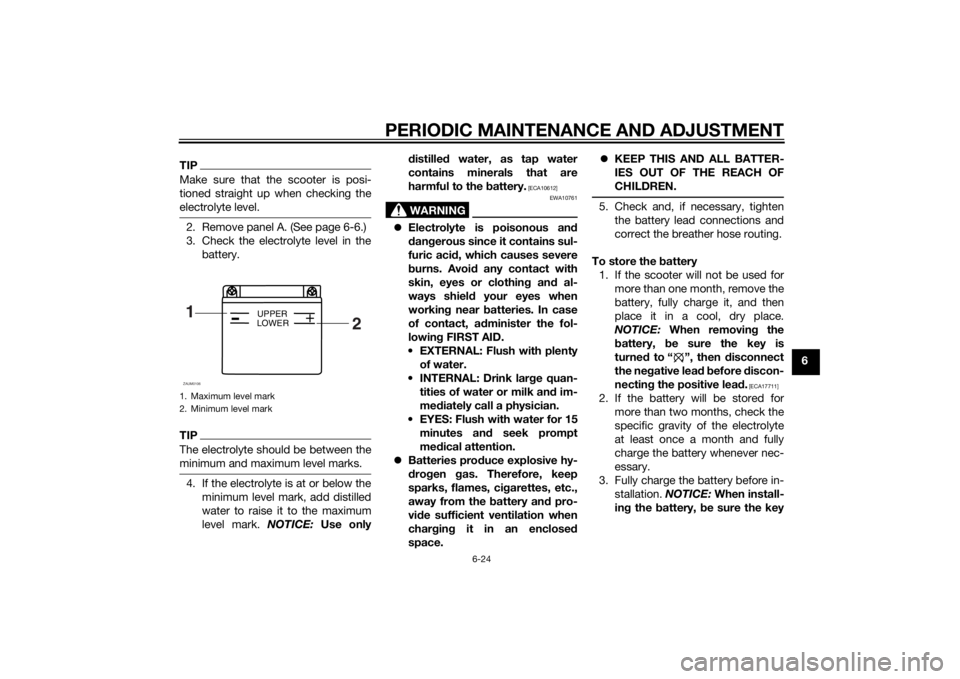
battery.TIPThe electrolyte should be between the
minimum and maximum level marks.4. If the electrolyte is at or below the
minimum level mark, add distilled
water to raise it to the maximum
level mark. NOTICE: Use onlydistilled water, as tap water
contains minerals that are
harmful to the battery.
[ECA10612]
WARNING
EWA10761
Electrolyte is poisonous and
dangerous since it contains sul-
furic acid, which causes severe
burns. Avoid any contact with
skin, eyes or clothing and al-
ways shield your eyes when
working near batteries. In case
of contact, administer the fol-
lowing FIRST AID.
EXTERNAL: Flush with plenty
of water.
INTERNAL: Drink large quan-
tities of water or milk and im-
mediately call a physician.
EYES: Flush with water for 15
minutes and seek prompt
medical attention.
Batteries produce explosive hy-
drogen gas. Therefore, keep
sparks, flames, cigarettes, etc.,
away from the battery and pro-
vide sufficient ventilation when
charging it in an enclosed
space.KEEP THIS AND ALL BATTER-
IES OUT OF THE REACH OF
CHILDREN.
5. Check and, if necessary, tighten
the battery lead connections and
correct the breather hose routing.
To store the battery
1. If the scooter will not be used for
more than one month, remove the
battery, fully charge it, and then
place it in a cool, dry place.
NOTICE: When removing the
battery, be sure the key is
turned to “ ”, then disconnect
the negative lead before discon-
necting the positive lead.
[ECA17711]
2. If the battery will be stored for
more than two months, check the
specific gravity of the electrolyte
at least once a month and fully
charge the battery whenever nec-
essary.
3. Fully charge the battery before in-
stallation. NOTICE: When install-
ing the battery, be sure the key
1. Maximum level mark
2. Minimum level mark1
2
+
UPPER
LOWER
ZAUM0106
U1GBE0E0.book Page 24 Wednesday, June 26, 2013 4:04 PM
Page 60 of 78

PERIODIC MAINTENANCE AND ADJUSTMENT
6-25
6is turned to “ ”, then connect
the positive lead before con-
necting the negative lead.
[ECA17721]
4. After installation, make sure that
the battery leads are properly con-
nected to the battery terminals
and that the breather hose is
properly routed, in good condi-
tion, and not obstructed. NOTICE:
If the breather hose is posi-
tioned in such a way that the
frame is exposed to electrolyte
or gas expelled from the bat-
tery, the frame could suffer
structural and external damag-
es.
[ECA10602]
NOTICE
ECAM1120
Always keep the battery
charged. Storing a discharged
battery can cause permanent
battery damage.
After installing the battery, be
sure to turn the main switch
from “ ” to “ ” three times in
3 seconds intervals to initialize
the idle speed control system.
EAUM3270
Replacing the fuseThe fuse holder is located beside the
battery. Remove panel A to access the
fuse. (See page 6-6.)
If the fuse is blown, replace it as fol-
lows.
1. Turn the key to “ ” and turn off all
electrical circuits.
2. Remove the blown fuse, and then
install a new fuse of the specified
amperage. WARNING! Do not
use a fuse of a higher amperage
rating than recommended to
avoid causing extensive dam-
age to the electrical system and
possibly a fire.
[EWA15132]
NOTICE:After removing and installing
the main fuse, be sure to turn
the main switch from “ ”
to “ ” three times in 3 seconds
intervals to initialize the idle
speed control system.
[ECAM1130]
3. Turn the key to “ ” and turn on
the electrical circuits to check if
the devices operate.
4. If the fuse immediately blows
again, have a Yamaha dealer
check the electrical system.
1. Fuse
2. BatteryZAUM1079
12
Specified fuse:
15.0 A
U1GBE0E0.book Page 25 Wednesday, June 26, 2013 4:04 PM
Page 65 of 78

PERIODIC MAINTENANCE AND ADJUSTMENT
6-30
6
EAUM3290
Troubleshooting chartsStarting problems or poor engine performance
Check the fuel level in
the fuel tank.1. Fuel
There is enough fuel.
There is no fuel.
Check the battery.
Supply fuel.
The engine does not start.
Check the battery.
4. Compression
There is compression.
There is no compression.
The engine does not start.
Have a Yamaha dealer check the vehicle.Have a Yamaha dealer check the vehicle.
Remove the spark plug
and check the electrodes.3. Ignition
Wipe off with a dry cloth and correct the
spark plug gap, or replace the spark plug.
Have a Yamaha dealer check the vehicle.
The engine does not start.
Check the compression.
Operate the electric starter.2. Battery
The engine turns over
quickly.
The engine turns over
slowly.
The battery is good.
DryWet
The engine does not start.
Check the ignition.
Operate the electric
starter or the kickstarter.
Check the electrolyte and battery
lead connections, and charge the
battery if necessary.
Operate the electric starter or the
kickstarter.
U1GBE0E0.book Page 30 Wednesday, June 26, 2013 4:04 PM
Page 70 of 78

SCOOTER CARE AND STORAGE
7-4
7
EAU36564
StorageShort-term
Always store your scooter in a cool, dry
place and, if necessary, protect it
against dust with a porous cover. Be
sure the engine and the exhaust sys-
tem are cool before covering the
scooter.NOTICE
ECA10821
Storing the scooter in a poorly
ventilated room or covering it
with a tarp, while it is still wet,
will allow water and humidity to
seep in and cause rust.
To prevent corrosion, avoid
damp cellars, stables (because
of the presence of ammonia)
and areas where strong chemi-
cals are stored.Long-term
Before storing your scooter for several
months:
1. Follow all the instructions in the
“Care” section of this chapter.2. Fill up the fuel tank and add fuel
stabilizer (if available) to prevent
the fuel tank from rusting and the
fuel from deteriorating.
3. Perform the following steps to
protect the cylinder, piston rings,
etc. from corrosion.
a. Remove the spark plug cap
and spark plug.
b. Pour a teaspoonful of engine
oil into the spark plug bore.
c. Install the spark plug cap onto
the spark plug, and then place
the spark plug on the cylinder
head so that the electrodes are
grounded. (This will limit spark-
ing during the next step.)
d. Turn the engine over several
times with the starter. (This will
coat the cylinder wall with oil.)
e. Remove the spark plug cap
from the spark plug, and then
install the spark plug and the
spark plug cap. WARNING! To
prevent damage or injury
from sparking, make sure to
ground the spark plug elec-
trodes while turning the en-
gine over.
[EWA10952]
4. Lubricate all control cables and
the pivoting points of all levers and
pedals as well as of the side-
stand/centerstand.
5. Check and, if necessary, correct
the tire air pressure, and then lift
the scooter so that both of its
wheels are off the ground. Alterna-
tively, turn the wheels a little every
month in order to prevent the tires
from becoming degraded in one
spot.
6. Cover the muffler outlet with a
plastic bag to prevent moisture
from entering it.
7. Remove the battery and fully
charge it. Store it in a cool, dry
place and charge it once a month.
Do not store the battery in an ex-
cessively cold or warm place [less
than 0 °C (30 °F) or more than 30
°C (90 °F)]. For more information
on storing the battery, see page
6-23.TIPMake any necessary repairs before
storing the scooter.
U1GBE0E0.book Page 4 Wednesday, June 26, 2013 4:04 PM
Page 72 of 78

SPECIFICATIONS
8-2
8
Chassis:Frame type:
Underbone
Caster angle:
27.00 °
Trail:
172 mm (6.8 in)Front tire:Type:
Tubeless
Size:
120/70-13 53P(Michelin)
53L(SAVA,Metzeler)
Manufacturer/model:
MICHELIN/POWER PURE SC
Manufacturer/model:
SAVA/ MC 16
Manufacturer/model:
METZELER/ ME 7 TEENRear tire:Type:
Tubeless
Size:
130/60-13 53P(Michelin)
53L(SAVA,Metzeler)
Manufacturer/model:
MICHELIN/POWER PURE SC
Manufacturer/model:
SAVA/ MC 16
Manufacturer/model:
METZELER/ ME 7 TEENLoading:Maximum load:
182 kg (401 lb)(Total weight of rider, passenger, cargo
and accessories)
Tire air pressure (measured on cold
tires):Loading condition:
0–90 kg (0–198 lb)
Front:
150 kPa (1.50 kgf/cm², 22 psi)
Rear:
150 kPa (1.50 kgf/cm², 22 psi)
Loading condition:
90–182 kg (198–401 lb)
Front:
160 kPa (1.60 kgf/cm², 23 psi)
Rear:
170 kPa (1.70 kgf/cm², 25 psi)Front wheel:Wheel type:
Cast wheel
Rim size:
13xMT3.00Rear wheel:Wheel type:
Cast wheel
Rim size:
13xMT3.50Front brake:Type:
Single disc brake
Operation:
Right hand operation
Specified brake fluid:
DOT 4
Rear brake:Type:
Single disc brake
Operation:
Left hand operation
Specified brake fluid:
DOT 4Front suspension:Type:
Telescopic fork
Spring/shock absorber type:
Coil spring/oil damper
Wheel travel:
80.0 mm (3.15 in)Rear suspension:Type:
Unit swing
Spring/shock absorber type:
Coil spring/oil damper
Wheel travel:
70.0 mm (2.76 in)Electrical system:Ignition system:
TCI
Charging system:
AC magnetoBattery:Model:
CB5L-B(GS)
Voltage, capacity:
12 V, 5.0 AhHeadlight:Bulb type:
Halogen bulb
U1GBE0E0.book Page 2 Wednesday, June 26, 2013 4:04 PM
Page 75 of 78

INDEX
AAcceleration and deceleration ................ 5-2
Air filter element and check hose,
replacing and cleaning ....................... 6-13
Auxiliary light bulb, replacing ............... 6-28BBattery .................................................. 6-23
Brake fluid, changing............................ 6-20
Brake fluid level, checking.................... 6-18
Brake lever, front .................................... 3-7
Brake lever, rear ..................................... 3-7
Brake levers, lubricating ....................... 6-21
Braking ................................................... 5-3CCables, checking and lubricating ......... 6-20
Care ........................................................ 7-1
Catalytic converter ............................... 3-10
Centerstand, checking and
lubricating........................................... 6-21
Coolant ................................................. 6-12
Coolant temperature warning light ......... 3-2
Cowling and panel, removing and
installing ............................................... 6-6DDimmer switch........................................ 3-7EEngine break-in ...................................... 5-4
Engine oil ................................................ 6-9
Engine trouble warning light ................... 3-3FFinal transmission oil ............................ 6-11
Front and rear brake lever free play,
checking ............................................. 6-17
Front and rear brake pads, checking ... 6-18Front fork, checking ............................. 6-22
Fuel ........................................................ 3-8
Fuel consumption, tips for reducing ...... 5-3
Fuel level warning light........................... 3-2
Fuel tank cap.......................................... 3-8
Fuse, replacing..................................... 6-25
HHandlebar switches ............................... 3-6
Headlight bulb, replacing ..................... 6-26
High beam indicator light ....................... 3-2
Horn switch ............................................ 3-7IIdentification numbers ........................... 9-1
Indicator lights and warning lights ......... 3-2KKickstarter ............................................ 3-10LLicense plate light ................................ 6-28MMain switch/steering lock ...................... 3-1
Maintenance and lubrication, periodic... 6-3
Maintenance, emission control
system ................................................. 6-2
Matte color, caution ............................... 7-1
Model label............................................. 9-1
Multi-function display............................. 3-3PParking ................................................... 5-4
Part locations ......................................... 2-1SSafe-riding points................................... 1-5
Safety information .................................. 1-1
Seats .................................................... 3-11
Spark plug, checking ............................. 6-7Specifications ......................................... 8-1
Starting a cold engine............................. 5-1
Starting off .............................................. 5-2
Start switch ............................................. 3-7
Steering, checking ................................ 6-23
Storage ................................................... 7-4
Storage compartment........................... 3-12
TTail/brake light bulb, replacing ............. 6-27
Throttle grip and cable, checking and
lubricating ........................................... 6-20
Throttle grip free play, checking ........... 6-14
Tires ...................................................... 6-15
Troubleshooting .................................... 6-29
Troubleshooting charts ......................... 6-30
Turn signal indicator light ....................... 3-2
Turn signal light bulb, replacing............ 6-27
Turn signal switch ................................... 3-7VValve clearance..................................... 6-14
Vehicle identification number ................. 9-1WWheel bearings, checking .................... 6-23
Wheels .................................................. 6-17
U1GBE0E0.book Page 1 Wednesday, June 26, 2013 4:04 PM