2014 VOLVO S80 child lock
[x] Cancel search: child lockPage 51 of 380

01 Safety
Top tether anchors01
49
Child restraint anchorages
Your Volvo is equipped with child restraint top tether anchorages in the rear seat. Theyare located on the rear parcel shelf.
Securing a child seat
1. Place the child restraint on the rear seat.
2. Fold up the plastic cover over the anchor-age to be used.
3. Route the top tether strap under the head restraint and attach it to the anchor.
4. Fold down the outboard head restraints or lower the center head restraint for eas- ier access to the ISOFIX/LATCH anchor.
5. Attach lower tether straps to the lower ISOFIX/LATCH anchors. If the child restraint is not equipped with lower tetherstraps, or the restraint is used in the cen-ter seating position, follow instructions forsecuring a child restraint using the Auto-matic Locking Retractor seat belt (seepage 38).
6. Firmly tension all straps. Refer also to the child seat manufacturer's instructions for information on securing thechild seat.
WARNING
• Always refer to the recommendations made by the child restraint manufac-turer.
• Volvo recommends that the top tetheranchors be used when installing a for-ward-facing child restraint.
• Never route a top tether strap over thetop of the head restraint. The strapshould be routed beneath the headrestraint.
• Child restraint anchorages aredesigned to withstand only thoseloads imposed by correctly fitted childrestraints. Under no circumstances arethey to be used for adult seat belts orharnesses. The anchorages are notable to withstand excessive forces onthem in the event of collision if full har-ness seat belts or adult seat belts areinstalled to them. An adult who uses abelt anchored in a child restraintanchorage runs a great risk of suffer-ing severe injuries should a collisionoccur.
• Do not install rear speakers thatrequire the removal of the top tetheranchors or interfere with the properuse of the top tether strap.
Page 52 of 380

01 Safety
Child safety locks 01
50
Child safety locks
G021077
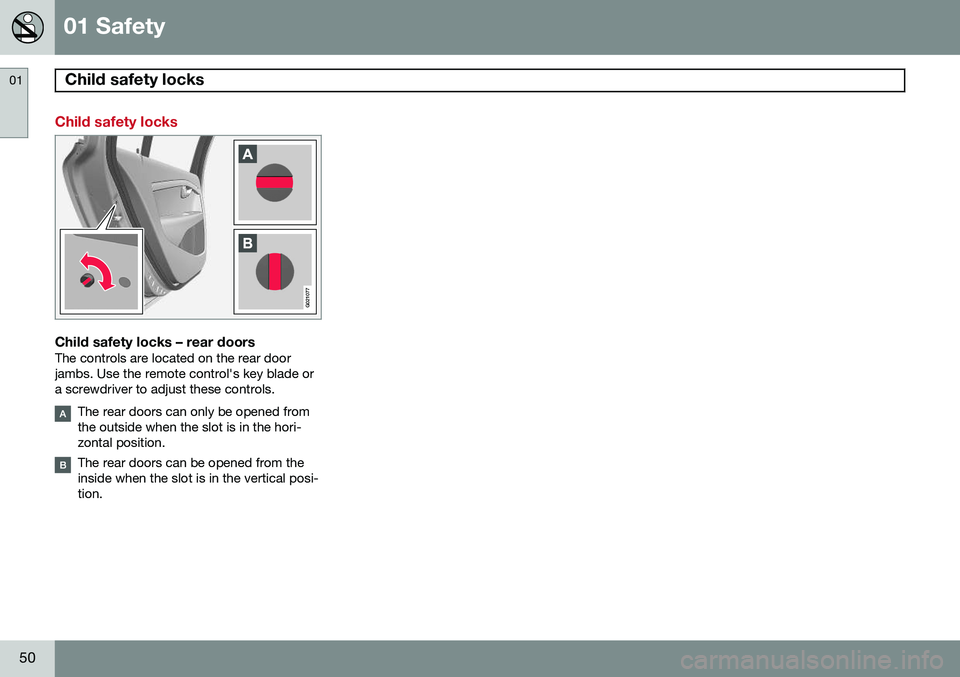
Child safety locks – rear doorsThe controls are located on the rear door jambs. Use the remote control's key blade ora screwdriver to adjust these controls.
The rear doors can only be opened from the outside when the slot is in the hori-zontal position.
The rear doors can be opened from the inside when the slot is in the vertical posi-tion.
Page 56 of 380

02 Locks and alarm
Remote key and key blade
02
54
Introduction
Two remote keys or optional Personal Car Communicators (PCC) are provided with yourvehicle. They enable you to unlock the doorsand trunk, and also function as ignition keysto start the vehicle or operate electrical com-ponents. The remote keys contain detachablemetal key blades for manually locking orunlocking the driver's door and the glovecompartment. The visible ends of these keyblades are unique to make it easier to identify"your" remote key. Up to six remotes can beprogrammed for use on the same vehicle. The PCCs have enhanced functionality com- pared with the standard remote key.
NOTE
In the remainder of this chapter, all refer- ences to the remote key also pertain to thePCC unless otherwise stated.
WARNING
Never leave the remote key in the ignition slot if children are to remain in the vehicle.
See page 84 for more information on the various ignition modes.
Detachable key bladeEach remote key or PCC contains a detacha-ble metal key blade for mechanically lockingor unlocking the driver's door and the glovecompartment, and to enable the valet lockingfunction. See page 60 for more informationon the key blade and see page 63 for infor-mation on the valet locking function. The keyblades have a unique code, which is used ifnew ones need to be produced. This code isavailable at an authorized Volvo retailer. The visible ends of these key blades are unique to make it easier to identify "your"remote key.
Loss of a remote keyIf either of the remote keys is lost, the othershould be taken with the car to a Volvoretailer. As an anti-theft measure, the code ofthe lost remote key must be erased from thesystem.
NOTE
Additional or duplicate remote control keys can be obtained from any AuthorizedVolvo Retailer. You can also obtain additional or duplicate remote control keys from certain inde-pendent repair facilities and locksmithsthat are qualified to make remote controlkeys. Each key must be programmed towork with your vehicle. California Only: A list of independent repair facilities and/or locksmiths known to Volvo that can cutand code replacement keys can be found:
• on the Volvo website at http://www.volvocars.com/us/keys
• by calling Volvo Customer Care at1-800-458-1552
The number of registered keys for the vehicle can be found by pressing
MY CAR and going
into
SettingsInformationNumber of
keys. See page 193 for a description of the
menu system. USA-5WK49264FCC ID:KR55WK49264 + Siemens VDO 5WK49236 FCC ID:KR55WK49236, 5WK49266
Page 71 of 380

02 Locks and alarm
Locks
02
69
Unlocking/opening the trunk from the passenger compartment
–Press the button on the lighting panel (1) to unlock and pop open the trunk
NOTE
The taillights will illuminate automatically for a short period when the trunk has beenopened.
Locking the trunk with the remote key–Press the lock button on the remote, see page 57
The alarm indicator on the dashboard willbegin flashing to show that the vehicle islocked and that the alarm has been armed.
NOTE
• If the doors are locked while the trunk is open, the trunk will remain unlockeduntil the vehicle is relocked by press-ing the Lock button on the remote key.
• On keyless drive vehicles, the gearselector must be in the Park (
P) posi-
tion, all doors and the trunk must beclosed and the ignition must beswitched off before the vehicle can belocked.
Opening the trunk from the inside (U.S. models only)
G022920
Opening the trunk from the inside
The vehicle is equipped with a florescent han- dle on the inside of the trunk lid, which canbe used in an emergency situation to open the trunk from the inside. Pull the handledown to release the trunk lid. After use, thehandle must be pushed back into its originalposition before the trunk can be closed. This handle is not intended to be used to anchor the trunk lid when long loads arebeing transported.
WARNING
•
Keep vehicle doors and trunk locked and keep keys out of a child’s reach.Unsupervised children could lockthemselves in an open trunk and riskinjury. Children should be taught not toplay in vehicles.
• On hot days, the temperature in thetrunk or vehicle interior can rise veryquickly. Exposure of people to thesehigh temperatures for even a shortperiod of time can cause heat-relatedinjury or death. Small children are par-ticularly at risk.
Page 91 of 380

03 Your driving environment
Seats
03
* Option/accessory, for more information, see Introduction.89
NOTE
• The seat will move to this position even if someone else has moved it to adifferent position and locked the vehi-cle with a
different remote key.
• This feature will work in the same waywith all of the remote keys that youuse with your vehicle.
Emergency stop
WARNING
•
Because the driver's seat can be adjusted with the ignition off, childrenshould never be left unattended in thevehicle.
• Movement of the seat can be STOP-PED at any time by pressing any but-ton on the power seat control panel.
• Do not adjust the seat while driving.The seat should be adjusted so thatthe brake pedal can be depressedfully. In addition, position the seat asfar rearward as comfort and controlallow.
• The seat rails on the floor must not beobstructed in any way when the seat isin motion.
Heated/ventilated seats*See page 202.
Rear seats
Rear center head restraint
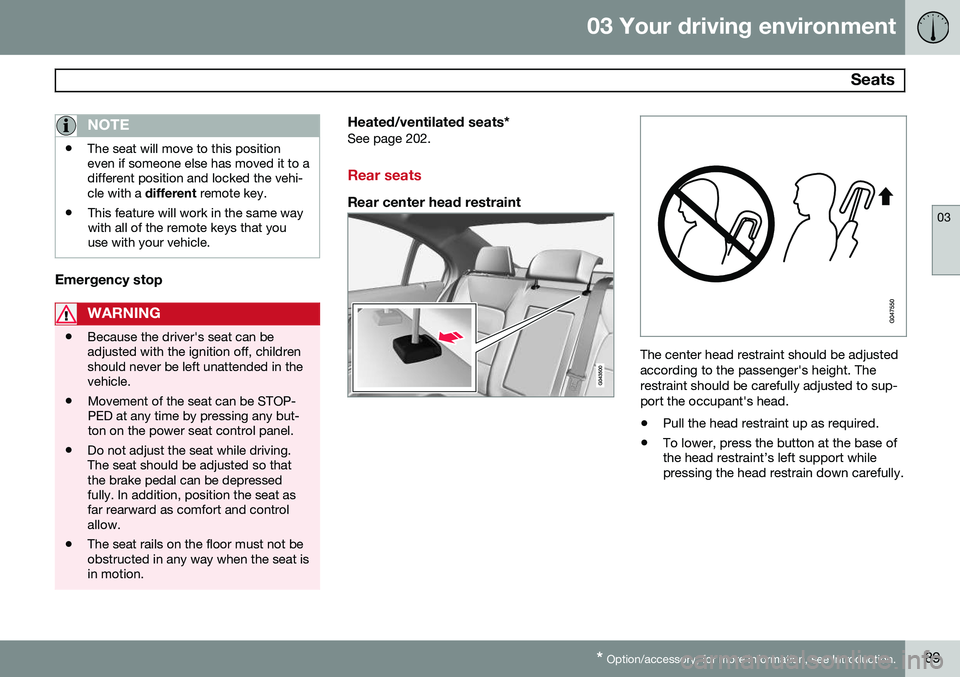
The center head restraint should be adjusted according to the passenger's height. Therestraint should be carefully adjusted to sup-port the occupant's head.
• Pull the head restraint up as required.
• To lower, press the button at the base of the head restraint’s left support whilepressing the head restrain down carefully.
Page 93 of 380

03 Your driving environment
Seats
03
91
CAUTION
To help avoid damage to the upholstery, there should be no objects on the rear seatand the seat belt should not be buckledwhen the backrest is folded down.
WARNING
•Keep vehicle doors and trunk locked and keep keys out of a child’s reach.Unsupervised children could lockthemselves in an open trunk and riskinjury. Children should be taught not toplay in vehicles.
• On hot days, the temperature in thetrunk or vehicle interior can rise veryquickly. Exposure of people to thesehigh temperatures for even a shortperiod of time can cause heat-relatedinjury or death. Small children are par-ticularly at risk.
WARNING
•When one or more sections of the backrest is returned to the uprightposition, check that it is properlylocked in place by pushing and pullingit. The red indicators should also notbe visible.
• Return the outboard head restraints tothe upright position.
• Long loads should always be securelyanchored to help avoid injury in theevent of a sudden stop.
• Always turn the engine off and applythe parking brake when loading/unloading the vehicle.
• Place the transmission in the Park (
P)
position to help prevent inadvertentmovement of the gear selector.
• On hot days, the temperature in thevehicle interior can rise very quickly.Exposure of people to these high tem-peratures for even a short period oftime can cause heat-related injury ordeath. Small children are particularly atrisk.
Page 114 of 380

03 Your driving environment
Power moonroof
03
112* Option/accessory, for more information, see Introduction.
WARNING
• During manual closing, if the moonroof is obstructed, immediately open itagain.
• Never open or close the moonroof if itis obstructed in any way.
• Never allow a child to operate themoonroof.
• Never leave a child alone in a vehicle.
• When leaving the vehicle, ensure thatthe ignition is in mode
0 (see page 84
for information about the various igni-tion modes) to disable the moonroof.Never leave the remote key/PCC* inthe vehicle.
• Never extend any object or body partthough the open moonroof, even if thevehicle's ignition is completelyswitched off.
Tilt position
G028899
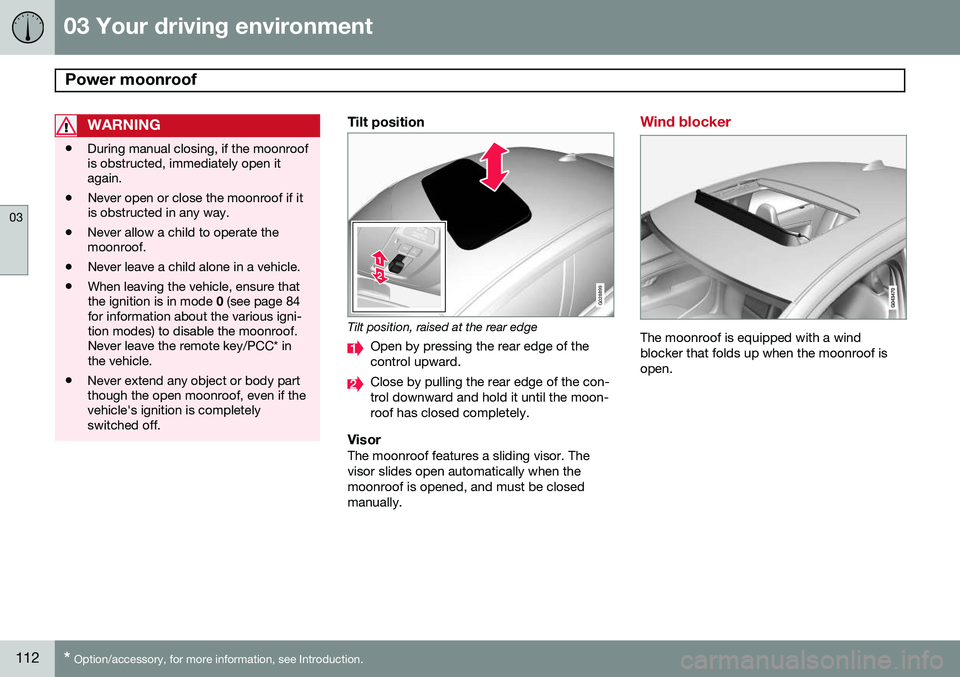
Tilt position, raised at the rear edge
Open by pressing the rear edge of the control upward.
Close by pulling the rear edge of the con- trol downward and hold it until the moon-roof has closed completely.
VisorThe moonroof features a sliding visor. Thevisor slides open automatically when themoonroof is opened, and must be closedmanually.
Wind blocker
The moonroof is equipped with a wind blocker that folds up when the moonroof isopen.
Page 309 of 380

08 Wheels and tires
Tire Sealing System*
08
* Option/accessory, for more information, see Introduction.307
Inflating tires
The tire sealing system can be used to inflate the tires. To do so:
1. Park the car in a safe place.
2. The compressor should be switched off.
Ensure that the on/off switch is in position0 (the 0 side of the switch should be
pressed down).
3. Take out the electrical wire and hose.
4. Remove the valve cap from the tire’s inflation valve and screw the hose con- nector onto the valve as tightly as possi-ble by hand.
5. Connect the electrical wire to the nearest 12-volt socket in the vehicle.
6. Start the vehicle’s engine.WARNING
• The vehicle’s engine should be running when the tire sealing system is used toavoid battery drain. Therefore, be surethe vehicle is parked in a well ventilatedplace, or outdoors, before using thesystem. The parking brake should besecurely applied and the gear selectorshould be in the
P (park) position.
• Children should never be left unatten-ded in the vehicle when the engine isrunning.
7. Check the tire’s inflation pressure on the
gauge. Switch off the compressor briefly to get a clear reading from the pressuregauge.
8. Refer to the tire inflation table in this chapter for the correct inflation pressure.If the tire needs to be inflated, start thetire sealing system’s compressor (pressthe on/off switch to position I). If neces-sary, release air from the tire by turningthe air release knob counterclockwise.
CAUTION
The compressor should not be used for more than 10 minutes at a time to avoidoverheating.
9. Turn off the compressor (press the on/off switch to position 0) when the correct
inflation pressure has been reached.
10. Unscrew the hose from the tire’s inflation valve and reinstall the valve cap.
CAUTION
•After pumping the tires, always reinstall the valve cap to help avoid damage tothe valve from dirt, gravel, etc.
• Use plastic valve caps only. Metal capscould corrode and become difficult toremove.
11. Disconnect the electrical wire from the
12-volt socket.