2014 VOLKSWAGEN TRANSPORTER cooling
[x] Cancel search: coolingPage 3 of 486

While driving .. ...... 257
Starting the engine, changing gear and parking
-Starting and stopping the engine .. 257
-Changing gears . . . . . . . . . .......... 260
-Braking, stopping and parking ......... 269
-Driving with respect for the environment 278
-Steering ........... 281
Driver assist systems
-Pull-away assist systems .... 282
-ParkPilot ............................ 287
-Reversing camera (Rear Assist) ....... 291
-Cruise control system (CCS) . . . . . ... 295
-Adaptive cruise control (ACC) ......... 298
-Area monitoring system (Front Assist) .. 307
-Lane change assist system (Side Assist) . .. . . .. .. . . . . . . . . .......... 312
-Driver Alert System (recommendation for rest breaks) . . . . . . . . . . ......... 315
-Adaptive chassis control (DCC) ........ 317
-Tyre monitoring system . . . . . . . ....... 318
Air conditioning system
-Heating, ventilating, cooling ........... 322
-Supplementary heaters (auxiliary air heater or auxiliary coolant heater) .... 332
At the filling station
-Filling the tank ....................... 340
-Fuel . . . . . . . . . . . . . . . . ........ 343
-Emission control system for diesel vehicles (AdBiue®j ................... 346
Cleaning and maintenance ...... 350
In the engine compartment
-Preparation for working in the engine compartment . . . . . . . . . . . . . . . . 350
-Engine oil ........................... 353
-Coolant ..................... 358
-Vehicle battery ....................... 362
Wheels and tyres
-Useful information about wheels and
tyres . . . . . . . . . . . . . . ..... 367
Vehicle care and maintenance
-Caring for and cleaning the vehicle exterior . . . . . . . . . . . . . . . . . . . ... 380
-Cleaning and caring for the interior ..... 388
-Accessories, modifications, repairs and renewal of parts . . . . . . . .... 394
-Mobile online services .. 402
-Consumer information 404
-Engine management system and exhaust purification system . . . .. 407
If and when ........................ 410
Practical tips
-Frequently asked questions ........... 410
-In an emergency ..................... 411
-Manual opening and closing . . . . . . . . . 413
-Vehicle toolkit . . ............... 416
-Hubcaps.. . .................... 417
-Changing a wheel .................... 420
-Breakdown set ....................... 425
-Fuses................ . . 429
-Changing bulbs . . . . . . . . .....•.... 432
-Jump starting . . . . . . .......... 443
-Tow-starting and towing . . . 446
Technical data ...
Technical data
-Vehicle data
-Petrol engines
-Diesel engines ..
Abbreviations
Index .......... .
... 450
... 450
......... 453
455
..... " ... 463
.. 465
Table of Contents 3
Page 69 of 486
A WARNING (Continued)
• The steering wheel must always point to-wards the chest and not towards the face. This ensures that the driver front airbag pro-vides maximum protection in the event of an accident.
• While driving, always keep both hands on the outside of the steering wheel (at the 9 o'clock and 3 o'clock positions =>Fig. 47). This reduces the risk of injury if the driver front alrbag Is triggered.
Seat functions, front
a:n Introduction
This chapter contains information on the following subjects:
Seat heating . . . . . . . . . . . . . . . . . . . • • • . . . . . . 69
Memory seats . . . . . . . . . . . . . . . . . . . 70
Rotating front seats . . . . . . . . . . . . . . . . . . . . . . 71
Additional information and warnings:
• Adjusting the seat position =>page 61
• Seat bells =>page 79
• Airbag system =>page 87
• Child seats (accessories) 96
• Heating, ventilating, cooling 322
Seat heating
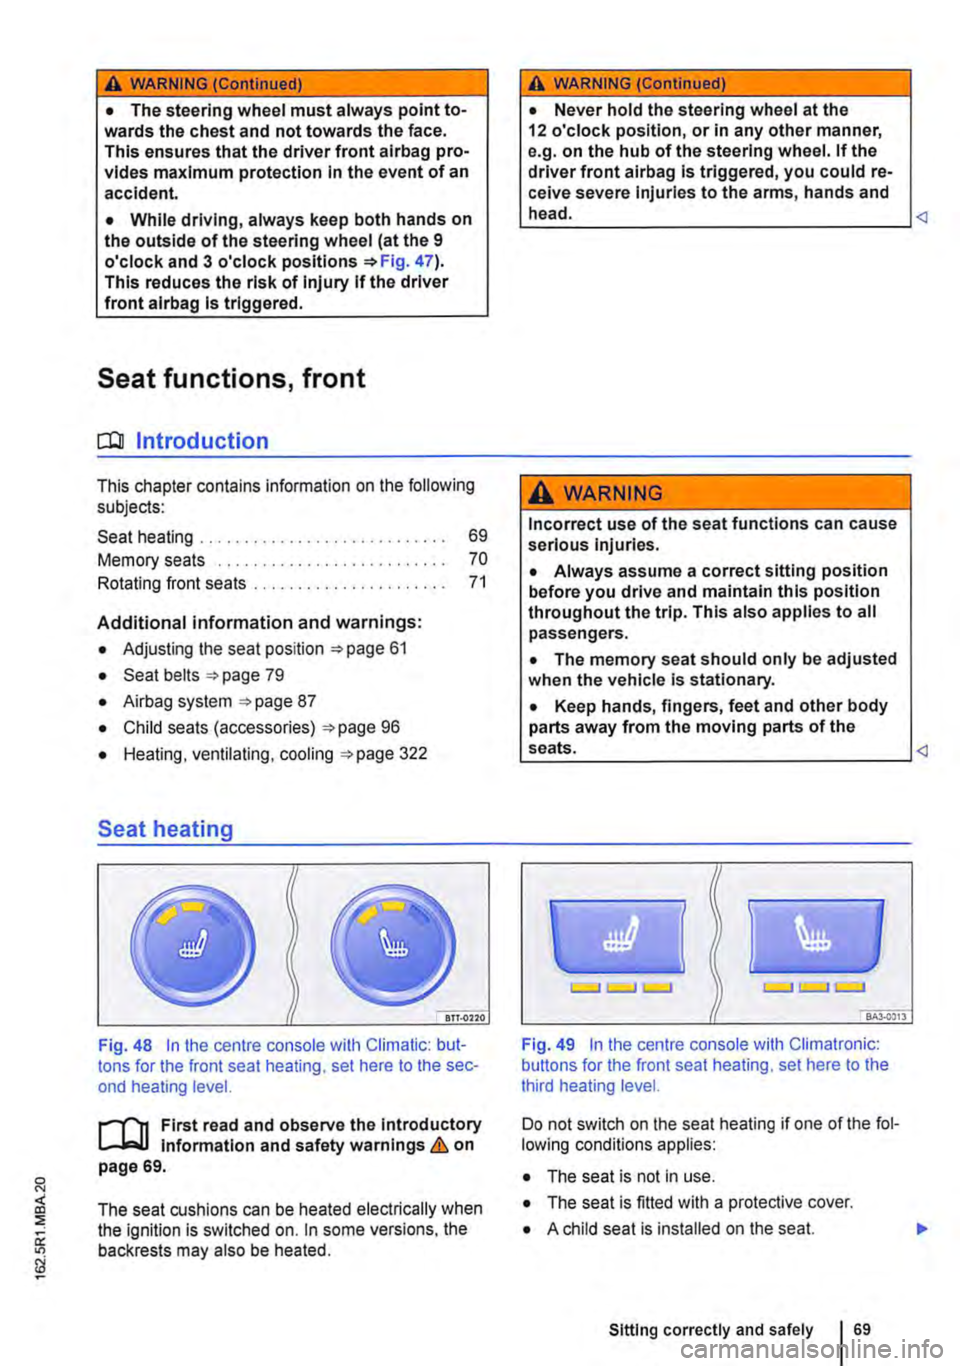
Fig. 48 In the centre console with Climatic: but-tons for the front seat heating, set here to the sec-ond heating level.
First read and observe the Introductory l-J,:.,U Information and safety warnings & on page 69.
The seat cushions can be heated electrically when the ignition is switched on. In some versions, the backrests may also be heated.
A WARNING (Continued)
• Never hold the steering wheel at the 12 o'clock position, or in any other manner, e.g. on the hub of the steering wheel. If the driver front airbag is triggered, you could re-ceive severe Injuries to the arms, hands and head.
A WARNING
Incorrect use of the seat functions can cause serious injuries.
• Always assume a correct sitting position before you drive and maintain this position throughout the trip. This also applies to all passengers.
• The memory seat should only be adjusted when the vehicle Is stationary.
• Keep hands, fingers, feet and other body parts away from the moving parts of the seats.
Fig. 49 In the centre console with Climatronic: buttons for the front seat heating, set here to the third heating level.
Do not switch on the seat heating if one of the fol-lowing conditions applies:
• The seat is not in use.
• The seat is fitted with a protective cover.
• A child seat is installed on the seat.
Sitting correctly and safely 69
Page 141 of 486

A WARNING (Continued)
• Never try to stop a trailer from snaking by Increasing your speed.
A WARNING
Accidents and severe injuries can occur if the maximum permitted draw bar weight is ex-ceeded.
• Never exceed the specified values.
A WARNING
The start/stop system must always be switch-ed off manually when a trailer Is to be towed with towing brackets that were not retrofitted by Volkswagen Commercial Vehicles. Other-wise faults can occur In the brake system, possibly resulting In accidents and serious Injuries.
Technical requirements
,...-.('n First read and observe the introductory 1--J,:.U information and safety warnings & on page 139.
If the vehicle is supplied with a factory-fitted tow-ing bracket it will already have the necessary tech-nical modifications and meet the statutory require-ments for towing a trailer.
Only use a towing bracket which is approved for the gross weight of the trailer you want to tow as a retrofit solution. The towing bracket must be suit-able for the vehicle and trailer and be securely bol-ted to the vehicle's chassis. Only a towing bracket with a removable ball coupling should be used. Al-ways check and follow the data provided by the towing bracket manufacturer. Never install a weight-distributing or load-balancing towing brack-et on the vehicle.
Towing brackets fitted to the rear bumper
Never fit a towing bracket to the rear bumper or to its fastenings. The towing bracket must not prevent the rear bumper from functioning correctly. Do not
A WARNING (Continued)
• Always switch off the start/stop system manually If a trailer is attached to a towing bracket that was not retrofitted by Volkswa-gen Commercial Vehicles.
m Always switch off the anti-theft alarm when a L!J trailer is being hitched or unhitched 43. The tilt sensor could otherwise trigger an alarm unnecessarily.
m In new vehicles, do not tow a trailer during L!J the first 1,000 km 394.
m Volkswagen Commercial Vehicles recom-L!J mends removing the ball coupling before driving without a trailer. The level of damage sus-tained during a rear-end collision could be greater for vehicles with a fitted ball coupling than for those without.
m By law, the ball coupling must be removed if L!J a trailer is not being towed if it obscures the number plate.
m In some models, the towing bracket is re-L!J qui red for towing vehicles. For this reason, the towing bracket ball coupling should be stored in the vehicle at all times.
Engine cooling system
There is an increased load on the engine and the cooling system when towing a trailer. The cooling system must contain sufficient coolant and be able to cope with the extra load added by the trailer.
Trailer brake
If the trailer is equipped with its own brake system, comply with the relevant regulations. The trailer's brake system must never be connected to the ve-hicle brake system.
Emergency breakaway cable
Always use safety chains between your vehicle and the trailer 144.
Trailer rear lights
The rear lights on the trailer must meet legal re-quirements 144.
Transporting items 1141
Page 149 of 486
Retrofitting a towing bracket
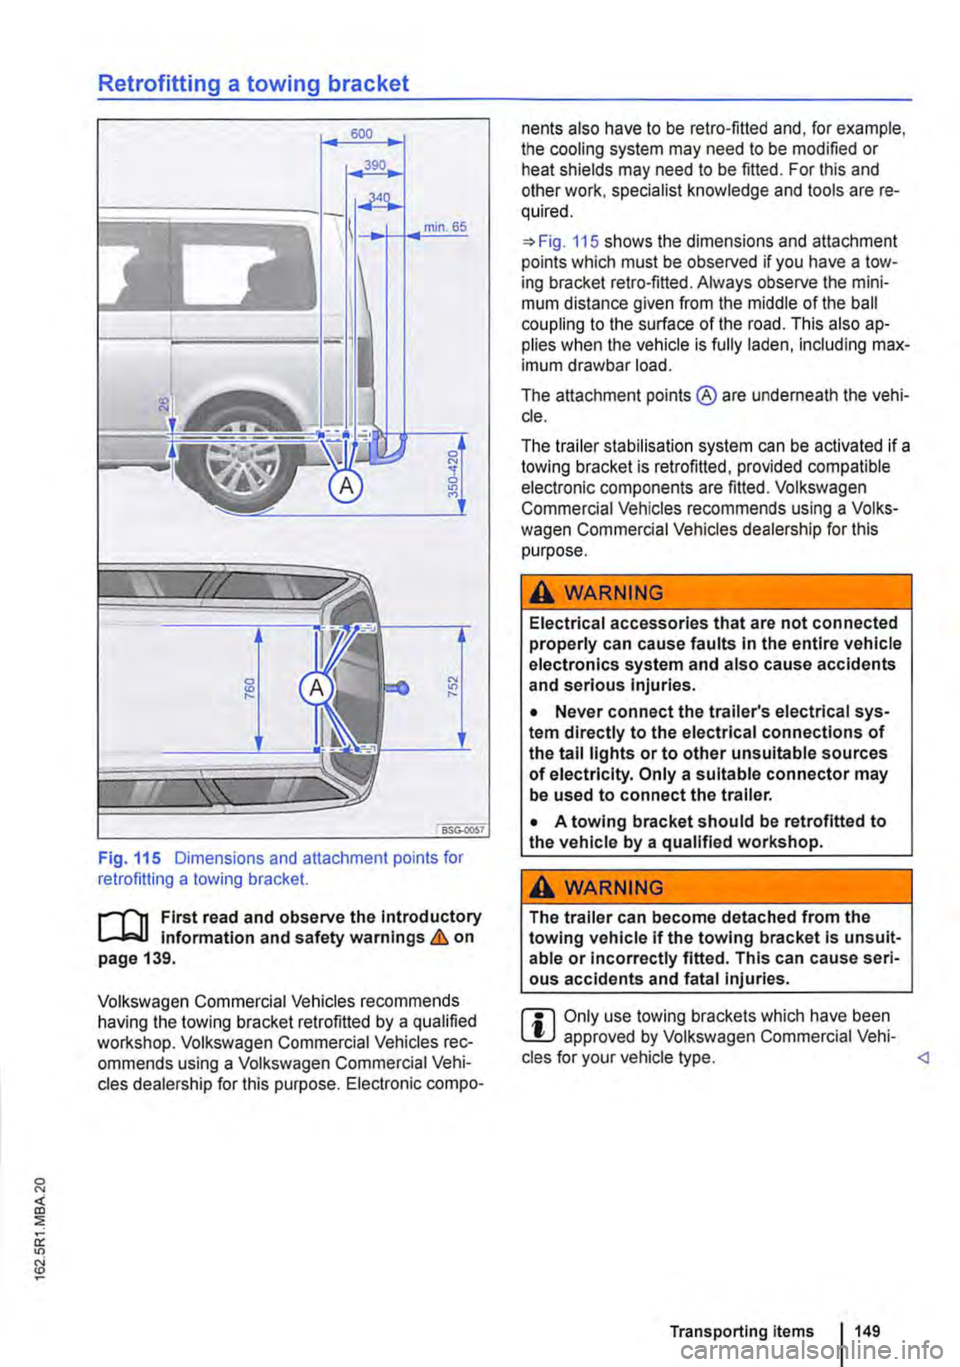
Fig. 115 Dimensions and attachment points for retrofitting a towing bracket.
r-1"'11 First read and observe the Introductory L-J,:.U Information and safety warnings & on page 139.
Volkswagen Commercial Vehicles recommends having the towing bracket retrofitted by a qualified workshop. Volkswagen Commercial Vehicles rec-ommends using a Volkswagen Commercial Vehi-cles dealership for this purpose. Electronic compo-
nents also have to be retro-fitted and, for example, the cooling system may need to be modified or heat shields may need to be fitted. For this and other work, specialist knowledge and tools are re-quired.
=>Fig. 115 shows the dimensions and attachment points which must be observed if you have a tow-ing bracket retro-fitted. Always observe the mini-mum distance given from the middle of the ball coupling to the surface of the road. This also ap-plies when the vehicle Is fully laden, including max-imum drawbar load.
The attachment points ® are underneath the vehi-cle.
The trailer stabilisation system can be activated if a towing bracket is retrofitted, provided compatible electronic components are fitted. Volkswagen Commercial Vehicles recommends using a Volks-wagen Commercial Vehicles dealership for this purpose.
A WARNING
Electrical accessories that are not connected properly can cause faults In the entire vehicle electronics system and also cause accidents and serious Injuries.
• Never connect the trailer's electrical sys-tem directly to the electrical connections of the tall lights or to other unsuitable sources of electricity. Only a suitable connector may be used to connect the trailer.
• A towing bracket should be retrofitted to the vehicle by a qualified workshop.
A WARNING
The trailer can become detached from the towing vehicle if the towing bracket Is unsuit-able or Incorrectly fitted. This can cause seri-ous accidents and fatal injuries.
r::l Only use towing brackets which have been W approved by Volkswagen Commercial Vehi-cles for your vehicle type.
Page 152 of 486
Cooling the stowage compartment
There is a vent in the rear panel 117 Q). If the air conditioning is switched on, cooled air can be directed into the compartment. Turn the vents to open and close them.
A WARNING
If the stowage compartment on the front pas-senger side is left open, this can Increase the risk of serious injury In the event of an acci-dent or during sudden braking or driving ma-noeuvres.
Other stowage compartments
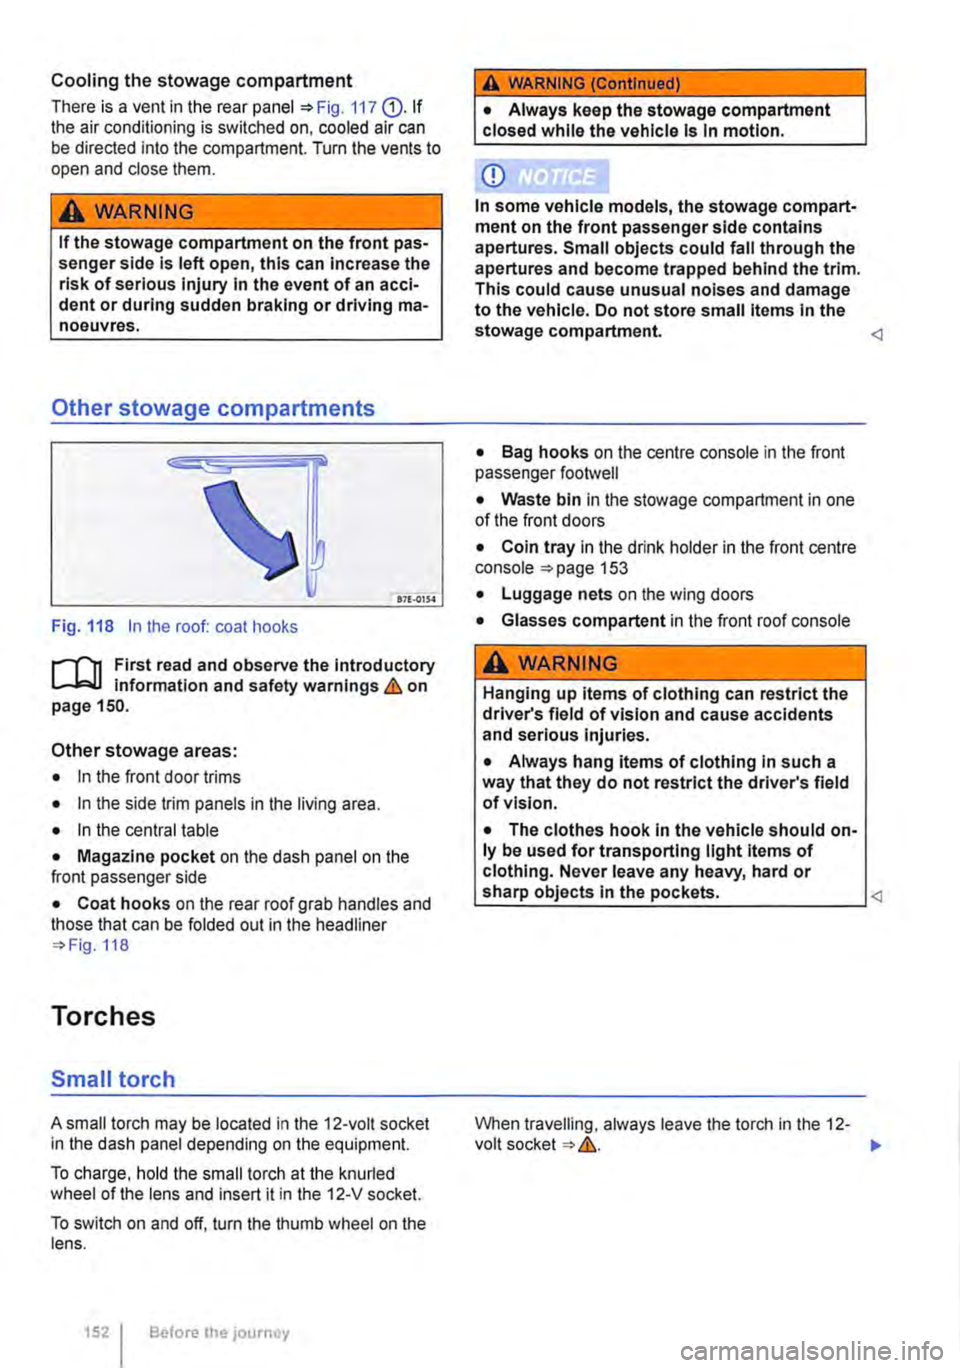
Fig. 118 In the roof: coat hooks
r-T'n First read and observe the Introductory 1...-J,:.lJ information and safety warnings&. on page 150.
Other stowage areas:
• In the front door trims
• In the side trim panels in the living area.
• In the central table
• Magazine pocket on the dash panel on the front passenger side
• Coat hooks on the rear roof grab handles and those that can be folded out in the headliner 118
Torches
Small torch
A small torch may be located in the 12-volt socket in the dash panel depending on the equipment.
To charge, hold the small torch at the knurled wheel of the lens and insert it in the 12-V socket.
To switch on and off, turn the thumb wheel on the lens.
1521 Before the journey
A WARNING (Continued)
• Always keep the stowage compartment closed while the vehicle Is In motion.
CD
In some vehicle models, the stowage compart-ment on the front passenger side contains apertures. Small objects could fall through the apertures and become trapped behind the trim. This could cause unusual noises and damage to the vehicle. Do not store small Items In the stowage compartment.
• Bag hooks on the centre console in the front passenger footwell
• Waste bin in the stowage compartment in one of the front doors
• Coin tray in the drink holder in the front centre console 153
• Luggage nets on the wing doors
• Glasses compartent in the front roof console
A WARNING
Hanging up items of clothing can restrict the driver's field of vision and cause accidents and serious Injuries.
• Always hang items of clothing In such a way that they do not restrict the driver's field of vision.
• The clothes hook In the vehicle should on-ly be used for transporting light Items of clothing. Never leave any heavy, hard or
When travelling, always leave the torch in the 12-volt socket &.. ..,.
Page 161 of 486

Switching the cool box on and off
Fig. 127 Controls on the cool box
r-f'n First read and observe the Introductory Information and safety warnings & on page 158.
The interior temperature of the cool box is dependent on the temperature in the vehicle. In cooling mode, the interior temperature can be max. 20•c (68°F) below the temperature in the vehicle. In heating mode it can be max. 35•c (95.F) de-grees above the temperature in the vehicle. If you switch directly from cooling to heating (or vice ver-sa) it will take a relatively long time for the interior to reach the desired temperature.
Switching the cool box on
• Connect the 12-volt power supply.
• Press the red Fig. 127 G) to turn on the heating mode. An indicator lamp in the but-ton lights up above the button which was pressed.
• OR: press the blue button (!)®to switch on the cooling mode. An indicator lamp in the button lights up above the button which was pressed.
Ashtray and cigarette lighter
o:n Introduction
This chapter contains information on the following subjects:
Ashtray . . . . . . . . . . . . . . . . . . . 162
Removable ashtray in the drink holder 162
Cigarette lighter . . . . . . . . . . . . . . . . . . . 163
Additional information and warnings:
• Drink holder 153
• Electrical sockets 163
Switching cooling and heating mode off
• Press the red button(!) or the blue button (!). The corresponding warning lamp goes out.
Switching the cool box completely off
• Press the@) button @.
• OR: disconnect the 12-volt power supply.
Faults
If the cool box does not work, proceed as follows:
• Check whether the plug is securely in the sock-et.
• Check the connecting cable for damage.
• Check the 12-volt socket fuses.
• Run the engine to recharge the vehicle battery.
If these steps do not help, contact a qualified work-shop.
• Consumer information 404
A WARNING
Improper use of the ashtray and cigarette lighter could cause fires, burns and other se-rious Injuries.
• Never put paper or any other combustible materials In the ashtray.
Page 187 of 486
Switching on the refrigerator box
• Slide the cover open =>Fig. 149 (D.
• Move switch =>Fig. 150 CD to I position. When the refrigerator box is switched on, the lamp in the box lights up.
• Fill the refrigerator box and then close the lid =>&.
Switching off the refrigerator box
• Slide the cover open =>Fig. 149 (D.
• Move switch =>Fig. 150 CD to 0 position. The in-dicator lamp in the refrigerator box goes out.
• Close the cover.
Notes on cleaning and care
Clean the refrigerator box thoroughly before using it for the first time, if it is dirty or if it has not been used for a long time.
To avoid stains and mildew in the refrigerator box if it remains unused for a long time, leave the cover slightly open.
• Use water and normal household cleaning fluid to clean the refrigerator box.
• The refrigerator box should be defrosted regu-larly to prevent layers of ice forming. To do this, switch the refrigerator box off and leave the cover open. Do not use an additional heat source to de-frost the refrigerator more quickly. This could dam-age the refrigerator =>
If the refrigerator box is left on when the engine is not running, the additional battery runs down. The refrigerator box is therefore fitted with a battery monitor. The battery monitor will switch the refriger-ated box off if the charge of the additional battery becomes too low. The battery monitor will switch the refrigerator box on again as soon as the addi-tional battery has reached a suitable charge level, for example, after a long journey.
Rear-seat telephony, Business
a:n Introduction
This chapter contains information on the following subjects:
Components . . . . . . . . . . . . . . . . . . . . . . . . . . . . 189
Pairing a mobile telephone before using it for the first time . . . . . . . . . 190
Functional description ........... . 190
A WARNING
Objects that are not secured, or are secured incorrectly, can cause serious injuries in the event of a sudden driving or braking manoeu-vre or accident.
• The refrigerator box lid must always be kept closed and locked when the vehicle is in motion.
• Never use the refrigerator box as a table or stowage compartment when the vehicle is In motion.
A WARNING
If the ambient temperature In the vehicle Is too low, the temperature in the refrigerator box could fall below +2 •c {+35 °F) degrees. ThIs could cause the contents of the refriger-ator box to freeze and bottles and other con-tainers to burst, potentially causing Injuries.
• Do not use the refrigerator box when the ambient temperature Is too low.
CD
Handling the refrigerator box incorrectly could damage it.
• Do not place containers, food or other ob-jects which are warmer than +50 •c (+122 •F) In the refrigerator box.
• Do not place corrosive substances or sol-vents in the refrigerator box.
• Do not use an additional heat source to de-frost the refrigerator box.
m The refrigerator box is not suitable for cooling W the vehicle interior. The refrigerator box should only be used to keep food cool and for transporting heat-sensitive items on short journeys.
The rear-seat telephony system (hands-free sys-tem in the passenger compartment with Private Mode) works independently of other provision for mobile telephones fitted in the vehicle. Neither the
Equipment, Business 1187
Page 207 of 486
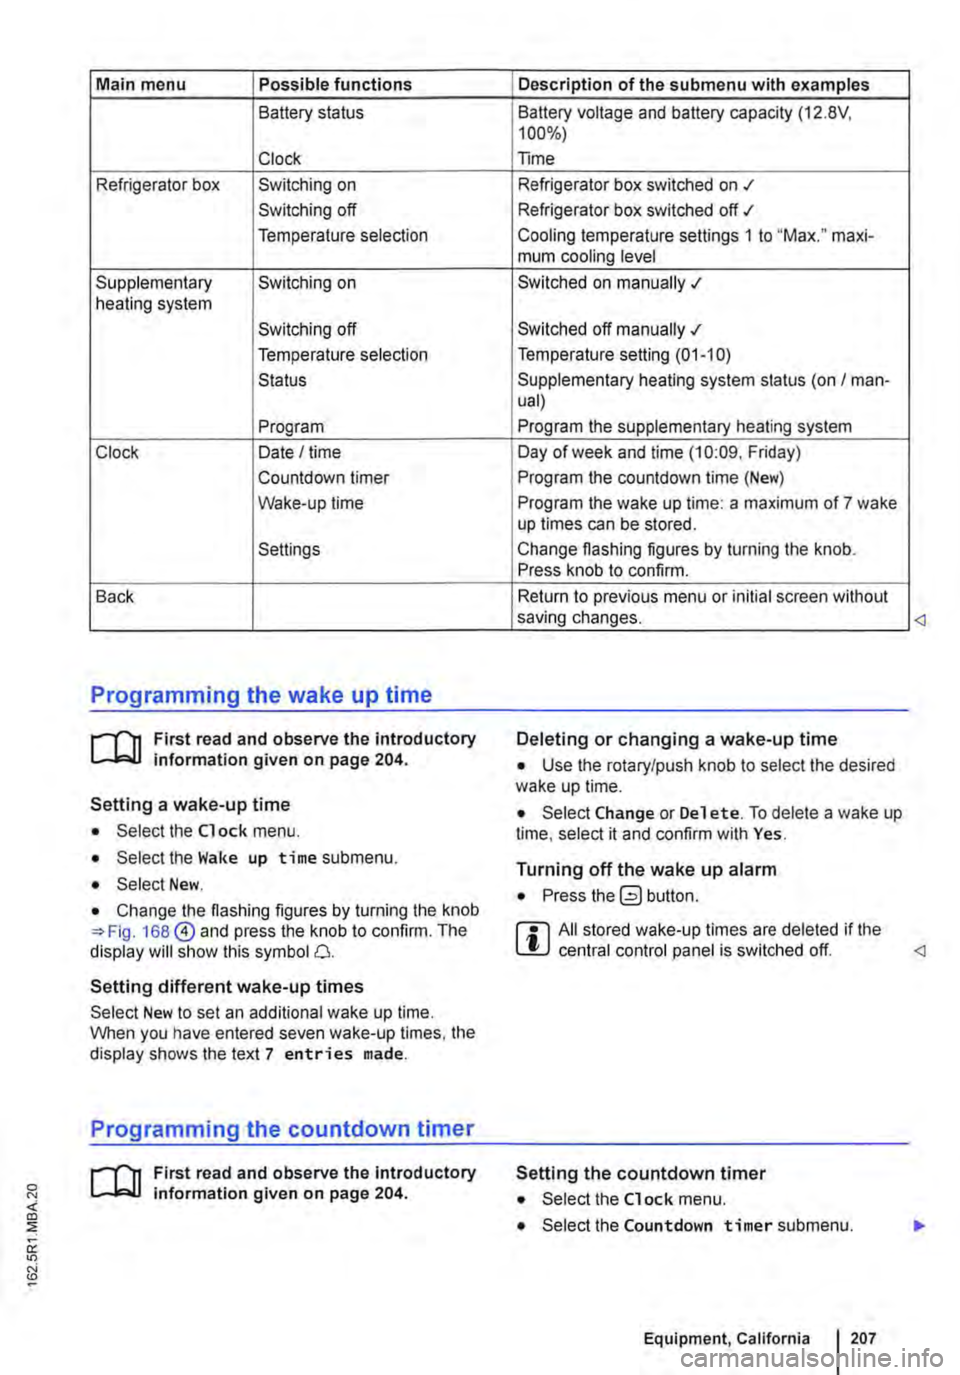
Main menu Possible functions
Battery status
Clock
Refrigerator box Switching on
Switching off
Temperature selection
Supplementary Switching on heating system
Switching off
Temperature selection
Status
Program
Clock Date I time
Countdown timer
Wake-up time
Settings
Back
Programming the wake up time
r--f"'n First read and observe the introductory L-lo::.U information given on page 204.
Setting a wake-up time
• Select the Clock menu.
• Select the Wake up time submenu.
• Select New.
• Change the flashing figures by turning the knob 168@ and press the knob to confirm. The display will show this symbol 0.
Setting different wake-up times
Select New to set an additional wake up time. When you have entered seven wake-up times, the display shows the text 7 entries made.
Programming the countdown timer
r--f"'n First read and observe the introductory L-lo::.U information given on page 204.
Description of the submenu with examples
Battery voltage and battery capacity (12.8V, 100%)
Time
Refrigerator box switched on .t
Refrigerator box switched off ./
Cooling temperature settings 1 to "Max." maxi-mum cooling level
Switched on manually .;
Switched off manually .;
Temperature setting (01-10)
Supplementary heating system status (on I man-ual)
Program the supplementary heating system
Day of week and time (10:09. Friday)
Program the countdown time (New)
Program the wake up time: a maximum of 7 wake up times can be stored.
Change flashing figures by turning the knob. Press knob to confirm.
Return to previous menu or initial screen without saving changes.
Deleting or changing a wake-up time
• Use the rotary/push knob to select the desired wake up time.
• Select Change or Del et e. To delete a wake up time, select it and confirm with Yes.
Turning off the wake up alarm
• Press button.
r::l All stored wake-up times are deleted if the L!J central control panel is switched off.
Setting the countdown timer
• Select the Clock menu.
• Select the Countdown timer submenu.
Equipment, California I 207