2014 VOLKSWAGEN TRANSPORTER ice warning
[x] Cancel search: ice warningPage 28 of 486

Main menu
m First read and observe the introductory Information and safety warnings & on page 24.
Menu I Function See
MFD Information and settings for the multifunction display (MFD). 28
298, ACC Adaptive cruise control (ACC) display. Adaptive cruise control (ACC)
Station display in radio mode. Audio Track display in CD mode. Track display in media mode.
Information displays from active navigation system: Booklet Radio, Turning arrows and proximity bars are displayed if you use active provision for mo-route guidance. The display is similar to the symbols used in the bile telephone, in-Navigation navigation system. fotainment system, The direction of travel (compass function) and the name of the navigation system road being used are displayed if the route guidance option is not active.
Telephone Information and settings for the provision for mobile telephone.
Current warning or information texts. 21, Dis-
Veh. status The menu option only appears If warning and information texts plays and are available. The number of announcements will be shown In the 22, Serv-display. Example: 1/1 or Z/2. Ice Interval display
Settings Various settings for convenience, light & vision, time, speed warn-30 ing for winter tyres, language and units.
MFD (multifunction display) menu
rl'l1 First read and observe the Introductory L-J,.:.U Information and safety warnings & on page 24.
The multifunction display (MFD) is equipped with two automatic memories: 1 -Trip memory and 2 -Total journey memory. The number of the current memory on display will be shown in the upper right-hand corner of the display.
When the Ignition Is switched on and memory 1 or 2 is shown on the display, press the@ button to switch between the two memories.
1 Trip memory
2 Total journey memory
The memory collects travel and consumption data from the moment the ignition is switched on until it is switched off. The memory is automatically deleted whenever the journey is interrupted for more than 2 hours. If the journey is continued within two hours of the ignition being switched off, the new values will be added to the existing trip recorder.
The memory collects journey data for any number of individual journeys up to a to-tal of 19 hours and 59 minutes or 99 hours and 59 minutes journey time or 1,999.9 km (miles) or 9,999 km (miles) distance travelled. If one of these maximum limits8l is exceeded, the memory is automatically deleted and reset to 0.
•l Changes depending on the Instrument cluster version.
28 I Overview of the vehicle
<
Page 30 of 486

Settings menu
rn First read and observe the introductory information and safety warnings & on page 24.
Settings menu Function
Assist systems Settings for the various driver assist systems =:.page 30, Assist systems sub-menu.
Language Setting the language for the display texts and messages in the navigation system.
MFD data Settings for which MFD display items should appear in the instrument cluster dis-play. A '1ick" indicates that a display item is activated.
Convenience Settings for the vehicle's convenience functions 31, Convenience sub-menu.
Lights & Vision Settings for the vehicle lighting =:.page 31, Lights & Vision submenu.
Coasting Switching coasting for 7-speed dual clutch gearbox DSG® on or off=:. page 260.
Setting the hours and minutes for the clock in the instrument cluster and in the nav-Time igation system. The time can be shown in a 12 and 24 hour display. An S may be shown in the upper part of the display to indicate that summer time Is selected.
Winter tyres Setting the visual and acoustic speed warning. Use this function only when winter tyres are fitted which are not designed for the vehicle's top speed.
Units Setting the units for temperature, consumption values and distances.
Tyre pressure Store the tyre pressures of all tyres in the tyre monitoring system again.
Switching the second speed display on or off. A "tick" indicates that a display item Alt. speed dis. is activated. it is not possible to switch off the second speedometer display in those countries where the law stipulates that the display cannot be deactivated.
Service Calling up service messages or resetting service interval displays.
Factory setting The functions in the Settings menu are reset to the factory settings.
Back The display returns to the main menu.
Assist systems submenu
rn First read and observe the introductory information and safety warnings & on page 24.
Assist systems submenu
Side Assist
Front Assist
ACC
Driver alert
Function
Switches the lane change assist system on or off and adjusts the base brightness of the warning =:.page 312.
Switches the Front Assist system and related warnings on or off =:.page 307.
Activation or deactivation of the last selected distance. The following functions can be set: -Gearbox programme, -Active distance setting (time interval to the vehicle ahead) when the adaptive cruise control (ACC) is switched on ::.page 298.
Switching the Driver Alert System (recommendation for rest breaks) on and off ::.page 315.
Page 34 of 486

Checklist (Continued)
..( Fasten your seat belt correctly before set-ting off and keep it properly fastened throughout the journey. This also applies to all passengers 79 .
..!
..!
..!
..!
..!
Each vehicle occupant must sit in a seat of their own and must have their own seat belt.
Never drive if your driving ability is impaired, e.g. by medication, alcohol or drugs.
Do not allow yourself to be distracted from the traffic, e.g. by passengers, telephone calls, opening menus and making adjust-ments to settings .
Always adapt your speed and driving style to suit visibility, weather, road and traffic conditions.
Observe traffic regulations and speed limits.
Driving abroad
r-f'n First read and observe the introductory l.-J=.U information and safety warnings.& on page 33.
Checklist
In some countries, special safety standards and emissions-related regulations apply that the vehi-cle may not comply with. Volkswagen Commercial Vehicles recommends that you visit your Volkswa-gen Commercial Vehicles dealer before travelling abroad to find out about any legal requirements and the following points concerning your destina-tion:
..( Does the vehicle need any technical modifi-cations for driving abroad, e.g. masking or switching the headlights over?
..( Are the necessary tools, diagnostic equip-ment and spare parts available for service and repair work?
..( Are there any Volkswagen Commercial Ve-hicles dealerships in the country of destina-tion?
..( For petrol engines: is unleaded petrol with the correct octane number available?
34 Before the journey
..( When travelling long distances, stop and take a break regularly-at least every 2 hours.
..( Secure animals in the vehicle using a sys-tem that is suitable for their weight and size.
A WARNING
Always observe current traffic regulations and speed limits, and think ahead when driv-Ing. Correct interpretation of a driving situa-tion can make the difference between reach-Ing your destination safely and having an ac-cident with serious Injuries.
W Regular servicing of your vehicle not only W maintains its value, it also ensures that your vehicle remains roadworthy and in perfect working order. Servicing work should therefore be carried out in accordance with the service schedule. Some work may have to be carried out before the due date of the next service if the vehicle is subjected to severe operating conditions. Severe operating conditions are, for example, regular stop and go driving, regular driving with a trailer and driving in areas with high levels of dust. Additional informa-tion is available from your Volkswagen Commercial Vehicles dealership or qualified workshop.
..( Are the correct engine oil 353 and other service fluids in accordance with the specifications of Volkswagen Commercial Vehicles available in the destination coun-try?
..( Will the factory-fitted navigation system work with the navigation data available in the destination country?
..( Are special tyres necessary for travelling in the destination country?
CD
Volkswagen Commercial Vehicles is not re-sponsible for any vehicle damage which Is caused by low-quality fuel, inadequate servic-ing work or lack of availability of Genuine Parts.
Page 35 of 486
Driving through water on roads
r"f"'n First read and observe the introductory l-J,::.U information and safety warnings & on page 33.
Please follow these rules to help prevent damage to your vehicle when driving through water, for ex-ample if the road is flooded:
• Check the depth of the water before driving through it. The water level must be no higher than the lower edge of the vehicle body
• Do not drive faster than walking speed.
• Never stop the vehicle, reverse or switch off the engine while in water.
• Oncoming vehicles will create waves that could increase the water level for your vehicle to such an extent that it is not safe to drive through the water.
• Always switch off the start/stop system manual-ly when driving through water.
A wARNING
After driving through water, mud, slush etc., the brakes may react slowly and the braking distance will be increased as the brake discs and pads will be wet, or possibly iced up in winter.
• You can "dry and de-ice" the brakes by performing careful braking manoeuvres. Make sure that you do not endanger any oth-er road users or violate any legal regulations when doing so.
• Avoid abrupt and sudden braking ma-noeuvres directly after driving through water.
CD
• If you drive through water, parts of the vehi-cle, such as the engine, drive train, running gear and vehicle electrics, could sustain severe damage.
• Never drive through salt water as salt can cause corrosion. Rinse all components that have been exposed to salt water immediately with fresh water. <1
Before setting off 35
Page 38 of 486
New keys or replacement keys are available from Volkswagen Commercial Vehicle dealerships or from qualified workshops and authorised key serv-ices which are qualified to manufacture these vehi-cle keys.
New and replacement keys need to be synchron-ised before use =:-page 39.
CD
Every vehicle key contains electronic compo-nents. Protect the key from damage, moisture and excessive vibration.
m Press the buttons on the remote control key W only if the corresponding function is actually needed. Pressing a button when the function is not
required could lead to the vehicle being unlocked unintentionally or the alarm going off. This also ap-plies even when you are not within the effective range.
m The function of the remote control key can be W affected temporarily if there is more than one transmitter in the direct vicinity working on the same frequency (e.g. a mo-way radio or mobile telephone).
m Obstacles bemeen the remote control and W the vehicle, bad weather conditions and weak batteries can reduce the range of the remote con-trol.
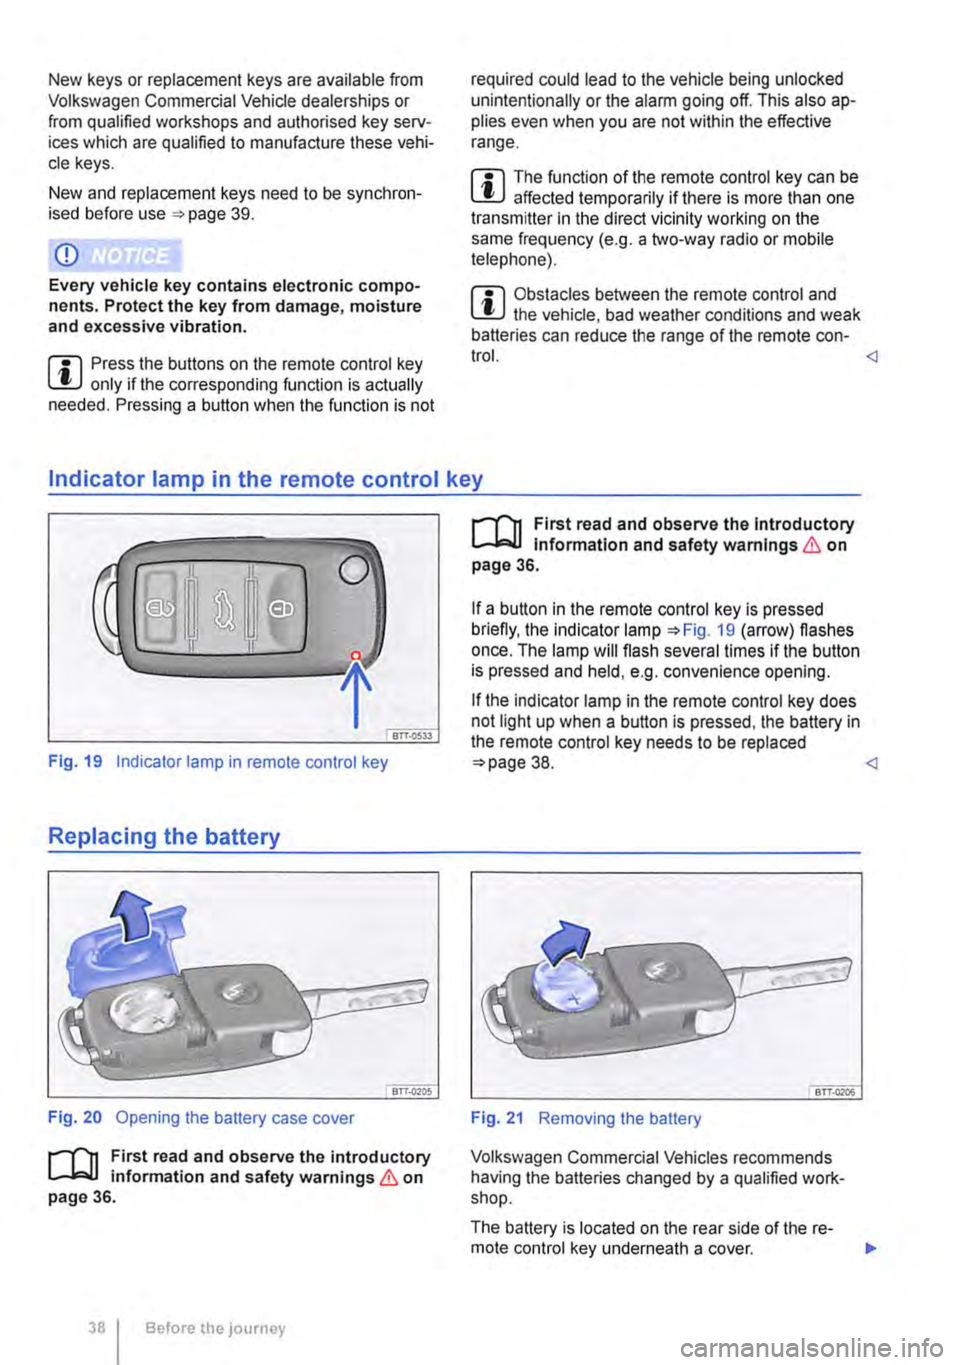
Fig. 19 Indicator lamp in remote control key
Replacing the battery
Fig. 20 Opening the battery case cover
r--('n First read and observe the introductory 1..-J=.U information and safety warnings & on page 36.
38 I Before the JOUrney
r--('n First read and observe the Introductory 1..-J=.U Information and safety warnings & on page 36.
If a button in the remote control key is pressed briefly, the indicator lamp =:-Fig. 19 (arrow) flashes once. The lamp will flash several times if the button is pressed and held, e.g. convenience opening.
If the indicator lamp in the remote control key does not light up when a button is pressed, the battery in the remote control key needs to be replaced =:>page 38.
Volkswagen Commercial Vehicles recommends having the batteries changed by a qualified work-shop.
The battery is located on the rear side of the re-mote control key underneath a cover. ..,.
Page 41 of 486
ro First read and observe the Introductory Information and safety warnings & on page 39.
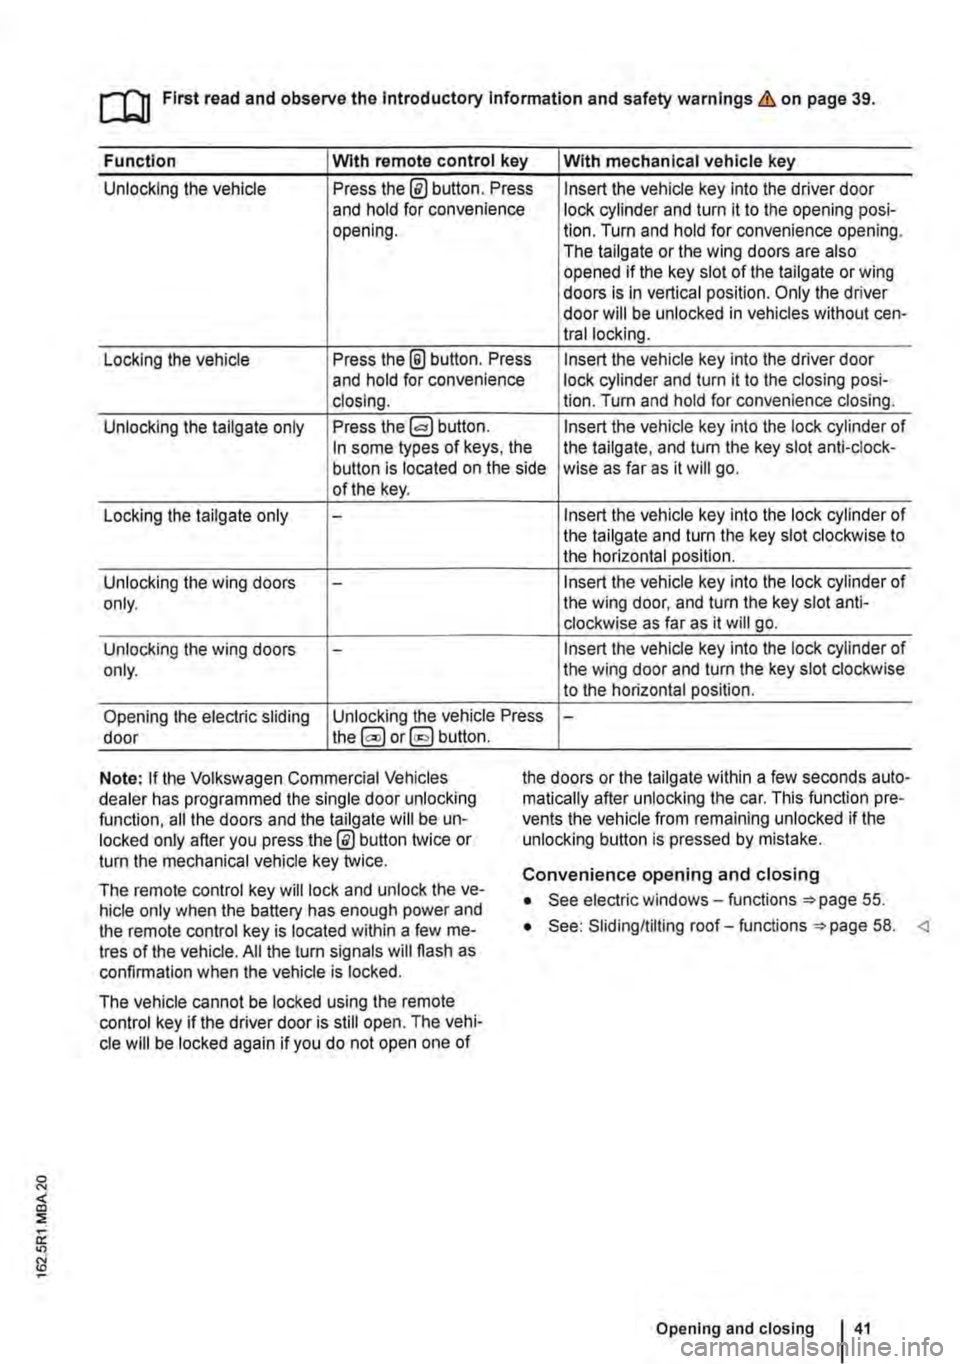
Function Wlth remote control key With mechanical vehicle key
Unlocking the vehicle Press the@ button. Press Insert the vehicle key into the driver door and hold for convenience lock cylinder and turn it to the opening posi-opening. lion. Turn and hold for convenience opening. The tailgate or the wing doors are also opened if the key slot of the tailgate or wing doors is in vertical position. Only the driver door will be unlocked in vehicles without cen-trallocking.
Locking the vehicle Press the @ button. Press Insert the vehicle key into the driver door and hold for convenience lock cylinder and turn it to the closing posi-closing. lion. Turn and hold for convenience closing.
Unlocking the tailgate only Press the Insert the vehicle key into the lock cylinder of In some types of keys, the the tailgate, and turn the key slot anti-clock-button is located on the side wise as far as it will go. of the key.
Locking the tailgate only -Insert the vehicle key into the lock cylinder of the tailgate and turn the key slot clockwise to the horizontal position.
Unlocking the wing doors -Insert the vehicle key into the lock cylinder of only. the wing door, and turn the key slot anti-clockwise as far as it will go.
Unlocking the wing doors -Insert the vehicle key into the lock cylinder of only. the wing door and turn the key slot clockwise to the horizontal position.
Opening the electric sliding Unlocking the vehicle Press -door the@ or§] button.
Note: If the Volkswagen Commercial Vehicles dealer has programmed the single door unlocking function, all the doors and the tailgate will be un-locked only after you press the @ button twice or turn the mechanical vehicle key twice.
the doors or the tailgate within a few seconds auto-matically after unlocking the car. This function pre-vents the vehicle from remaining unlocked if the unlocking button is pressed by mistake.
The remote control key will lock and unlock the ve-hicle only when the battery has enough power and the remote control key is located within a few me-tres of the vehicle. All the turn signals will flash as confirmation when the vehicle is locked.
The vehicle cannot be locked using the remote control key if the driver door is still open. The vehi-cle will be locked again if you do not open one of
Convenience opening and closing
• See electric windows-functions 55.
• See: Sliding/tilting roof-functions =:>page 58.
Page 42 of 486
Locking and unlocking the vehicle from inside
c
1 PSG-0030
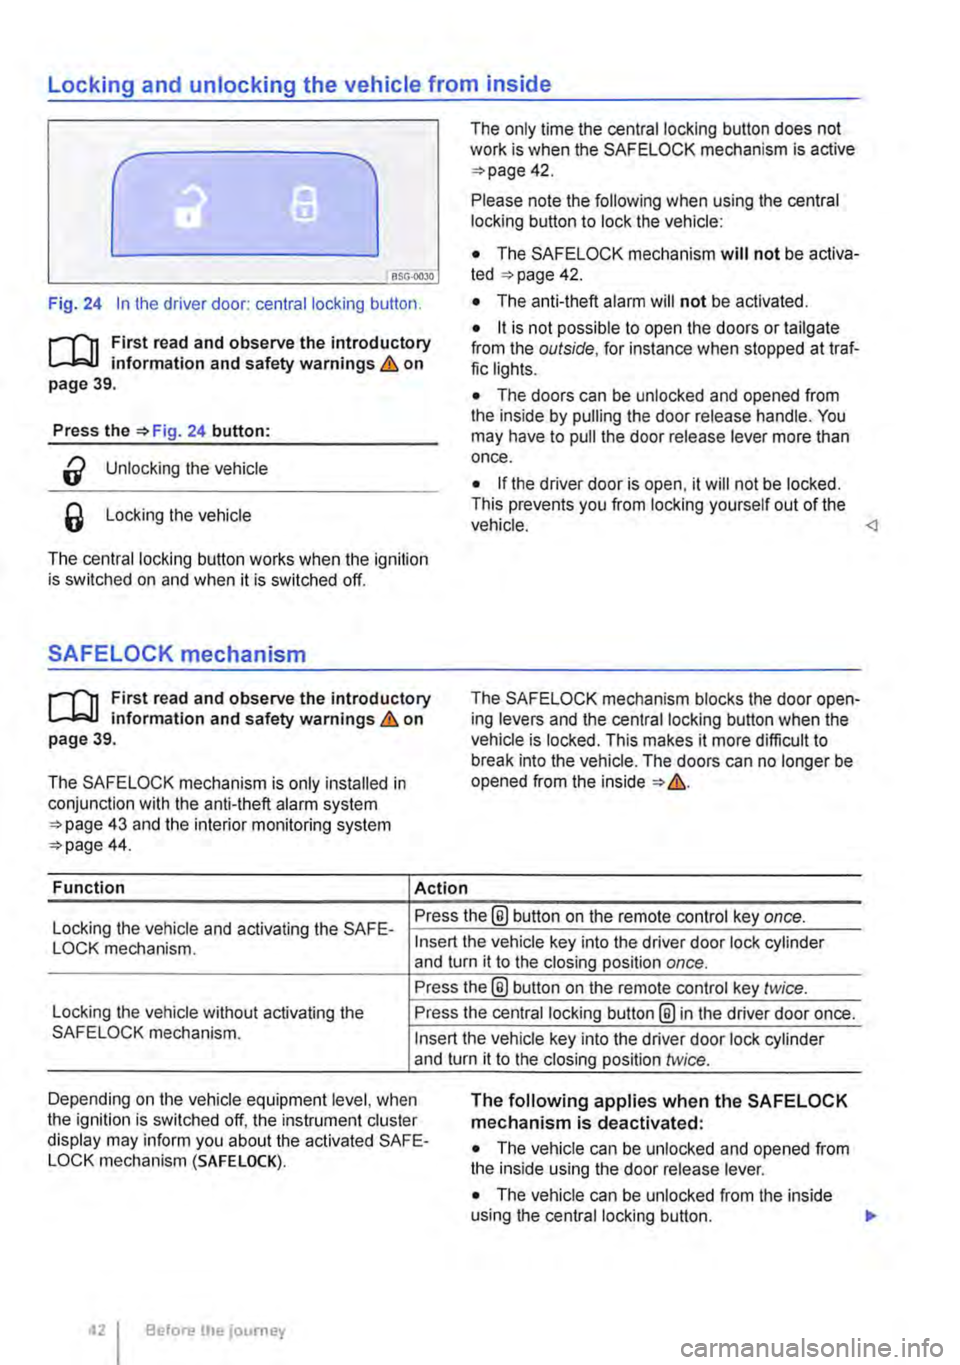
Fig. 24 In the driver door: central locking button.
rf'n First read and observe the introductory L.-J=.I.I information and safety warnings & on page 39.
Press the =>Fig. 24 button:
a Unlocking the vehicle
6 Locking the vehicle
The central locking button works when the ignition is switched on and when it is switched off.
SAFELOCK mechanism
rf'n First read and observe the introductory L.-J=.I.I information and safety warnings & on page 39.
The SAFELOCK mechanism is only installed in conjunction with the anti-theft alarm system =>page 43 and the interior monitoring system =>page 44.
Function Action
The only time the central locking button does not work is when the SAFE LOCK mechanism is active =>page 42.
Please note the following when using the central locking button to lock the vehicle:
• The SAFELOCK mechanism will not be activa-ted =:>page 42.
• The anti-theft alarm will not be activated.
• it is not possible to open the doors or tailgate from the outside, for instance when stopped at traf-fic lights.
• The doors can be unlocked and opened from the inside by pulling the door release handle. You may have to pull the door release lever more than once.
• If the driver door is open, it will not be locked. This prevents you from locking yourself out of the vehicle.
Locking the vehicle and activating the SAFE-Press the® button on the remote control key once.
LOCK mechanism.
Locking the vehicle without activating the SAFELOCK mechanism.
Insert the vehicle key into the driver door lock cylinder and turn it to the closing position once.
Press the@ button on the remote control key twice.
Press the central locking button@ in the driver door once.
Insert the vehicle key into the driver door lock cylinder and turn it to the closing position twice.
Depending on the vehicle equipment level, when the ignition is switched off, the instrument cluster display may inform you about the activated SAFE-LOCK mechanism (SAFE LOCK).
The following applies when the SAFELOCK mechanism is deactivated:
• The vehicle can be unlocked and opened from the inside using the door release lever.
• The vehicle can be unlocked from the inside using the central locking button. .,.
Before the journey
Page 43 of 486

• If the SAFELOCK mechanism has been activa-ted using the remote control key: the anti-theft alarm is active.
Indicator lamp in the driver door
After locking the vehicle:
• If the SAFELOCK mechanism has been activa-ted using the remote control key in the driver door lock cylinder: the anti-theft alarm is not active.
• The interior monitoring system and anti-tow alarm are deactivated.
Meaning
A red LED flashes for approximately 2 seconds, firstly at short inteNals and then more slowly. The SAFELOCK mechanism is activated.
A red LED flashes for approximately 2 seconds and then goes out. The LED light starts to flash again after approxi-mately 30 seconds.
The SAFELOCK mechanism is deactivated.
A red LED lights up steadily for approximately 30 seconds. Fault in the locking system. Go to a qualified workshop.
Notes for vehicles without SAFELOCK
mechanism
Please note the following when the vehicle is locked with the remote control key or with the vehi-cle key in the driver door lock cylinder:
• The anti-theft alarm and the interior monitoring system are immediately activated. All turn signals flash briefly to confirm activation.
Anti-theft alarm
rflt First read and observe the introductory 1..-.L::.U information and safety warnings & on page 39.
The anti-theft alarm makes it more difficult to break into the vehicle or steal it.
The anti-theft alarm system is automatically activa-ted when the vehicle is locked.
When does the system trigger an alarm?
The anti-theft alarm will sound an acoustic alarm for approximately 30 seconds and trigger a visible warning for up to 5 minutes if any of the following unauthorised actions are performed while the vehi-cle is locked:
• Mechanical unlocking of the vehicle with the ve-hicle key and failure to switch on the ignition within 15 seconds
• A door is opened.
A WARNING
Take care when using the SAFELOCK mecha-nism to avoid accidents or injuries.
• Never leave anybody in the vehicle if the vehicle has been locked using the remote control key. The doors can no longer be opened from the inside once the SAFELOCK mechanism is activated.
• Locked doors make it more difficult for emergency service personnel to gain access to the vehicle and provide assistance when needed. In an emergency, people locked in-side the vehicle would not be able to leave the vehicle by unlocking the doors.
• The tailgate is opened.
• The ignition is switched on using an invalid key.
• Movement inside the vehicle (in vehicles with interior monitoring).
• The vehicle is towed (vehicles with anti-tow alarm).
• The vehicle is lifted (vehicles with anti-tow alarm).
• Transportation of the vehicle on a ferry or train.
• Disconnection of the vehicle battery (only an acoustic alarm)
Switching off the alarm
Unlock the vehicle using the release button on the remote control key or insert the ignition key into the ignition lock. 11>-
Opening and closing 43