2014 VOLKSWAGEN JETTA GLI lock
[x] Cancel search: lockPage 311 of 357

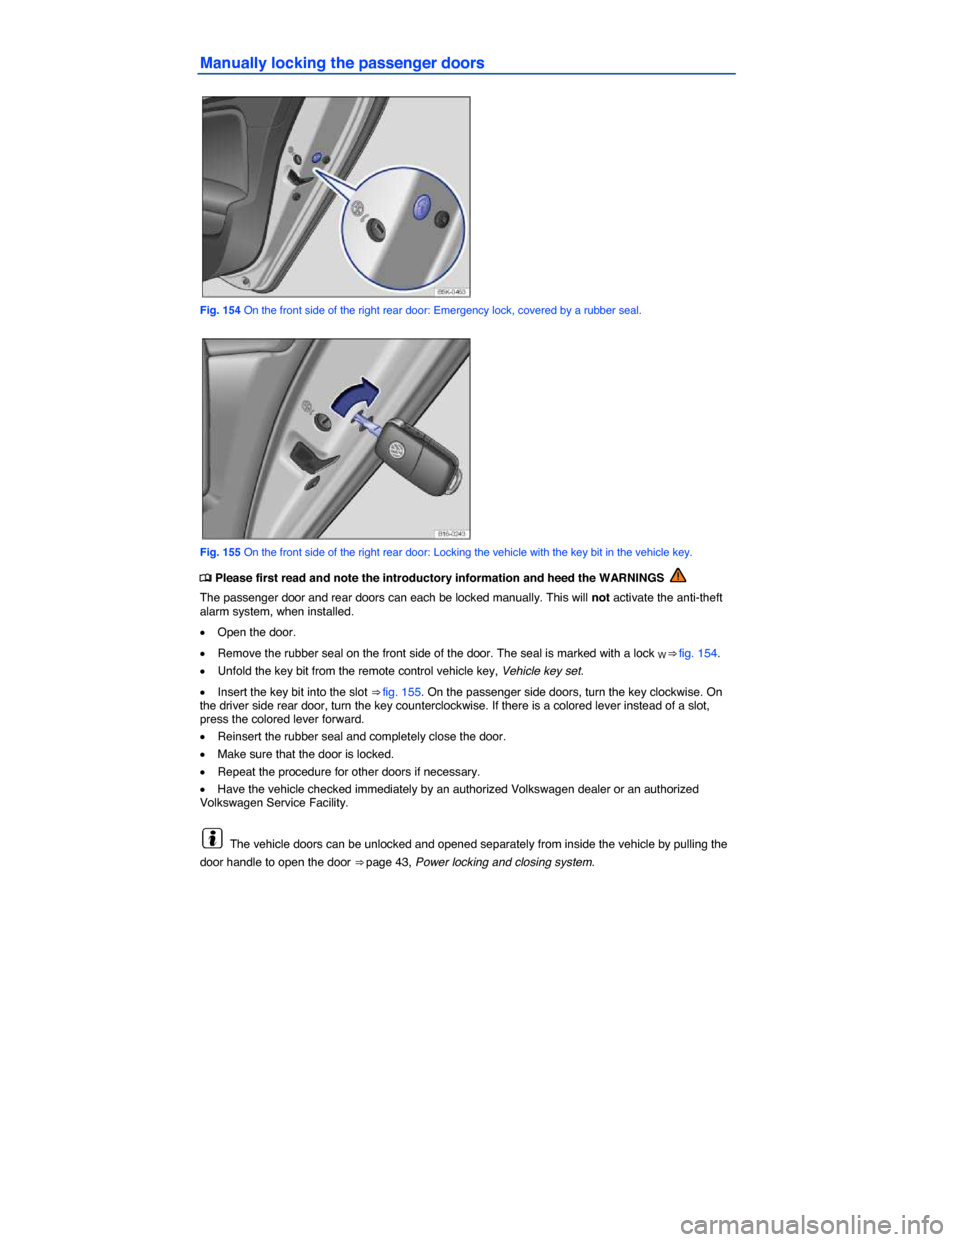
Manually locking the passenger doors
Fig. 154 On the front side of the right rear door: Emergency lock, covered by a rubber seal.
Fig. 155 On the front side of the right rear door: Locking the vehicle with the key bit in the vehicle key.
�
Page 314 of 357

2. Insert a commercially available 1/6 in. (4 mm) Allen wrench7 into the hexagonal head screw
⇒ fig. 159 (1).
3. Turn the wrench counterclockwise to close the power sunroof.
4. Install the cover again.
5. Have the power sunroof checked by an authorized Volkswagen dealer or an authorized Volkswagen Service Facility. Emergency closing may cause the power sunroof and its pinch protection to malfunction.
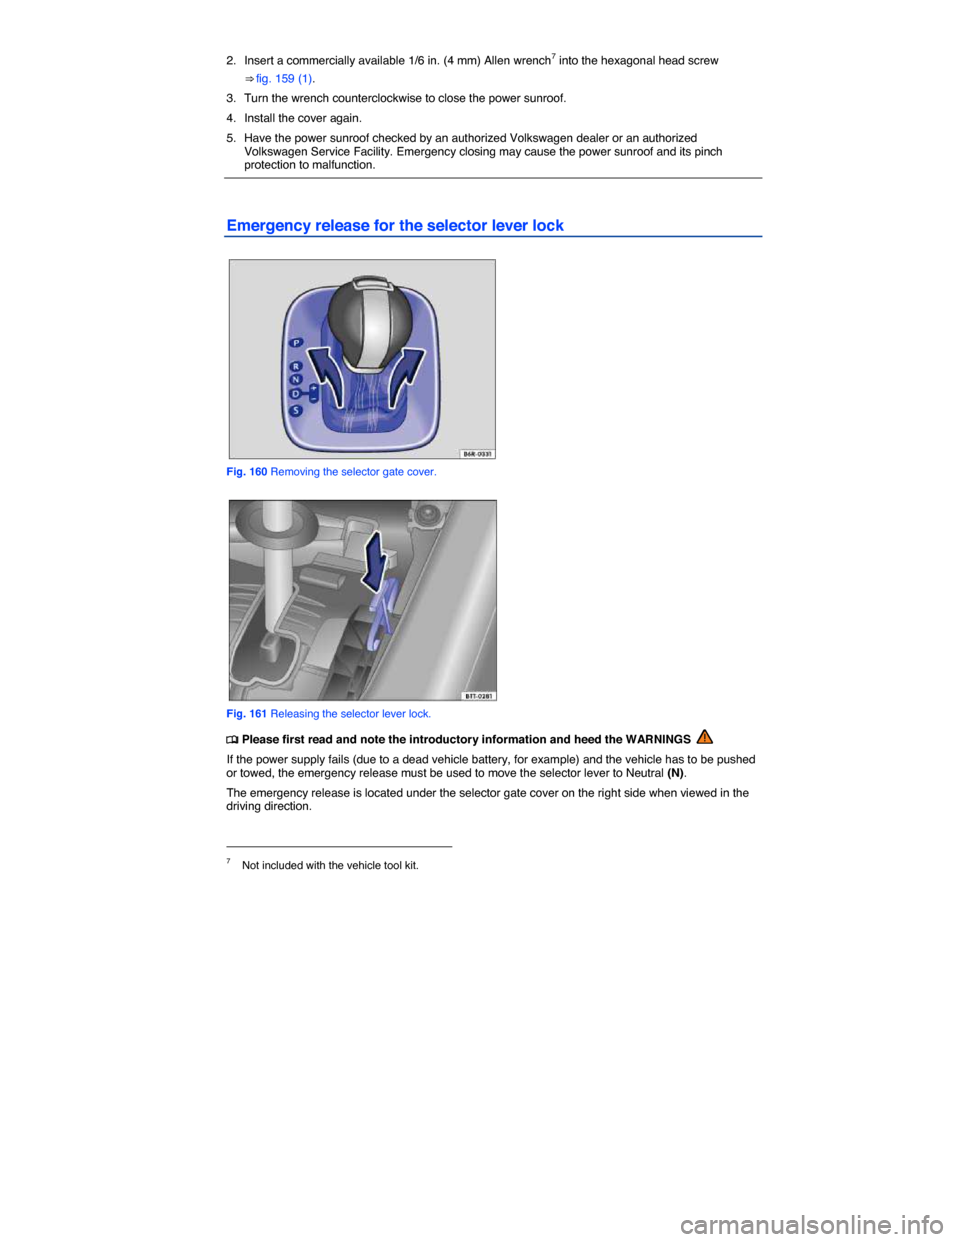
Emergency release for the selector lever lock
Fig. 160 Removing the selector gate cover.
Fig. 161 Releasing the selector lever lock.
�
Page 322 of 357

WARNING
Changing a wheel, especially on the side of the road, can be dangerous. To help reduce the risk of serious personal injury:
�x Always stop the vehicle as soon as it is safe to do so. Move the vehicle a safe distance off the road where it is safe to change the wheel.
�x Always make sure that all passengers, especially children, are in a safe place outside the vehicle and away from the vehicle and traffic (such as behind a guard rail).
�x Turn on the emergency flashers and set up another warning device about 25 yards (25 meters) behind the vehicle to warn approaching traffic.
�x Change a wheel by yourself only if you are familiar with the necessary steps. Otherwise, get expert assistance.
�x Always switch the engine off, firmly apply the parking brake, and shift the transmission into Park (P) (automatic transmission) or any gear (manual only) to help prevent the vehicle from moving suddenly and slipping off the jack.
�x Always make sure that the ground is level and firm. If necessary, place the jack on a large and sturdy board or on a similar ground support.
�x Always block the wheel diagonally opposite the wheel being changed with chocks or other similar things.
�x If you are towing a trailer, always unhitch it from your vehicle before starting to change the wheel. Always apply the trailer brakes firmly and make sure the trailer cannot move unintentionally.
�x Always use proper and undamaged tools when changing a wheel.
�x Once a wheel is lifted off the ground, having the transmission in Park (P) or in gear will not prevent sudden vehicle movement.
�x Always use a jack that has been approved by the manufacturer for your vehicle. Never use other jacks, even if they have been approved for use on other Volkswagen models.
�x To reduce the risk of losing control, crashes, and serious personal injuries, never loosen the screws on rims with threaded rim rings.
�x After changing a wheel, have the wheel bolt tightening torque checked with an accurate torque wrench.
�x After changing a wheel or tire, reset the Tire Pressure Monitoring System, Tire Pressure Monitoring System (TPMS).
Preparations for changing a wheel
�
Page 327 of 357

Removing the wheel
�x Review the checklist, Preparations for changing a wheel.
�x Loosen the wheel bolts, Wheel bolts.
�x Lift the vehicle, Lifting the vehicle with the vehicle jack.
�x Completely unscrew and remove the previously loosened wheel bolts using the hexagonal socket
in the screwdriver handle ⇒ fig. 171. Place the wheel bolts on a clean surface.
�x Remove the wheel.
Mounting a spare or compact spare wheel
If the tire is a unidirectional tire, be sure to install it in the proper rolling direction ⇒ page 199, Tires and wheels.
�x Place the spare wheel or compact spare wheel on the axle.
�x Screw in the wheel bolts clockwise and tighten them slightly using the hexagonal socket in the screwdriver handle.
�x Lower the vehicle with the jack.
�x Use the lug wrench to firmly tighten all wheel bolts (turn clockwise) ⇒ . Do not tighten them in sequence! Tighten any wheel bolt to begin, then tighten the wheel bolt diagonally opposite the first bolt, and so forth.
�x Install the wheel bolt caps, center wheel hubcap, or wheel cover, if any, Wheel trim.
WARNING
Wheel bolts that are tightened or installed improperly can come loose, causing loss of vehicle control, a crash, and serious personal injury.
�x Always keep wheel bolts and threads in the wheel hub clean and free of oil and grease. The wheel bolts must turn easily and must be tightened with the right torque.
�x Use the hexagonal socket in the screwdriver handle only to turn the wheel bolts when they are loose, never to loosen them or tighten them firmly.
WARNING
Improper use of a compact spare wheel can cause loss of vehicle control, a crash or other accident, and serious personal injury.
�x Never use a compact spare wheel if it is damaged or worn down to the wear indicators.
�x Never drive faster than 50 mph (80 km/h) with a compact spare wheel. Avoid full-throttle acceleration, heavy braking, and fast cornering!
�x Never drive more than 125 miles (200 km) with a compact spare wheel that is installed on the front axle (drive axle).
�x Replace the compact spare with a normal wheel and tire as soon as possible. Compact spare tires are designed for brief use only.
After changing a wheel
�
Page 331 of 357

Color Current strength in amps(ATO/MINI) Current strength in amps(JCASE)
Brown 7.5 —
Red 10 50
Blue 15 20
Yellow 20 60
White or clear 25 —
Green 30 40
Orange 40 —
Pink 30 30
Opening the fuse box in the instrument panel
�x Pull the lower part of the cover in the direction of the arrow ⇒ fig. 172 and remove the cover from the bottom.
�x On the inside of the cover there are plastic tweezers for removing and inserting fuses.
�x To install, guide the cover from the bottom into the instrument panel and push in the direction opposite to the arrow until you can hear it latch into place.
Opening the fuse box in the engine compartment
�x Open the engine hood ß, Working in the engine compartment.
�x Move the release tabs in the direction of the arrows ⇒ fig. 173 to unlock the fuse box cover.
�x Remove the cover upward.
�x To install push the cover onto the fuse box. The locking tabs must latch with an audible “click.”
NOTICE
�x To help prevent vehicle damage, be careful when removing fuse box covers and be sure to reinstall them properly.
�x Open fuse boxes must be protected from dirt and moisture. Dirt and moisture in fuse boxes can cause damage to the electrical system.
The vehicle contains other fuses in addition to those mentioned in this section. Have these fuses replaced by an authorized Volkswagen dealer or an authorized Volkswagen Service Facility.
Page 338 of 357

Please carry out each step only in the order specified:
fig. 176 (A) (B) (C) (C)
Low beam, daytime low beam headlight or daytime running light, side marker light
Front turn signal indicator High beam Parking light (small bulb holder)
3. Pull off the rubber cover on the back of the headlight. Depending on the model, a plastic cover with securing clip might be used. Press the securing clip upward and remove the cover.
4. Turn the bulb holder as far as it goes to the left and pull out with the light bulb facing rearward. Pull out the bulb holder with the light bulb facing rearward.
5. Pull the light bulb straight out of the bulb socket. If necessary, press the lock on the bulb holder.
6. Replace the burned out light bulb with a new bulb of the same type.
7. Insert the bulb holder into the headlight assembly and turn as far as it goes to the right. Insert the bulb holder into the headlight and slide it in completely.
8. Attach the rubber or plastic cover. If applicable slide the securing clip rearward.
The illustrations show the left headlight assembly from the rear. The right headlight assembly is the mirror image of the left headlight assembly.
Different models may have different lights, and the location and design of covers, bulb holders, and bulbs may be in a different location than shown in the illustrations.
You cannot replace the LEDs in LED daytime running lights. Contact your authorized Volkswagen dealer or an authorized Volkswagen Service Facility for assistance.
Page 342 of 357

Please carry out each step only in the order specified:
3. Using the screwdriver from the vehicle tool kit, carefully pry the cover off with the flat blade of the screwdriver inserted in the opening A (1).
4. Loosen the fasteners ⇒ fig. 180 B (2) and carefully remove the taillight with the connected wire from the luggage compartment lid.
5. Pull the red retainer ⇒ fig. 181 A (1) in the direction of the arrow to release the lock on the connector A (2).
6. Press the lock on the connector A (3) and disconnect the connector A (2).
7. Turn the bulb holder A (4) in the direction of the arrow until it stops and remove it with the bulb.
8. Pull the burned out bulb out of the bulb holder in the direction of the arrow and replace it with a new bulb of the same type B.
9. Insert the bulb holder A (4) in the taillight and turn it in the direction of the arrow until it stops.
10. Connect the connector A (2) and press the red retainer A (1) in the opposite direction of the arrow.
11. Hold the taillight in the installation position with one hand and tighten the bolts with the
other hand ⇒ fig. 180 B (2).
12. Check the taillight assembly for proper installation and secure fit.
13. Insert the cover. The cover must securely lock into place.
14. Close the luggage compartment lid
LEDs in the taillights
LEDs cannot be replaced. Contact your authorized Volkswagen dealer or authorized Volkswagen Service Facility for assistance.
Different models may have different lights, and the location and design of covers, bulb holders, and bulbs may be in a different location than shown in the illustrations.
Page 347 of 357

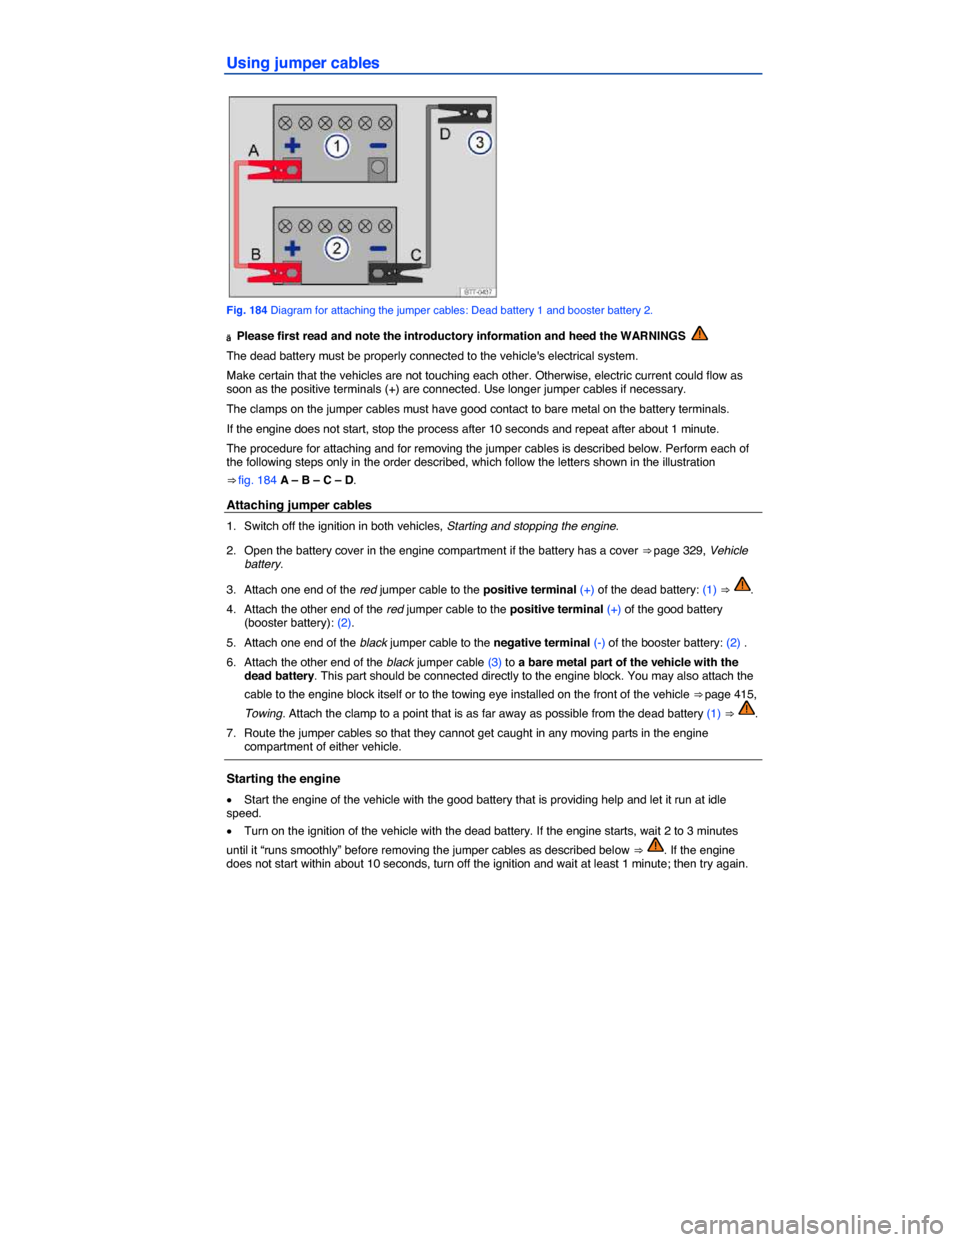
Using jumper cables
Fig. 184 Diagram for attaching the jumper cables: Dead battery 1 and booster battery 2.
ä Please first read and note the introductory information and heed the WARNINGS
The dead battery must be properly connected to the vehicle's electrical system.
Make certain that the vehicles are not touching each other. Otherwise, electric current could flow as soon as the positive terminals (+) are connected. Use longer jumper cables if necessary.
The clamps on the jumper cables must have good contact to bare metal on the battery terminals.
If the engine does not start, stop the process after 10 seconds and repeat after about 1 minute.
The procedure for attaching and for removing the jumper cables is described below. Perform each of the following steps only in the order described, which follow the letters shown in the illustration
⇒ fig. 184 A – B – C – D.
Attaching jumper cables
1. Switch off the ignition in both vehicles, Starting and stopping the engine.
2. Open the battery cover in the engine compartment if the battery has a cover ⇒ page 329, Vehicle battery.
3. Attach one end of the red jumper cable to the positive terminal (+) of the dead battery: (1) ⇒ .
4. Attach the other end of the red jumper cable to the positive terminal (+) of the good battery (booster battery): (2).
5. Attach one end of the black jumper cable to the negative terminal (-) of the booster battery: (2) .
6. Attach the other end of the black jumper cable (3) to a bare metal part of the vehicle with the dead battery. This part should be connected directly to the engine block. You may also attach the
cable to the engine block itself or to the towing eye installed on the front of the vehicle ⇒ page 415,
Towing. Attach the clamp to a point that is as far away as possible from the dead battery (1) ⇒ .
7. Route the jumper cables so that they cannot get caught in any moving parts in the engine compartment of either vehicle.
Starting the engine
�x Start the engine of the vehicle with the good battery that is providing help and let it run at idle speed.
�x Turn on the ignition of the vehicle with the dead battery. If the engine starts, wait 2 to 3 minutes
until it “runs smoothly” before removing the jumper cables as described below ⇒ . If the engine does not start within about 10 seconds, turn off the ignition and wait at least 1 minute; then try again.