2014 VAUXHALL MOVANO_B brake light
[x] Cancel search: brake lightPage 18 of 201

16In brief
Manual transmission automatedN=neutralo=drive+=higher gear-=lower gearA/M=switch between automatic
and manual modeR=reverse gear
Manual transmission automated
3 114.
Starting off
Check before starting off ■ Tyre pressure and condition 3 152,
3 189.
■ Engine oil level and fluid levels 3 134.
■ All windows, mirrors, exterior lighting and number plates are free
from dirt, snow and ice and are
operational.
■ Proper position of mirrors, seats and seat belts 3 30, 3 36,
3 44.
■ Brake function at low speed, particularly if the brakes are wet.Starting the engine
■ Turn key to position A
■ move the steering wheel slightly to release the steering wheel lock
■ operate clutch and brake
■ do not operate accelerator pedal
■ turn the key to position M for
preheating and wait until control
indicator ! extinguishes in the
Driver Information Centre
■ turn key to position D and release
Starting the engine 3 107.
Page 81 of 201

Instruments and controls79
Illuminates when the engine is
running Stop, switch off engine. Vehicle
battery is not charging. Engine
cooling may be interrupted. The
brake servo unit may cease to be
effective. Seek the assistance of a
workshop.
Malfunction indicator light Z illuminates or flashes yellow.
Illuminates briefly when the ignition is
switched on.
Illuminates when the engine is running Fault in the emission control system.
The permitted emission limits may be
exceeded. Seek the assistance of a
workshop immediately.Flashes when the engine is
running
Fault that could lead to catalytic converter damage. Ease up on the
accelerator until the flashing stops.
Seek the immediate assistance of a
workshop.
Service vehicle soon A illuminates yellow.
Illuminates briefly when the ignition is
switched on.
The vehicle needs a service.
May illuminate in combination with
another control indicator or a
message in the Driver Information
Centre 3 83.
Illuminates if cleaning of the diesel particle filter is required and
automatic cleaning does not occur
3 112.
Seek the assistance of a workshop
immediately.
Stop engine C illuminates red.Illuminates for a few seconds when
the ignition is switched on.
If C illuminates (possibly in
combination with W and/or R), stop
engine immediately and seek the
assistance of a workshop.
Depending on the type of fault, a
warning message may also appear in the Driver Information Centre 3 83.
Brake system R illuminates red.
Illuminates briefly when the ignition is
switched on.
Control indicator R remains
illuminated after the ignition is
switched on if the parking brake is
applied 3 119.
When the parking brake is released,
R illuminates (possibly in
combination with C) if the brake fluid
level is too low 3 136.
Page 86 of 201

84Instruments and controls
remains illuminated. The fault will
then be stored in the on board
system.Fault messagesCHECK ESPCHECK FUEL FILTERCHECK GEARBOXCHECK AUTO LIGHTS
Warning messages
These may appear with control
indicator C or in combination with
other warning messages, control
indicators or an audible warning. Stop
engine immediately and seek the
assistance of a workshop.
Warning messagesINJECTION FAULTENGINE OVERHEATINGGEARBOX OVERHEATING
Warning chimes
When starting the engine or
whilst driving
Only one warning chime will sound at
a time.
The warning chime regarding
unfastened seat belts has priority
over any other warning chime.
■ If seat belt is not fastened.
■ If a certain speed is exceeded with the parking brake applied.
■ If the parking assist detects an object.
■ If the vehicle has manual transmission automated and the
clutch temperature is too high.
■ If the vehicle speed briefly exceeds
a set limit.
■ During closing of the power sliding door.
■ If the sliding door is open and the parking brake is released.
■ During activation and deactivation of alarm monitoring of vehicle
inclination.
When the vehicle is parked and/ or the driver's door is opened ■ When the key is in the ignition switch.
■ With exterior lights on.
■ If the vehicle has manual transmission automated; neutral is
not selected or the foot brake has
not been depressed. A
corresponding message appears in the Driver Information Centre.
Page 116 of 201

114Driving and operatingCaution
It is inadvisable to drive with hand
resting on the selector lever.
Manual transmission
automated
The manual transmission automated (MTA) permits manual (manual
mode) or automatic gear shifting
(automatic mode), both with
automatic clutch control.
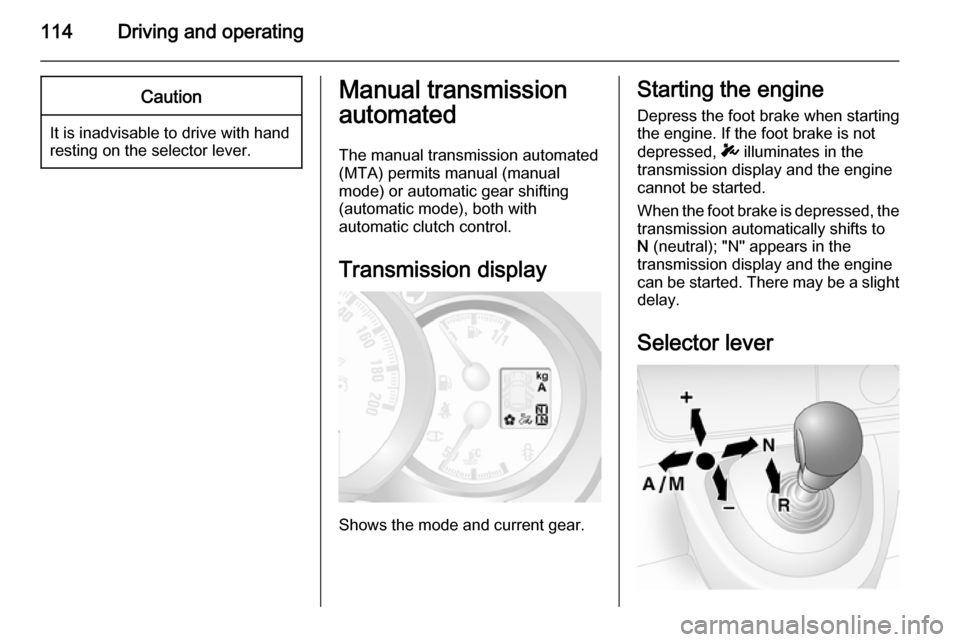
Transmission display
Shows the mode and current gear.
Starting the engine Depress the foot brake when starting
the engine. If the foot brake is not
depressed, T illuminates in the
transmission display and the engine
cannot be started.
When the foot brake is depressed, the
transmission automatically shifts to
N (neutral); "N" appears in the
transmission display and the engine
can be started. There may be a slight delay.
Selector lever
Page 118 of 201

116Driving and operating
Rocking the vehicleRocking the vehicle is only
permissible if the vehicle is stuck in
sand, mud, snow or a hole.Move the
selector lever between R and A/M (or
between + and -) in a repeat pattern,
while applying light pressure to the
accelerator pedal.Do not race the
engine and avoid sudden
acceleration.
Parking
Apply the parking brake.The most recently engaged gear (see
transmission display) remains
engaged.With N, no gear is engaged.
When the ignition is switched off, the
transmission no longer responds to
movement of the selector lever.
If the ignition is not switched off, or the
parking brake has not been applied, a warning chime will sound upon
opening the driver's door.
Manual mode If a higher gear is selected when the
engine speed is too low, or a lower
gear when the speed is too high, theshift is not executed. This prevents
the engine from running at too low or
too high an engine speed.
If engine speed is too low, the
transmission automatically shifts to a
lower gear.
If engine speed is too high, the
transmission only switches to a higher gear via kickdown.
Electronic driving
programmes
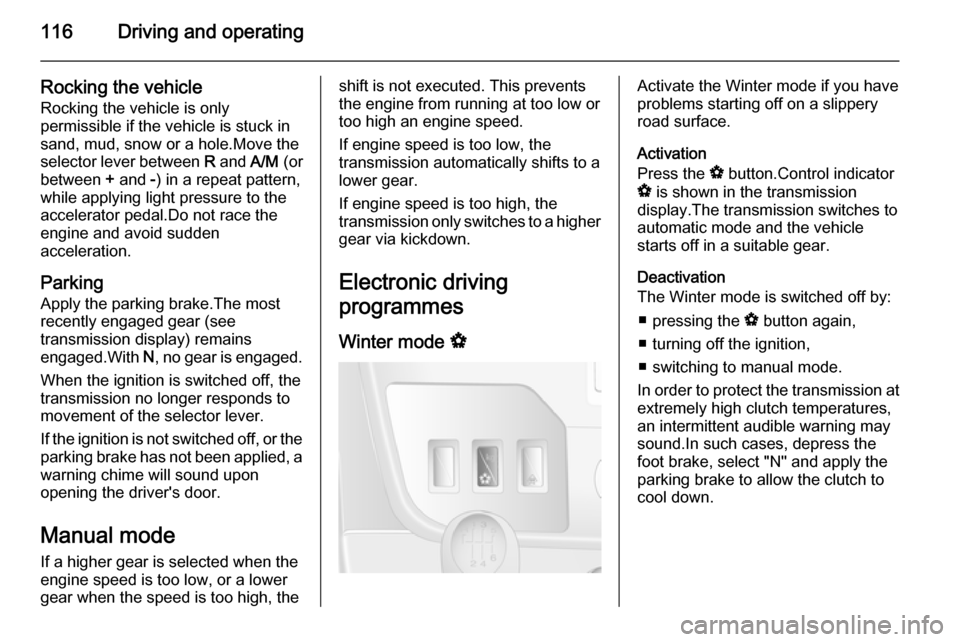
Winter mode VActivate the Winter mode if you have
problems starting off on a slippery
road surface.
Activation
Press the V button.Control indicator
V is shown in the transmission
display.The transmission switches to
automatic mode and the vehicle
starts off in a suitable gear.
Deactivation
The Winter mode is switched off by:
■ pressing the V button again,
■ turning off the ignition,
■ switching to manual mode.
In order to protect the transmission at extremely high clutch temperatures,
an intermittent audible warning may
sound.In such cases, depress the
foot brake, select "N" and apply the
parking brake to allow the clutch to
cool down.
Page 121 of 201

Driving and operating119Parking brake
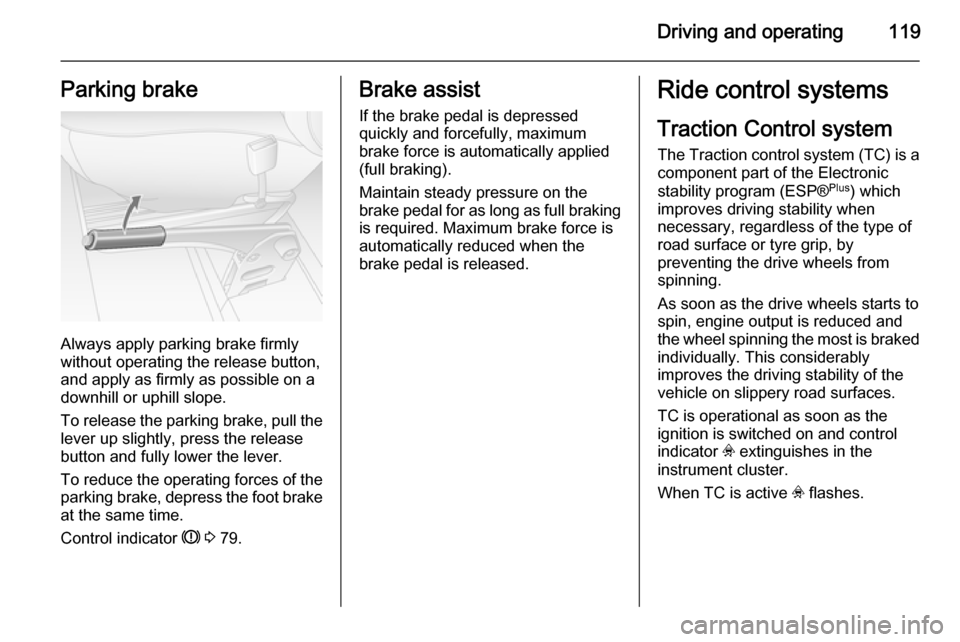
Always apply parking brake firmly
without operating the release button,
and apply as firmly as possible on a
downhill or uphill slope.
To release the parking brake, pull the lever up slightly, press the release
button and fully lower the lever.
To reduce the operating forces of the
parking brake, depress the foot brake
at the same time.
Control indicator R 3 79.
Brake assist
If the brake pedal is depressed
quickly and forcefully, maximum
brake force is automatically applied
(full braking).
Maintain steady pressure on the
brake pedal for as long as full braking
is required. Maximum brake force is
automatically reduced when the
brake pedal is released.Ride control systems
Traction Control system
The Traction control system (TC) is a
component part of the Electronic
stability program (ESP® Plus
) which
improves driving stability when
necessary, regardless of the type of
road surface or tyre grip, by
preventing the drive wheels from
spinning.
As soon as the drive wheels starts to spin, engine output is reduced and
the wheel spinning the most is braked individually. This considerably
improves the driving stability of the
vehicle on slippery road surfaces.
TC is operational as soon as the
ignition is switched on and control
indicator v extinguishes in the
instrument cluster.
When TC is active v flashes.
Page 131 of 201

Driving and operating129Trailer hitch
General information
Only use towing equipment that has
been approved for your vehicle.
Entrust fitting of towing equipment at
a later date to a workshop. It may be
necessary to make changes that
affect the cooling system, heat
shields or other equipment.
Driving characteristics and
towing tips In the case of trailers with brakes,
attach the breakaway stopping cable.
Before attaching a trailer, lubricate
the coupling ball. However, do not do
so if a stabiliser, which acts on the
coupling ball, is being used to reduce snaking movements. For trailers with
low driving stability the use of a
stabiliser is recommended.
A maximum speed of 50 mph must
not be exceeded, even in countries
where higher speeds are permitted.If the trailer starts snaking, drive more
slowly, do not attempt to correct the
steering and brake sharply if
necessary.
When driving downhill, drive in the
same gear as if driving uphill and
drive at a similar speed.
Adjust tyre pressure to the value
specified for full load 3 189.
Trailer towing Trailer loads
The permissible trailer loads are
vehicle-dependent and engine-
dependent maximum values which
must not be exceeded. The actual trailer load is the difference between
the actual gross weight of the trailer
and the actual coupling socket load
with the trailer coupled.
The permissible trailer loads are
specified in the vehicle documents. In general, they are valid for gradients
up to max. 12 %.
The permitted trailer load applies up to the specified incline and up to an
altitude of 1000 metres above sealevel. Since engine power decreases
as altitude increases due to the air
becoming thinner, therefore reducing
climbing ability, the permissible gross
train weight also decreases by 10 %
for every 1000 metres of additional
altitude. The gross train weight does
not have to be reduced when driving
on roads with slight inclines (less than
8 %, e.g. motorways).
The permissible gross train weight
must not be exceeded. This weight is
specified on the identification plate
3 171.
Vertical coupling load
The vertical coupling load is the load
exerted by the trailer on the coupling
ball. It can be varied by changing the
weight distribution when loading the
trailer.
The maximum permissible vertical
coupling load is specified on the
towing equipment identification plate
and in the vehicle documents. Always aim for the maximum load, especially
in the case of heavy trailers. The
vertical coupling load should never
fall below 25 kg.
Page 146 of 201

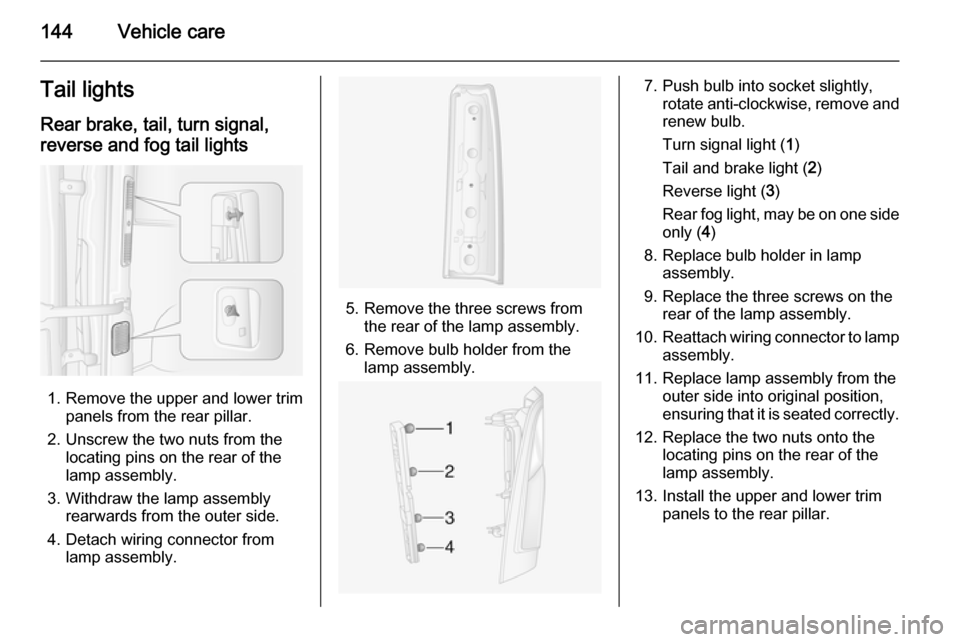
144Vehicle careTail lightsRear brake, tail, turn signal,reverse and fog tail lights
1. Remove the upper and lower trim panels from the rear pillar.
2. Unscrew the two nuts from the locating pins on the rear of the
lamp assembly.
3. Withdraw the lamp assembly rearwards from the outer side.
4. Detach wiring connector from lamp assembly.
5. Remove the three screws from the rear of the lamp assembly.
6. Remove bulb holder from the lamp assembly.
7. Push bulb into socket slightly, rotate anti-clockwise, remove and
renew bulb.
Turn signal light ( 1)
Tail and brake light ( 2)
Reverse light ( 3)
Rear fog light, may be on one side only ( 4)
8. Replace bulb holder in lamp assembly.
9. Replace the three screws on the rear of the lamp assembly.
10. Reattach wiring connector to lamp
assembly.
11. Replace lamp assembly from the outer side into original position,
ensuring that it is seated correctly.
12. Replace the two nuts onto the locating pins on the rear of the
lamp assembly.
13. Install the upper and lower trim panels to the rear pillar.