2014 VAUXHALL ADAM check engine light
[x] Cancel search: check engine lightPage 18 of 217

16In briefTransmission
Manual transmission
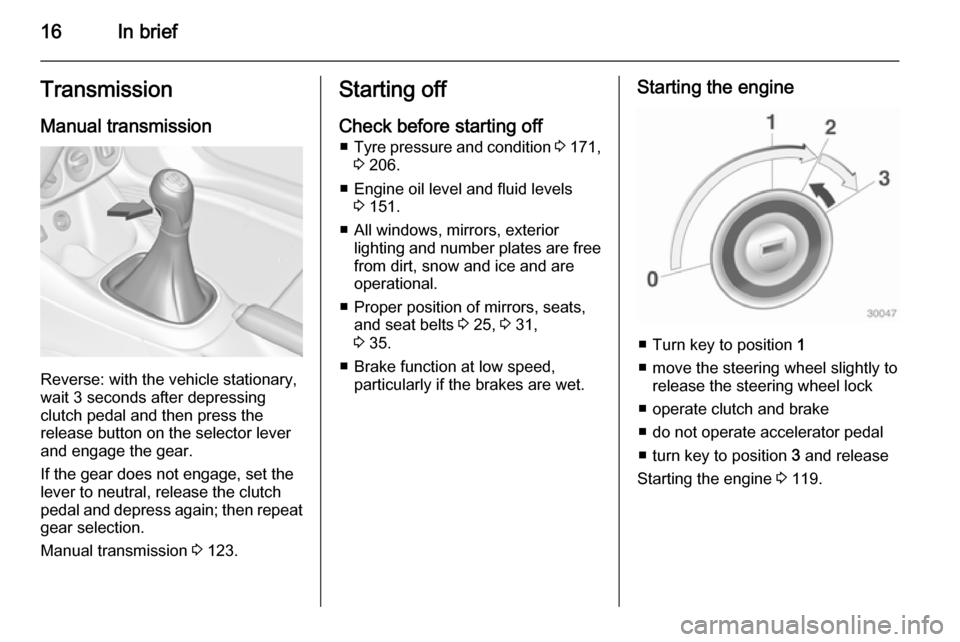
Reverse: with the vehicle stationary,
wait 3 seconds after depressing
clutch pedal and then press the
release button on the selector lever
and engage the gear.
If the gear does not engage, set the
lever to neutral, release the clutch
pedal and depress again; then repeat
gear selection.
Manual transmission 3 123.
Starting off
Check before starting off ■ Tyre pressure and condition 3 171,
3 206.
■ Engine oil level and fluid levels 3 151.
■ All windows, mirrors, exterior lighting and number plates are free
from dirt, snow and ice and are
operational.
■ Proper position of mirrors, seats, and seat belts 3 25, 3 31,
3 35.
■ Brake function at low speed, particularly if the brakes are wet.Starting the engine
■ Turn key to position 1
■ move the steering wheel slightly to release the steering wheel lock
■ operate clutch and brake
■ do not operate accelerator pedal
■ turn key to position 3 and release
Starting the engine 3 119.
Page 27 of 217

Keys, doors and windows25
The anti-theft alarm system can only
be deactivated by pressing button c
on the radio remote control or by switching on the ignition.
A triggered alarm, which has not been interrupted by the driver, will be
indicated by the hazard warning
lights. They will flash quickly three
times when the vehicle is unlocked
with the radio remote control.
Vehicle messages 3 92.
If the vehicle's battery is to be
disconnected (e.g. for maintenance
work), the alarm siren must be
deactivated as follows: switch the
ignition on then off, then disconnect
the vehicle's battery within
15 seconds.
Immobiliser
The system is part of the ignition
switch and checks whether the
vehicle is allowed to be started with
the key being used.
The immobiliser is activated
automatically after the key has been
removed from the ignition switch.If the control indicator d flashes when
the ignition is on, there is a fault in the
system; the engine cannot be started. Switch off the ignition and repeat the
start attempt.
If the control indicator continues
flashing, attempt to start the engine
using the spare key and seek the
assistance of a workshop.
Notice
The immobiliser does not lock the
doors. You should always lock the
vehicle after leaving it and switch on the anti-theft alarm system 3 20,
3 24.
Control indicator d 3 85.Exterior mirrors
Convex shape
The convex exterior mirror contains
an aspherical area and reduces blind spots. The shape of the mirror makes
objects appear smaller, which will
affect the ability to estimate
distances.
Electric adjustment
Select the relevant exterior mirror by
turning the control to left (L) or right
(R) . Then swivel the control to adjust
the mirror.
Page 87 of 217

Instruments and controls85Engine oil pressureI illuminates red.
Illuminates when the ignition is
switched on and extinguishes shortly after the engine starts.
Illuminates when the engine is runningCaution
Engine lubrication may be
interrupted. This may result in
damage to the engine and/or
locking of the drive wheels.
1. Depress clutch.
2. Select neutral gear.
3. Move out of the flow of traffic as quickly as possible without
impeding other vehicles.
4. Switch off ignition.
9 Warning
When the engine is off,
considerably more force is needed
to brake and steer. During an
Autostop the brake servo unit will still be operational.
Do not remove key until vehicle is stationary, otherwise the steeringwheel lock could engage
unexpectedly.
Check oil level before seeking the
assistance of a workshop 3 151.
Low fuel
Y illuminates or flashes yellow.
Illuminates
Level in fuel tank is too low.
Flashes Fuel used up. Refuel immediately.
Never run the tank dry.
Catalytic converter 3 123.
Immobiliser
d flashes yellow.
Fault in the immobiliser system. The
engine cannot be started.
Exterior light8 illuminates green.
The exterior lights are on 3 101.
High beam
C illuminates blue.
Illuminated when high beam is on or
during headlight flash 3 102.
Rear fog light
r illuminates yellow.
The rear fog light is on 3 104.
Cruise control m illuminates white or green.
Illuminates white The system is on.
Page 146 of 217

144Driving and operating
Pressing the LPG button switches
between petrol and liquid gas
operation as soon as the required
parameters (coolant temperature,
gas temperature and minimum
engine speed) have been reached.
The requirements are usually fulfilled
after approx. 60 seconds (depending
on exterior temperature) and the first
firm press on the accelerator. The
LED status shows the current
operating mode.LED off=petrol operationLED illu‐
minates=liquid gas operationLED
flashes=no switching is
possible, one type of
fuel is empty
As soon as the liquid gas tanks are empty, petrol operation is
automatically engaged until the
ignition is switched off.
Every six months, run the petrol tank down until control indicator Y
illuminates, then refuel. This helps
maintain fuel quality and system
function for petrol operation.
Fill the tank completely at regular
intervals to prevent corrosion in the
tank.
Faults and remedies
If gas mode is not possible, check the following:
■ Is there enough liquid gas present?
■ Is there enough petrol present for starting?
Due to extreme temperatures in
combination with the gas
composition, it may take slightly
longer before the system switches
from petrol to gas mode.
In extreme situations, the system may
also switch back to petrol mode if the
minimum requirements are not
fulfilled.
Seek the assistance of a workshop in the event of all other faults.Caution
Repairs and adjustments may onlybe made by trained specialists in
order to maintain the safety and
warranty on the LPG system.
Liquid gas is given a particular odour
(odorised) so that any leaks can be
detected easily.
9 Warning
If you smell gas in the vehicle or in
the immediate vicinity, switch to petrol mode immediately. No
smoking. No naked flames or
ignition sources.
If the gas odour persists, do not start
the engine. Have the cause of the
fault remedied by a workshop.
When using underground car parks,
follow the instructions of the operator
and local laws.
Notice
In the event of an accident, switch off
the ignition and lights.
Page 158 of 217

156Vehicle care
■See the Owner's manual for further
information.
■ Explosive gas may be present in the vicinity of the battery.
Wiper blade replacement
Lift the wiper arm until it stays in the
raised position, press button to
disengage the wiper blade and
remove.
Attach the wiper blade slightly angled
to the wiper arm and push until it
engages.
Lower wiper arm carefully.
Wiper blade on the rear window
Lift wiper arm. Disengage wiper blade as shown in illustration and remove.
Attach the wiper blade slightly angled
to the wiper arm and push until it
engages.
Lower wiper arm carefully.
Bulb replacement
Switch off the ignition and switch off
the relevant switch or close the doors.
Only hold a new bulb at the base! Do not touch the bulb glass with bare
hands.
Use only the same bulb type for
replacement.
Replace headlight bulbs from within
the engine compartment.
Bulb check After a bulb replacement switch on
the ignition, operate and check the
lights.
Halogen headlights
Halogen headlights with separate
bulbs for low beam and high beam.
Page 180 of 217

178Vehicle care
9. Connect the compressor plug tothe power outlet or cigarette
lighter socket.
To avoid discharging the battery,
we recommend running the
engine.
10. Set the rocker switch on the compressor to I. The tyre is filled
with sealant.
11. The compressor pressure gauge briefly indicates up to 6 bar whilstthe sealant bottle is emptying
(approx. 30 seconds). Then the
pressure starts to drop.
12. All of the sealant is pumped into the tyre. Then the tyre is inflated.
13. The prescribed tyre pressure should be obtained within
10 minutes. Tyre pressure
3 206 . When the correct pressure
is obtained, switch off the
compressor.
If the prescribed tyre pressure is
not obtained within 10 minutes,
remove the tyre repair kit. Move
the vehicle one tyre rotation.
Reattach the tyre repair kit and
continue the filling procedure for
10 minutes. If the prescribed tyre
pressure is still not obtained, the
tyre is too badly damaged. Seek
the assistance of a workshop.
Drain excess tyre pressure with
the button over the pressure indicator.
Do not run the compressor longer
than 10 minutes.
14. Detach the tyre repair kit. Push catch on bracket to remove
sealant bottle from bracket. Screw the tyre inflation hose to the freeconnection of the sealant bottle.
This prevents sealant from
escaping. Stow tyre repair kit in
load compartment.
15. Remove any excess sealant using a cloth.
16. Take the label indicating maximum permitted speed from
the sealant bottle and affix in the
driver's field of view.
17. Continue driving immediately so that sealant is evenly distributedin the tyre. After driving approx.
6 miles (but no more than
10 minutes), stop and check tyre
pressure. Screw compressor air
Page 215 of 217

213
Service ....................................... 117
Service display ............................ 78
Service information ....................193
Service vehicle soon .................... 83
Side airbag system ......................40
Side blind spot alert ....................141
Sidelights .................................... 101
Side turn signal lights ................162
Spare wheel ............................... 182
Speed limiter............................... 130
Speedometer ............................... 76
Starting and operating ................118
Starting off ................................... 16
Starting the engine ....................119
Steering wheel adjustment ......9, 68
Steering wheel controls ...............68
Stop-start system........................ 120
Storage ......................................... 49
Storage compartments .................49
Sun visors .................................... 29
Symbols ......................................... 4
T Tachometer ................................. 76
Tail lights ................................... 159
Three-point seat belt .................... 35
Tools .......................................... 169
Top-tether fastening eyes ............48
Towing ........................................ 188
Towing another vehicle .............189Towing the vehicle .....................188
Traction Control system ............. 126
Transmission ............................... 16
Tread depth ............................... 174
Trip computer .............................. 95
Trip odometer .............................. 76
Turn and lane-change signals ...104
Turn signal ................................... 81
Tyre chains ................................ 175
Tyre designations ......................171
Tyre pressure ............................ 171
Tyre pressure monitoring system ............................... 84, 172
Tyre pressures ........................... 206
Tyre repair kit ............................. 175
U
Ultrasonic parking assist ...... 84, 131
Upholstery .................................. 192
Upshift .......................................... 83
Using this manual ..........................3
V Vehicle battery ........................... 154
Vehicle checks............................ 150
Vehicle data ................................ 198
Vehicle data recording and privacy ..................................... 207
Vehicle dimensions .................... 203
Vehicle Identification Number ....196Vehicle jack ................................ 169
Vehicle messages .......................92
Vehicle personalisation ...............97
Vehicle security ............................ 23
Vehicle specific data ......................3
Vehicle storage ........................... 149
Vehicle tools ............................... 169
Vehicle unlocking ........................... 6 Vehicle weight ........................... 203
Ventilation ................................... 109
W
Warning chimes ........................... 94
Warning lights ............................... 76
Warning triangle .......................... 65
Washer and wiper systems .........14
Washer fluid ............................... 153
Wheel changing .........................179
Wheel covers ............................. 175
Wheels and tyres .......................170
Windows ....................................... 27
Windscreen................................... 27 Windscreen wiper/washer ...........70
Winter tyres ............................... 170
Wiper blade replacement ..........156